Anabaseios: The Tenth Circle (Savage)
Game8 has gone with the FFO strat.
The FFO strat is Inumaru’s strat with two adjustments:
- The first set of Dæmoniac Bonds use just the west-side island.
- The turret order is different.
- Inumaru: (melee + tank) → (ranged + healer) → (healer + tank) → tank
- FFO: (healer + tank) → (ranged + tank) → (melee + tank) → tank
English
■ Wicked Step:  MT→Left ST→Right
■ Entangling Web: H→Left DPS→Right
■ Pandæmonic Pillars ------------------------------------
 ST H1 MT       |D1 MT ST D2
 D1 H2 D2      |
 D3  D4      |D3 H1 H2 D4
■ Silkspit--------------|■ Steel Web -------------------
 MT      ST| TH → Left DPS → Right
   D1   D2   | Fans → Point North
     H1    | Stacks → South in a line
   D3    D4  | Do not cross tethers
     H2    |
■ Dæmoniac Bonds
 1-man spread:-----------------Turrets------------------
  MT D1       | D1 / MT ST / D2
   ST D2        |
  H1 D3       | D3 / H1 H2 / D4
  H2 D4       |
 2-man pairs: MTD1 STD2 H1D3 H2D4
 4-man stacks: MTSTH1H2  D1D2D3D4
 Touchdown:All 8-players west
■ Turrets
 West:H1MT → D3MT → D1MT → MT
 East:H2ST → D4ST → D2ST → ST
 ※ Point 3rd laser towards 4th turret
Japanese
■尖脚 左MT 右ST
■グランドウェブ 左H 右DPS
■パンデモニックピラー-----------------------
ST H1 MT       |D1 MT ST D2
D1 H2 D2       |
D3    D4       |D3 H1 H2 D4
■スピットウェブ---|■ヘビーウェブ-----
MT       ST   | 左TH 右DPS
  D1   D2     | 扇北向け
    H1       | 頭割り南で横並び
  D3    D4    | 線クロスしない
    H2       |
■ボンド
-西島/片面/震撃---------------タレット------------
MT D1        | D1 / MT ST / D2
ST D2        |
H1 D3        | D3 / H1 H2 / D4
H2 D4        |
ダブル MTD1 STD2 H1D3 H2D4
クアドラ MTSTH1H2 D1D2D3D4
タッチダウン時は西島に8人入って処理
■タレット
西 H1MT → D3MT → D1MT → MT
東 H2ST → D4ST → D2ST → ST
3番レーザーは4番タレットに向けて角度調整
Markers
A,B, and4are markers to stand on for Silksplit.- The
1,2,3markers are to stand on when building the web for Pandæmoniac Web.
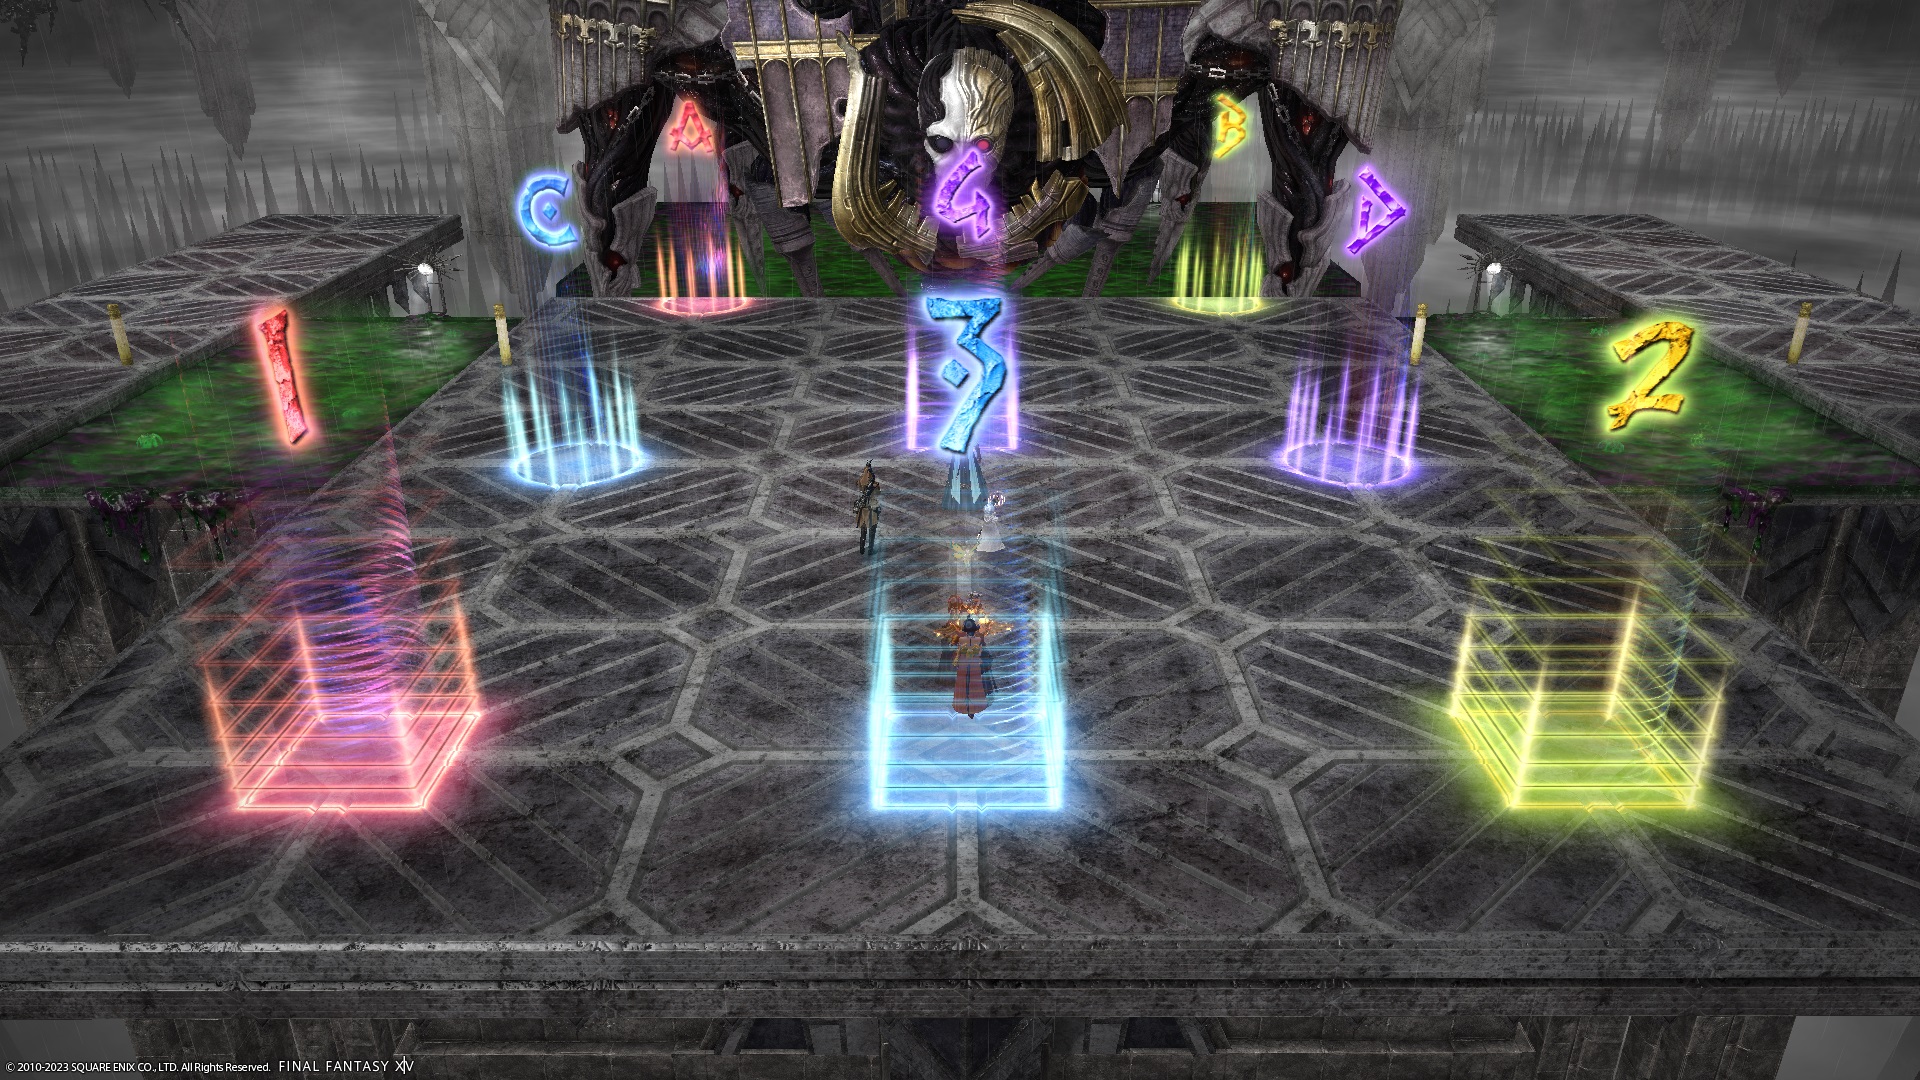
XIVLauncher WaymarkPresetPlugin positions
{
  "Name":"P10S",
  "MapID":939,
  "A":{"X":92.0,"Y":0.0,"Z":85.7,"ID":0,"Active":true},
  "B":{"X":108.0,"Y":0.0,"Z":85.7,"ID":1,"Active":true},
  "C":{"X":91.85,"Y":0.0,"Z":100.0,"ID":2,"Active":true},
  "D":{"X":108.15,"Y":0.0,"Z":100.0,"ID":3,"Active":true},
  "One":{"X":92.0,"Y":0.0,"Z":111.3,"ID":4,"Active":true},
  "Two":{"X":108.0,"Y":0.0,"Z":111.3,"ID":5,"Active":true},
  "Three":{"X":100.0,"Y":0.0,"Z":111.3,"ID":6,"Active":true},
  "Four":{"X":100.0,"Y":0.0,"Z":98.0,"ID":7,"Active":true}
}
Timeline
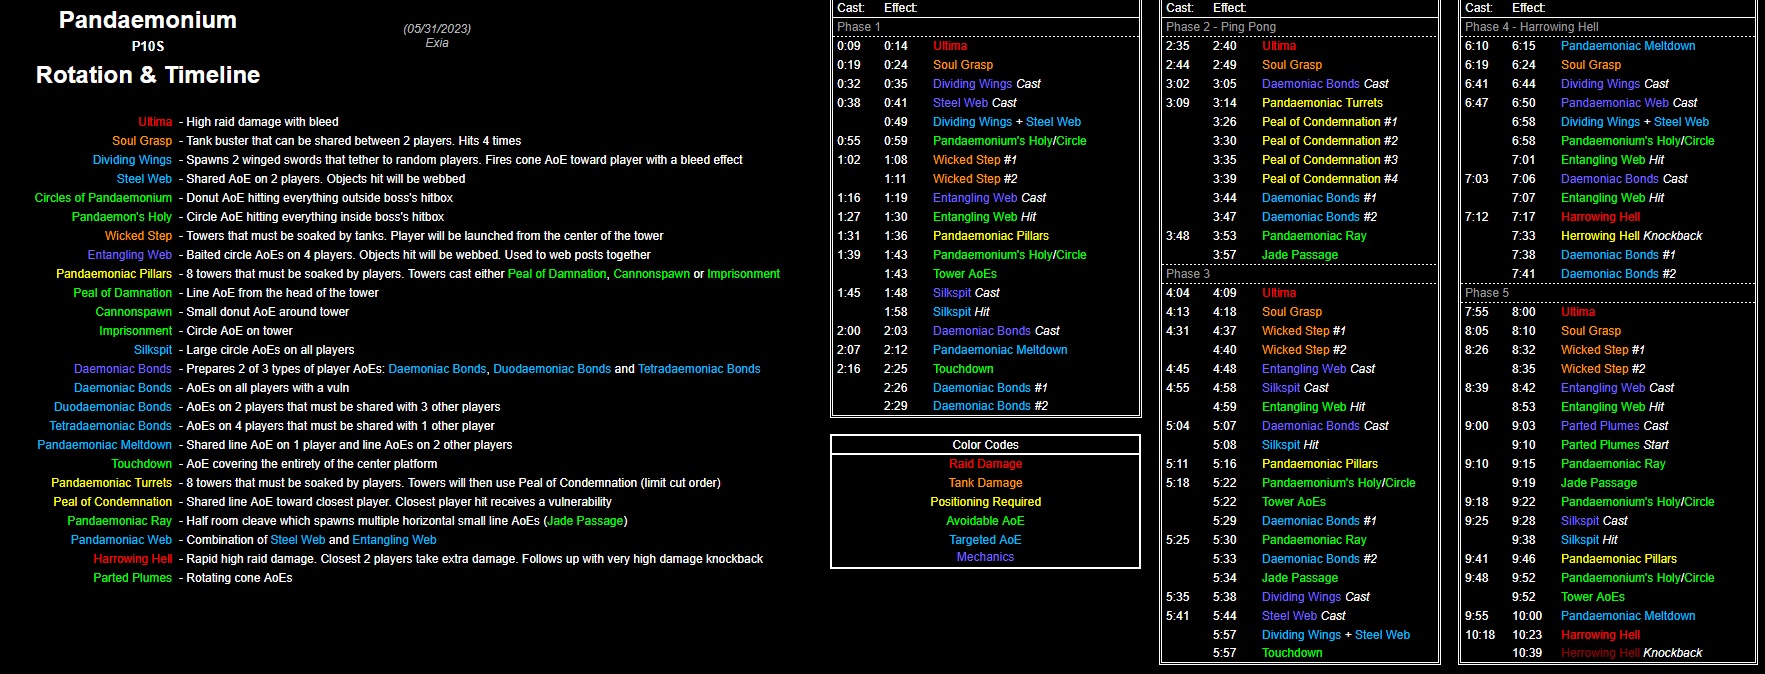 (Credit: u/ExiaKuromonji)
Notes
- If you do not have a PLD, you can invuln four Soul Grasps like so:
| Soul Grasp #1 | 0:24 | Superbolide > Living Dead |
| Soul Grasp #2 | 2:49 | Living Dead > Holmgang |
| Soul Grasp #3 | 4:18 | 2x tank share |
| Soul Grasp #4 | 6:24 | Superbolide > Living Dead |
| Soul Grasp #5 | 8:10 | Living Dead > Holmgang |
Frequently Asked Questions
[Damage Down] How strong is the damage down debuff in this fight?
The Damage Down debuff in this phase lowers a player's damage by 31%. |
[Soul Grasp] Can you tank swap to change which tank gets the stack damage midway?
No- the initially targeted tank will get all the stacks (unless they die), even if hate transfers in between. |