Abyssos: The Eighth Circle (Savage) - Part 2
PF uses Nukemaru’s strat, with Hydi/Bijyon’s strat for Limitless Desolation. The combination is often nicknamed “Nukehai” (ぬけはい).
(English subtitled)
Approximate milestones
- 40% HP when the boss finishes casting Ego Death.
Japanese
The following is Game8’s macro for the Nukehai strat.
(Nukemaru’s strat, Hydi/Bijyon’s Limitless Desolation)
【術式1回目(頭割は西)】【術式炎氷(TH西 DPS東) 】
   ★   紫   ST│ ▼炎:中央前詰め ▼氷誘導
D1 MT D2   MT │ MT>ST >H1>H2 西 D1>ST
H1  H2 H1 D2│ D1>D2>D3>D4 東MT>D2
D3 S T D4    D1 │【術式2回目散開 】
※左安置は H2 D3│ STMT 紫 D3D1
 左右反転→  D4  │   H1H2D4D2
【概念1回目①】  【概念1回目②】
    早α     │   遅α
複/遅α      │
       早β  │ 生物    遅β
重/遅βγ      │
    早γ     │   遅γ
※4塔:遅αβγ→北で合成
      複/重/早余り→南で合成
【万象灰燼:はいじあ/ビジョン式】
  MT  D1
ST  +   + D2 ※1,3番塔は前+で範囲捨て
H1 +   + D3 ※2,4番塔は後+で範囲捨て
   H2  D4
【概念2回目①】    【概念2回目②】
   無/早α    │    遅α
単          │ 生物
      早β │ イフ イフ    遅β
複/遅       │ 生物
    早γ      │    遅γ
※4塔:遅αβ→北で合成 遅γ/早余り→南で合成
【支配者の一撃】     【塔優先度】
 MTH1 D3 D1 西>MTSTH1H2D4D3D2D1>東
 ST H2 D4 D2
English:
The following is my interpretation of Game8’s macro, with some parts edited to fit the chat window and for clarity.
(Nukemaru’s strat, Hydi/Bijyon’s Limitless Desolation)
【Natural Alignment #1】
■ Spread 1st ■ Spread 2nd
★ ST ★ ST
D1 MT D2 MT MT ★ = Sigil
H1 H2 D2 H1 D2 players
D3 ST D4 D1 D1
■ Stack 1st D3 H2 D3
Dodge West D4 D4
■ Fire baits (②④ positions)
②/① ①/② T/H West:MT > ST > H1 > H2
④/③ ③/④ DPS East:D1 > D2 > D3 > D4
■ Ice baits West:D1 > ST East:MT > D2
【Natural Alignment #2】
Spread: ST MT ★ D3 D1
H1 H2 D4 D2
【High Concept 1-1】│【High Concept 1-2】
7α │ 27α
+27α │
7β │Concept 27β
+27βγ │
7γ │ 27γ
■ High Concept #1 2nd Synthesis
27αβγ → Synthesize North
//Unused 7αβγ → Synthesize South
Player from the top → Take top tower
【Limitless Desolation】(Hydi/Bijyon)
MT D1
ST + + D2 ※1st, 3rd AoE at top +
H1 + + D3 ※2nd, 4th AoE at bottom +
H2 D4
【High Concept 2-1】 │【High Concept 2-2】
Nothing/7α │ 27α
Solo │Concept
7β │Ifrit Ifrit 27β
/27 │Concept
7γ │ 27γ
■ High Concept #2 2nd Synthesis
27α + 27β → Synthesize North
Unused 7αβ + 27γ → Synthesize South
Player from the top → Take top > left tower
【Dominion】 【Tower priority】
MT H1 D3 D1 W:MTSTH1H2D4D3D2D1:E
ST H2 D4 D2
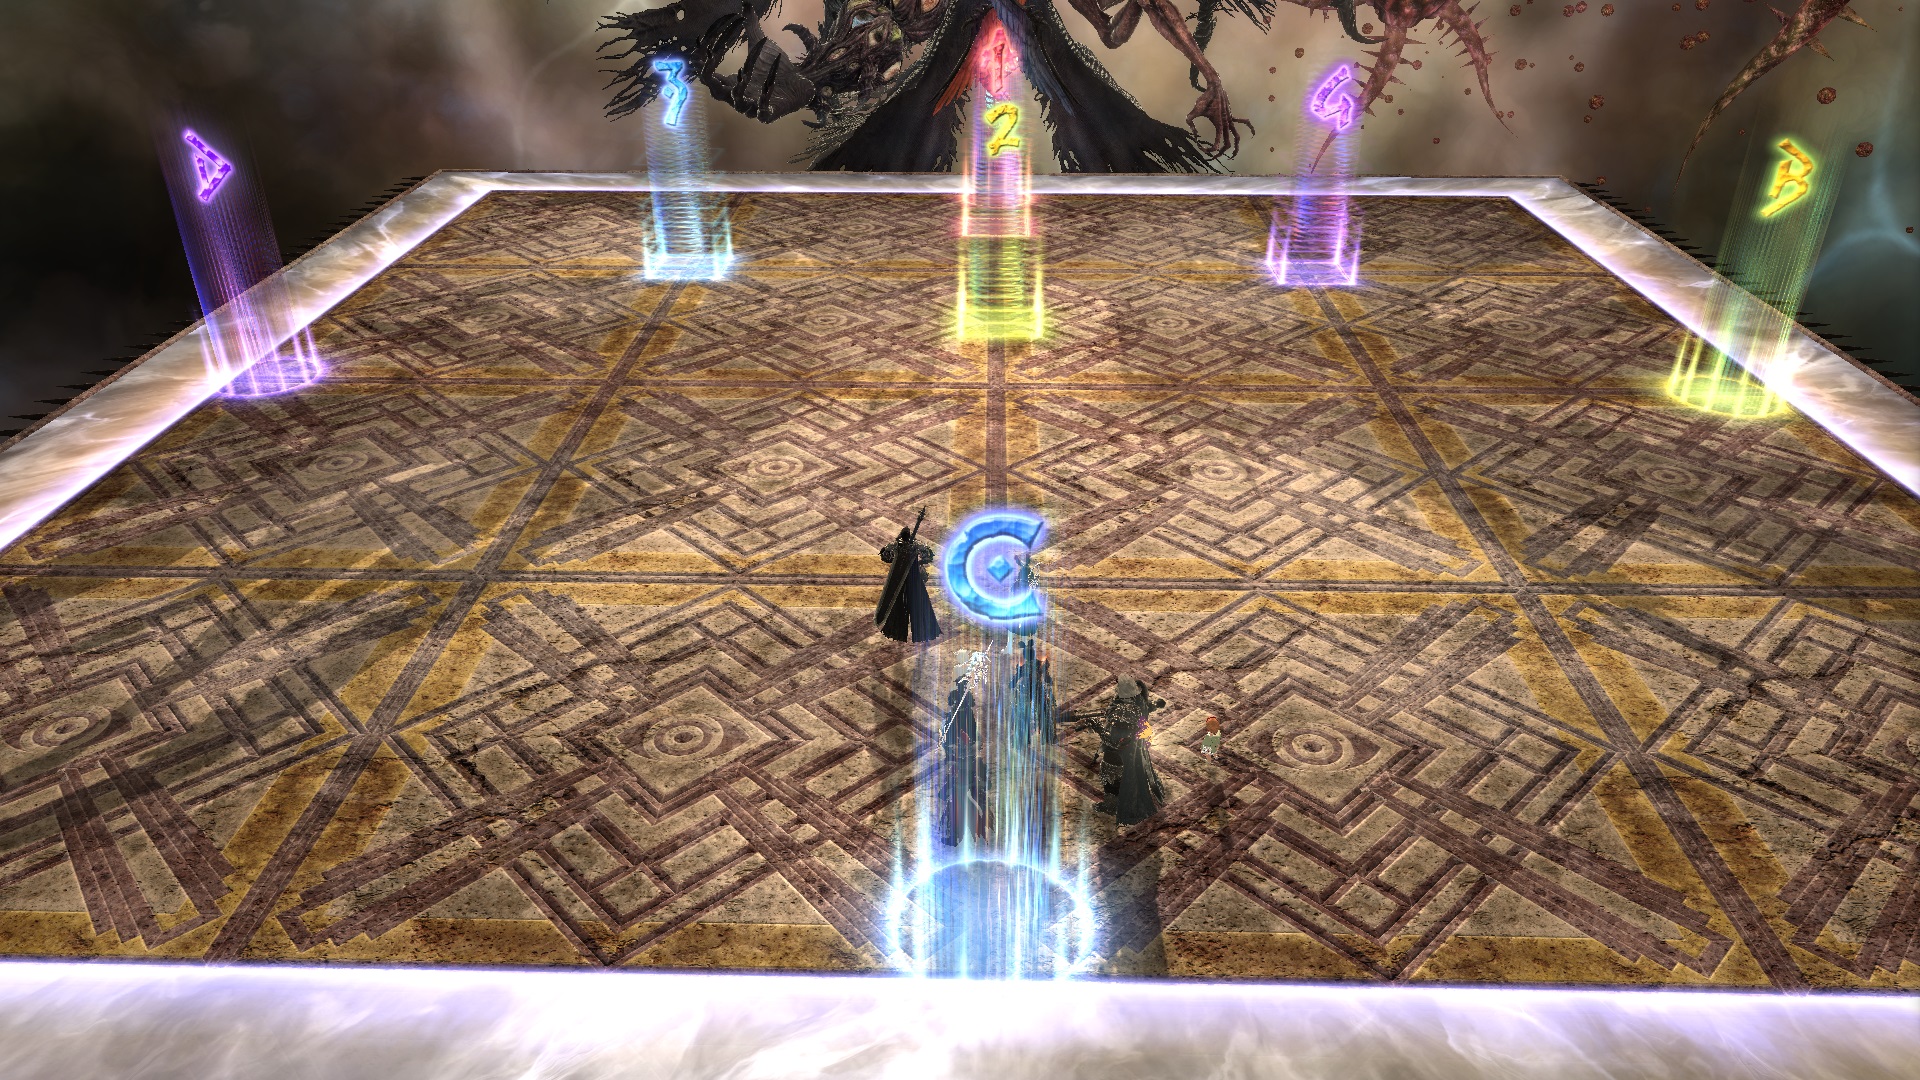
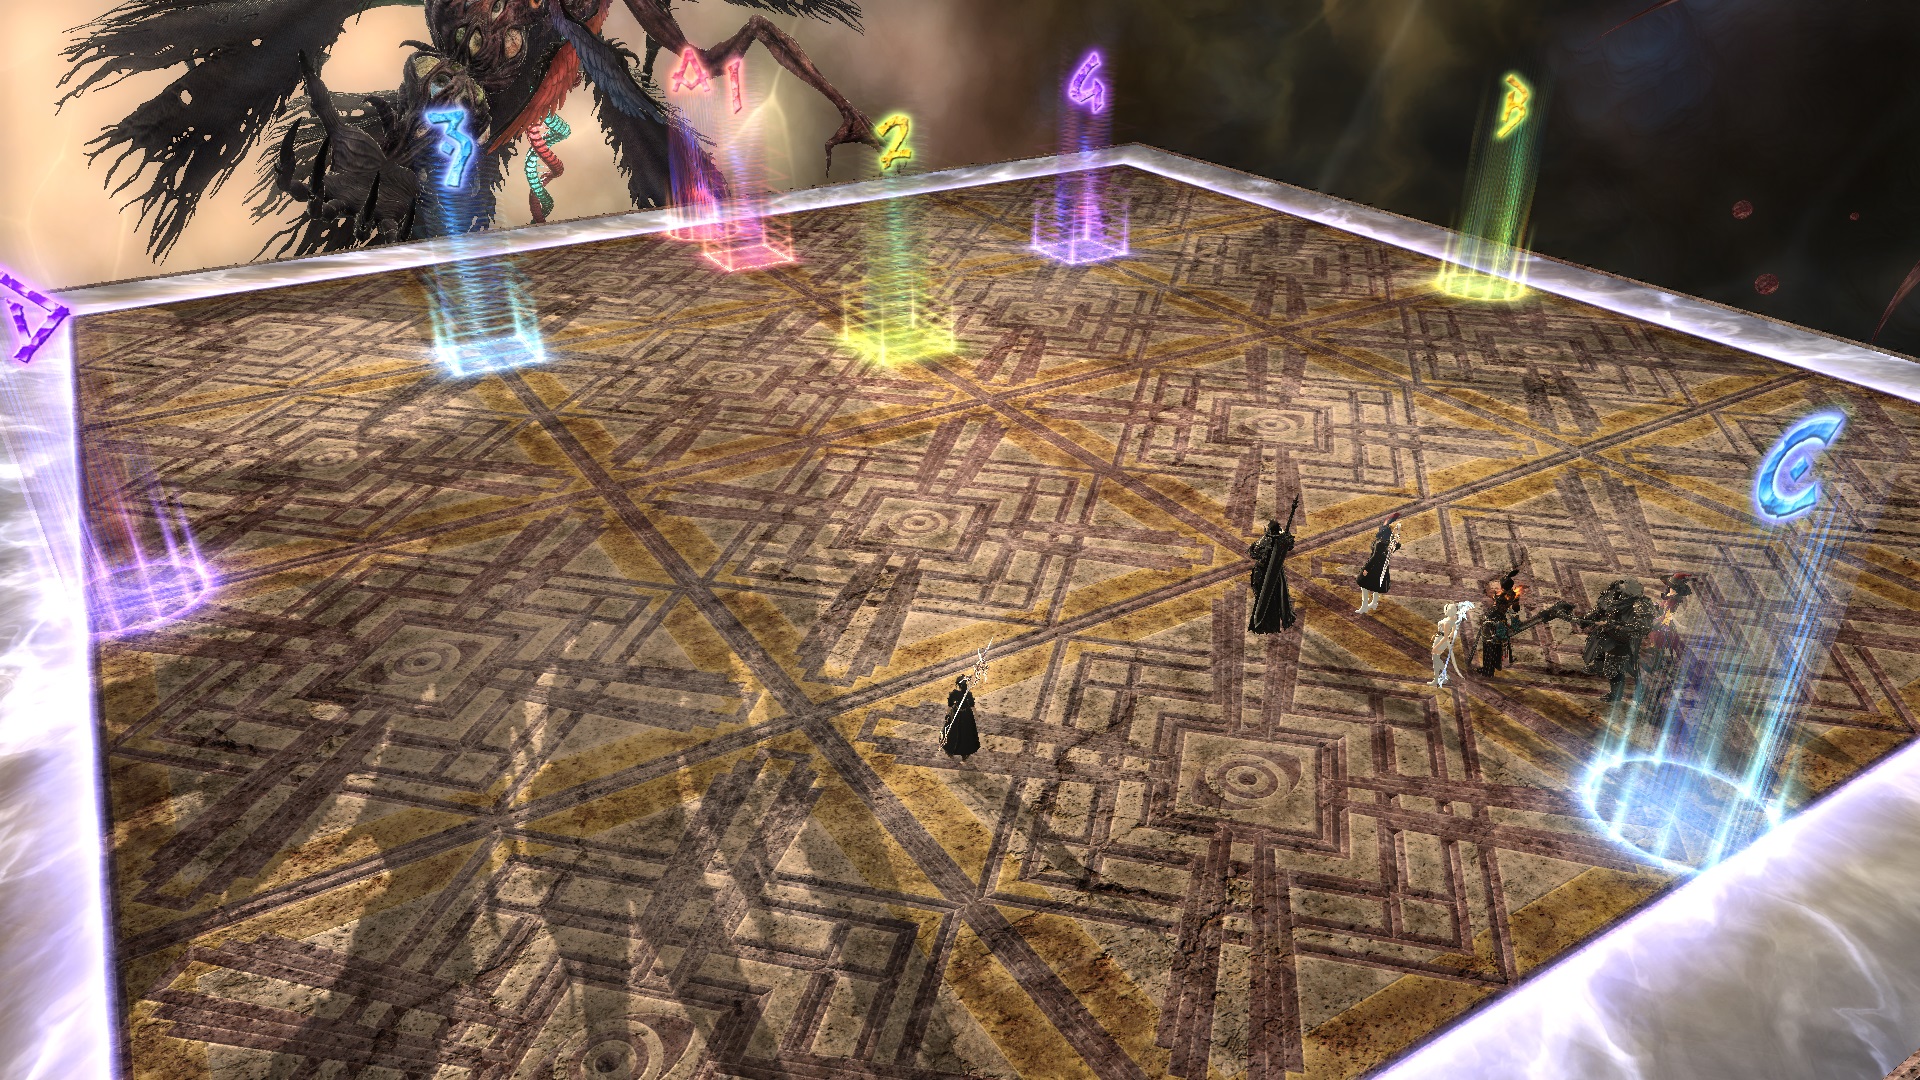
Markers:
1and2are for the two Sigil players during Natural Alignment’s Ice/Fire.ABCis for αβγ in High ConceptDdemarcates the center line for the two stacks in High Concept.
XIVLauncher WaymarkPresetPlugin positions
{
  "Name":"P8S P2 (Nukemaru)",
  "MapID":884,
  "A":{"X":100.0,"Y":0.0,"Z":81.5,"ID":0,"Active":true},
  "B":{"X":118.5,"Y":0.0,"Z":100.0,"ID":1,"Active":true},
  "C":{"X":100.0,"Y":0.0,"Z":118.5,"ID":2,"Active":true},
  "D":{"X":81.5,"Y":0.0,"Z":100.0,"ID":3,"Active":true},
  "One":{"X":100.0,"Y":0.0,"Z":85.0,"ID":4,"Active":true},
  "Two":{"X":100.0,"Y":0.0,"Z":95.0,"ID":5,"Active":true},
  "Three":{"X":90.0,"Y":0.0,"Z":90.0,"ID":6,"Active":true},
  "Four":{"X":110.0,"Y":0.0,"Z":90.0,"ID":7,"Active":true}
}
Timeline
 (Credit: u/ExiaKuromonji)
Nukemaru’s Natural Alignment
Here’s a breakdown for the Fire/Ice portion in Nukemaru’s Natural Alignment.
These are the base positions for all players during Natural Alignment. Two players of the same role (T/H vs DPS) will be selected as the Sigils (the players with the purple mark), forcing the remaining six players into a 2-4 or a 4-2 split. | 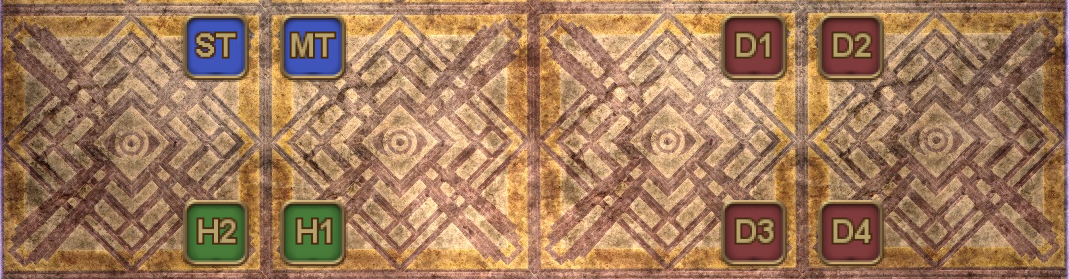 |
Fire is baited by the three furthest players from the Sigil.
- The side with 4 players take up their base positions as above.
- The side with 2 players have to figure out the priority between themselves to see who baits Fire:
Inside: MT>ST>H1>H2: Outside (baits Fire)
Inside: D1>D2>D3>D4: Outside (baits Fire)
Example 1: MT and ST are selected as the Sigils. The remaining pairs are:
Notice H1 and H2 are baiting Fire in the front of the row. | 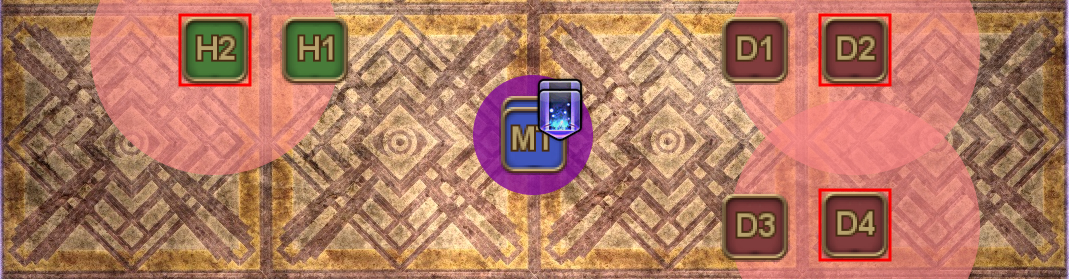 |
Example 2: D1 and D4 are selected as the Sigils. The remaining pairs are:
| 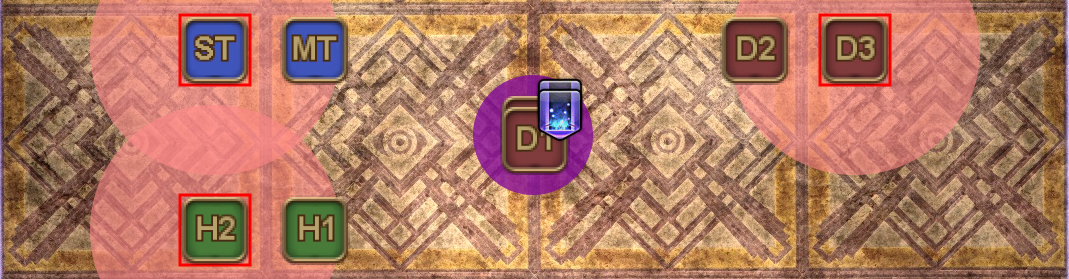 |
Ice is baited by the two closest players to the Sigil.
- Because the party is split 2-4 or 4-2, one of the players in the group of 4 will have to move to the other group to make it an even 3-3 split. This will either be the MT (if T/H have four players), or D1 (if DPS have four players)
- The melee pair from the side that has four players (MT+ST, or D1+D2) baits Ice.
Example 1: MT and ST are selected as the Sigils.
| 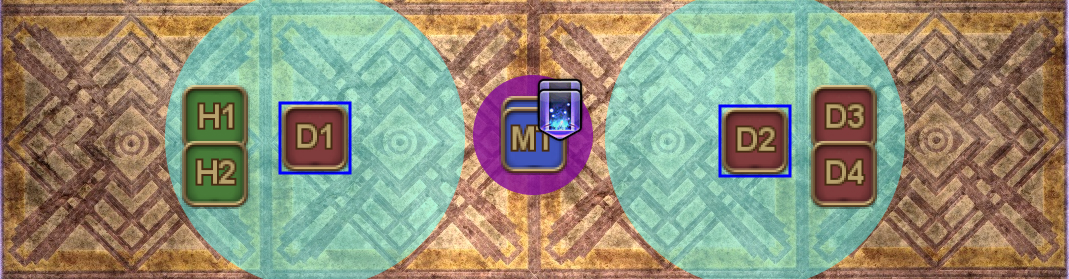 |
Example 2: D1 and D4 are selected as the Sigils.
| 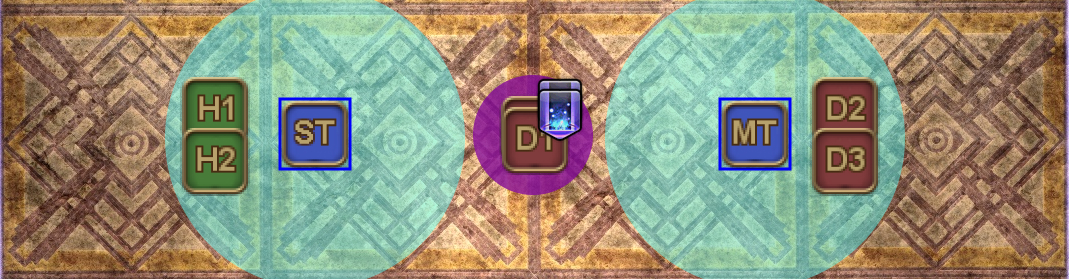 |
Nukemaru’s High Concept #1
Note that the colour combinations are fixed.
| 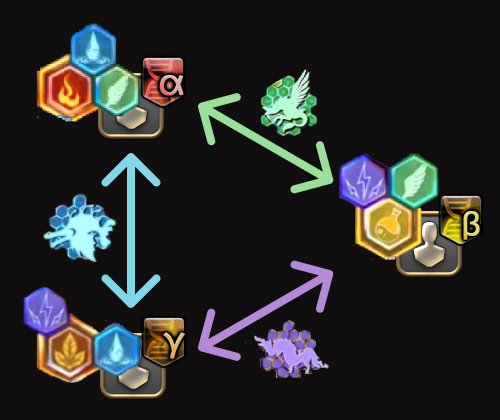 |
This is Nukemaru’s strat for High Concept #1. Note that αβγ are placed at cardinal positions instead of intercardinals, allowing players to naturally determine their North-South priorities when resolving various parts of High Concept.
1. All players take up their starting positions.
| 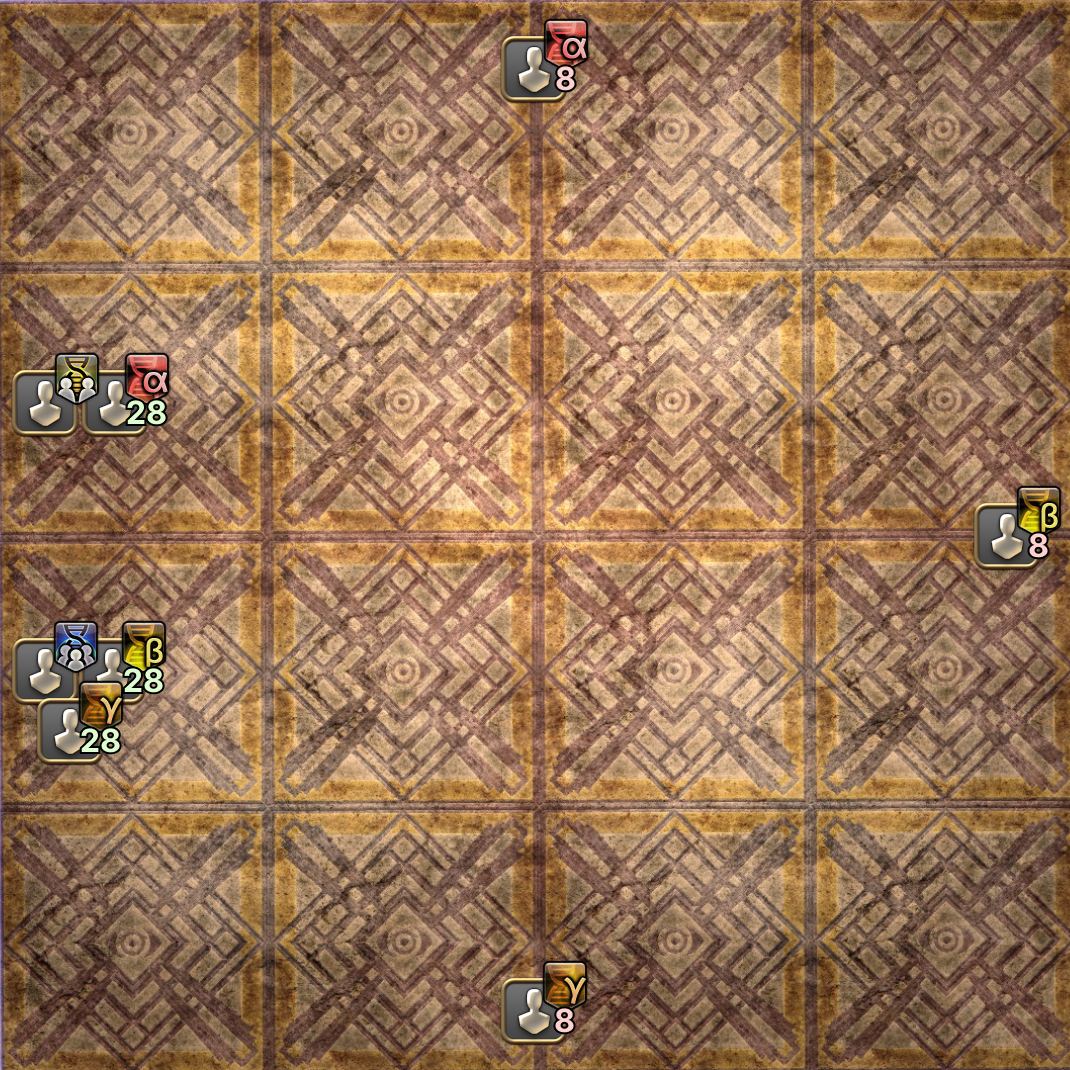 |
| 2. AoEs resolve. | 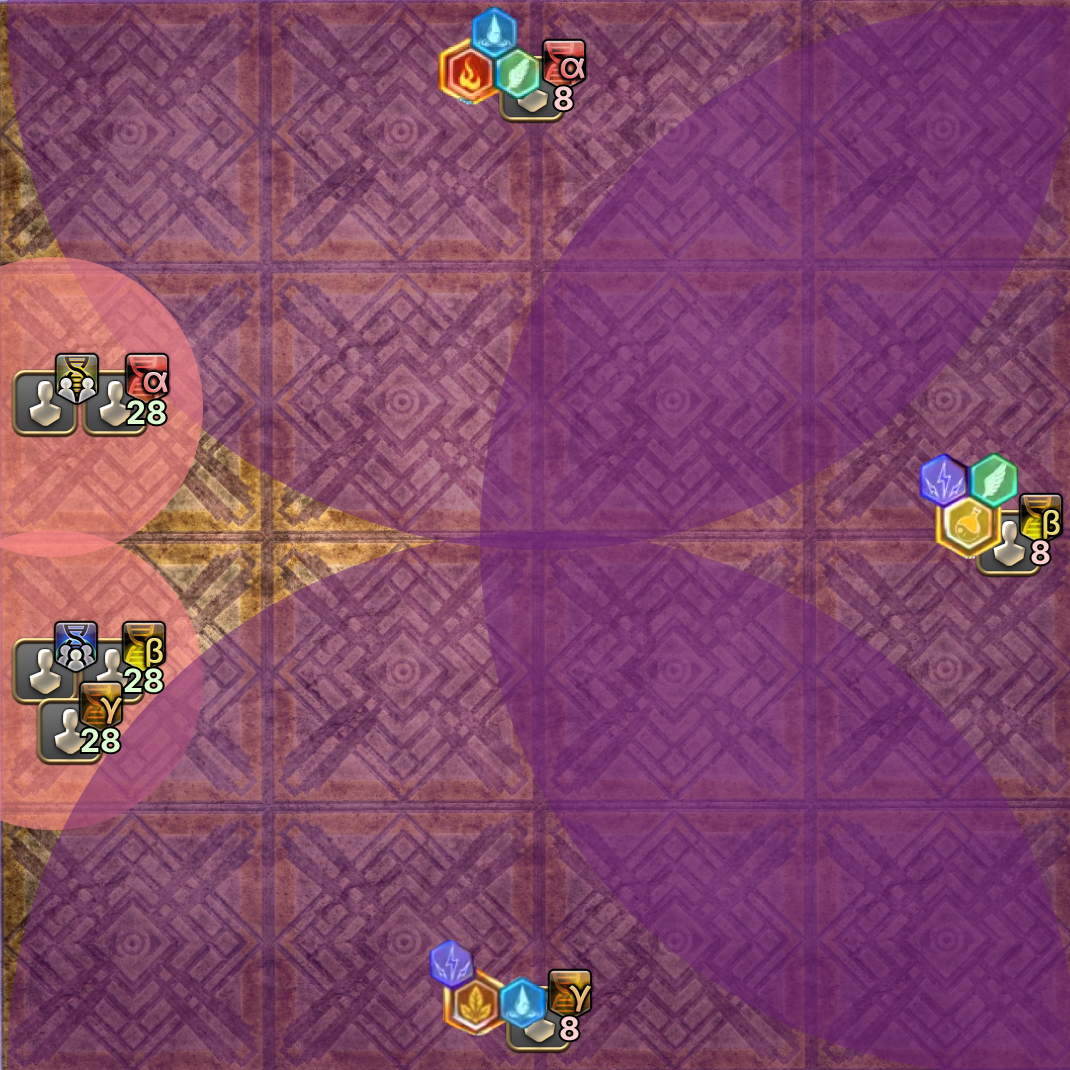 |
3. Two coloured towers spawn. Everyone gather up for heals.
In this example, the towers are purple, so 7β and 7γ will fuse. | 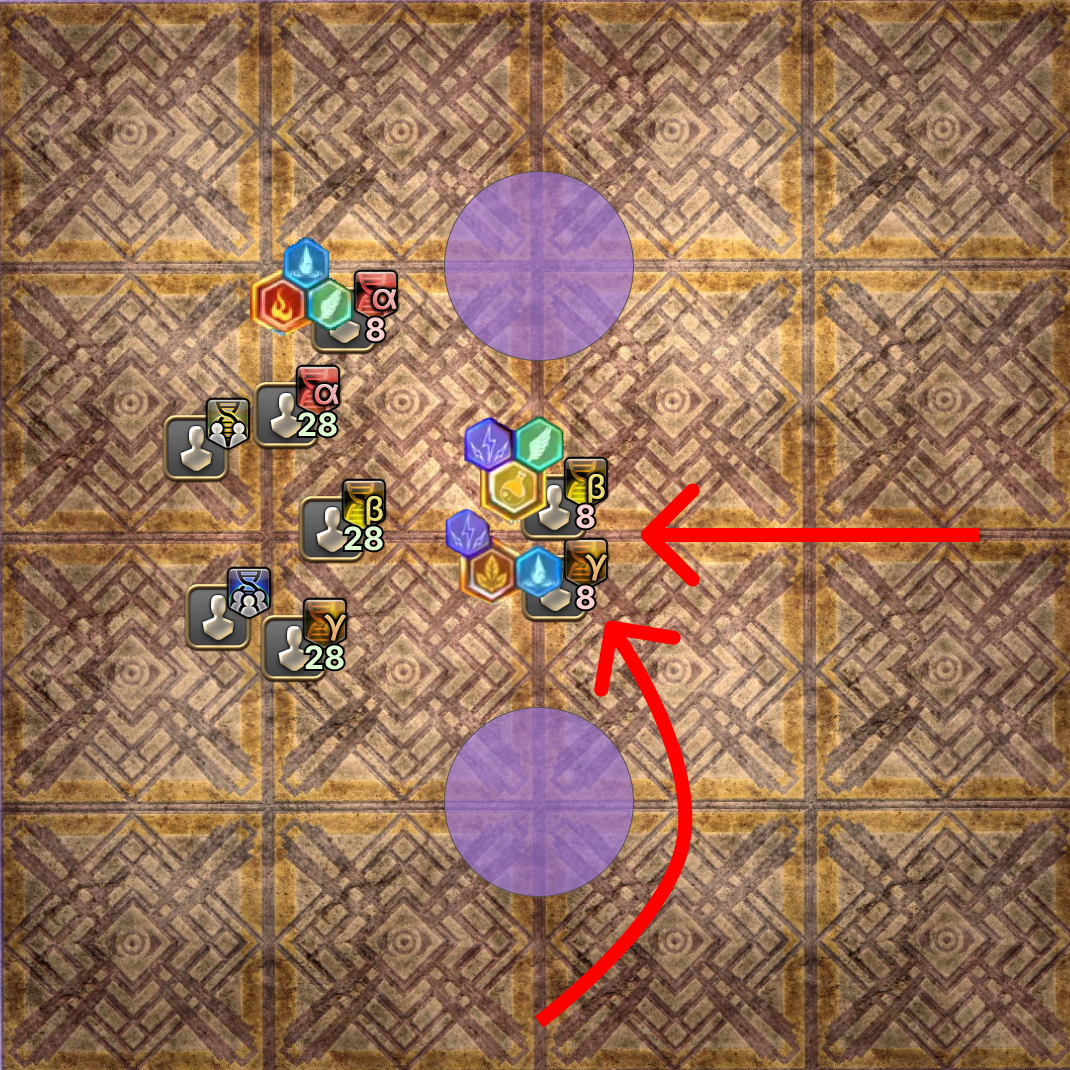 |
4. The boss will cleave one half of the arena. Once the two players have created the animal concept, they split to take the two towers while dodging the boss's AoE. If you came from the top side, you will take the top tower. In this example, 7β came from above 7γ, so 7β takes the north tower. The boss is also cleaving east here. | 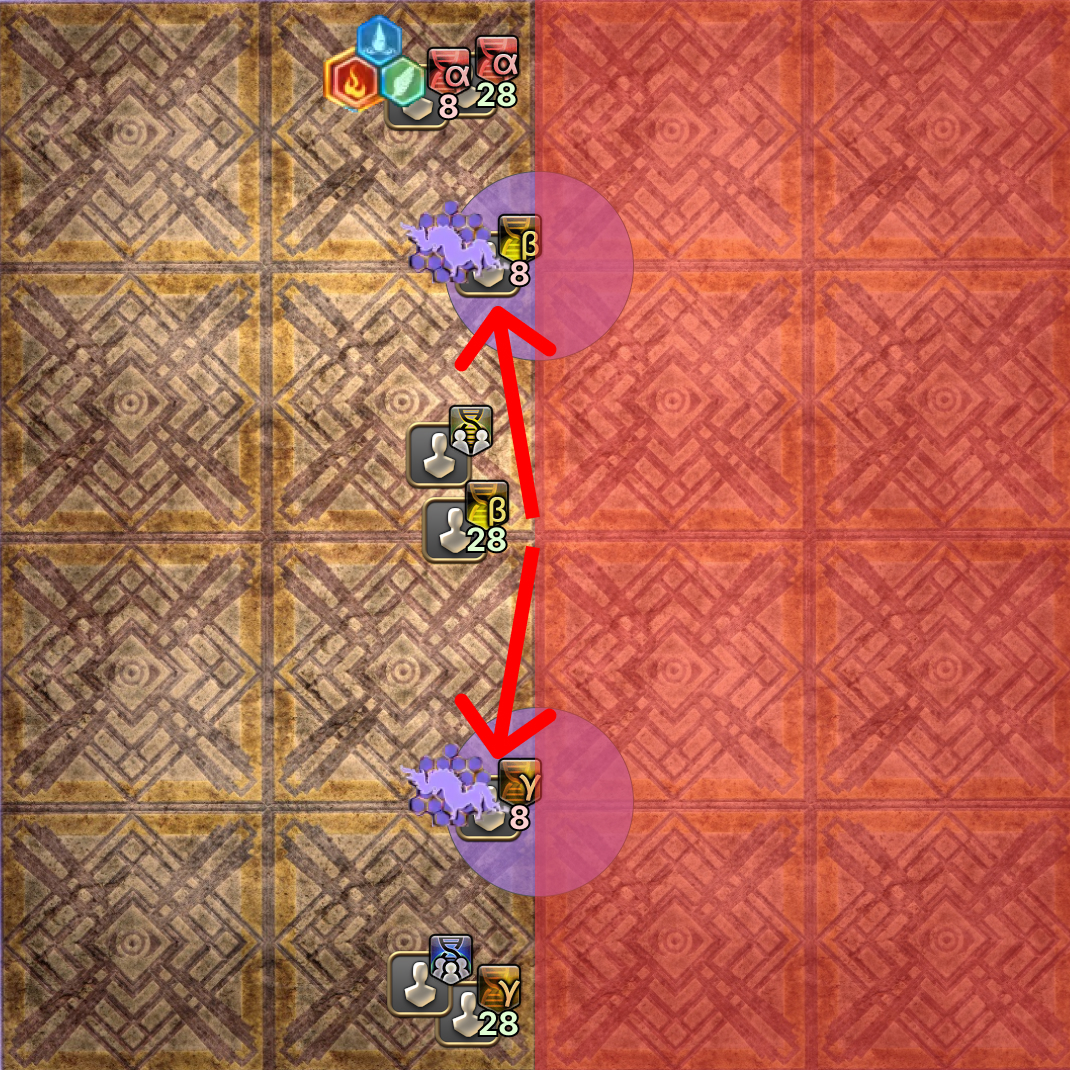 |
| 5. After the cleave goes off, everyone takes up position for the second set of AoEs.
In this example: | 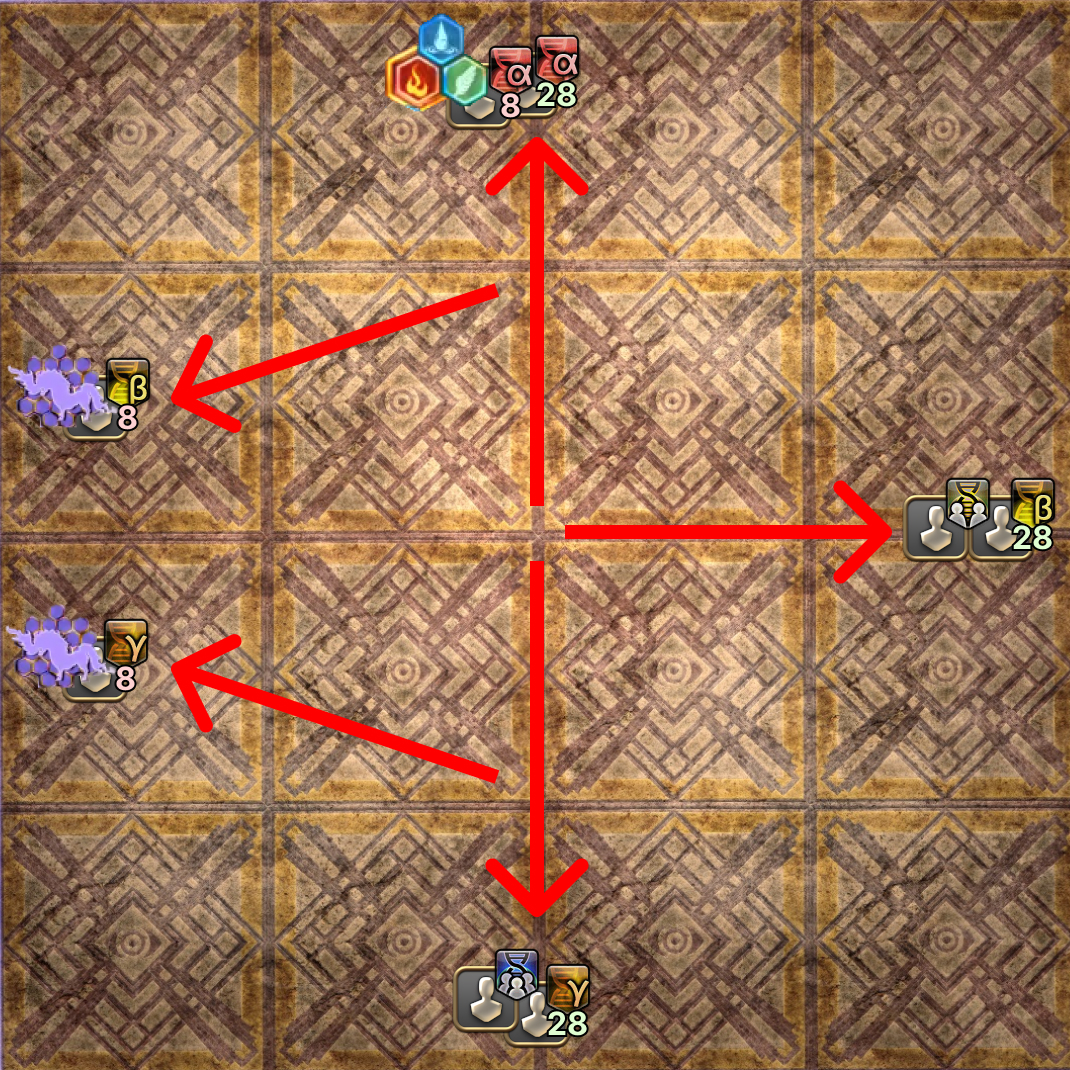 |
| 6. Second round of AoEs resolve. |  |
7. Four coloured towers spawn. If you need to fuse:
In this example, the towers are blue, so the players at α and γ will fuse. | 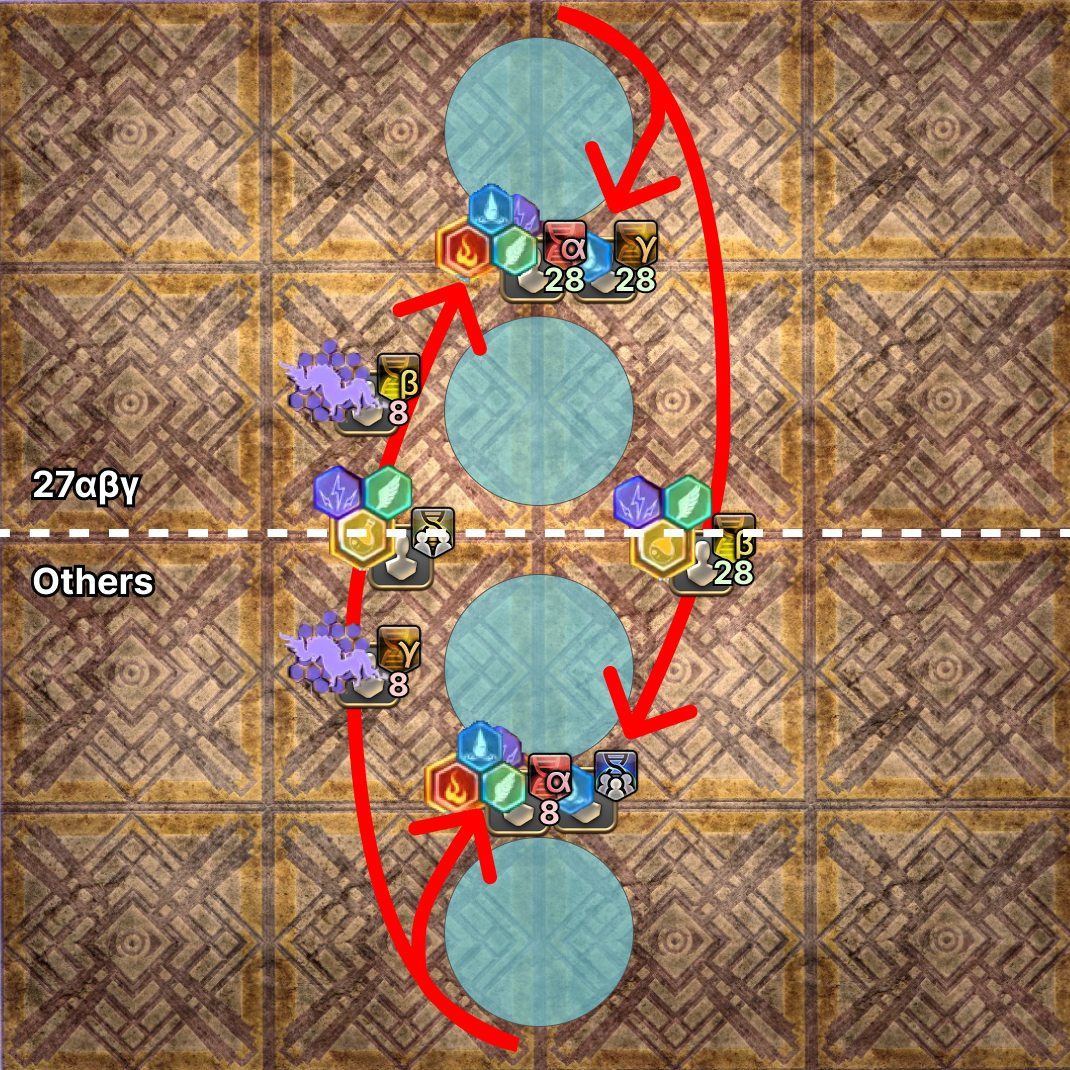 |
8. The boss will cleave one half of the arena again. Once each pair have created the animal concept, they split to take the two towers while dodging the boss's AoE. The player that came from the top side takes the top tower. In this example: | 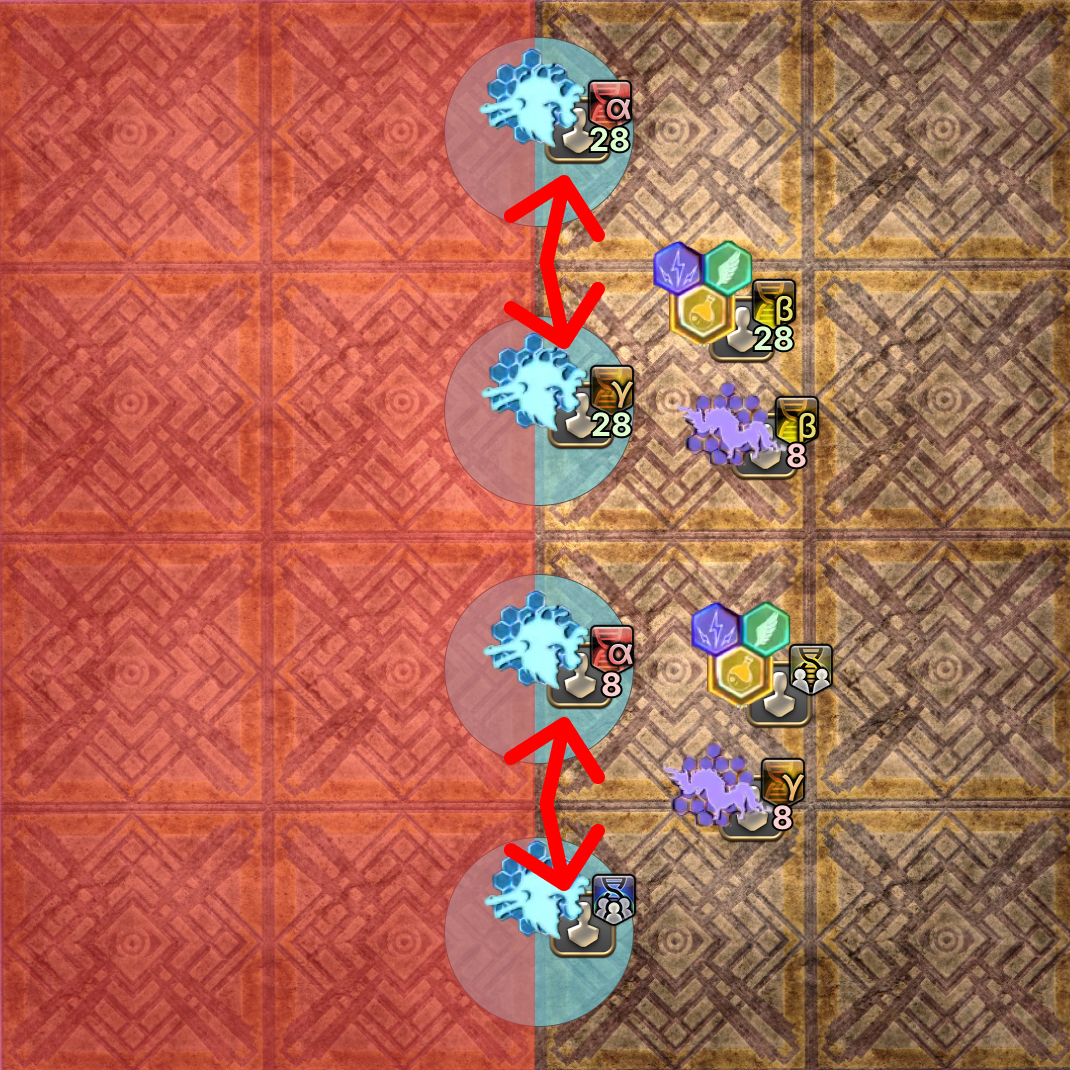 |
Limitless Desolation:
Hydi Ai and Bijyon proposes the following strategy for Limitless Desolation.
It takes advantage of the fact that the first and third set of towers always spawn in the top two rows, while the second and fourth set of towers always spawn in the middle two rows.
Nukemaru also made a guide explaining the strat:
Nukemaru’s High Concept #2
This is Nukemaru’s strat for High Concept #2. Several concepts from High Concept #1 carry over to High Concept #2.
1. All players take up their starting positions.
In this example, 27β has the solo stack. | 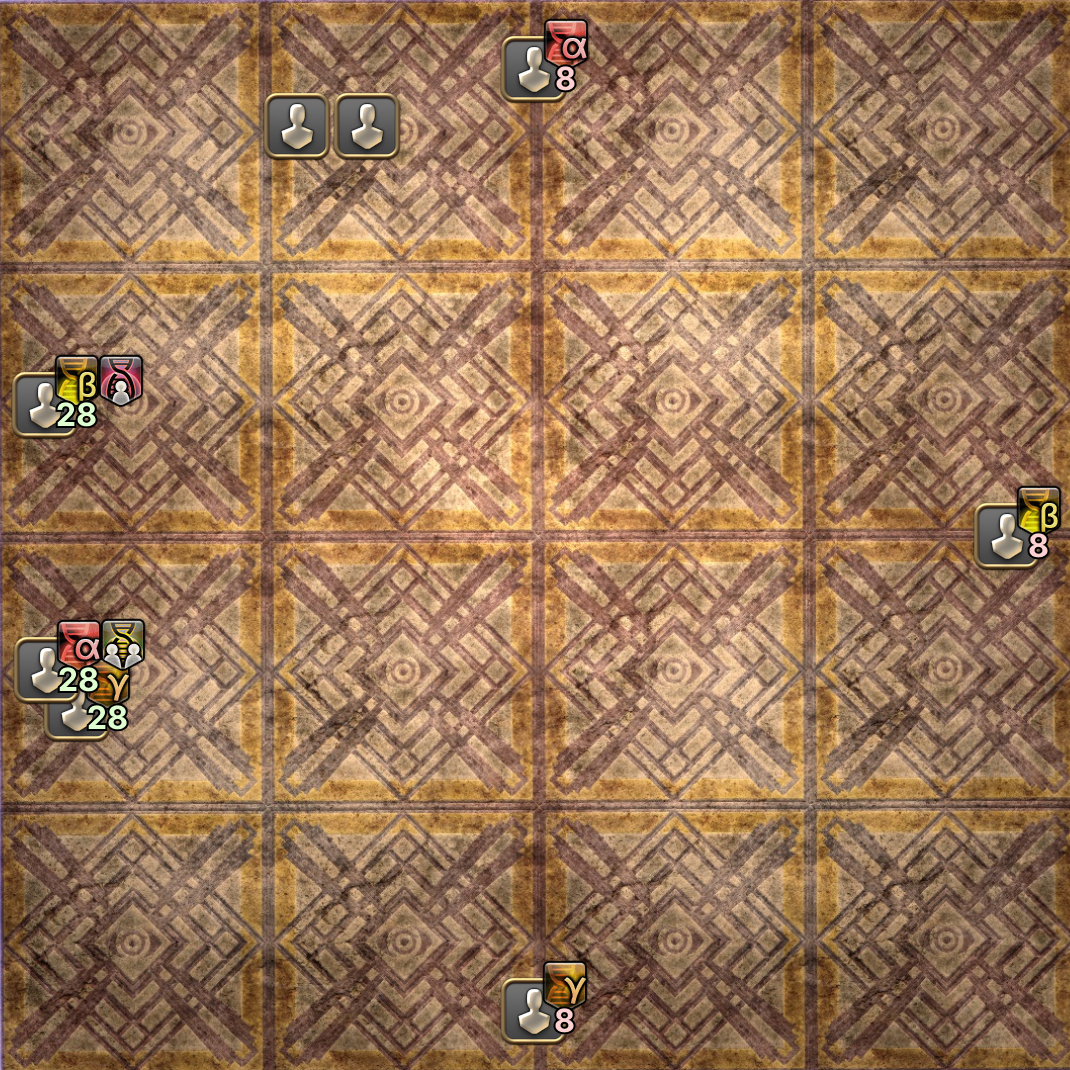 |
| 2. AoEs resolve. | 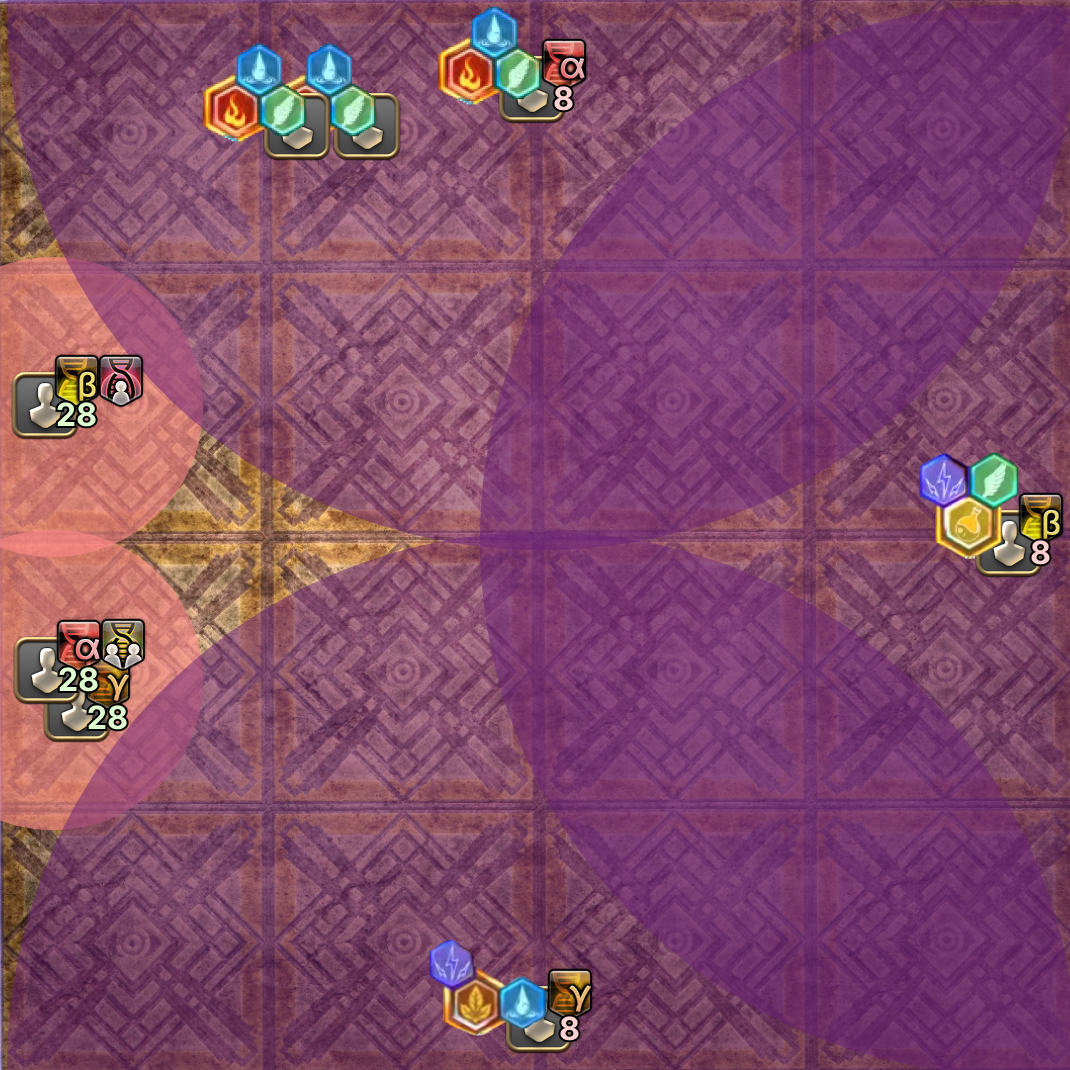 |
3. Two coloured towers spawn.
Ifrit players will suffer from continuous DoT damage until the end of High Concept, and need to be kept alive by the healers until then. Note that 7γ will always be involved in this fusion. In this example, the towers are purple, so 7β and 7γ will fuse. | 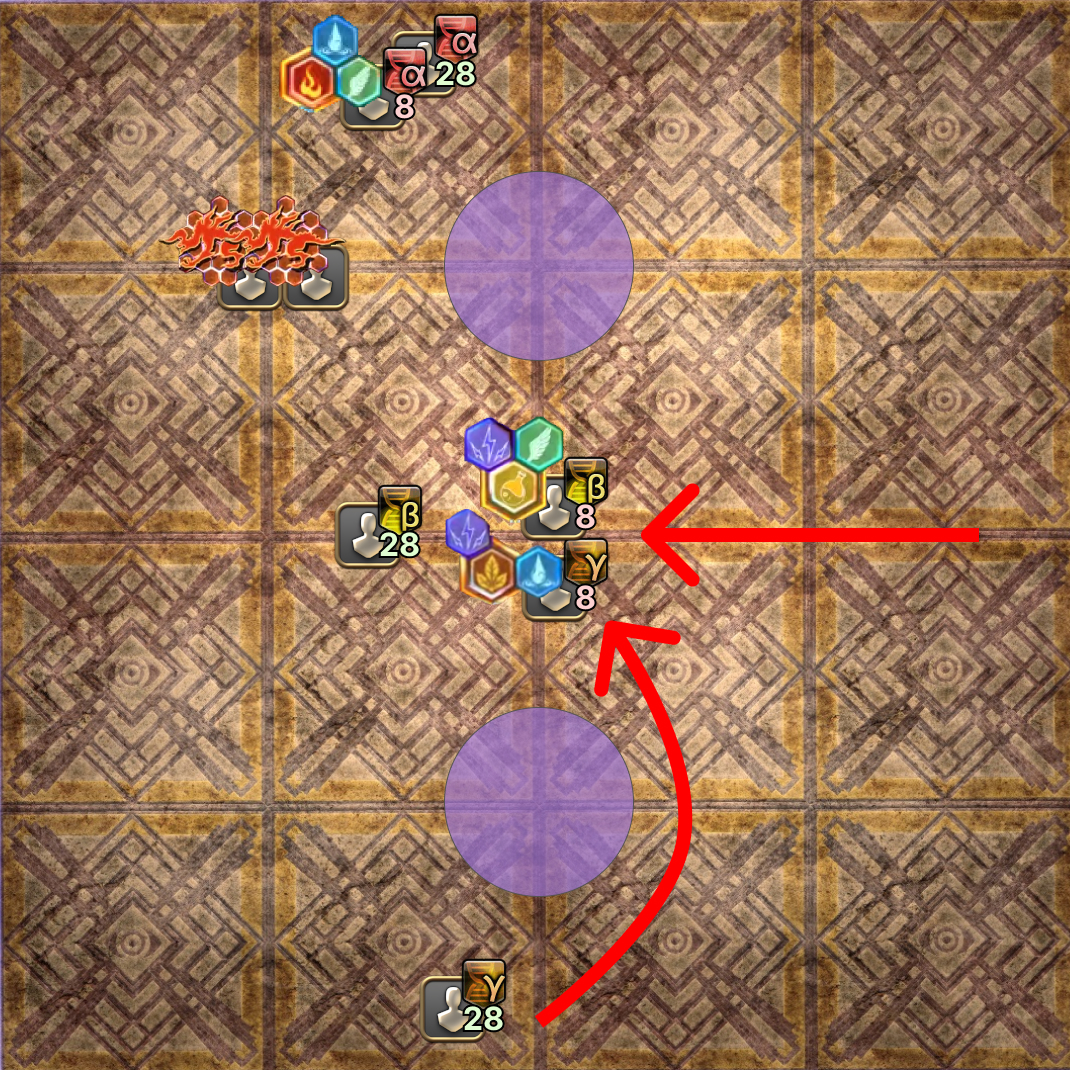 |
4. The boss will cleave one half of the arena. Merge Ifrit before dodging the cleave. Once the two players have created the animal concept, they split to take the two towers while dodging the boss's AoE. If you came from the top side, you will take the top tower. In this example, 7β came from above 7γ, so 7β takes the north tower. The boss is also cleaving east here. | 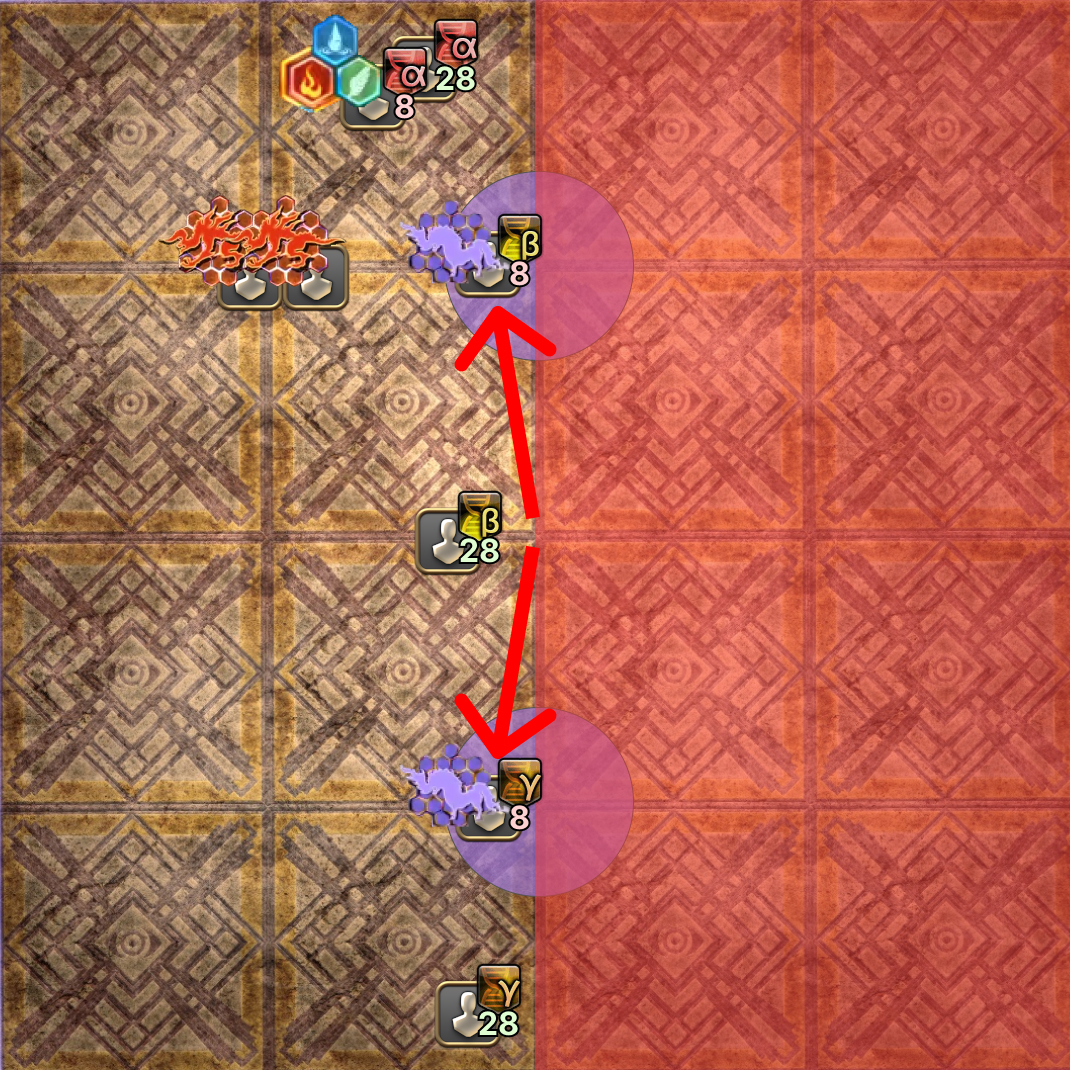 |
| 5. After the cleave goes off, everyone takes up position for the second set of AoEs.
In this example, 7α did not fuse earlier, so they return North. | 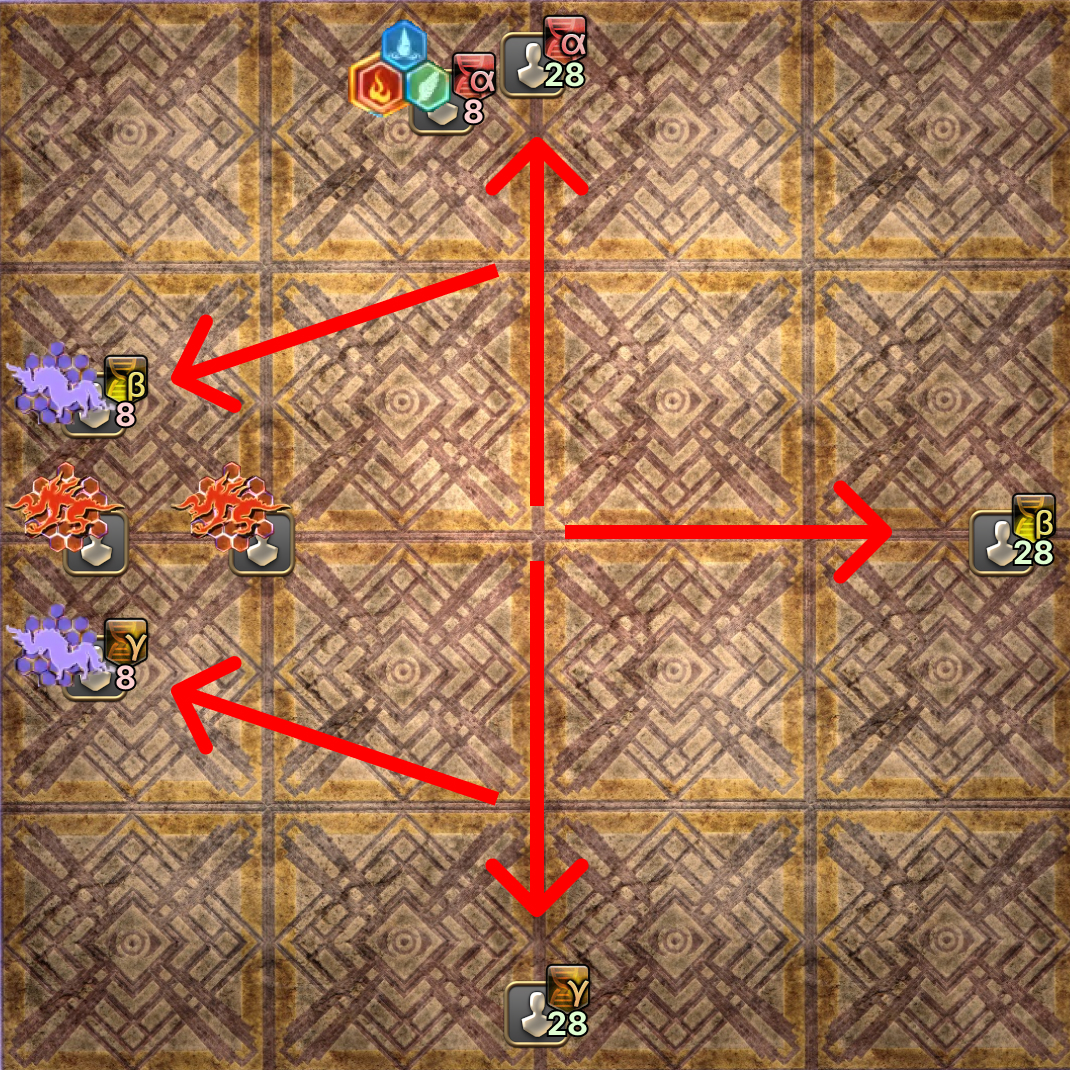 |
| 6. Second round of AoEs resolve. | 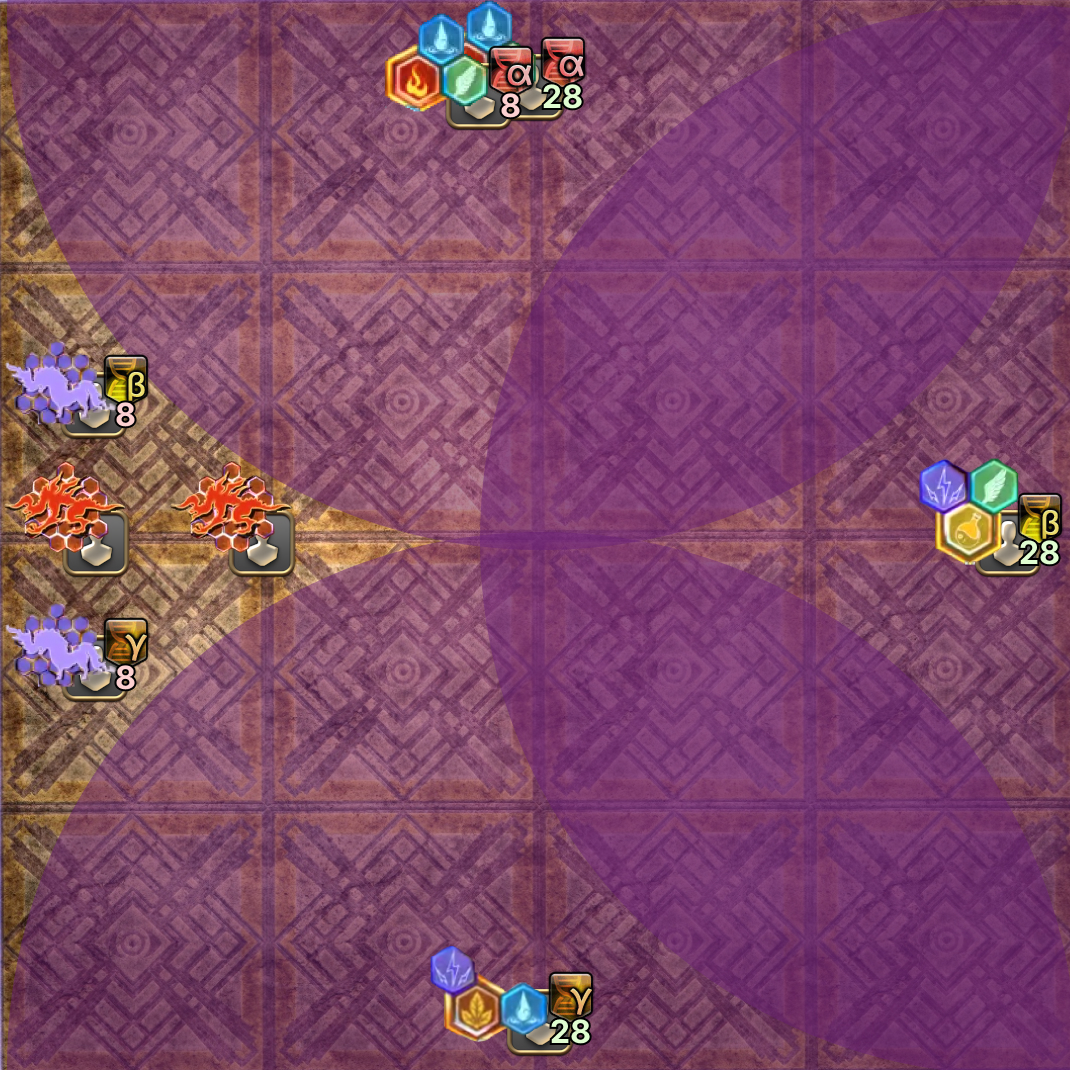 |
7. Four coloured towers spawn, along with four shades at the four cardinal directions.
In this example, 7α was not used in the first fusion, so they will go south to fuse with 27γ. | 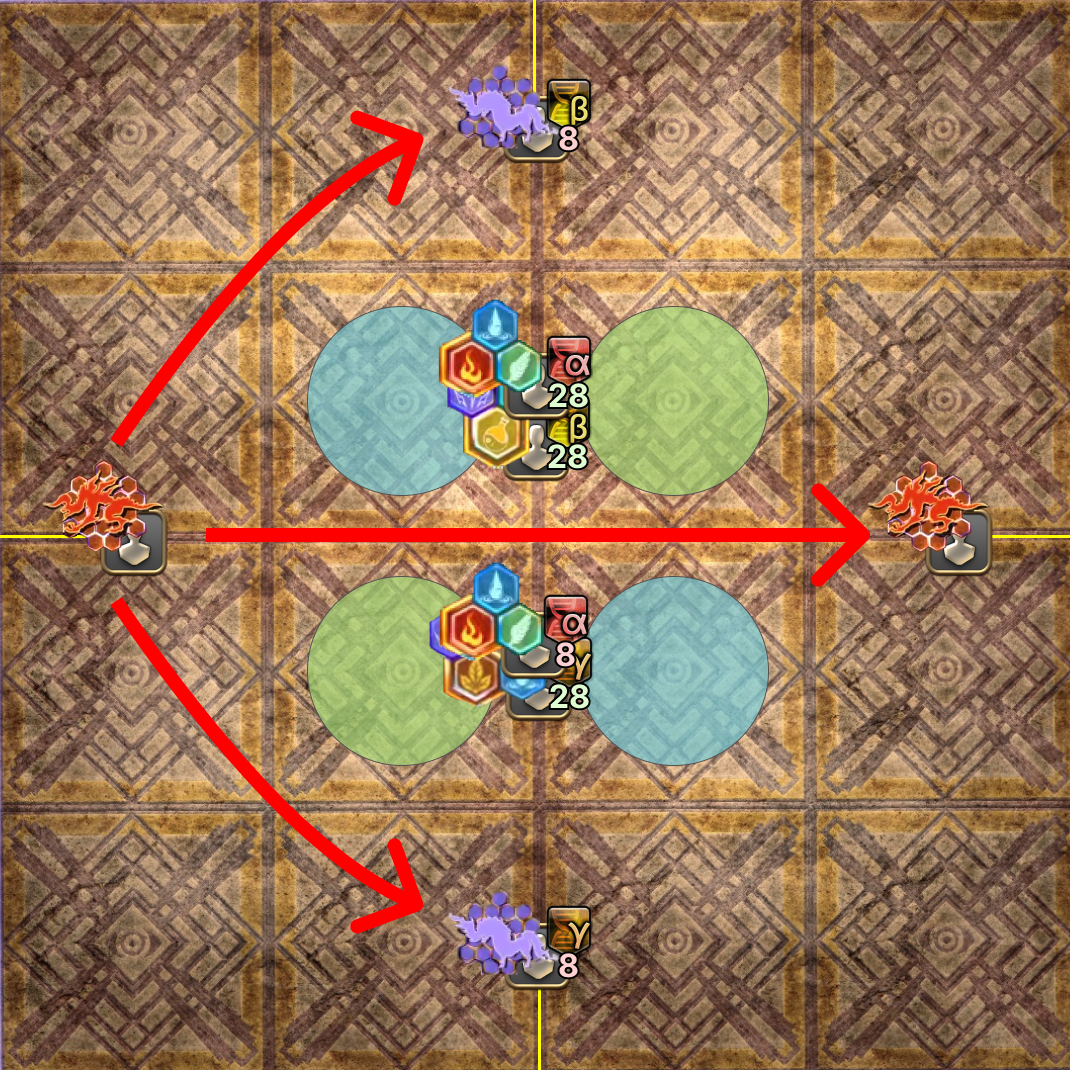 |
8. The shades will each fire a beam in the direction of the player they were tethered to.
In this example, 27α prioritizes north over 27β, and 7α prioritizes north over 27γ. | 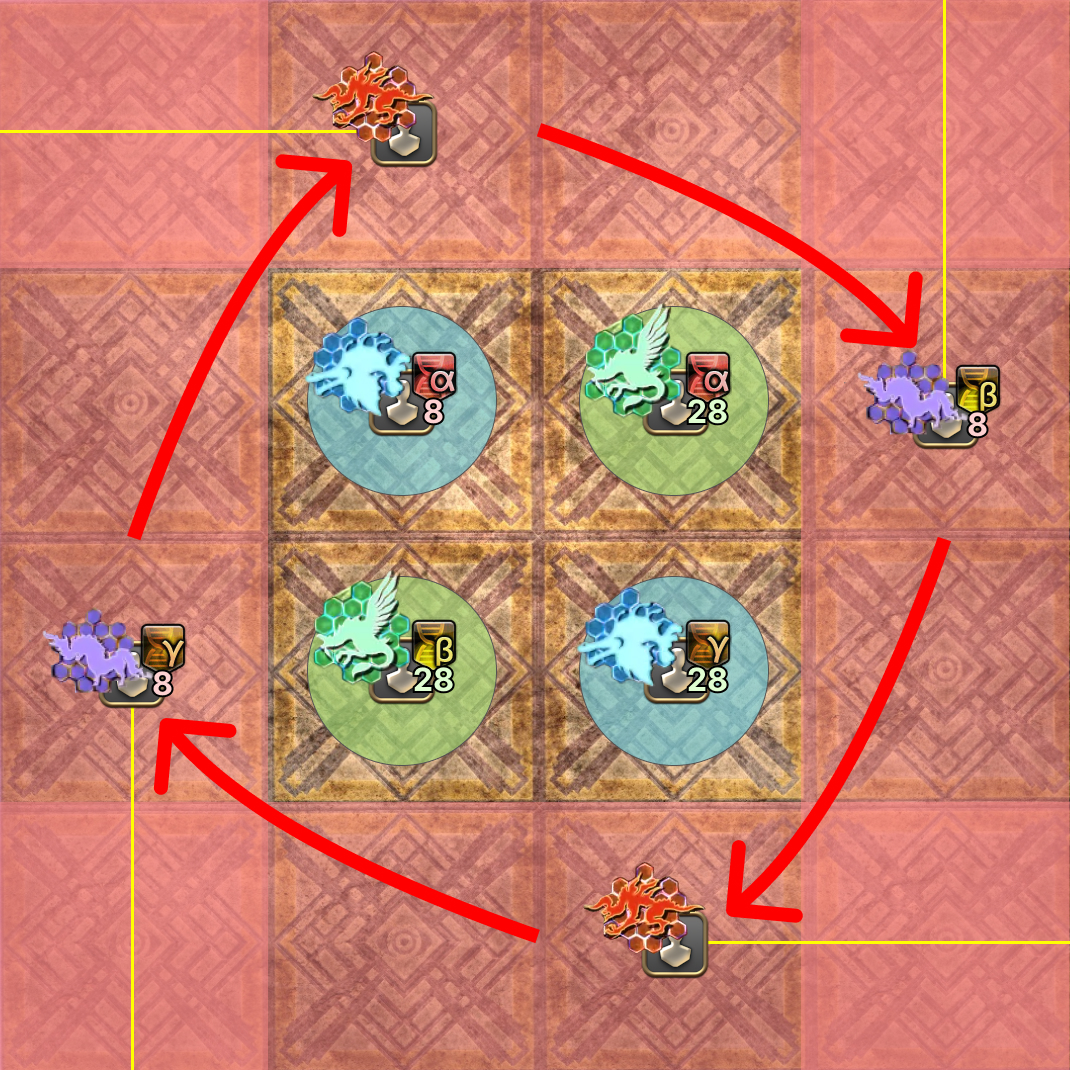 |
9. The two Ifrit players then combine with the two birds in the center to form four Phoenix feathers. The four Phoenix feathers will then tether together and fuse to form Phoenix, which gives the Phoenix concept to all players in the party. All party members must be topped to 100% HP before this final Phoenix fusion completes. | 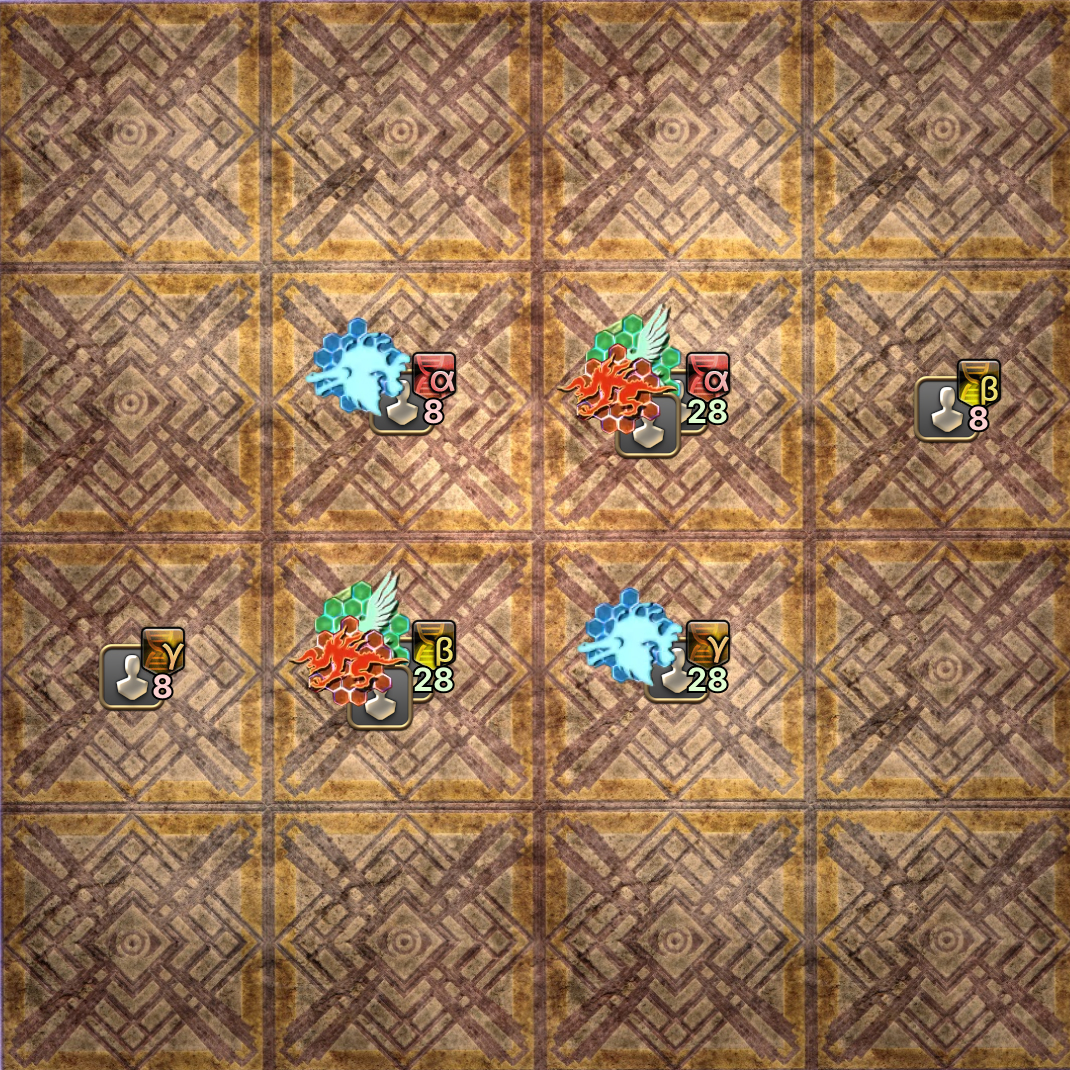 |
Frequently Asked Questions
[High Concept 1] Can both sets of towers be the same colour?
Yes, the two sets of towers in High Concept 1 are not related to one another. |
[High Concept 2] Why is 7γ missing in the macro where it says "27γ/Unused 7αβ→Synthesize South"?
The ultimate goal in High Concept 2 is to produce the Phoenix concept, which is done by merging two Ifrits with the two (green) birds, which are formed by combining α and β. If the first set of towers were green, then players would just form two birds and immediately fuse them with the two Ifrits to make Phoenix at the first set of fusions. Hence there cannot be any green towers in the first set, which means 7γ is always used. |
[High Concept 2] Why is 7γ always used in the first fusion?
The ultimate goal in High Concept 2 is to produce the Phoenix concept, which is done by merging two Ifrits with the two (green) birds, which are formed by combining α and β. If the first set of towers were green, then players would just form two birds and immediately fuse them with the two Ifrits to make Phoenix at the first set of fusions. Hence there cannot be any green towers in the first set, which means 7γ is always used. |
[High Concept 2] Why are the first set of towers always purple or blue, and never green?
The ultimate goal in High Concept 2 is to produce the Phoenix concept, which is done by merging two Ifrits with the two (green) birds, which are formed by combining α and β. If the first set of towers were green, then players would just form two birds and immediately fuse them with the two Ifrits to make Phoenix at the first set of fusions. Thus, the first set of towers cannot be green, and are therefore either purple or blue. |
[High Concept 2] Why should you create Ifrit first, before dodging the boss's E/W cleave?
The problem is that if a healer needs to combine to conceptualize Ifrit, they need to top up the party before the second set of AoEs. Ifrit cannot be merged in the center, as that spot is being used to merge the two tower players. By delaying the merge to after the cleave, you prevent the healer from going to the center to top up the party to prepare for the second set of AoEs- by the time Ifrit merges and the healer can go mid, the party would have likely spread out and be out of range of healing. |
[Dominion] Why is the tower order in Dominion D4321 instead of D1234?
Earlier macros had D1234- the problem is that RDM is the only DPS that cannot heal/shield themselves off the GCD, and would often end up dying to the follow-up raid-wide damage. Casters also have the lowest max HP of all the DPS. Putting the casters next to the healers in the priority order increases the likelihood that they are in range of receiving healing. Nukemaru's video guide also puts melees towards the outside and casters towards the center for the same reason, leading to the tanks > healers > D4321 order. |