Run: Dynamis (Delta Version)
P5 is split up into three “trios”- Delta, Sigma, and Omega. Each trio involves a series of mechanics before ending with Hello, World debuffs that give players stacks of Dynamis, needed to clear the final phase.
The strat that PF uses is the “Kinda Awk” strat, that pairs like tethers together.
Hello, World
The Hello, World debuffs serve as the “big puzzle” over the course of Delta, Sigma, and Omega. There are a total of four sets of Hello, World debuffs that the party will need to manage, and the goal is to have each player enter the final phase with 3 stacks of Dynamis.
[Click to Expand] Hello, World explanation
 | Hello, Near World
All three players hit gain one stack of Dynamis. If an AoE hits two players at the same time, or the player with Hello, Near World dies, the party wipes.
|
 | Hello, Distant World
All three players hit gain one stack of Dynamis. If an AoE hits two players at the same time, or the player with Hello, Distant World dies, the party wipes.
|
Solar Ray
There are four Solar Rays in this phase. These are two-hit tankbusters that also apply Magic Vulnerability, forcing either a tank swap, or invuln.
They also hit extremely hard (base damage is a little under three times a tank’s max HP).
Two of these will be taken with invulnerabilities, and the other two with mitigations; however, which two will depend on your party composition.
| If your party has a WAR | If your party does not have a WAR | |
|---|---|---|
| Before Delta | Hallowed Ground > Superbolide > Tank swap + Full buffs | Hallowed Ground > Superbolide > Living Dead |
| (N.B: With fast killtimes in P1-P3, Hallowed Ground may not be back in time.) | ||
| Before Sigma | Living Dead > Tank swap + Full buffs | Superbolide > Living Dead |
| Before Omega | Holmgang | Tank swap:
* Use Rampart when the Arm Lasers go off at the end of Sigma. |
| Before Blind Faith | Tank swap + full buffs | Tank swap:
|
Note that the invuln/mitigation order is determined by the tank jobs, and not by the tank roles.
Note: There is an edge case where you specifically have:
- WAR + PLD tanks and
- Fast killtimes (Hallowed Ground not available for first Solar Ray)
In such a scenario, use Holmgang for the second Solar Ray, essentially falling back to the "no WAR" plan. WARs, however, may not be familiar with this fallback.
After the Solar Ray, Omega-M will cast Run: ****mi* (Delta Version), which is a very hard-hitting raid-wide.
Tip: There is ~1:22 between Run Dynamis (Delta Version) and Run: Dynamis (Sigma Version).
Party mitigations that last 15 seconds, and have a 90-second cooldown (tank mitigations, D3) can be used immediately after the second Solar Ray hit in order to catch Run Dynamis (Delta Version) and be back up in time for Run Dynamis (Sigma Version).
Healer party mitigations last 20 seconds, and can be used to mitigate both Solar Ray hits and the follow-up Run Dynamis if timed correctly.
Run: Dynamis (Delta Version)
Run: Dynamis (Delta Version) can be broken down into three parts:
1. Rocket Punches
Tethers appear, splitting the party up into two groups:
- Four players will have red/green tethers.
- The other four players will have blue tethers.
- Hello, Near World and Hello, Distant World will also appear on two players with a blue tether.
1. Split off into your initial positions:
| 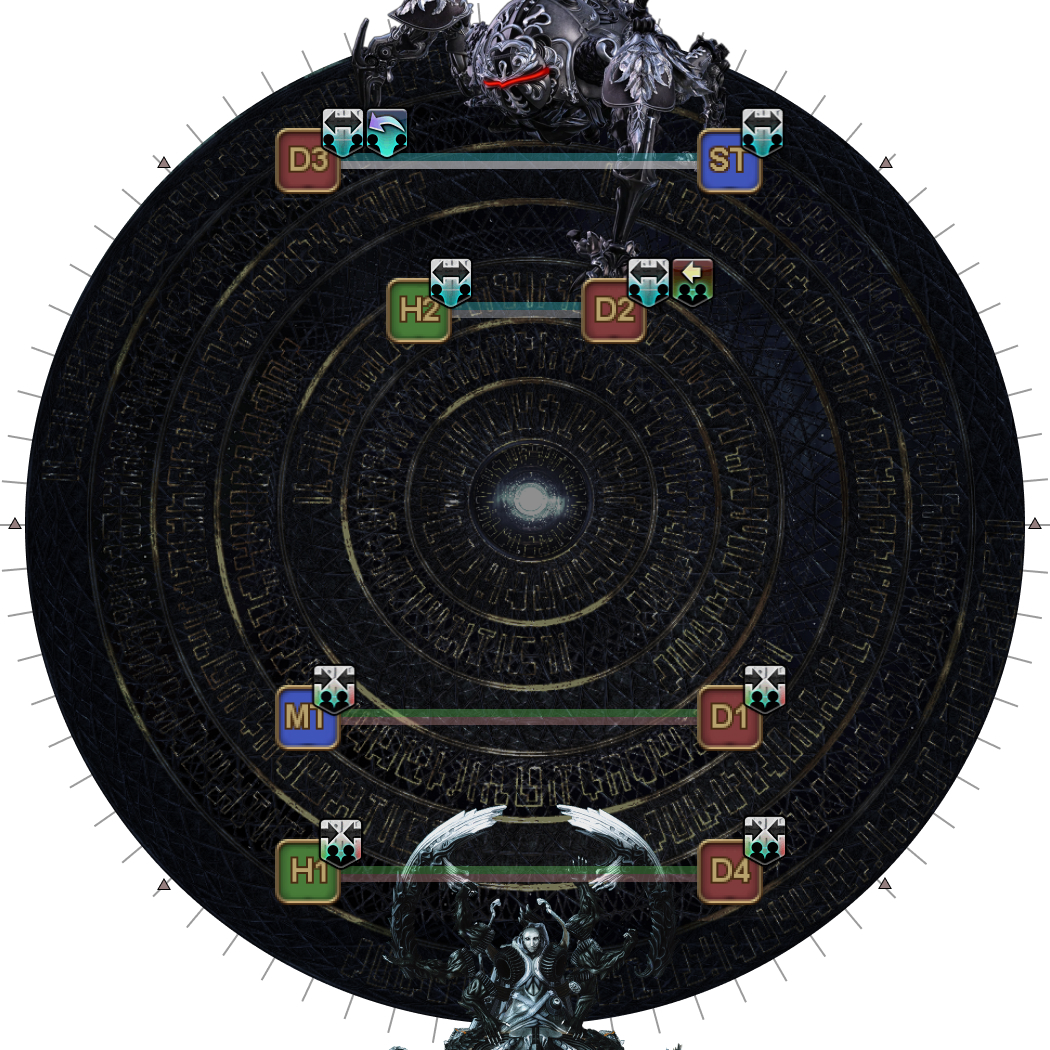 |
2. Blue and yellow fists appear above each player. The outer pair stays where they are, while the inner pairs move to be in line with them. The inner pair also adjusts if needed:
In the first example, the blue tethers have the same coloured fists together, so the inner tether (H2 and D2) swap sides. There is no swap needed for the green tethers, so the inner pair (MT, D1) goes to stack on their fist partners (H1 and D4 respectively). In the second example, the green tethers have the same coloured fists together, so the inner tether (MT and D1) swap sides. There is no swap needed for the blue tethers, so the inner pair (H2, D2) moves to stay in line with their fist partners (D3 and ST respectively). At most, only one pair will need to swap. | 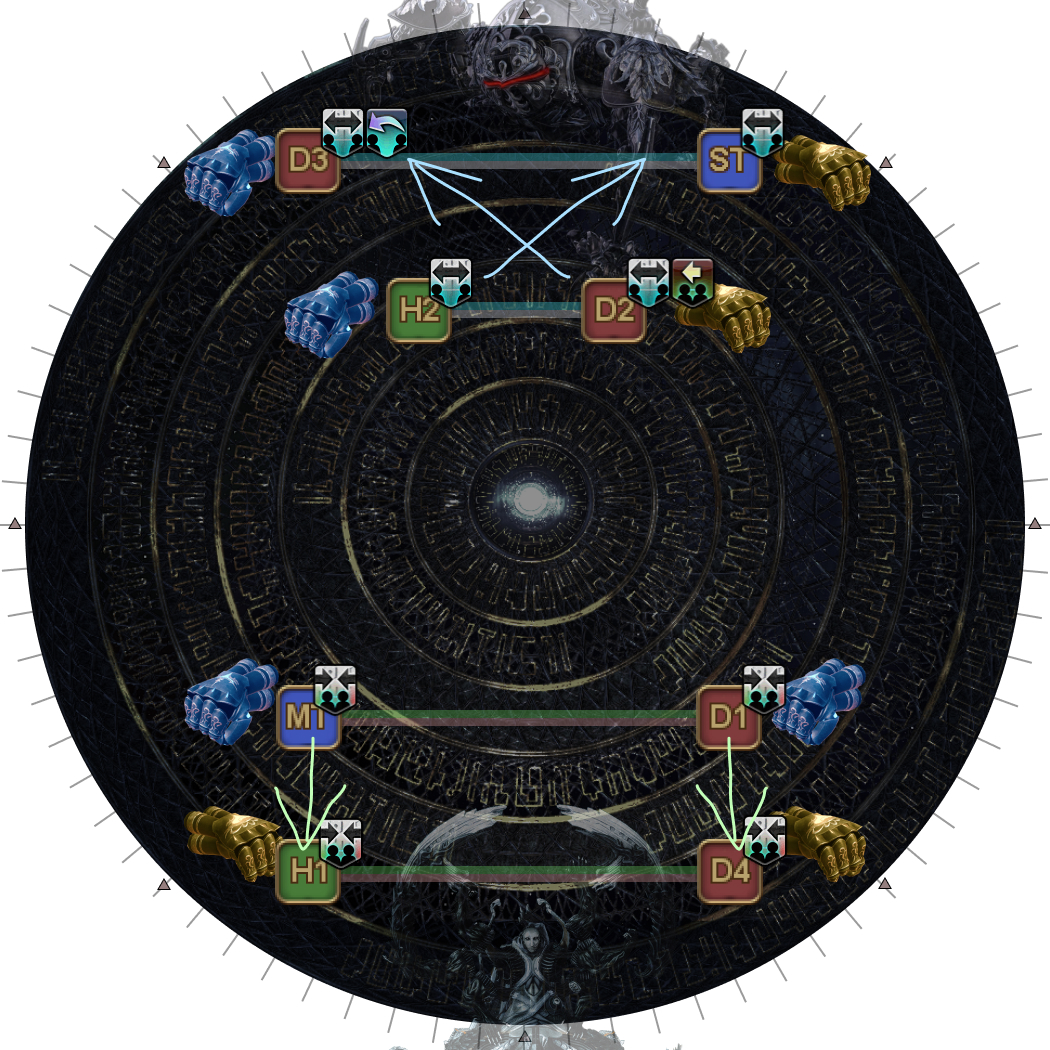 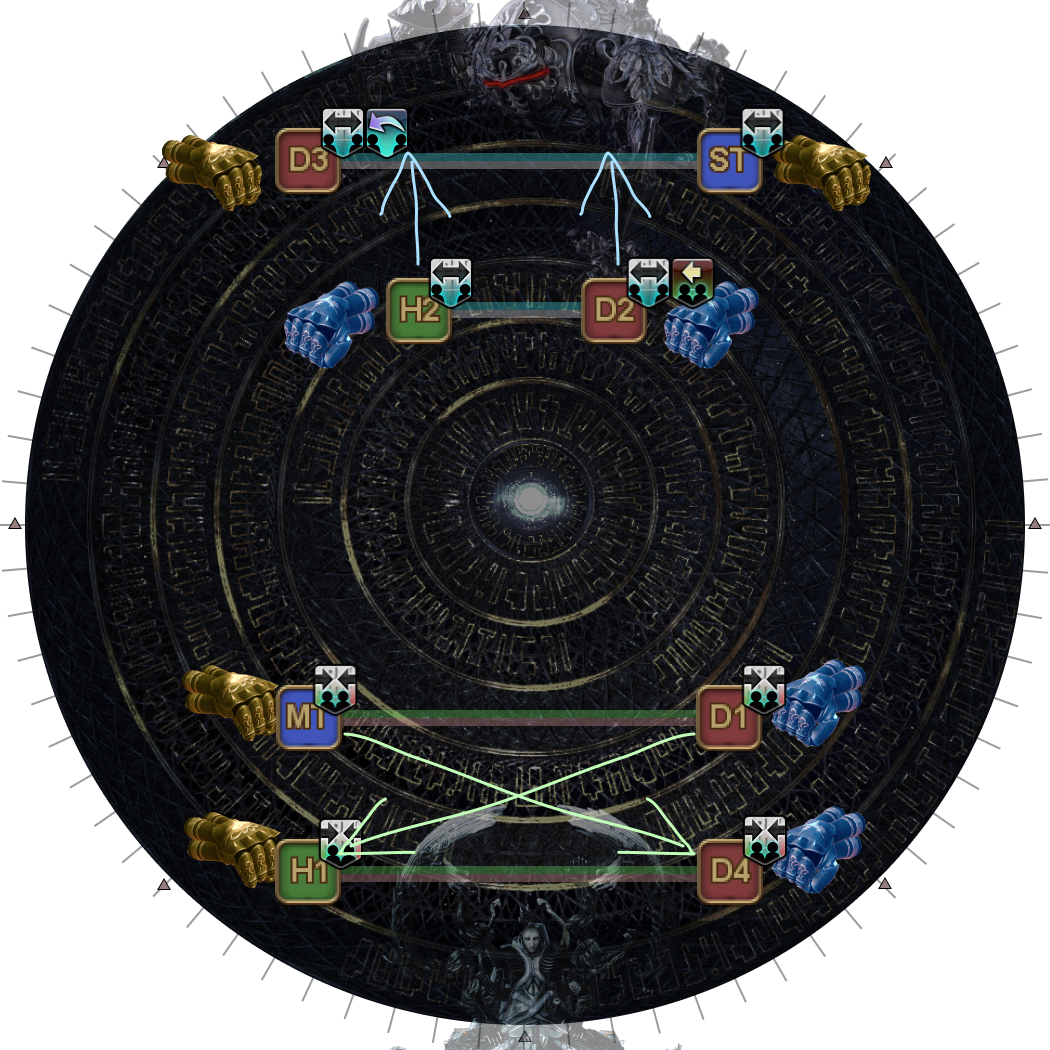 |
3. Arms appear on the outside of the arena, and telegraph which direction they will spin. | 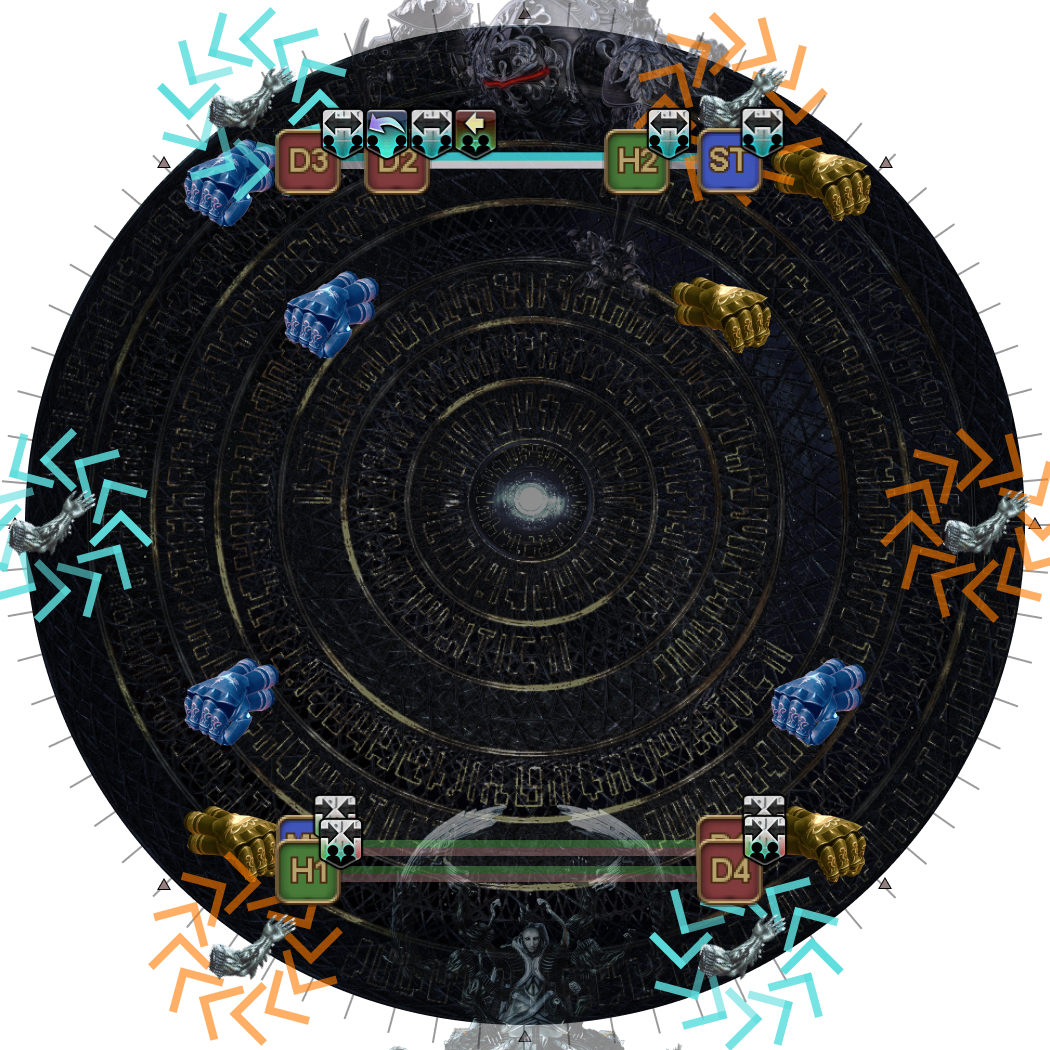 |
| 4. The tethers activate. This will break the outer blue-tether. The outer blue-tethered players move in to stack with the inner blue-tethered players. | 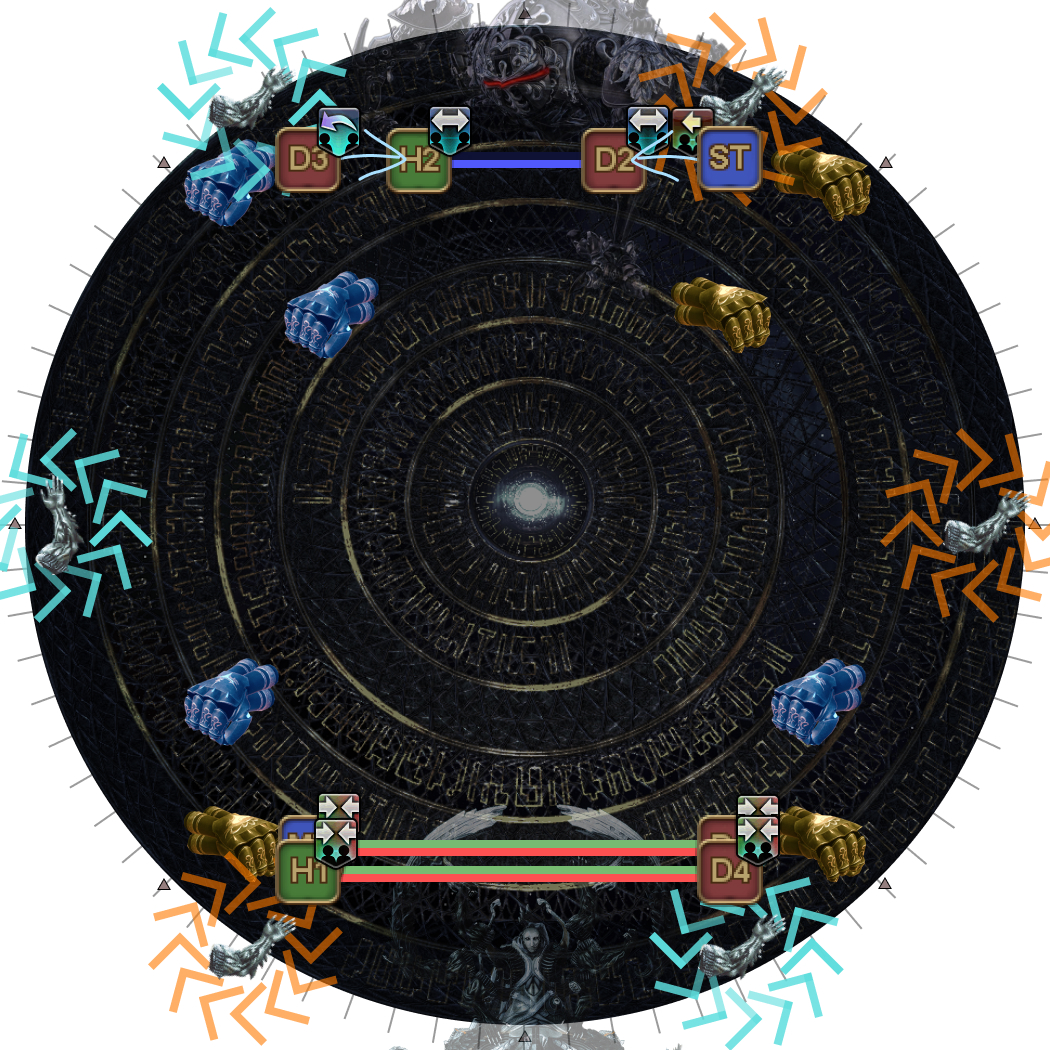 |
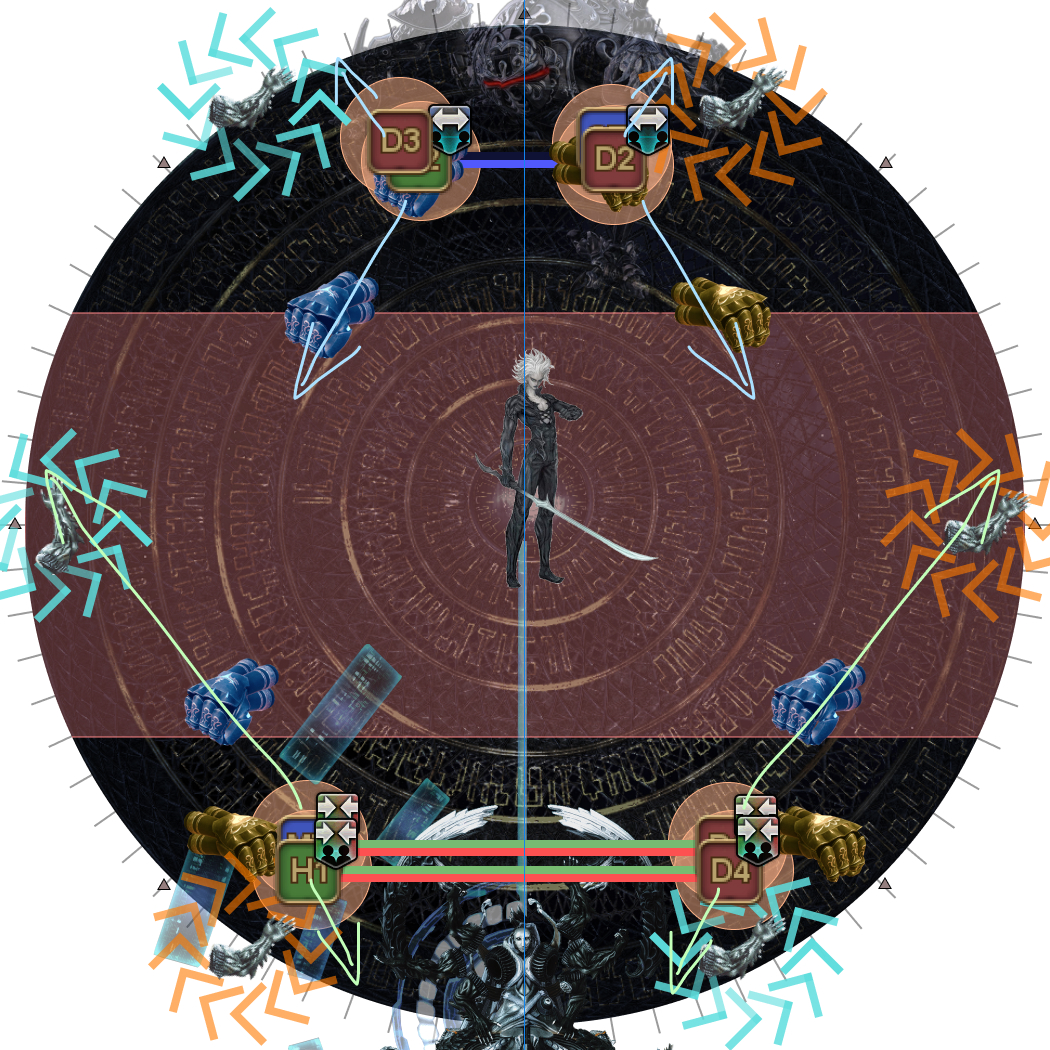
| 5. The fist telegraphs will appear together with the Eye's beam. The Reconstructed Omega will telegraph monitors on one side. One of the blue-tethered players will also get Monitors. Move to your assigned spinning fist.
|  |
2. Oversampled Wave Cannon and Pile Pitch
After baiting the outside arm lasers, players are split into two groups based on their tethers, with each tether group having different responsibilities.
- Red/green tethered players will be taking monitor hits.
- Blue tethered players will be handling Pile Pitch.
| 6. The outer arms will telegraph their AoEs targeting the closest player. The Omega-M clone hits one of the two closest players with Beyond Defense. | 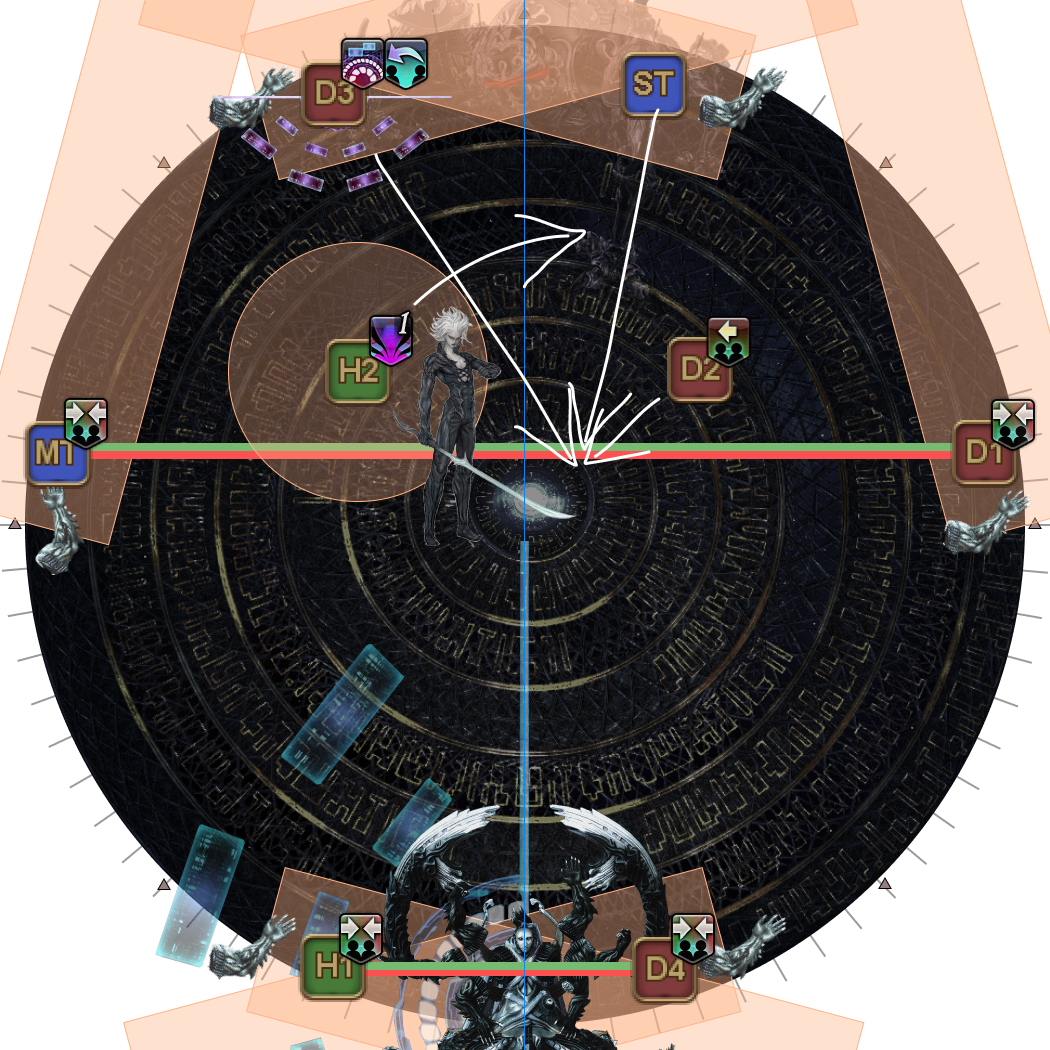 |
| 7. The player with Oversampled Wave Cannon Loading points their monitors in the other direction of Final Omega's Oversampled Wave Cannon. This creates a safe corridor for the three blue-tethered players that weren't hit by Beyond Defense to stack together to share Pile Pitch. Note that the Pile Pitch stack may or may not include the player with Oversampled Wave Cannon Loading. The player hit by Beyond Defense stands somewhere within this corridor, away from the Pile Pitch stack. | 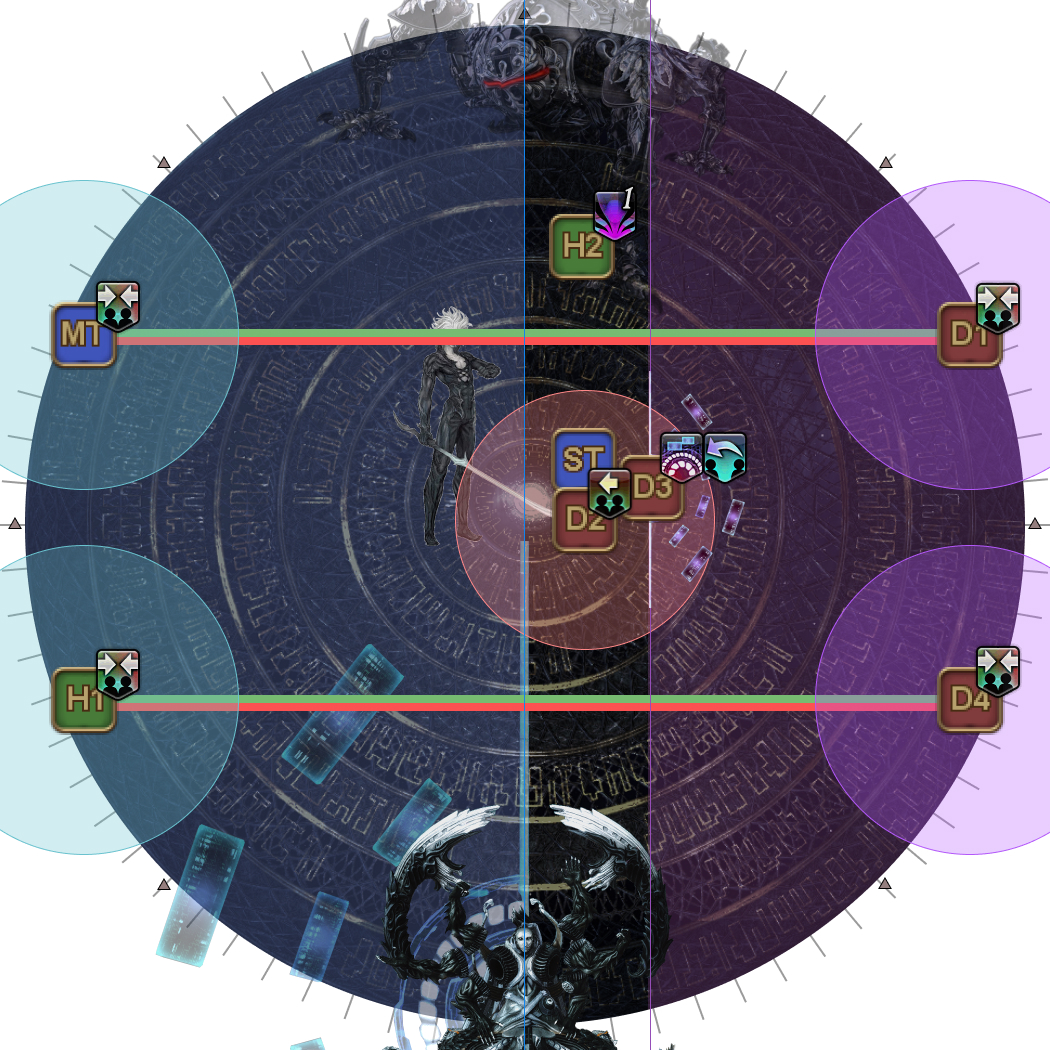 |
3. Hello, World
Omega-M and Final Omega will disappear, which is the cue for the last part of the mechanic, and where players will finally resolve Hello, Near World and Hello, Distant World.
8. The "beetle" Omega lights up to cleave one side of the arena. Move in to the safe side. | |
| The green-tether pair towards Beetle Omega |
|
| The green-tether pair away from Beetle Omega | Position to receive Hello, Distant World:
|
| Hello, Near World | Stand three rings from the center along the cardinal between the two bosses. |
| Hello, Distant World | Stand at the edge along the cardinal between the two bosses. |
| The two remaining blue-tethers with no debuff | Go to the edge of the arena at the intercardinal mark away from Beetle Omega, and three notches towards Beetle Omega- you will not be getting Dynamis stacks this round. |

With everyone in position, the cleave resolves together with Hello, Near World and Hello, Distant World.
| 9. Break the final red/green tether when the tether's debuff timer reaches 2 seconds. | 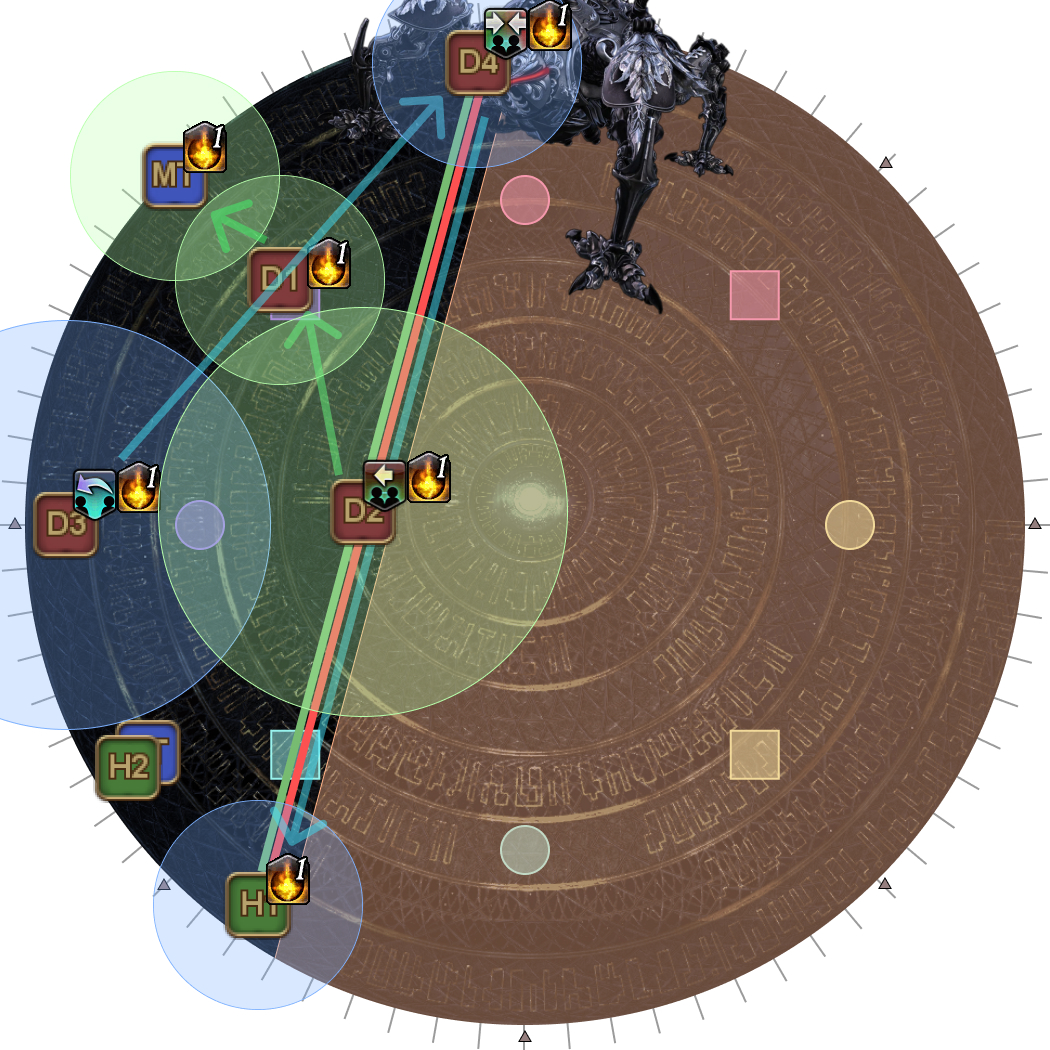 |
Frequently Asked Questions
[Solar Ray] Can you mitigate both Solar Ray and Run: Dynamis with party mitigations?
| Only healer 120s mitigations last long enough (20 seconds) to cover both Solar Ray and Run: Dynamis. |
[Solar Ray] If we don't have a WAR, why don't we alternate between invulning and mitigating Solar Ray? Wouldn't that be easier?
| This is a tradeoff to prepare for P6. You can alternate between invulning and mitigating Solar Rays in P5, but doing so leads to problems later on in P6. First, only two tanks can invuln the Solar Ray before Run: Dynamis (Omega) and have their invuln back in P6- DRK and WAR, so if your party is PLD + GNB, you're out of luck and have to invuln the first two Solar Rays in P5 to invuln anything in P6. This means we are left with DRK + (PLD/GNB), and we have to make a choice whether the Living Dead the second Solar Ray (before Sigma), or the third Solar Ray (before Omega). If a DRK spends Living Dead on the third Solar Ray, Living Dead will only be available for the final tankbuster in P6, leading to the following base mitigation plan:
This, however, has the following problems:
By not alternating between invulning and mitigating Solar Rays in P5, you get to do a much simpler base mitigation plan in P6 where things are more hectic:
This doesn't apply if your party has a WAR, as WAR is the only tank that can invuln the Solar Ray before Run: Dynamis (Omega) and have it back up for a Wave Cannon. |
[Solar Ray] If we have DRK + WAR, why do we use Living Dead at the second Solar Ray (before Sigma) instead of following PLD and GNB and invulning the first?
This is just a matter of convenience- the interval between Delta and Sigma is a 2-minute window, and spending Living Dead here means fewer buttons for the DRK to press during the burst window. |
[Delta (Awk)] Is there a reason why blue tethers go opposite Final Omega instead of beside it, or is this an arbitrary choice?
| Putting the blue tethers opposite Final Omega gives them the best vantage point for Final Omega's Oversampled Wave Cannon. This is important, as the blue tether players will be the ones resolving Beyond Defense → Pile Pitch together with Final Omega's (and a player's) Oversampled Wave Cannon. |
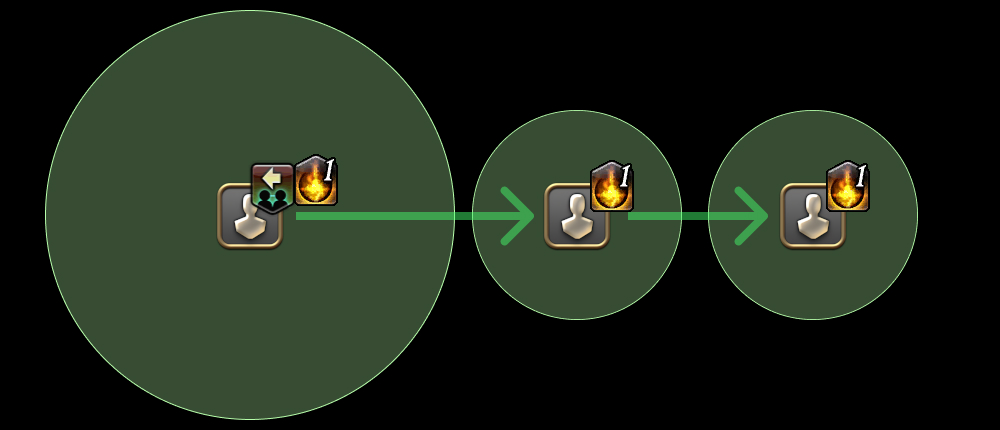
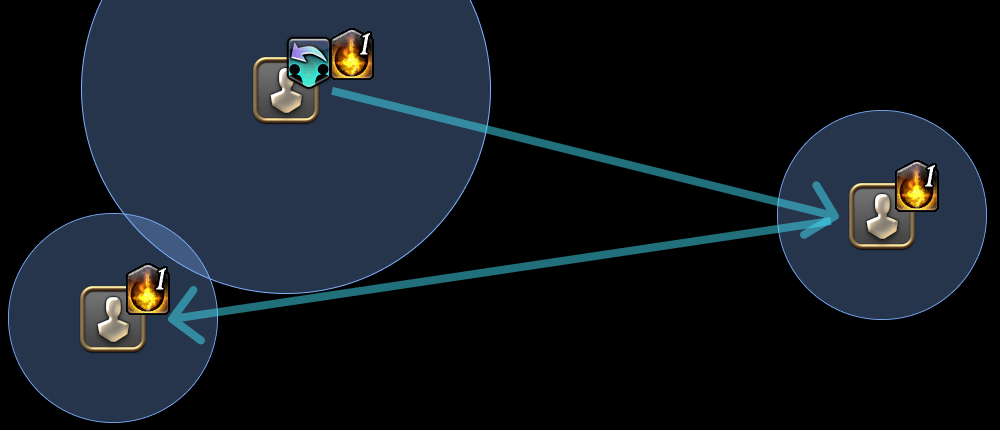
[Hello, World] Can Hello, World jump back to the original player?
Yes. If the original player with Hello, Near World or Hello, Distant World is the nearest (or furthest) player after the first bounce, it will bounce back to the original player, killing them. |
[Hello, World] What happens if a player that already has three stacks of Dynamis gets a Hello, World jump?
Nothing- Dynamis is capped at three stacks. |
Troubleshooting
[Delta] The blue/yellow fists AoEs are missing and we get hit by Unmitigated Explosion- what happened?
| The fist AoEs only appear if and only if a blue fist is correctly stacked with a yellow fist. This is done pair-wise, so players who have fist AoEs did it correctly. |