King Thordan
This is the “real” start of the fight, and the encounter will restart from this point in the event of a wipe.
Thordan opens with two auto-attacks. Each auto-attack is a small cleave, so Thordan should be pointed away from the party.
- Thordan will cast Ascalon’s Mercy Concealed- this will fire a lethal cone AoE at each player. All players (except the MT) stack behind Thordan to bait these, and dodge to the side when the cast finishes.
- Thordan will then target the MT with three Ascalon’s Might (large cleaves) before starting the first major mechanic.
Strength of the Ward
Part 1
| 1. Light party spreads. Healers are in front to allow them to dodge into the upcoming Heavy Impact early. This then lets them cast an additional GCD heal without using Swiftcast. | 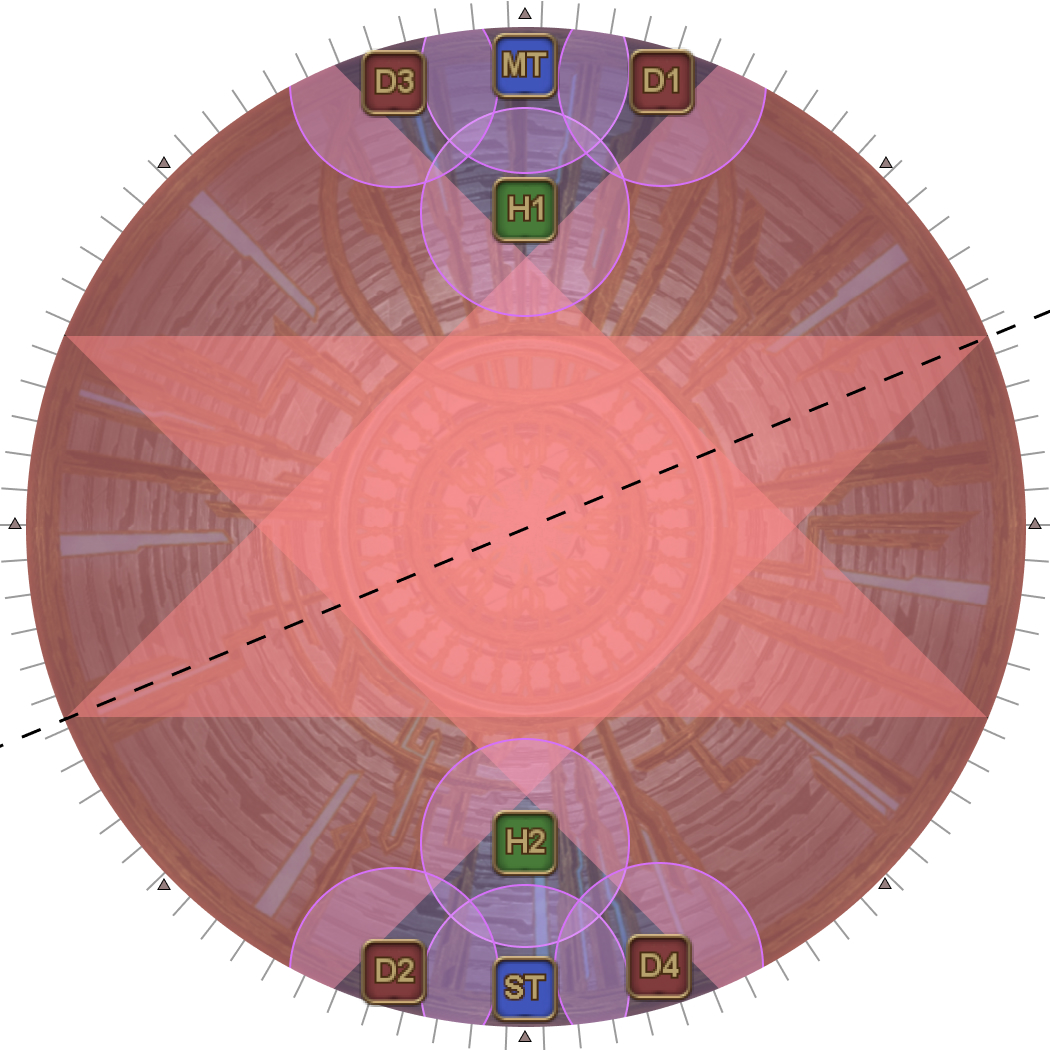 |
2. Heavy Impact boundaries. | 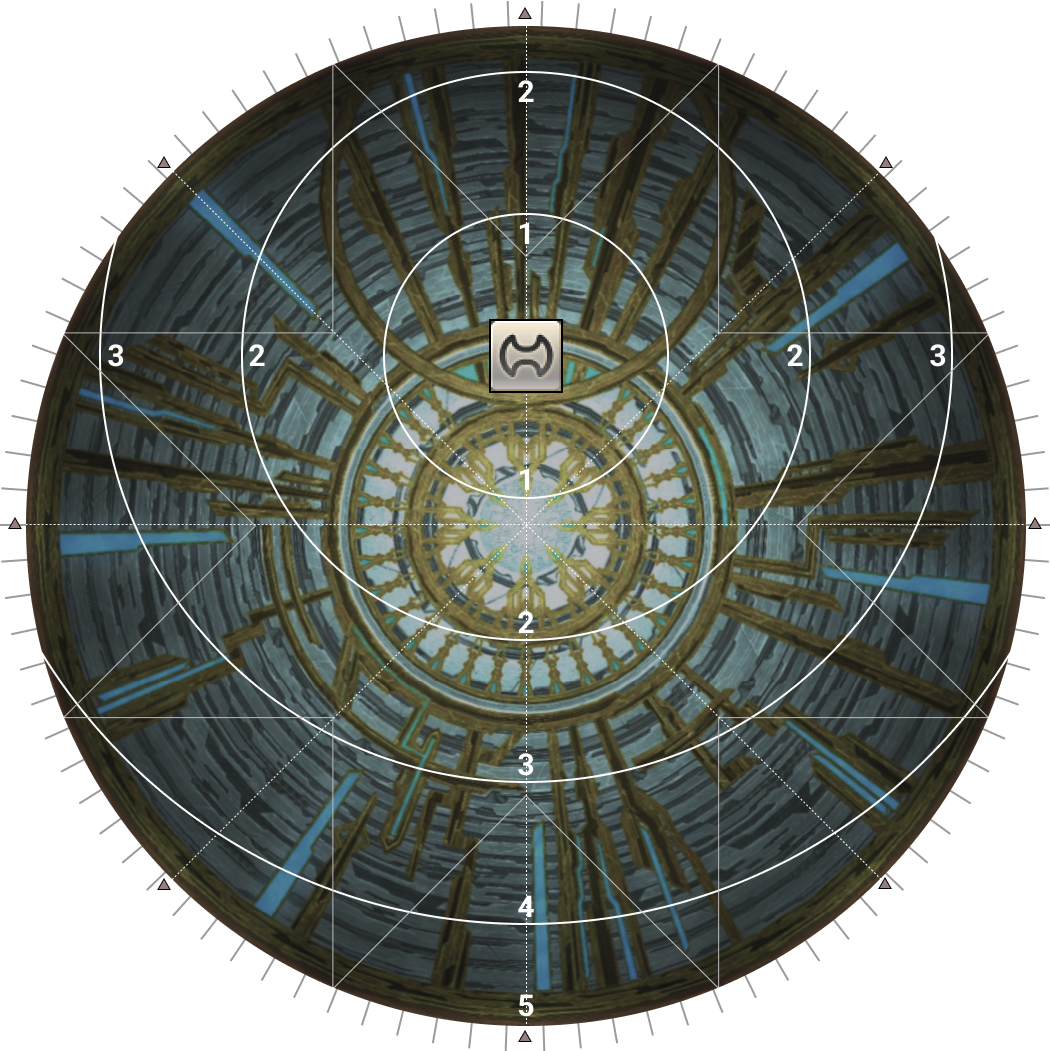 |
Note that players on the back row can simply run forward to naturally dodge the Heavy Impacts as long as Ser Guerrique is not on one of the three closer positions.
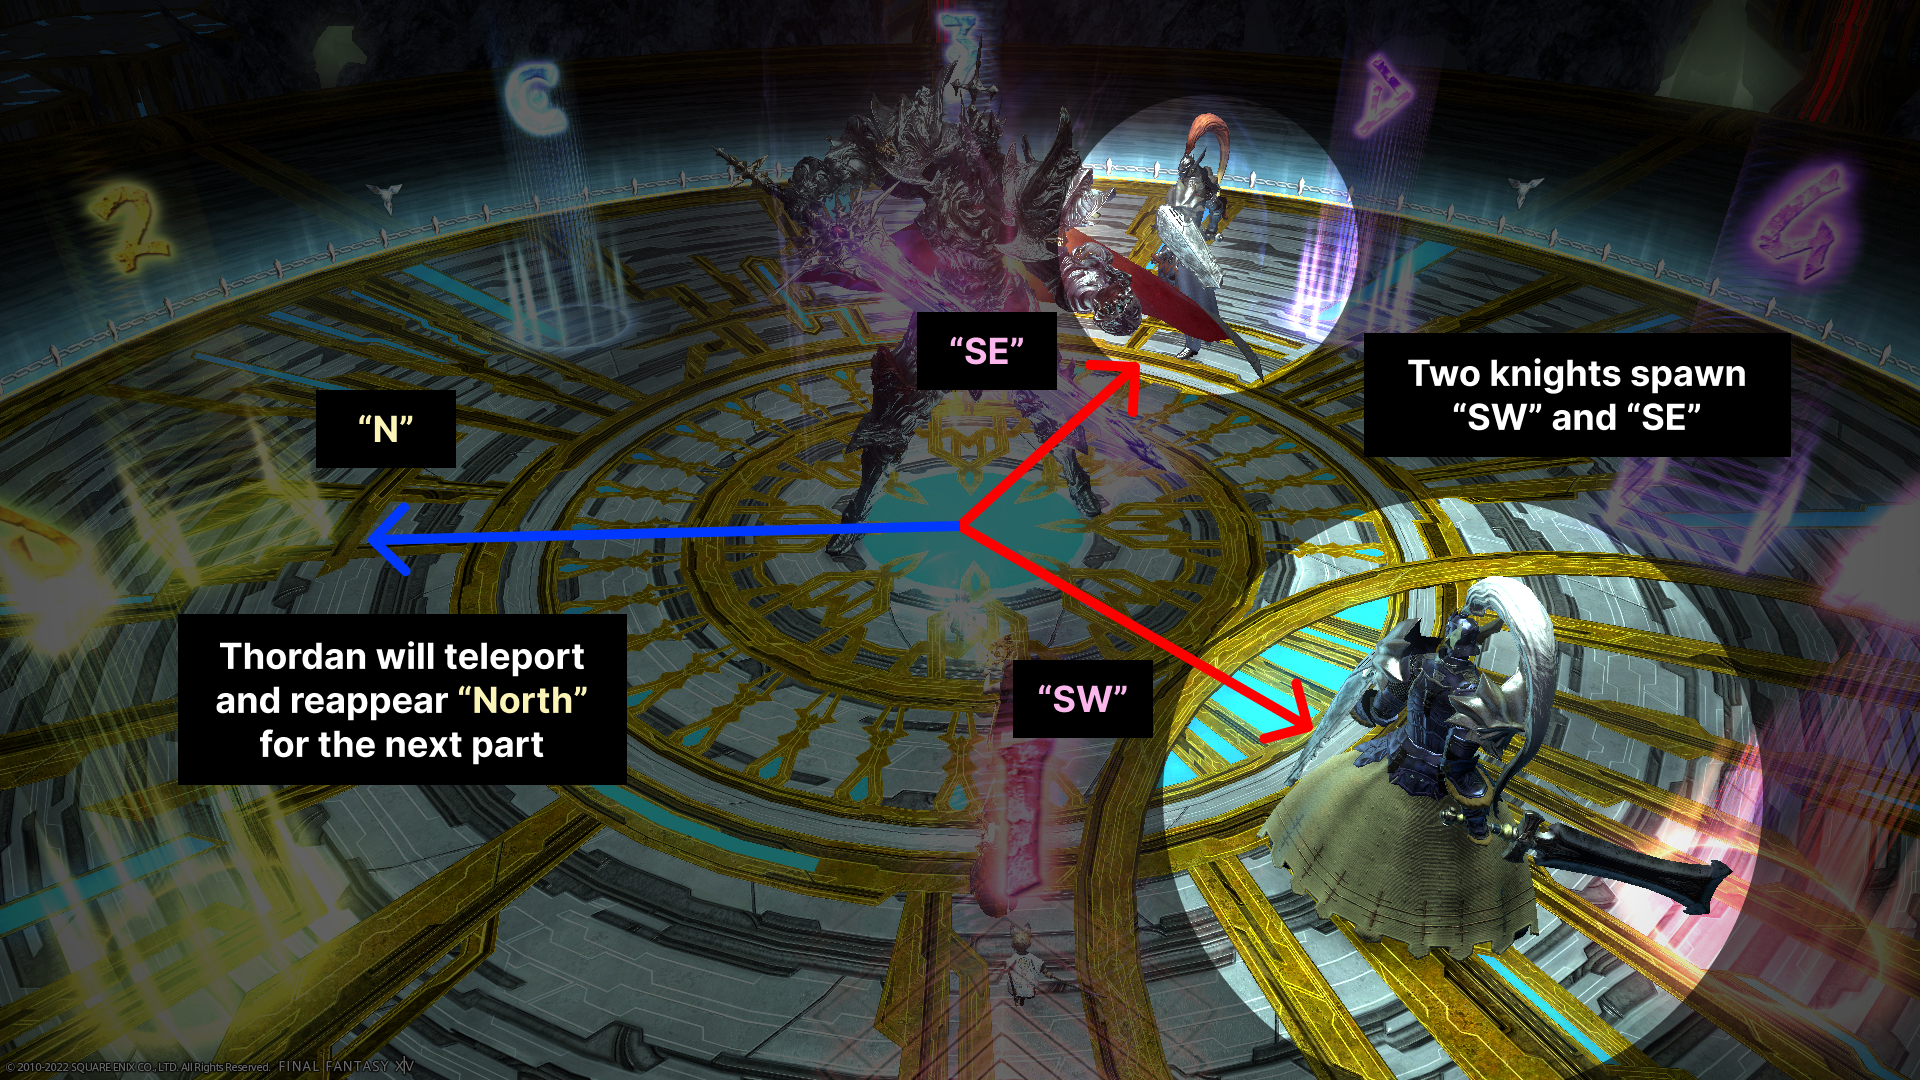
As you are dodging the Heavy Impact, locate the two knights towards the center of the arena.
These knights indicate the orientation of the map for the next part of Strength of the Ward, and will always spawn “southwest” and “southeast”.
Thordan will do another Ascalon’s Mercy Concealed that locks on each player’s position at the fourth Heavy Impact.
Dodge the Ascalon’s Mercy Concealed, and orientate yourself to the new “North” as indicated by the two knights.
Part 2
After dodging the Heavy Impact and Ascalon’s Mercy Concealed, orientate yourself such that Thordan is north.
| 1. Using Thordan as north:
|  |
| 2. To help communicate who will take which tower, the three (non-tanks) at Thordan will briefly spread to communicate which tower they will take before collapsing together in the middle for the stack. | 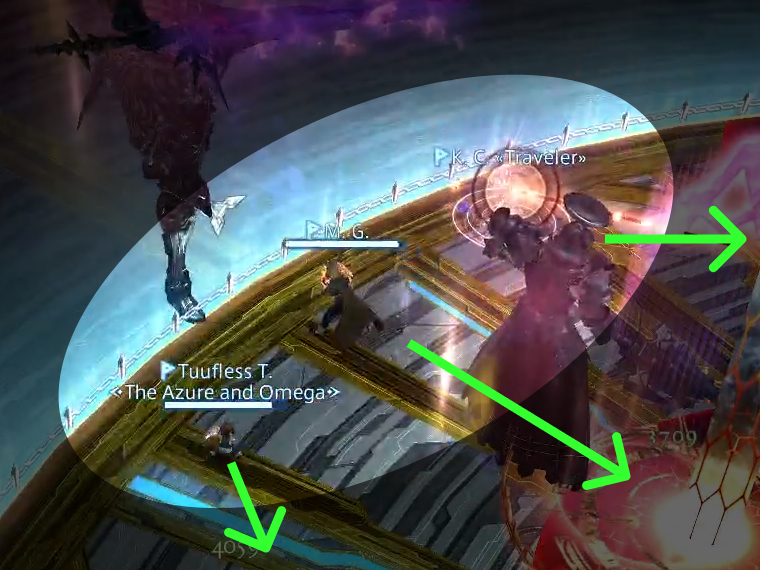 |
3. AoEs resolve.
|  |
4. The two tanks will be stunned and hit with Holy Bladedance. All other players enter their towers. | 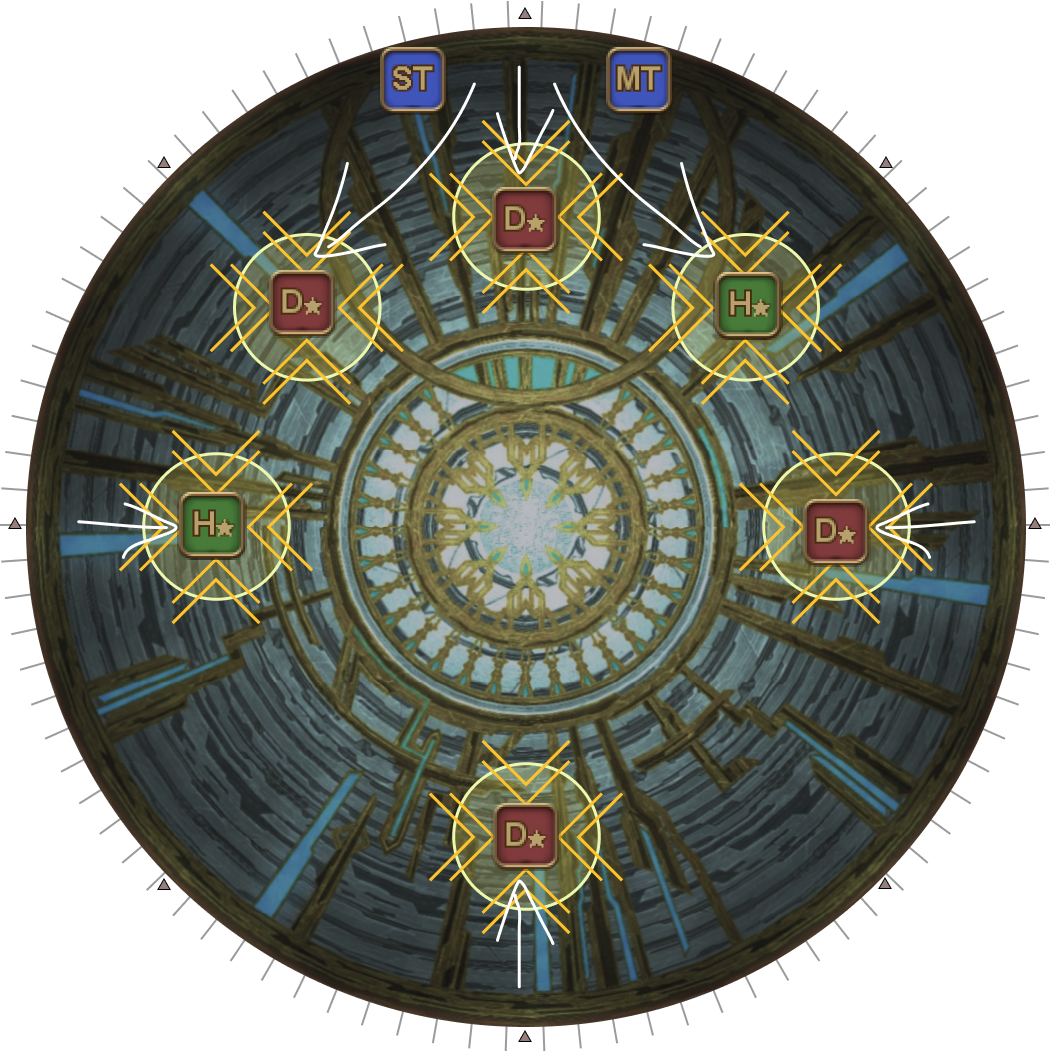 |
- Thordan will reappear in the middle of the arena and begin to cast Ancient Quaga.
- After the Ancient Quaga, Thordan will do another Heavenly Heel (tank swap), followed by 3x Ascalon’s Might.
Thordan will then cast Sanctity of the Ward.
Sanctity of the Ward
Part 1: Sacred Severs
This mechanic consists of the following parts:
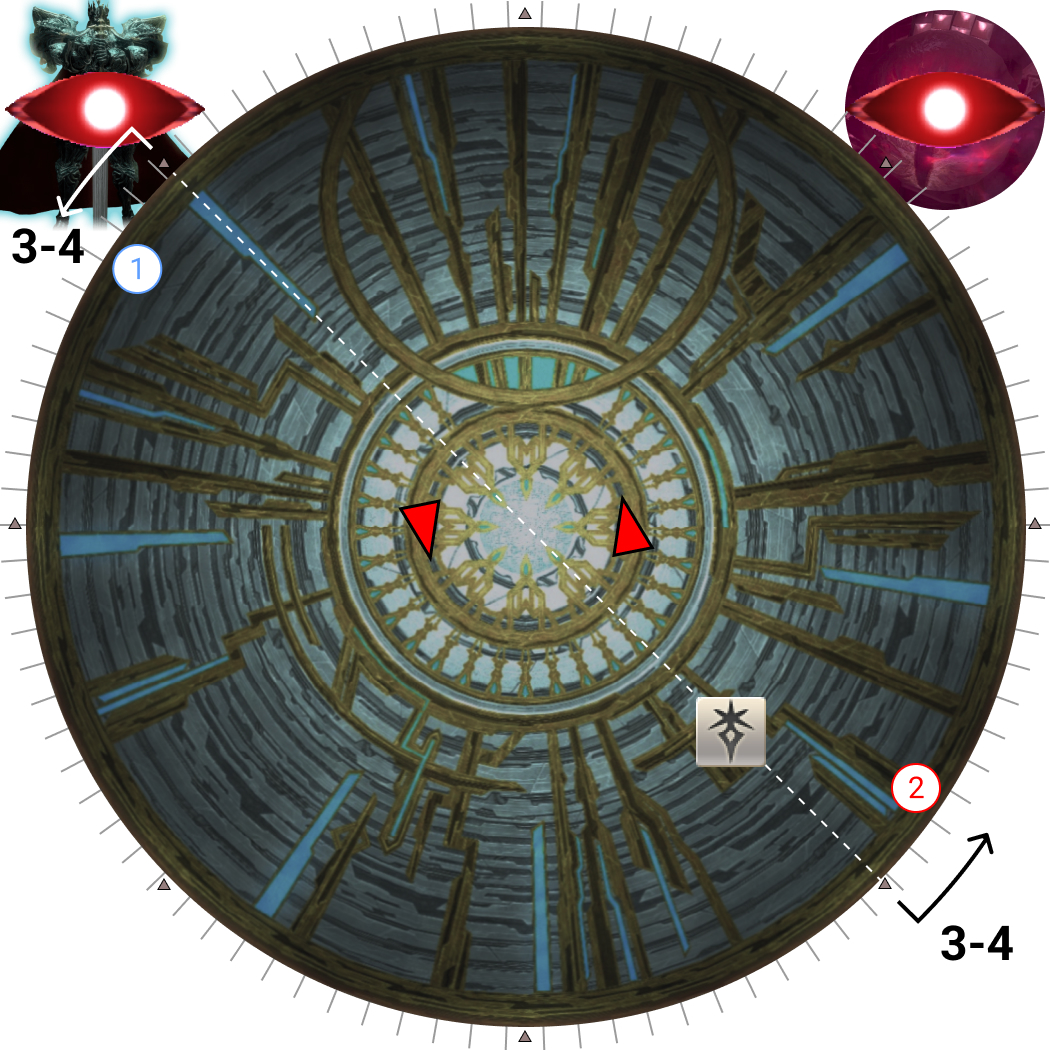
- Two knights (PLDs) will spawn a little east and west of the center, facing either clockwise or anti-clockwise.
- Ser Zephirin (DRK) will spawn towards the outside, at an intercardinal position.
- Thordan and a Dragon Eye will appear at two random cardinal/intercardinal locations, either 90, 135, or 180 degrees apart.
- Two random players will be assigned “1” and “2”, indicated by the number of swords above their head.
Ser Zephirin will jump four times, alternating between the two players marked “1” and “2”. When he lands, he deals damage in an AoE that is shared amongst the players hit. This damage decreases as the distance Ser Zephirin jumps increases.
We resolve Sacred Severs with a DRK-relative, role-adjust strat.
- MT, H1, D1, D3 takes Group 1 as its base position, opposite the DRK.
- ST, H2, D2, D4 takes Group 2 as its base position, on the same side as the DRK.
If a player in a group receives the wrong numbered sword for their group (e.g: D3 receives the “2” sword), then the corresponding role in the other group (D4) swaps groups with that person.
In other words:
- If you have a sword above your head, move to that group.
- Otherwise, if your role-partner has your group’s sword, swap groups.
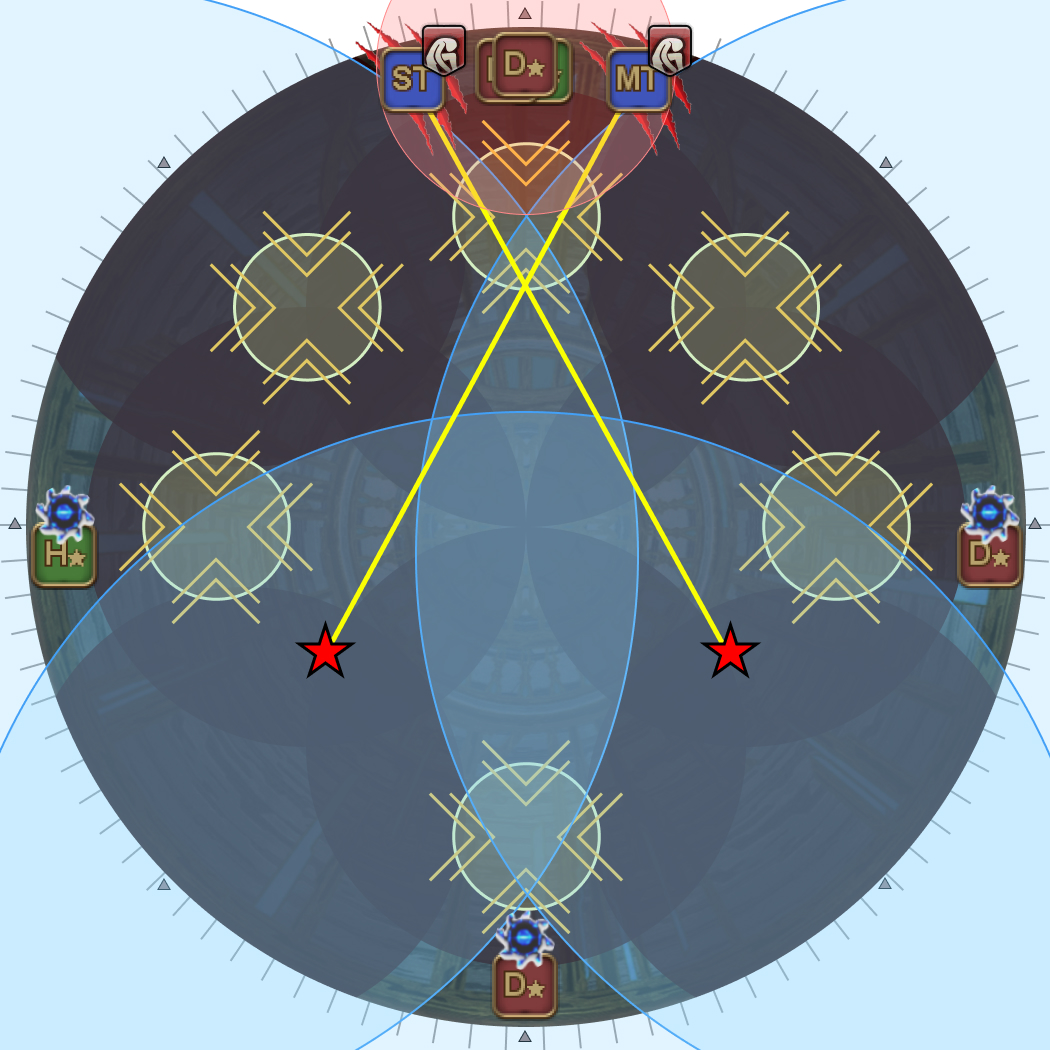
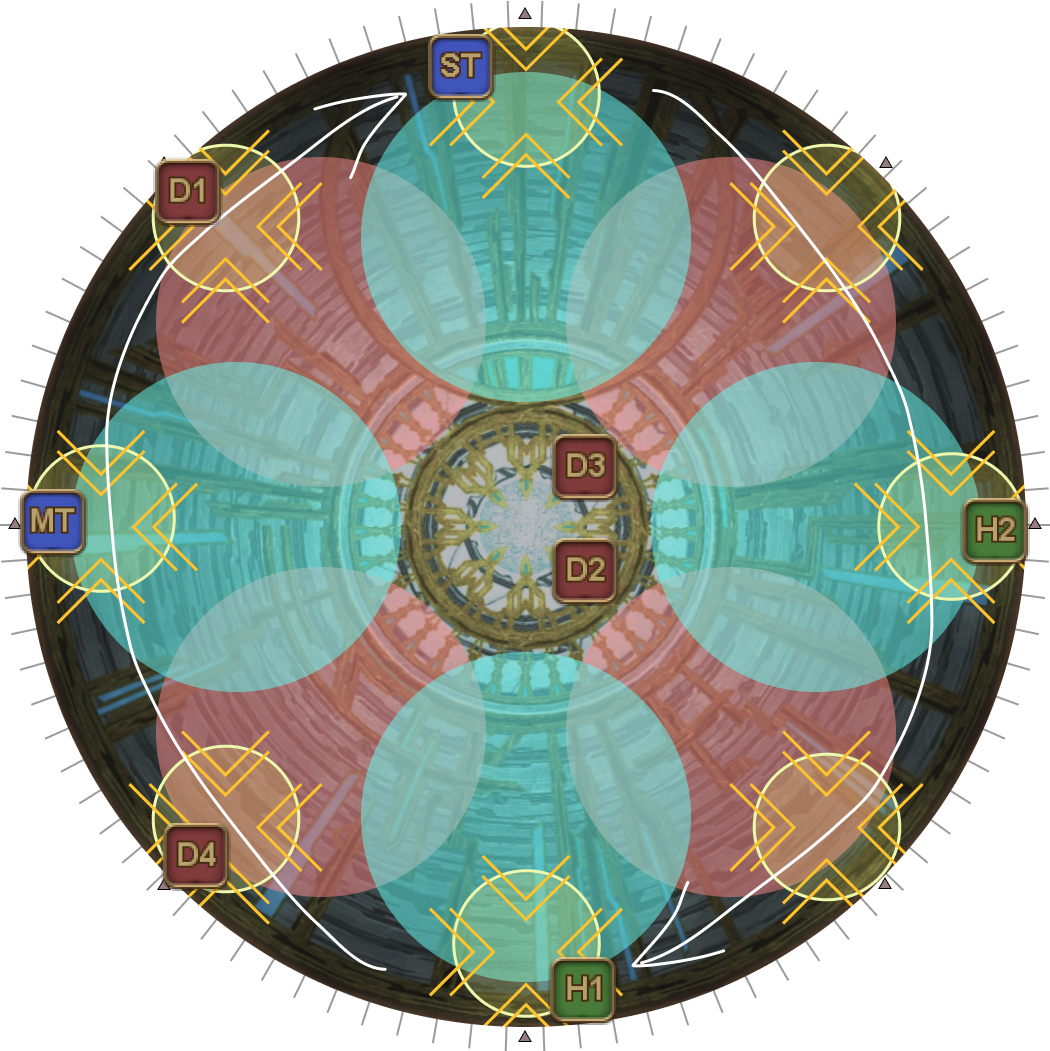
| 1. Sort out swords, and start 3-4 notches away from the intercardinal positions in the same direction the inside knights are facing. Look away from both Thordan and the Dragon Eye. In this example, the DRK is SE, and the center two knights are facing clockwise. Thus:
Tip: Because the two groups starts offset from intercardinals, simply facing directly outside from the starting positions will automatically dodge both gazes. | 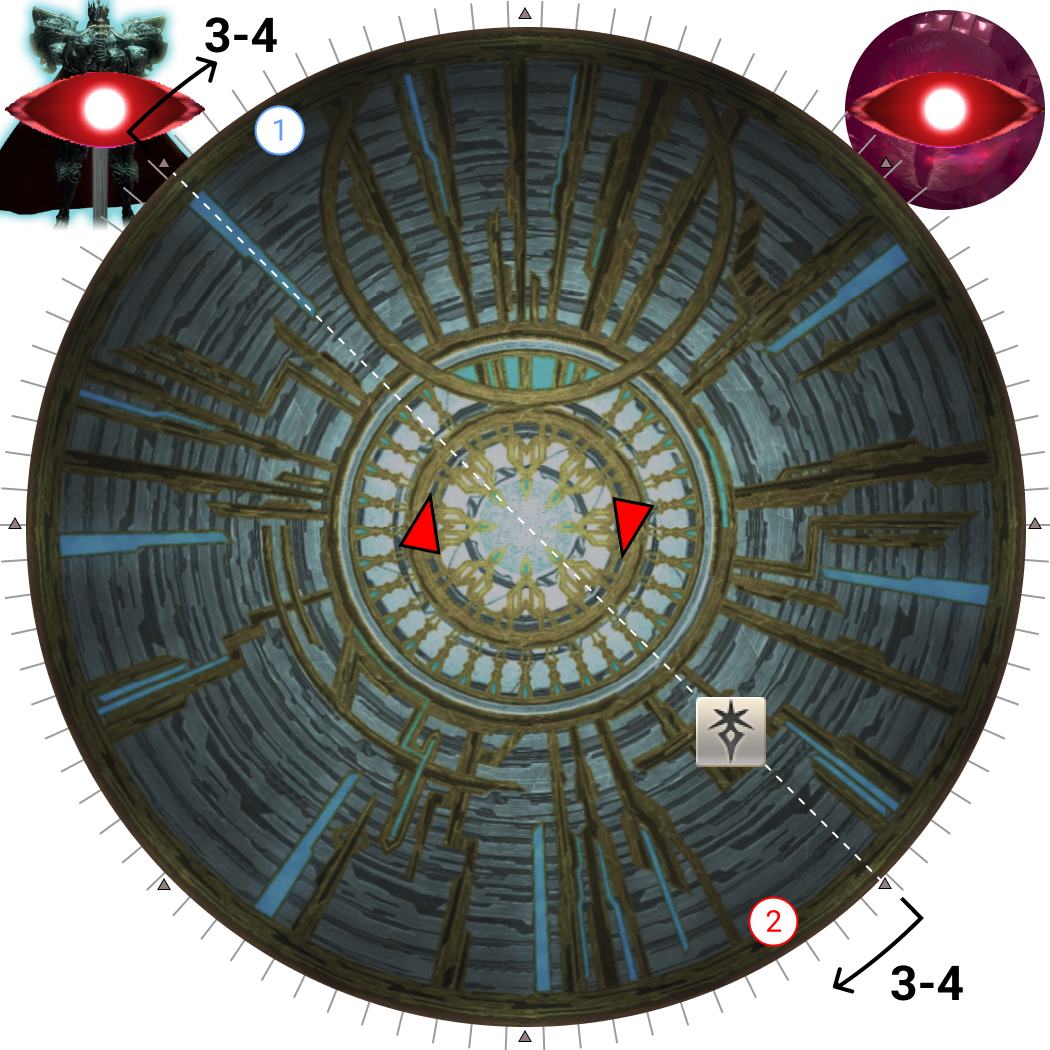 |
| 2. The two gazes will resolve. The two knights will begin their dashes, dropping white balls and AoEs in their path. At the same time, Ser Zephirin (the DRK) will jump four times in total, alternating between the players marked with one and two swords. | 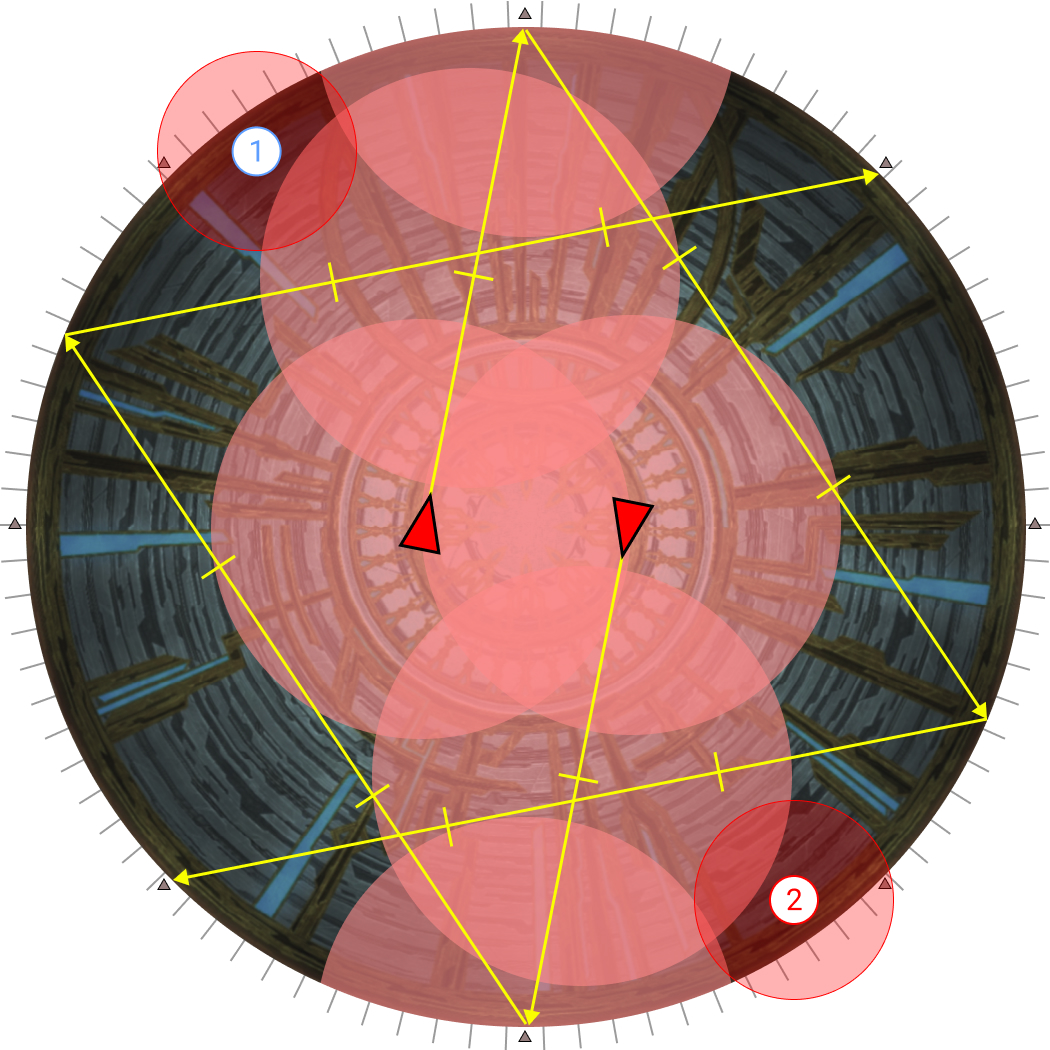 |
| 3. Your movement will also be in the same direction that the inside knights faced. Wait for the explosion in front of you to go off first before moving. The time to move will depend on whether you are moving towards N/S or E/W, but the principle stays the same. | 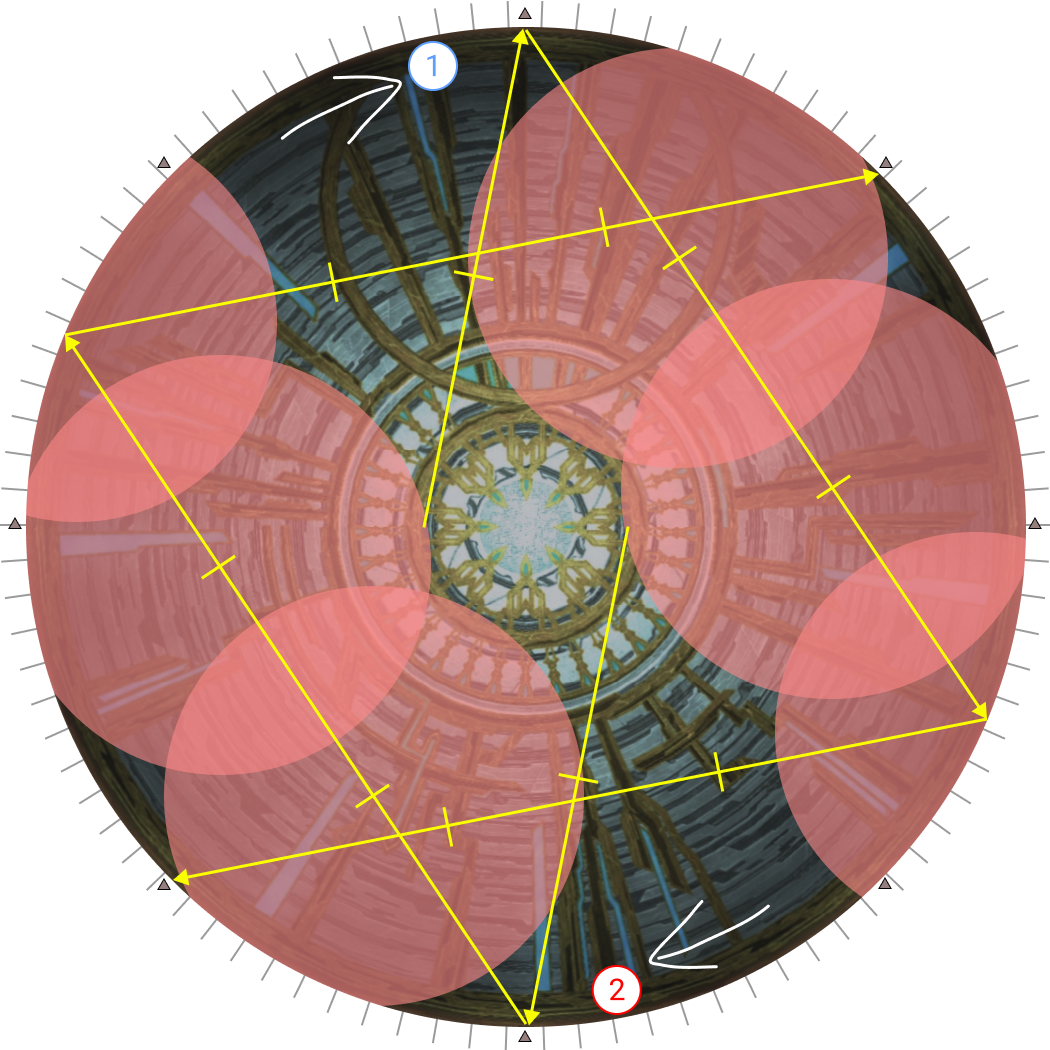 |
| 4. Stop three notches away from the next shuriken. | 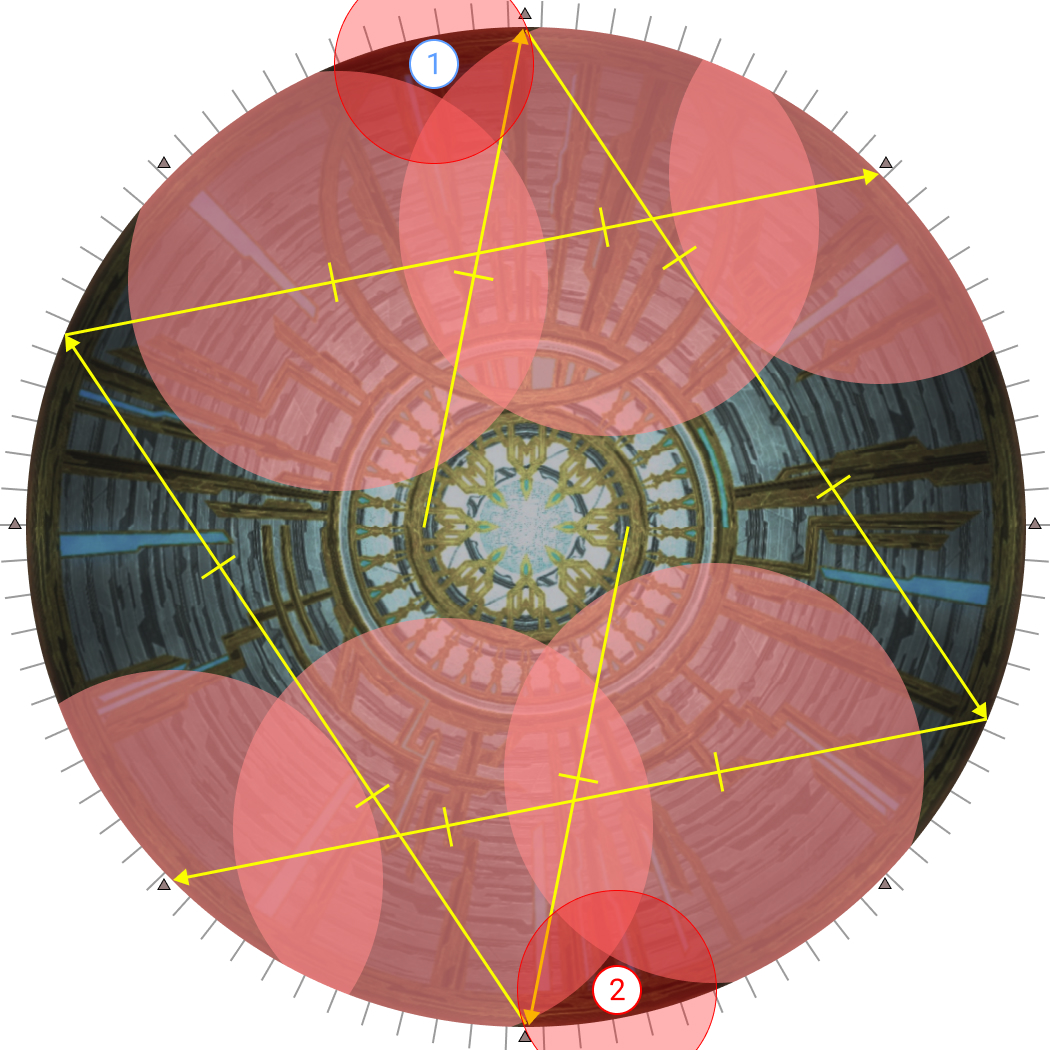 |
[Sacred Sever] Knights facing anti-clockwise
| 1. Sort out swords, and start 3-4 notches away from the intercardinal positions in the same direction the inside knights are facing. Look away from both Thordan and the Dragon Eye. In this example, the DRK is SE, and the center two knights are facing anti-clockwise. Thus:
|  |
| 2. The two gazes will resolve. The two knights will begin their dashes, dropping white balls and AoEs in their path. At the same time, Ser Zephirin (the DRK) will jump four times in total, alternating between the players marked with one and two swords. | 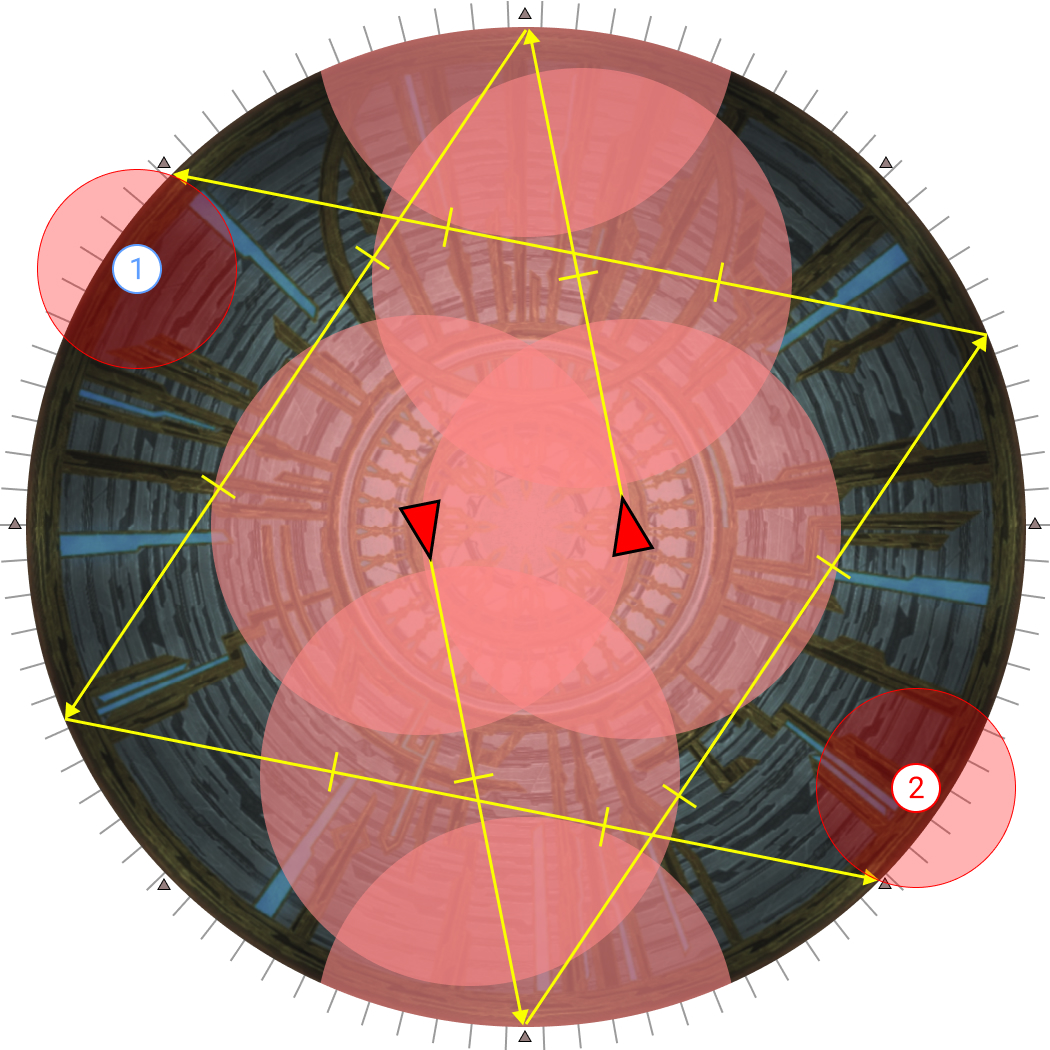 |
| 3. Your movement will also be in the same direction that the inside knights faced. Wait for the explosion in front of you to go off first before moving. Notice that because the party is moving towards E/W, the movement timing is different from the previous example. | 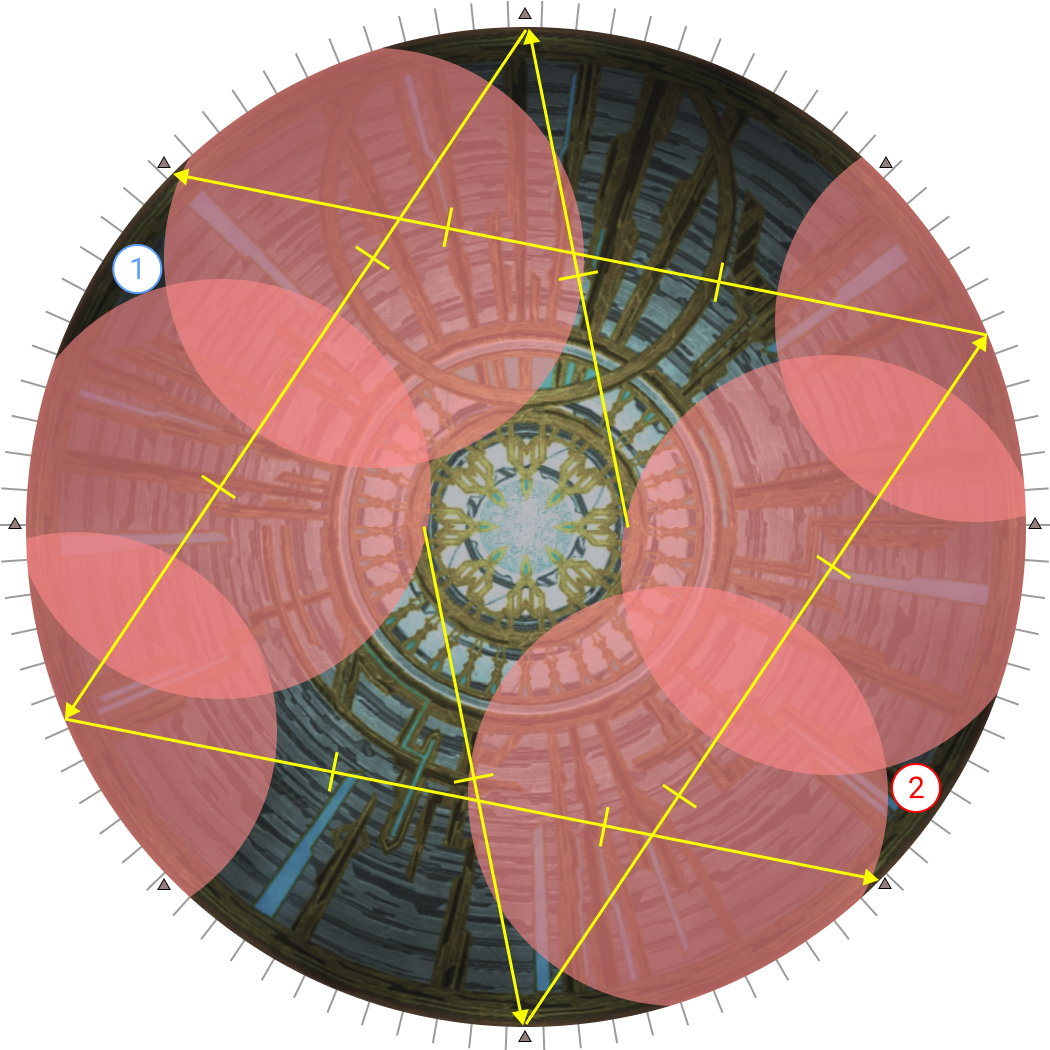 |
| 4. When the orbs in front of the party explode, move and stop three notches away from the next shuriken. |  |
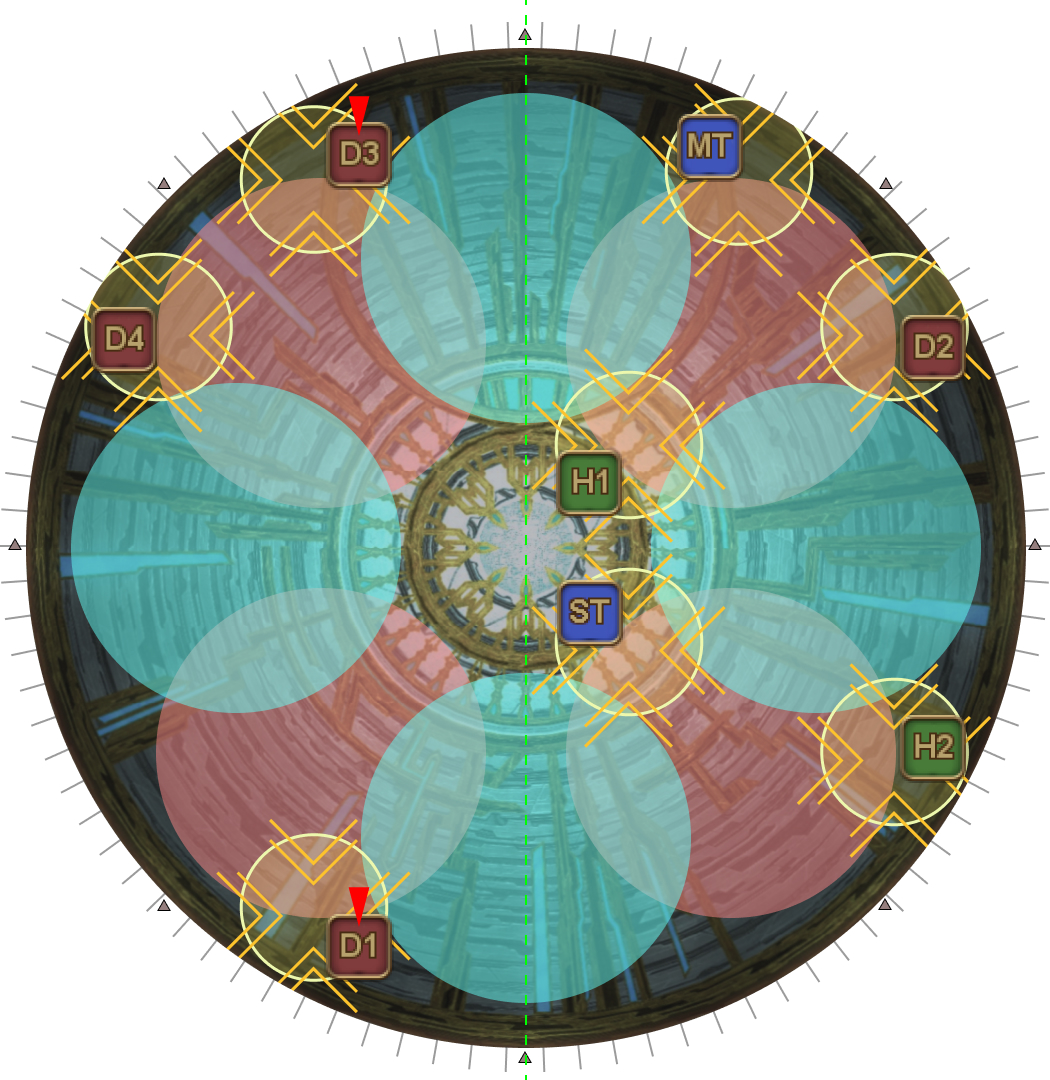
Part 2: Meteors
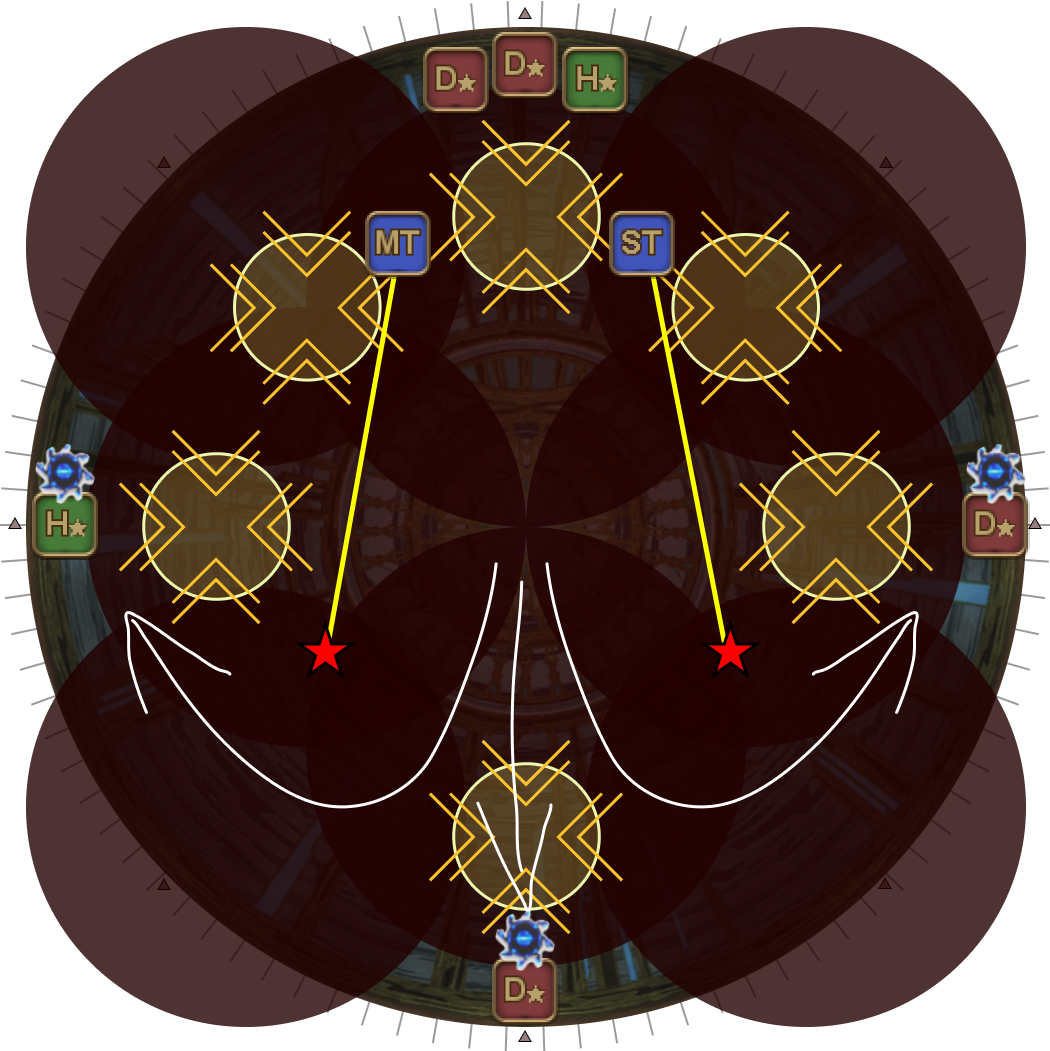
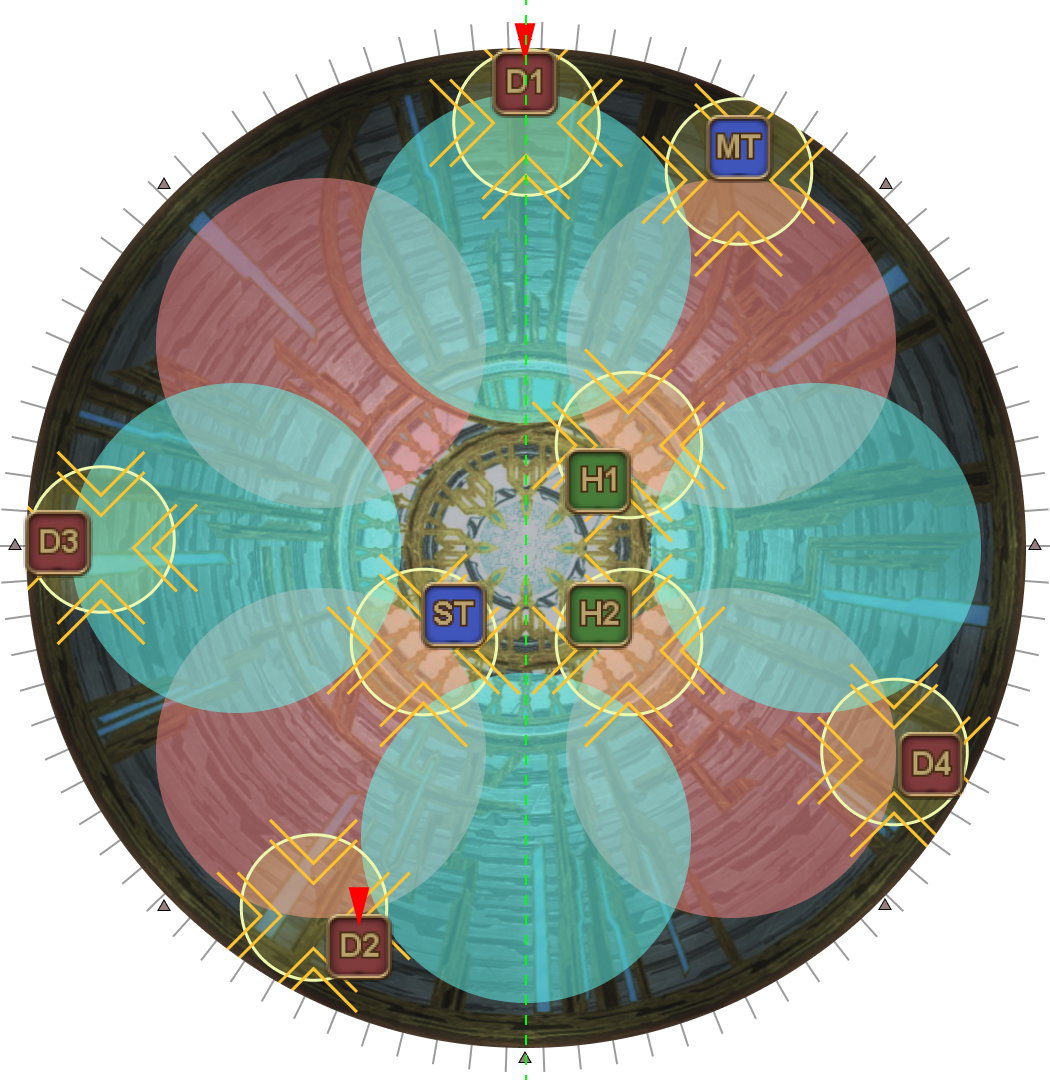
| 1. Split off into your preassigned pairs. When the markers appear:
In this example, H1 and MT will swap places. | 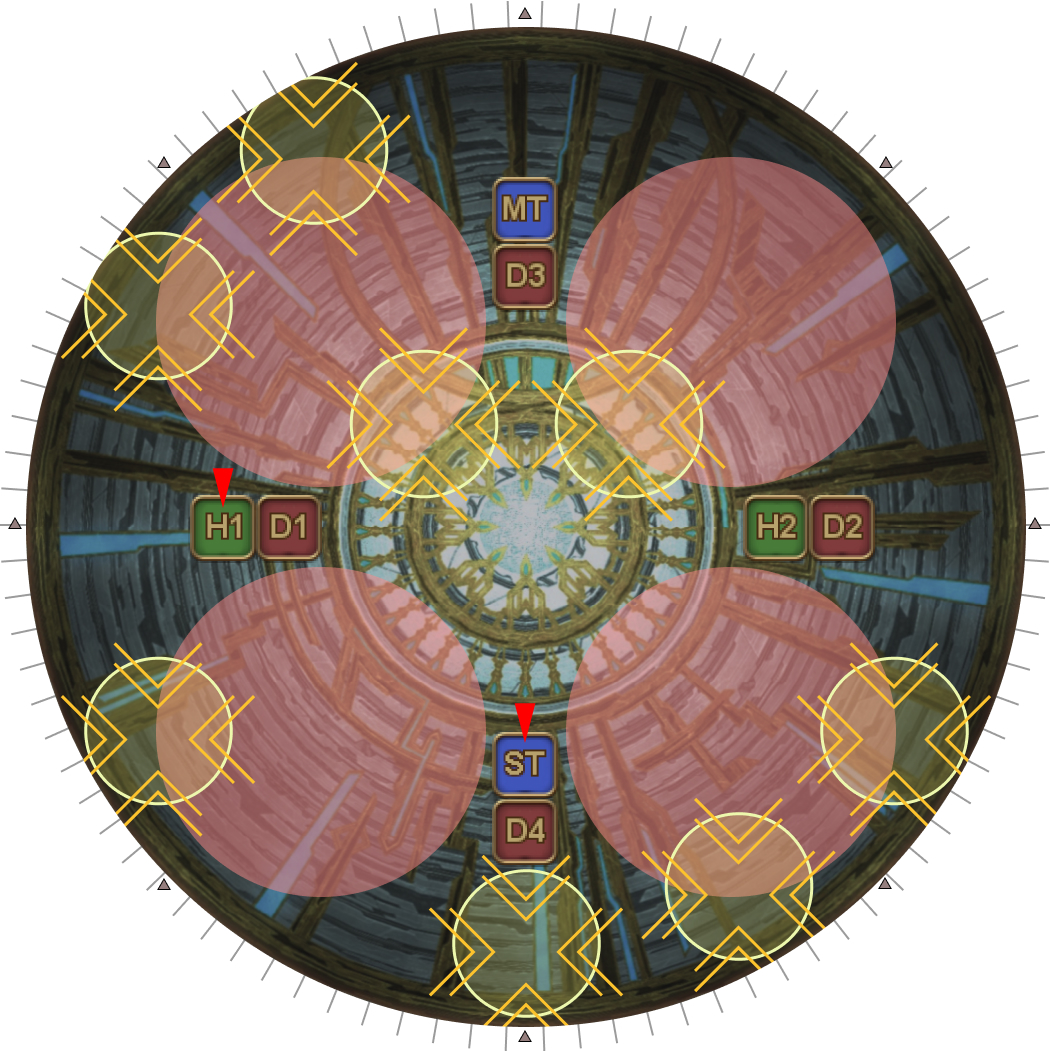 |
| 2. Ice puddles get dropped on each pair, and players then split off into their respective towers. Meteor role:
Non-Meteor role:
|  |
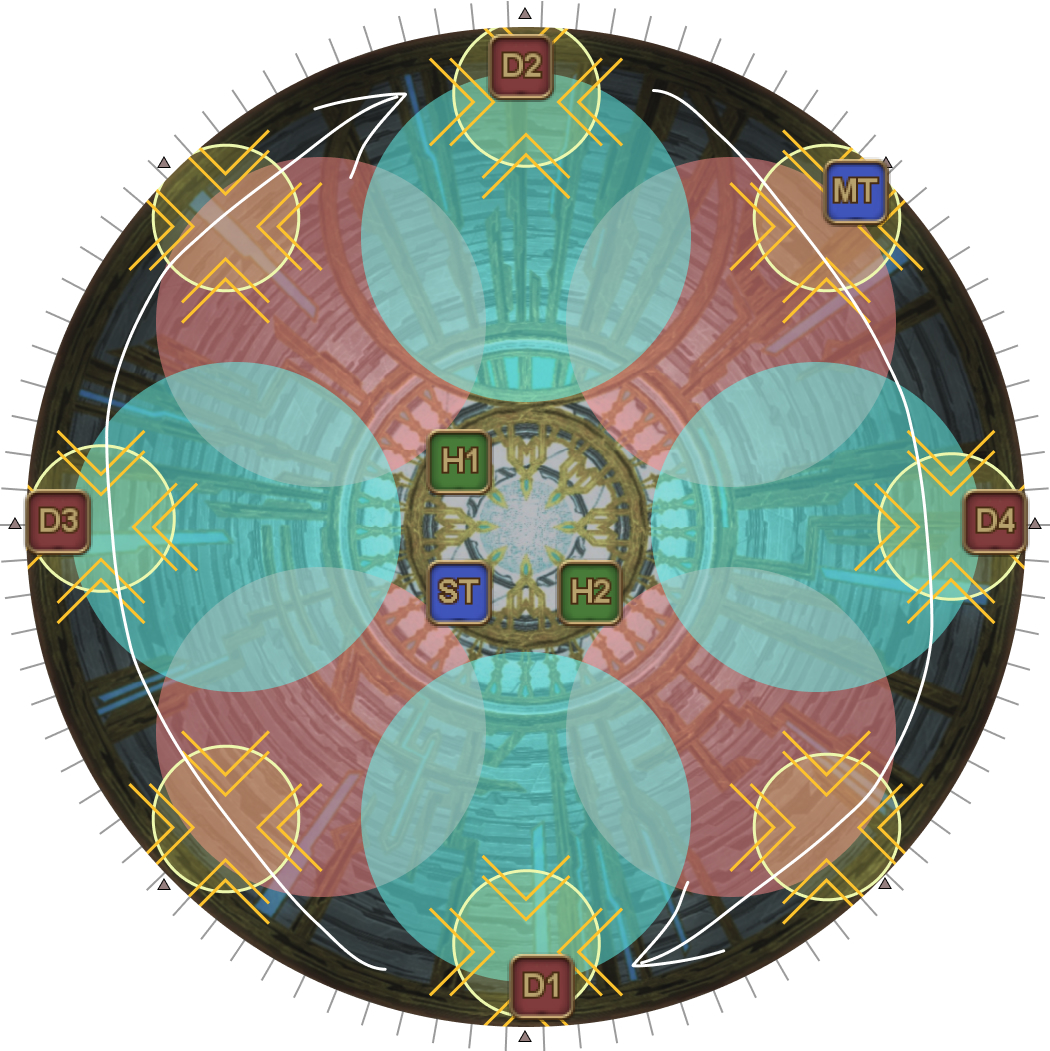
3. Like the towers in Strength of the Ward, before stacking in pairs, it helps if players move in the direction of the tower they are going to take to communicate where they'll be going next. This is particularly important for the N/S positions, as you want to try and avoid putting either of the meteor players into a "cursed" pattern as much as possible. | 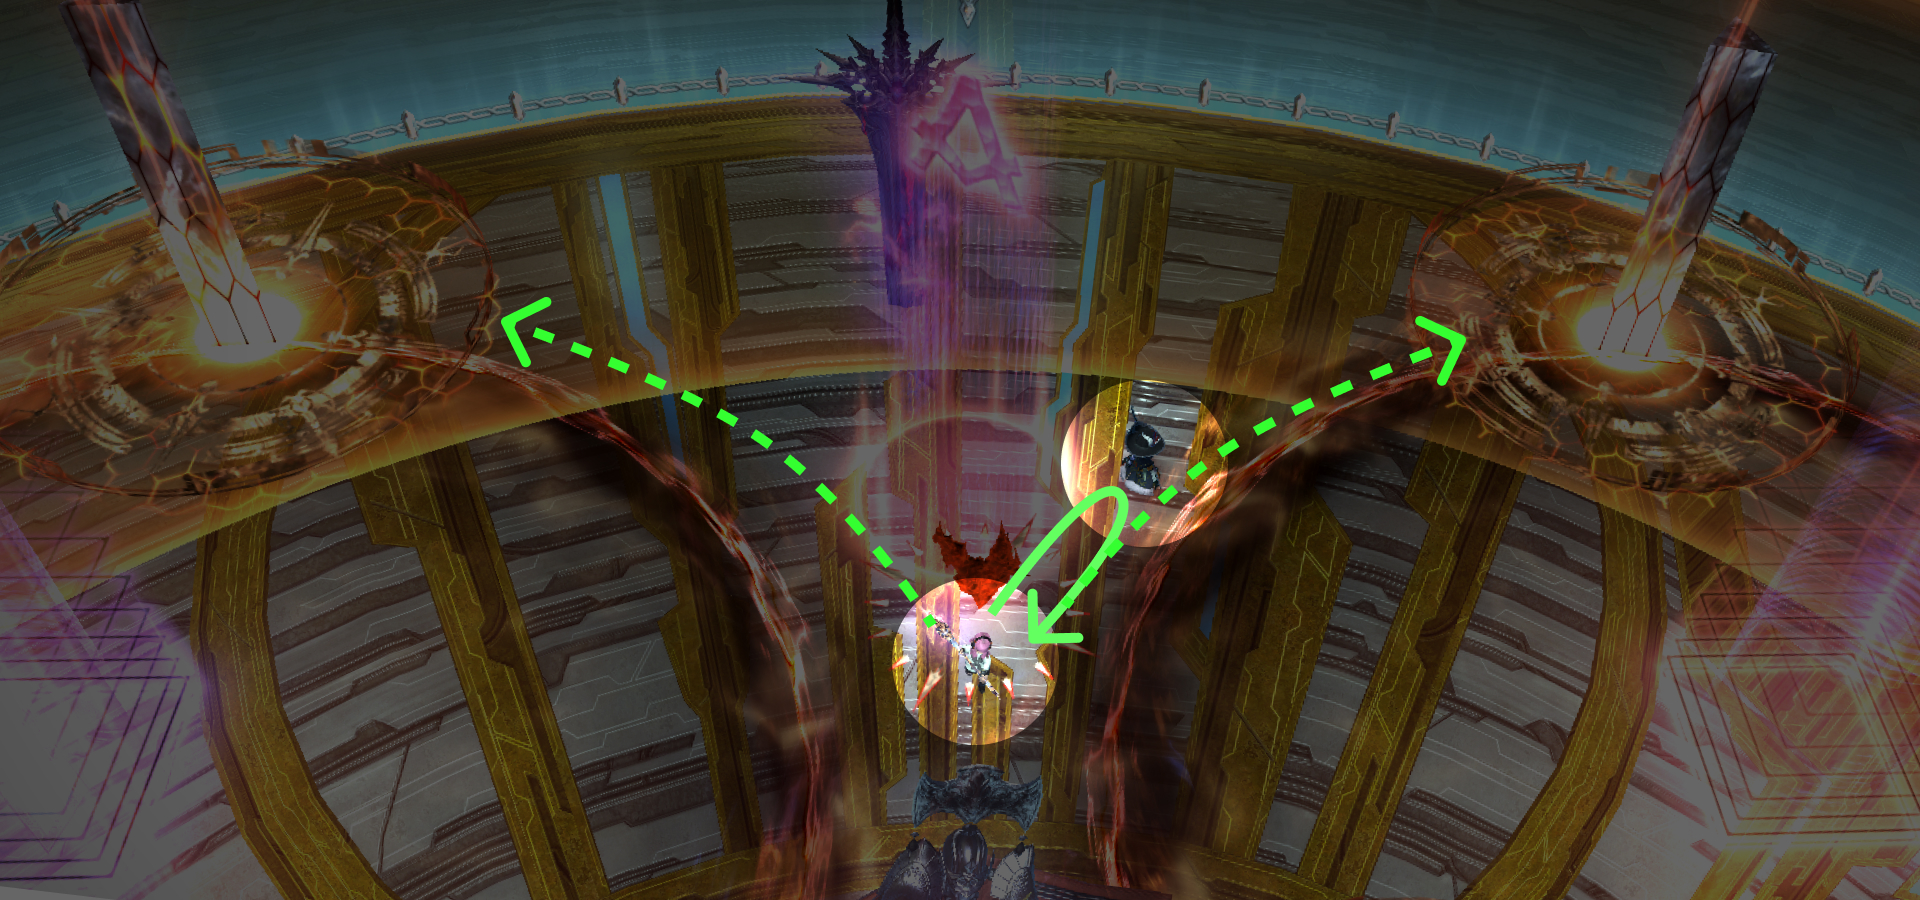 |
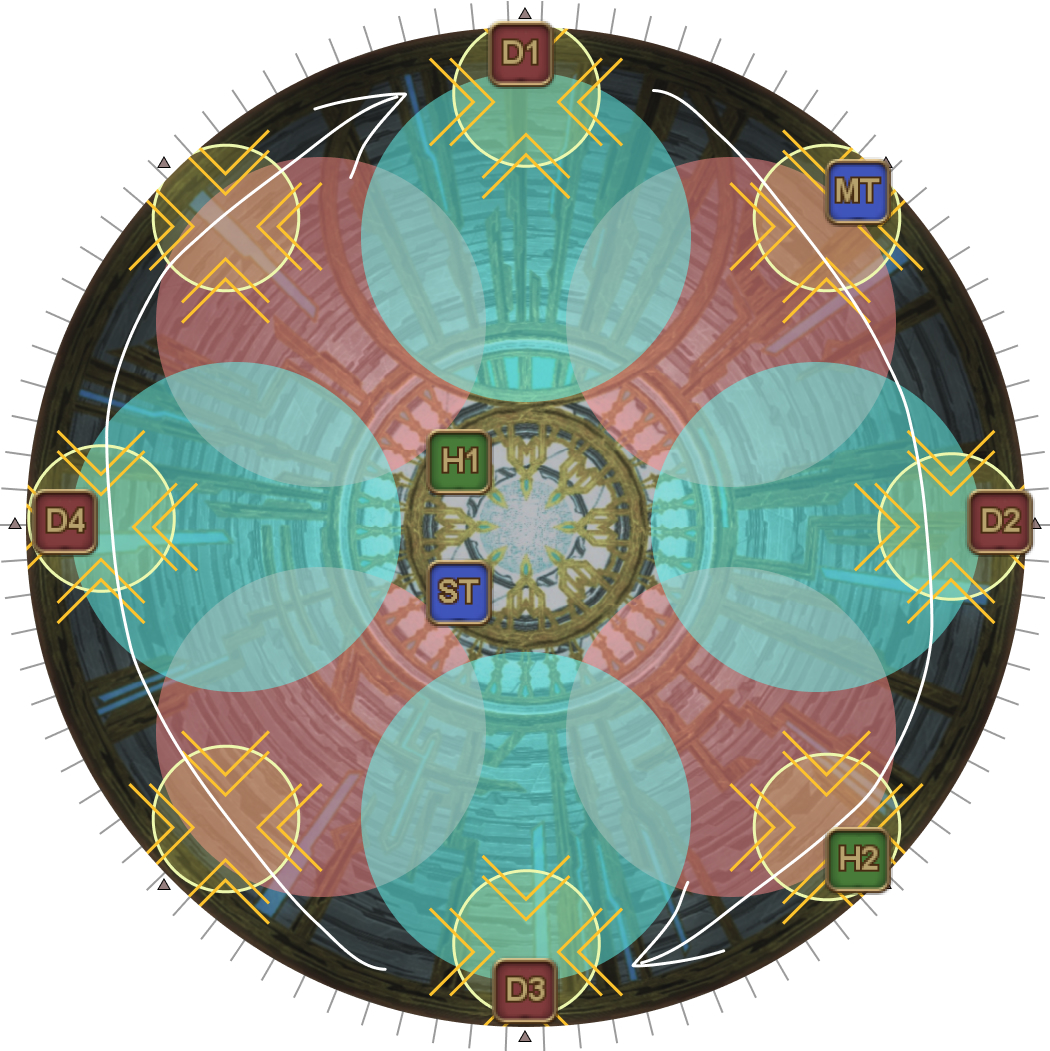
| 4. First set of towers resolve. Seven meteors will drop, one-by-one on the two previously marked players. Two meteors cannot be dropped near one another, or the raid wipes. Meanwhile, eight towers spawn on the outside at the eight intercardinal positions. Meteor players:
Non-Meteor players:
|  |
| 5. When the fifth Meteor lands, players on the outside use anti-knockback abilities. Players on the inside get knocked back to their (intercardinal) towers. | 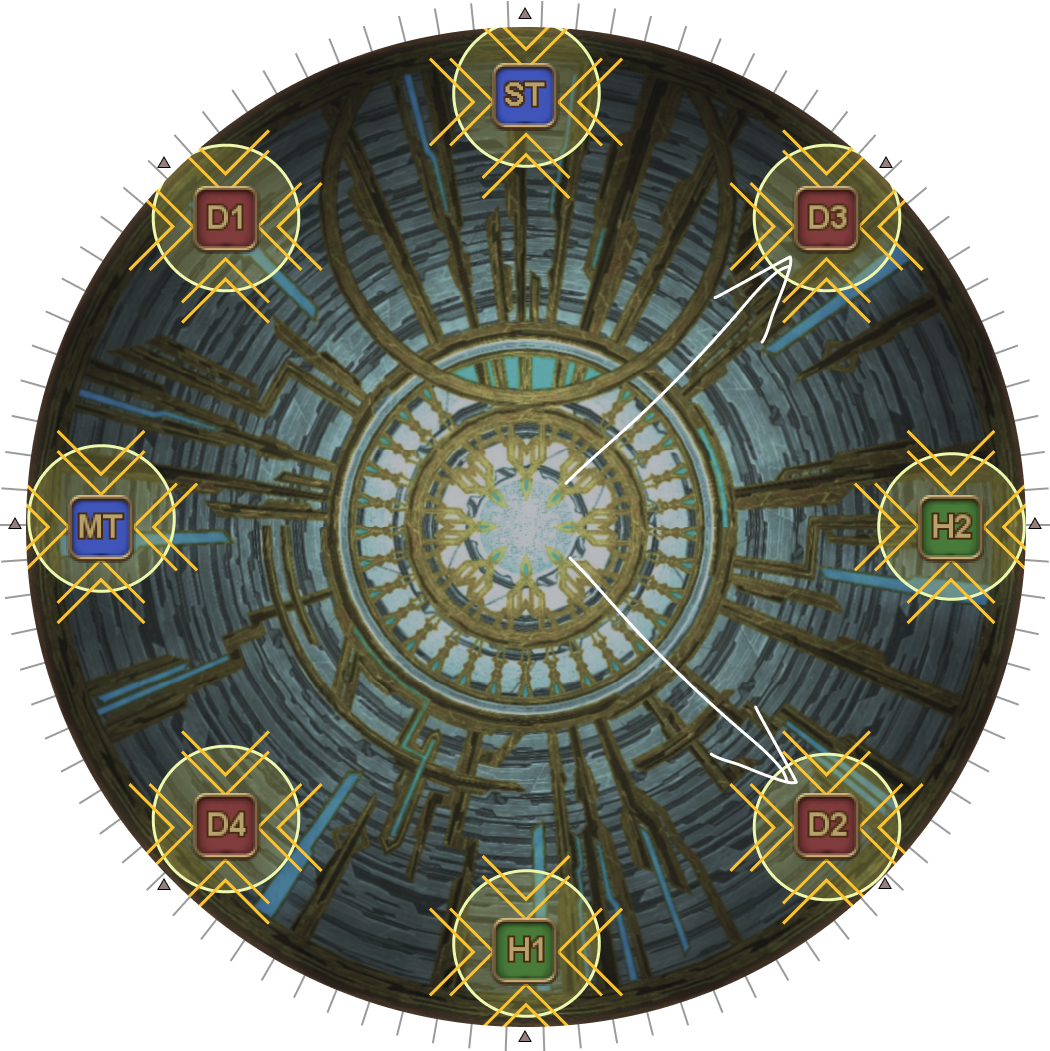 |
Additional Examples: Meteors
Since there are many Meteor configurations, here are a couple additional scenarios to consider.
[Meteors] Example #2 (D1, D2 meteors)
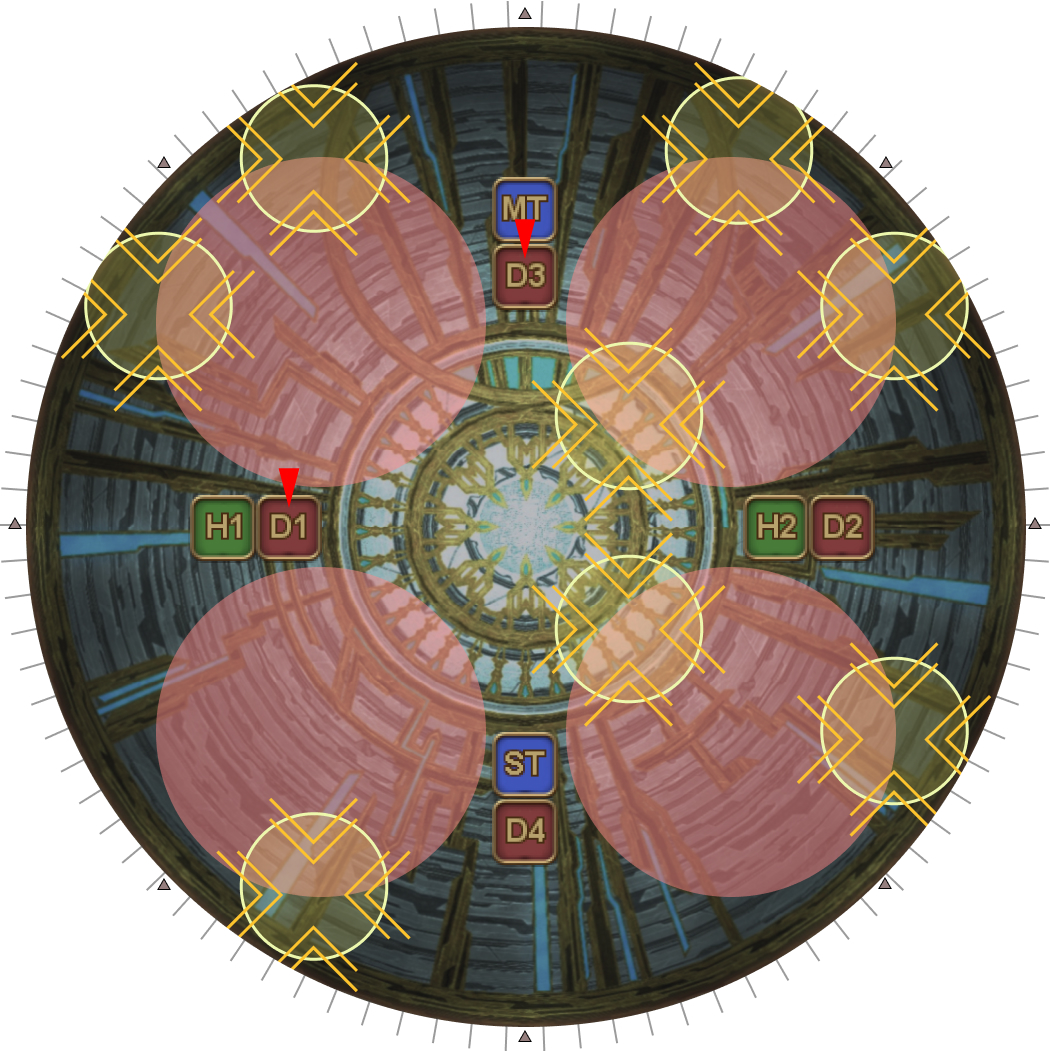
| 1. Everyone splits off into their preassigned pairs. Since D1 and D2 are targeted:
|  |
| 2. After adjusting players, ice puddles get dropped on each pair. | 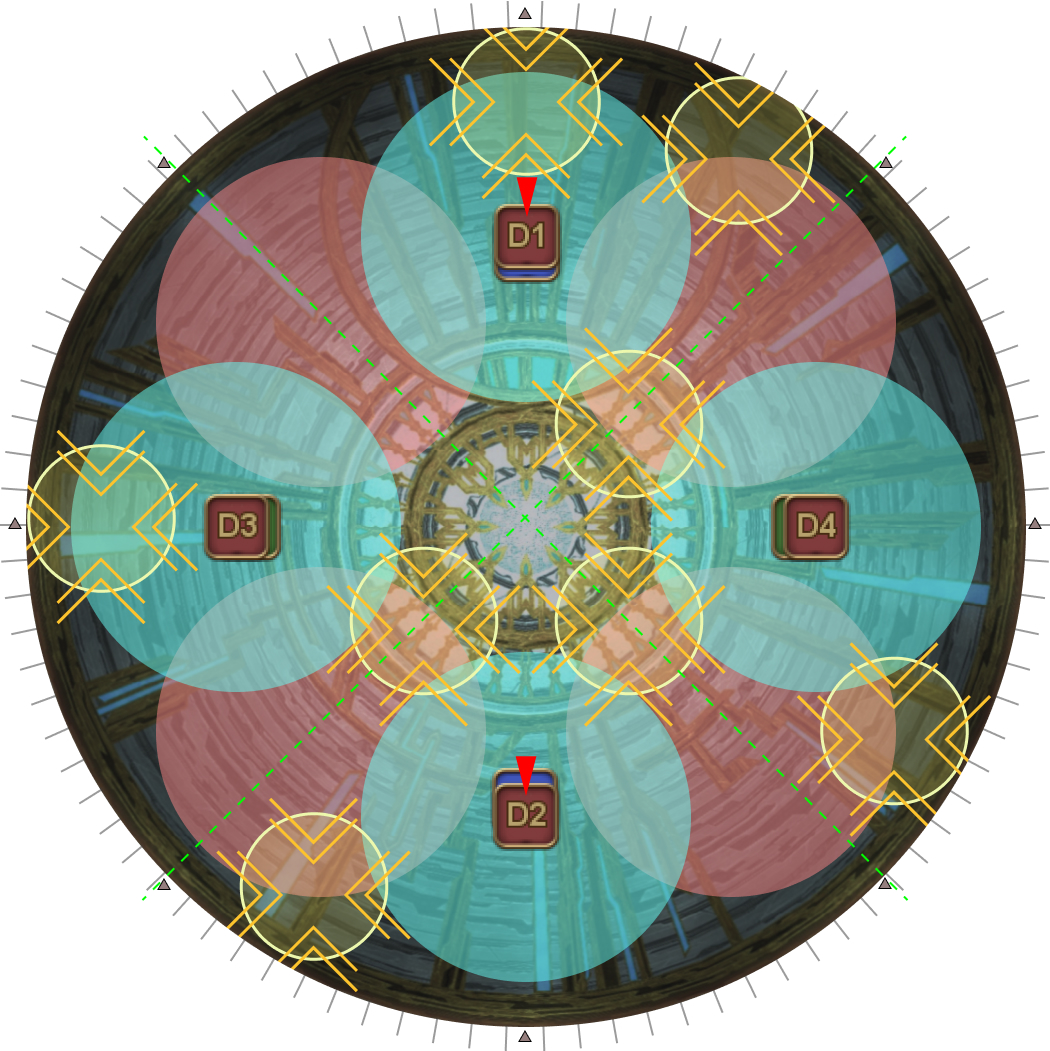 |
| 3. Players then split off into their respective towers.
|  |
| 4. First set of towers resolve. Meteor players:
Non-Meteor players:
|  |
| 5. When the fifth Meteor lands, players on the outside use anti-knockback abilities. Players on the inside get knocked back to their (intercardinal) towers. |  |
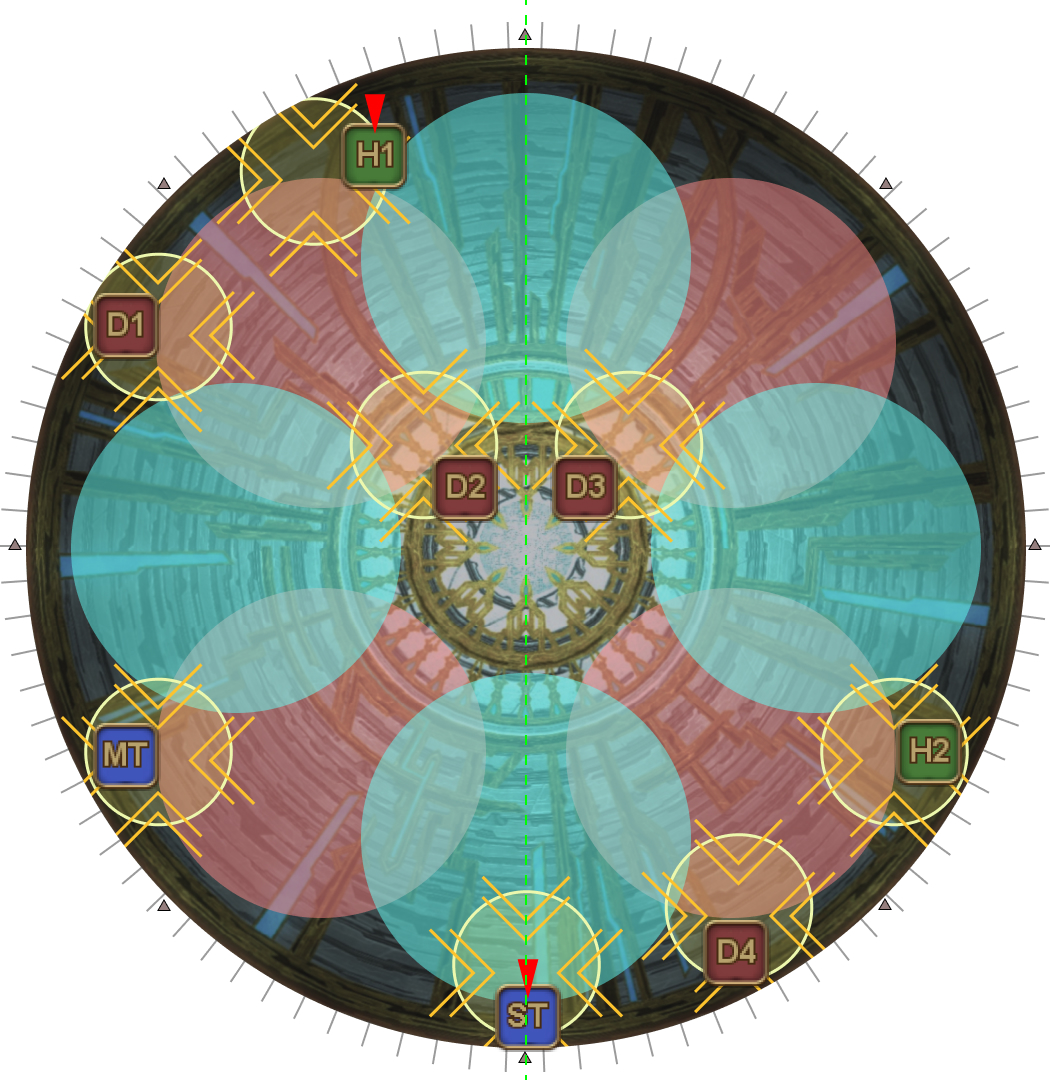
[Meteors] Example #3 (D1, D3 meteors)
| 1. Everyone splits off into their preassigned pairs. Since D1 and D3 are targeted:
|  |
| 2. After adjusting players, ice puddles get dropped on each pair. | 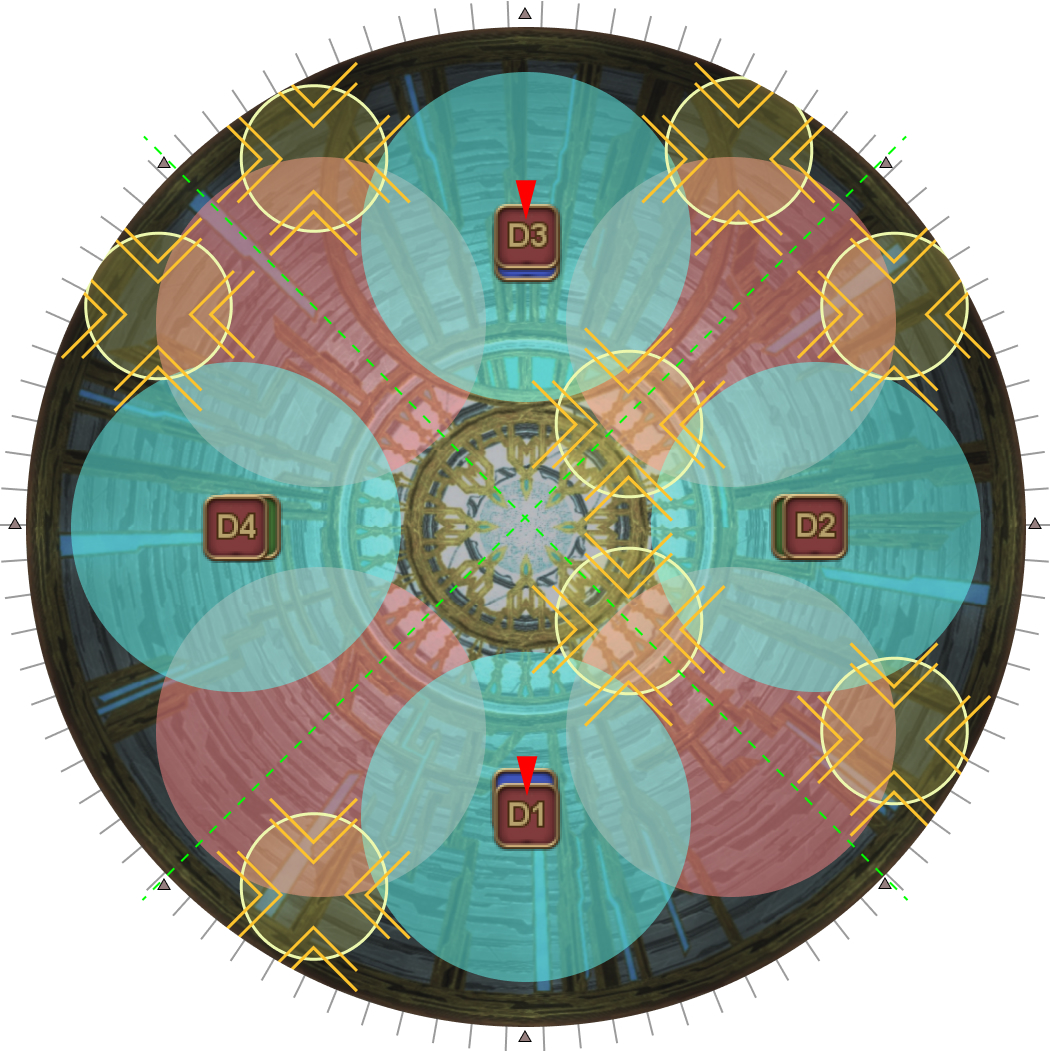 |
| 3. Players then split off into their respective towers. This is the unfortunate case where blindly following the priority order makes things harder. Ideally, the MT would've communicated that they should take the ccw tower, so D3 would take the cw tower and "uncurse" D1 as a result. By taking the towers as close to the N/S line, this maximises the available space even in the "cursed" configuration.
|  |
| 4. First set of towers resolve. Meteor players:
Non-Meteor players:
|  |
| 5. When the fifth Meteor lands, players on the outside use anti-knockback abilities. Players on the inside get knocked back to their (intercardinal) towers. | 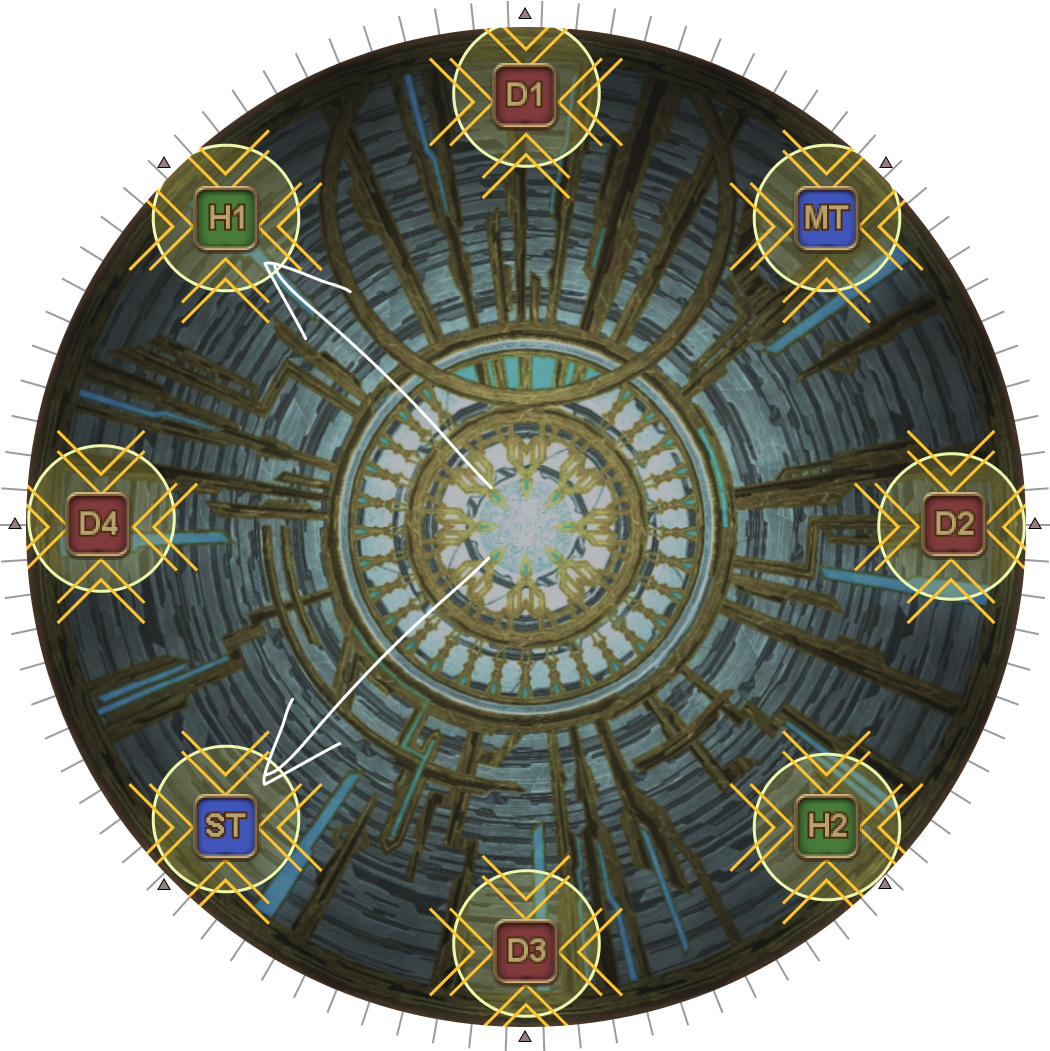 |
After Sanctity of the Ward, Thordan reappears North and begins casting Ultimate End (which does not have a visible castbar). This is very-heavy raid-wide damage that needs to be mitigated.
Thordan will flail around, doing two sets of Broad Swings. Each Broad Swing requires the party to dodge from behind Thordan to either his front-left or front-right, depending on which he cleaves first.
After both sets are complete, Thordan will cast Aetheric Burst, which serves as the hard enrage for this phase.
Frequently Asked Questions
[Strength of the Ward] Why are the healers in front?
Putting the healers in front lets them get to the middle quickly and start casting a GCD heal (hitting both light parties) before having to dodge the Ascalon's Mercy Concealed and without using Swiftcast. This affects AST and SCH (as opposed to WHM and SGE), as those healers do not have native access to GCD heals during movement. |
[Sanctity of the Ward] Why is there a need for a role swap? Aren't there simpler strategies?
| We do a role swap because we want each group to have:
This minimises the damage each group takes, while still being able to heal in between the two Sacred Severs each group takes. You can use other strats under certain conditions (e.g: an AST's Macrocosmos lets you do pretty much any strat you want), but this unfortunately doesn't generalise to PF. |
[Sanctity of the Ward] What is the probability of getting forced cursed N/S towers?
Time to stretch those discrete maths muscles! I will use the notation C(n,r) to represent choosing r objects from a set of size n, which is given by C(n,r) = n!/[r!(n-r)!]. With that out of the way, recall that Sanctity towers spawn according to the following rules:
Assuming that all tower configurations that satisfy the above conditions have an equal chance of spawning, we can count the total number of possible tower combinations: | |
| Five towers on the outside | Six towers on the outside |
| There are C(3,1)^4 ways to pick one tower in each quadrant. This leaves us with one extra tower to add, and four possible quadrants we can put the extra tower in, giving us a total of: C(4,1) x C(3,1)^4 = 324 possible combinations | There are C(3,1)^4 ways to pick one tower in each quadrant. This leaves us with two extra towers to add, and four possible quadrants we can put the extra tower in, giving us a total of: C(4,2) x C(3,1)^4 = 486 possible combinations |
| In total, there are 810 possible tower combinations that can spawn. Next, we count the number of cursed tower combinations. | |
| Five towers on the outside | Six towers on the outside |
| If we fix the North and South quadrant's towers to be on one side, then we have three remaining towers to place, and only the two E/W quadrants to put them in. Following the same logic above, this means we have C(2,1) x C(3,1)^2 ways to place three towers in two quadrants. We double this to account for its reflection (i.e: fixing the east-most towers instead) to get a total of: 2 x C(2,1) x C(3,1)^2 = 36 cursed combinations. | If we fix the North and South quadrant's towers to be on one side, then we have four remaining towers to place, and only the two E/W quadrants to put them in. Following the same logic above, this means we have C(2,2) x C(3,1)^2 ways to place four towers in two quadrants. We double this to account for its reflection (i.e: fixing the east-most towers instead) to get a total of: 2 x C(2,2) x C(3,1)^2 = 18 cursed combinations. |
| Thus, we have 54 cursed tower combinations out of a possible 810 combinations, or a 1/15 chance (6.67%) at getting a forced N/S cursed tower combination. | |
Troubleshooting
[Sanctity of the Ward] Any tips for cursed towers?
| Because there will be at least five towers on the outside, there will always be a non-cursed pair of positions. The problem is that this pair of positions isn't necessarily North and South. If you have voice comms, you can try to communicate that the Meteor pairs should go East and West instead, although this is rarely done. There are 90 notches around the arena. Assuming you have the cursed (120 degrees) tower pattern, you have 30 notches to put seven gaps between Meteors, which amounts to just over four notches each. |