Asphodelos: The First Circle (Savage)
PF references the following guides for P1S:
Things to check on Party Finder
- Check the chain pairs (Japanese groups pair MT+D4 instead of MT+D3, etc.)
- Check the markers. In particular, Japanese groups rotate all the outer markers clockwise.
English
【Spread Positions】
  D3 MT D4
  H1 ▲ H2
  D1 ST D2
【Aetherial Shackles】
Swap within same coloured marker as needed.
【Intemperance】
S tile not 3x Ice → MT+D3 swap for 3rd gems.
【Tankbusters (Pitiless Flails)】
Tank swap, Knockback to NW, Flare NE
【Shackles of Time】
Debuff: White, Party: Red
【Fourfold Shackles】
In order of ascending debuff time (3,8,13,18s)
Purple:ABCD, Red:1234
Japanese
【基本散開】
 D3 MT D4
 H1 ▲ H2
 D1 ST D2
【1回目鎖&2回目光炎中の鎖】
マーカーに基本散開、同色マーカーのペアで交代して調整
【氷火の調整】
1・3個目別色時にMTD3が3個目を交代
【懲罰連撃】
スイッチ、北西側へノックバック、北東側から交代
【時限の縛鎖】
デバフ付いた人は白床、その他は赤床
【4連鎖】
時間の短い順に(3,8,13,18秒)
紫:ABCD、赤:1234
Markers
The markers are for the purple/red chains. 1234 are for the red chains, while ABCD are for purple chains. 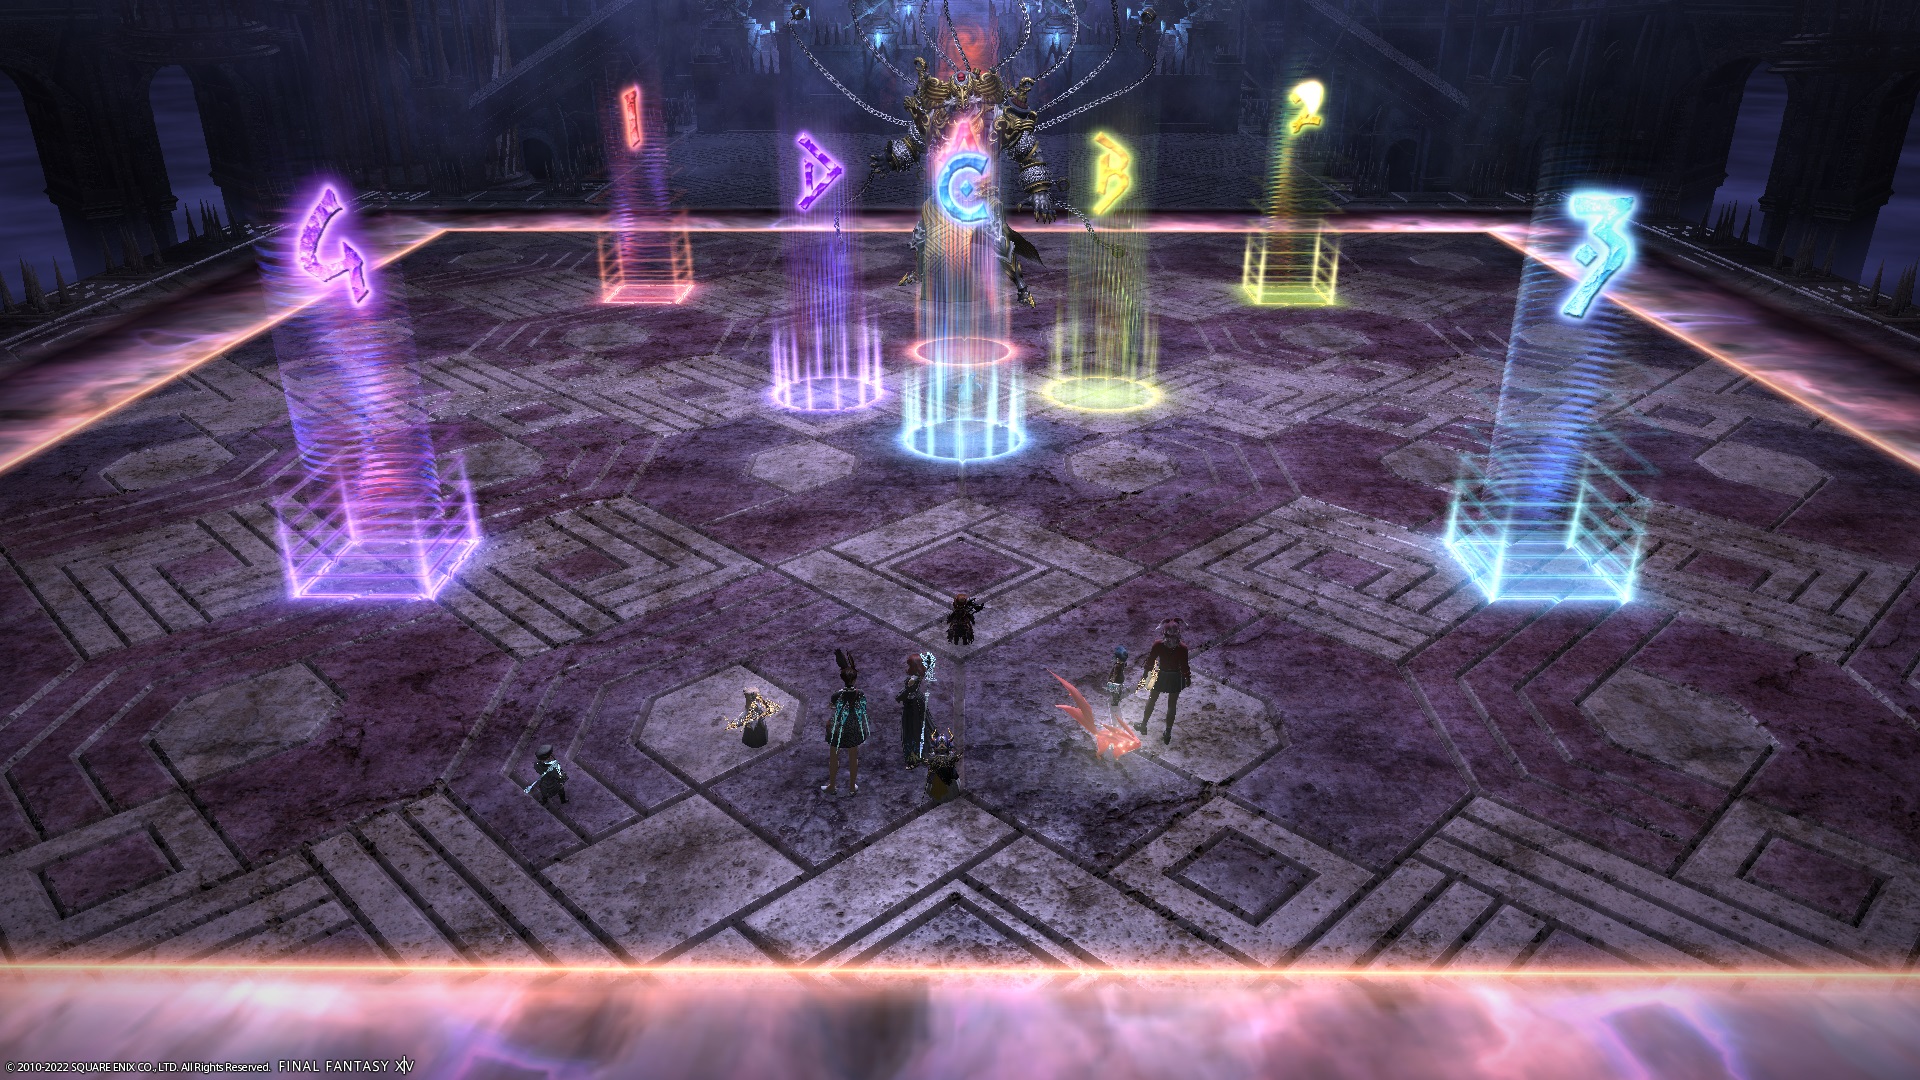
XIVLauncher WaymarkPresetPlugin positions
{
  "Name":"P1S (EN)",
  "MapID":809,
  "A":{"X":100.0,"Y":0.0,"Z":96.7,"ID":0,"Active":true},
  "B":{"X":103.3,"Y":0.0,"Z":100.0,"ID":1,"Active":true},
  "C":{"X":100.0,"Y":0.0,"Z":103.3,"ID":2,"Active":true},
  "D":{"X":96.7,"Y":0.0,"Z":100.0,"ID":3,"Active":true},
  "One":{"X":90.0,"Y":0.0,"Z":90.0,"ID":4,"Active":true},
  "Two":{"X":110.0,"Y":0.0,"Z":90.0,"ID":5,"Active":true},
  "Three":{"X":110.0,"Y":0.0,"Z":110.0,"ID":6,"Active":true},
  "Four":{"X":90.0,"Y":0.0,"Z":110.0,"ID":7,"Active":true}
}
{
  "Name":"P1S (JP)",
  "MapID":809,
  "A":{"X":100.0,"Y":0.0,"Z":96.7,"ID":0,"Active":true},
  "B":{"X":103.3,"Y":0.0,"Z":100.0,"ID":1,"Active":true},
  "C":{"X":100.0,"Y":0.0,"Z":103.3,"ID":2,"Active":true},
  "D":{"X":96.7,"Y":0.0,"Z":100.0,"ID":3,"Active":true},
  "One":{"X":110.0,"Y":0.0,"Z":90.0,"ID":4,"Active":true},
  "Two":{"X":110.0,"Y":0.0,"Z":110.0,"ID":5,"Active":true},
  "Three":{"X":90.0,"Y":0.0,"Z":110.0,"ID":6,"Active":true},
  "Four":{"X":90.0,"Y":0.0,"Z":90.0,"ID":7,"Active":true}
}
Aetherial Shackles
【Aetherial Shackles】
Swap within same coloured marker as needed.
In essence, we want the person with the purple chain as one of the four inner ABCD markers, and the person with the red chain as one of the outer 1234 markers.
If someone assigned to an inner marker is targeted with the red chain, that person swaps position with the same coloured marker (A with 1, B with 2, etc.) This then puts red on the outside.
The same logic applies if someone on the outer markers gets the purple chain.
Intemperance
【Intemperance】
S tile not 3x Ice → MT+D3 swap for 3rd gems.
There are two possible gem configurations. One of them will require MT and D3 to swap positions for the third set.
The “no swap” configuration is identified by either
- Three blue gems on the southern tile.
- The top and bottom gems on the corner tiles share the same colour.
In this case, everyone can resolve their own assigned tile throughout the entire mechanic.
The “need to swap” configuration is identified by either
- A red gem in the southern tile.
- The top and bottom gems on the corner tiles are different colours.
In this case, MT and D3 will need to swap tiles for the third set of gemstones.
Fourfold Shackles
The idea is to have the four purple chains in the inner markers, and the four red chains on the outer markers.
The macro uses the duration of each chain’s debuff to assign positions, although if you have voice comms, you can coordinate through that instead.
Be careful as the outer marker positions may differ between parties. 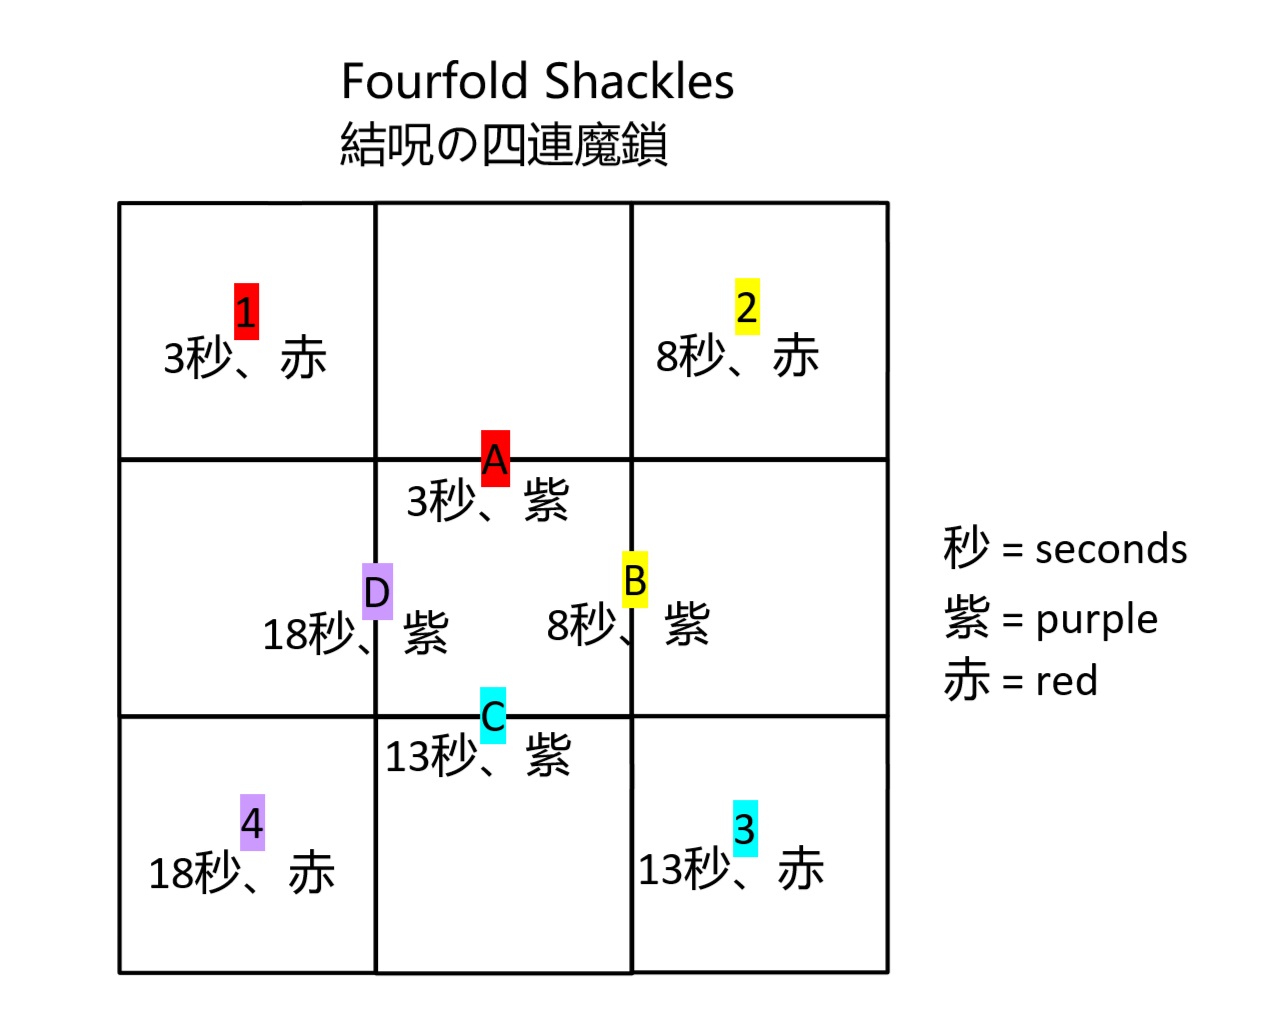
Timeline
 (Credit: u/Syldris)