Anabaseios: The Twelfth Circle (Savage) - Part 1
Game8 has gone along with Nukemaru’s strategy for the fight:
(English subtitled)
- Invuln Paradeigma 1
- 十-shaped Paradeigma 2
- Idyllshire’s Paradeigma 3
- Neverland’s Limit Cut
Approximate milestones
- Under 32% when the boss disappears for Limit Cut.
English
■ Paradeigma 1 - Tanks invuln (mit. AA after)
ーーーーーーーーーーーーーーーーーーーーーーーー
■ Paradeigma 2 - 十-formation
 Tethers:Pull opposite
 T/H:CCW from NW  DPS:CW from NE
ーーーーーーーーーーーーーーーーーーーーーーーー
■ Superchain Theory I, II  ※ All facing boss
 《Spread》    《Pairs》   《IIA Pairs》
  D1 D2        ▼        ▼
 MT   ST  MT/D1      ST/D2  MTD1
     ★        ★       ST D2
 H1   H2  H1/D3 H2/D4  H1D3
  D3 D4             H2D4
ーーーーーーーーーーーーーーーーーーーーーーーー
■ Superchain Theory I - (L)ight and (D)ark
  《Beams/4:4》   《Towers/AoE Spread》
      ★       MT/D1  ST/D2
 (D) Beam   (L) Beam      ★
 (L) Debuff (D) Debuff  (L) Towers (D)
              H1/D3  H2/D4
ーーーーーーーーーーーーーーーーーーーーーーーー
■ Apodialogos :H/D near + Tanks far
  Peridialogos:Tanks near + H/D far
ーーーーーーーーーーーーーーーーーーーーーーーー
■ Paradeigma 3 (Idyllshire)
 North:十-debuff    South:X-debuff
 North:MT > ST > H1 > H2:South
 DPS Towers:Mid > D1D2D3D4
ーーーーーーーーーーーーーーーーーーーーーーーー
■ Palladion (Limit Cut) - Neverland
    ★
     2/4   ※ 2,4 stacks along the
  5/7  6/8    edge, not corner
    1/3    ※ Drop puddles clockwise
 ※ Beams:5, 7 → 6, 8 → 1, 3 → 2, 4
 ※ Gather North after Limit Cut
Japanese
■パラ1回目 タンク無敵
ーーーーーーーーーーーーーーーーーーーーーーーー
■パラ2回目 十字
 線:対面に伸ばす
 塔TH:北西から反時計、塔DPS:北東から時計
ーーーーーーーーーーーーーーーーーーーーーーーー
■チェインⅠ、Ⅱ ※ボス基準
《8方向》     《ペア》      《ペア半面》ⅡA
        D1   D2                     MTD1
  MT              ST    MT/D1      ST/D2      STD2
          ★               ★             H1D3
  H1              H2    H1/D3      H2/D4       H2D4
       D3    D4
ーーーーーーーーーーーーーーーーーーーーーーーー
《ビーム誘導/4:4》   《塔/天火散開》
    ★         MT/D1   ST/D2
 黒ビーム    白ビーム       ★
 白デバフ    黒デバフ     白  黒
             H1/D3   H2/D4
ーーーーーーーーーーーーーーーーーーーーーーーー
 ■アポ :HDボス下 ペリ:HDボス背面サークル外
ーーーーーーーーーーーーーーーーーーーーーーーー
■パラデイグマ3回目 イディル
 北:十字    南:X字
 北 MT>ST>H1>H2 南
 DPS塔踏み:中央>D1D2D3D4
ーーーーーーーーーーーーーーーーーーーーーーーー
■サイコロ ネバラン
    ★
        2/4(2,4は辺から頭割り)
5/7  6/8
    1/3
 ※ビーム:5,7→6,8→1,3→2,4
※サイコロ後北に集合
Markers
XIVLauncher WaymarkPresetPlugin positions
{
  "Name":"P12S-1",
  "MapID":943,
  "A":{"X":100.0,"Y":0.0,"Z":82.0,"ID":0,"Active":true},
  "B":{"X":118.0,"Y":0.0,"Z":100.0,"ID":1,"Active":true},
  "C":{"X":100.0,"Y":0.0,"Z":118.0,"ID":2,"Active":true},
  "D":{"X":82.0,"Y":0.0,"Z":100.0,"ID":3,"Active":true},
  "One":{"X":110.0,"Y":0.0,"Z":90.0,"ID":4,"Active":true},
  "Two":{"X":110.0,"Y":0.0,"Z":110.0,"ID":5,"Active":true},
  "Three":{"X":90.0,"Y":0.0,"Z":110.0,"ID":6,"Active":true},
  "Four":{"X":90.0,"Y":0.0,"Z":90.0,"ID":7,"Active":true}
}
Timeline
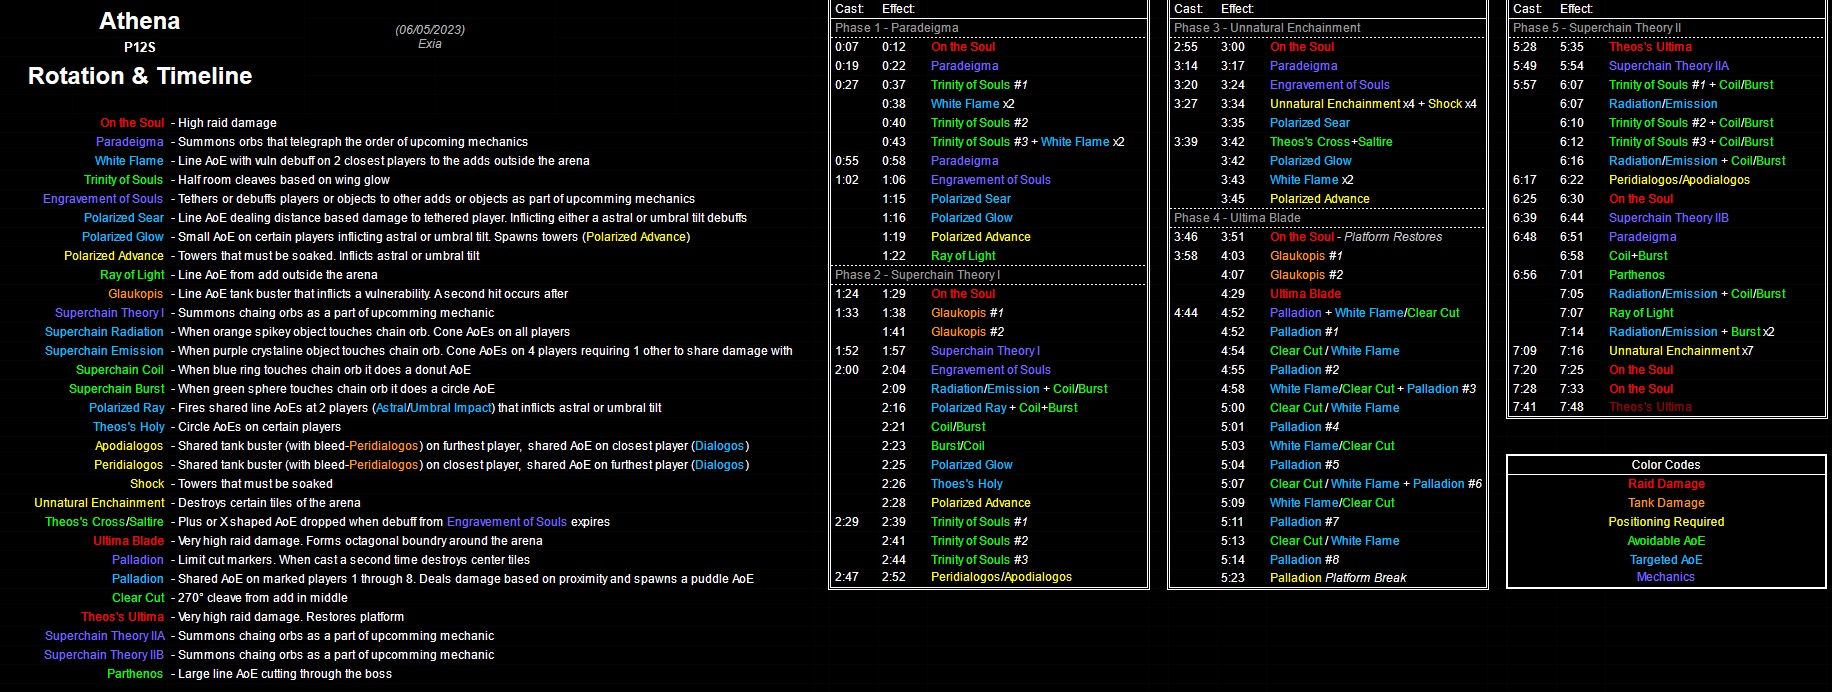 (Credit: u/ExiaKuromonji)
Superchain Theory 1
The debuffs applied during Superchain Theory 1 split the party into tanks/healers and DPS:
- One role is responsible for placing and resolving the aspected towers.
- The other role will spread for the Heavensflame AoEs.
Because of this, the movement after the third set of shapes is fixed:
| Tanks + Healers Heavensflame, DPS towers | DPS Heavensflame, Tanks + Healers towers |
|---|---|
 | 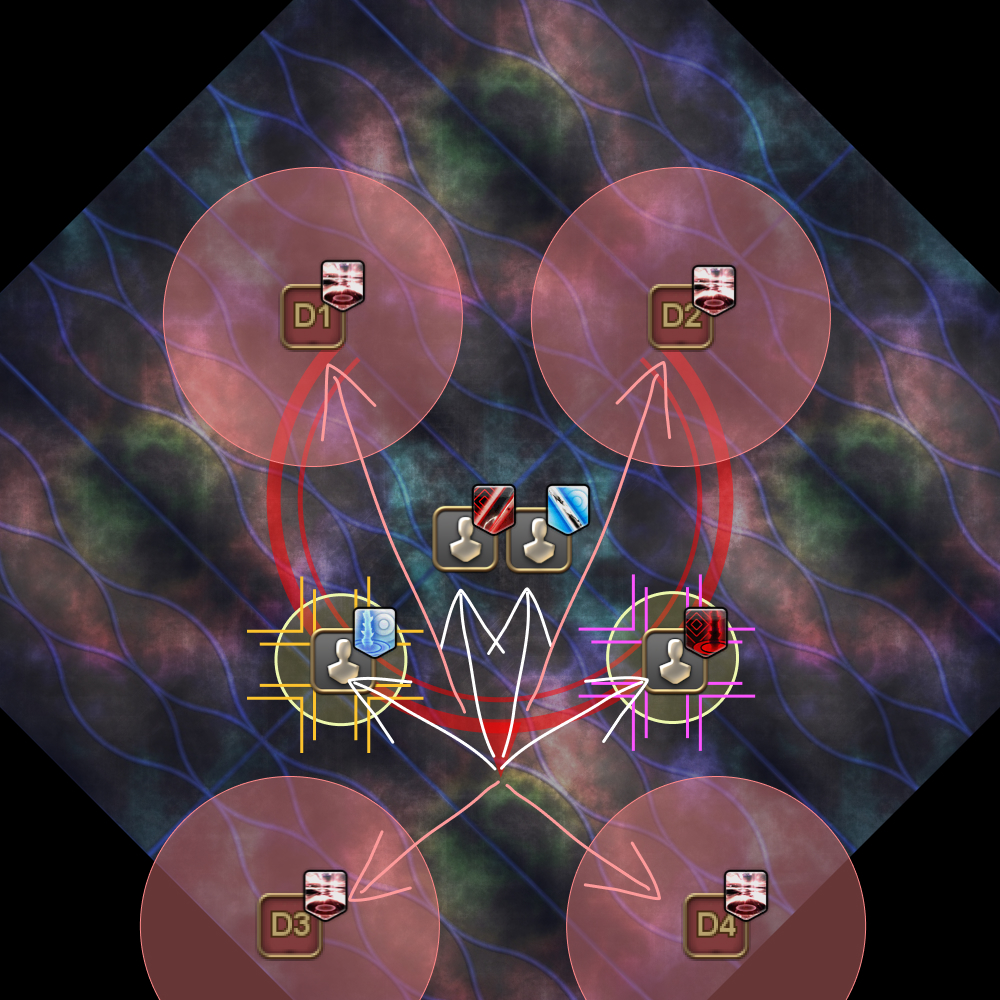 |
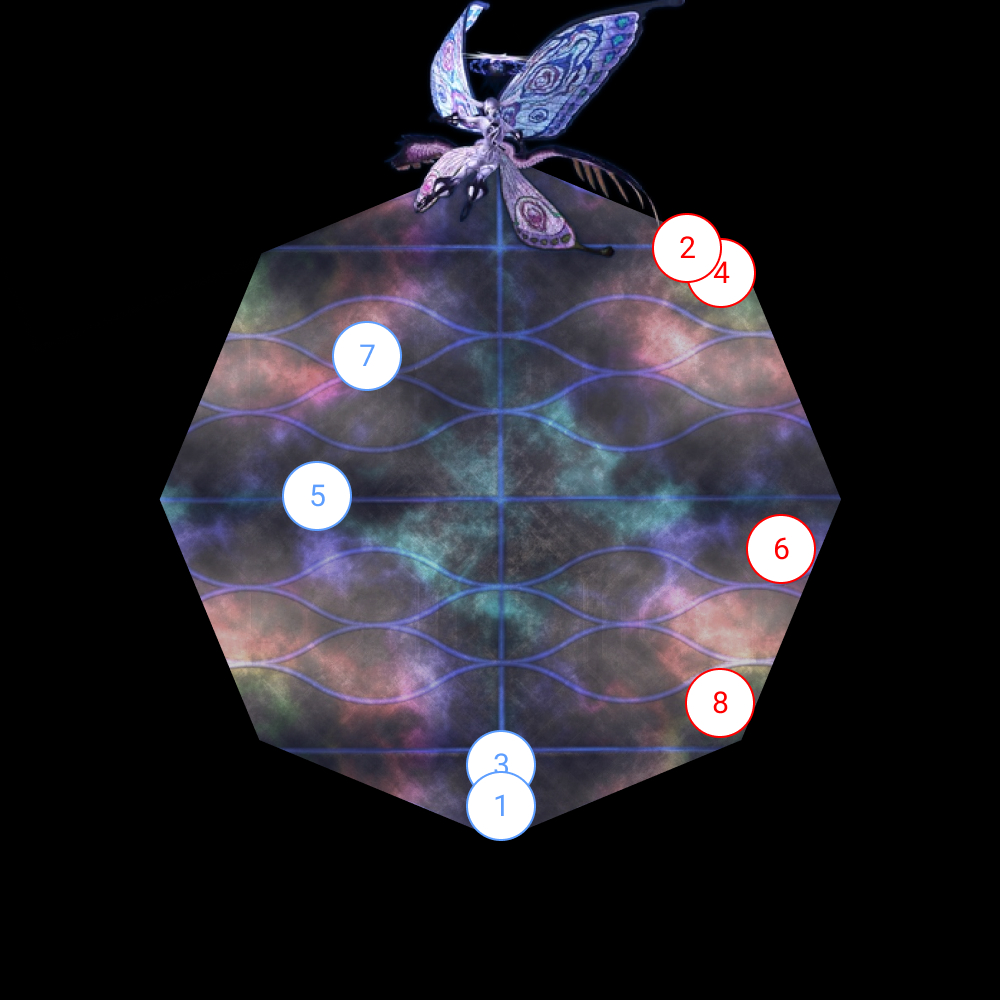
Limit Cut
Limit Cut can be broken into two parts- the first four dashes, and the last four dashes.
Within each block of four dashes, the center add will do a small 270-degree cleave in the middle twice, and fire two beams at the two closest players twice, all in a random order.
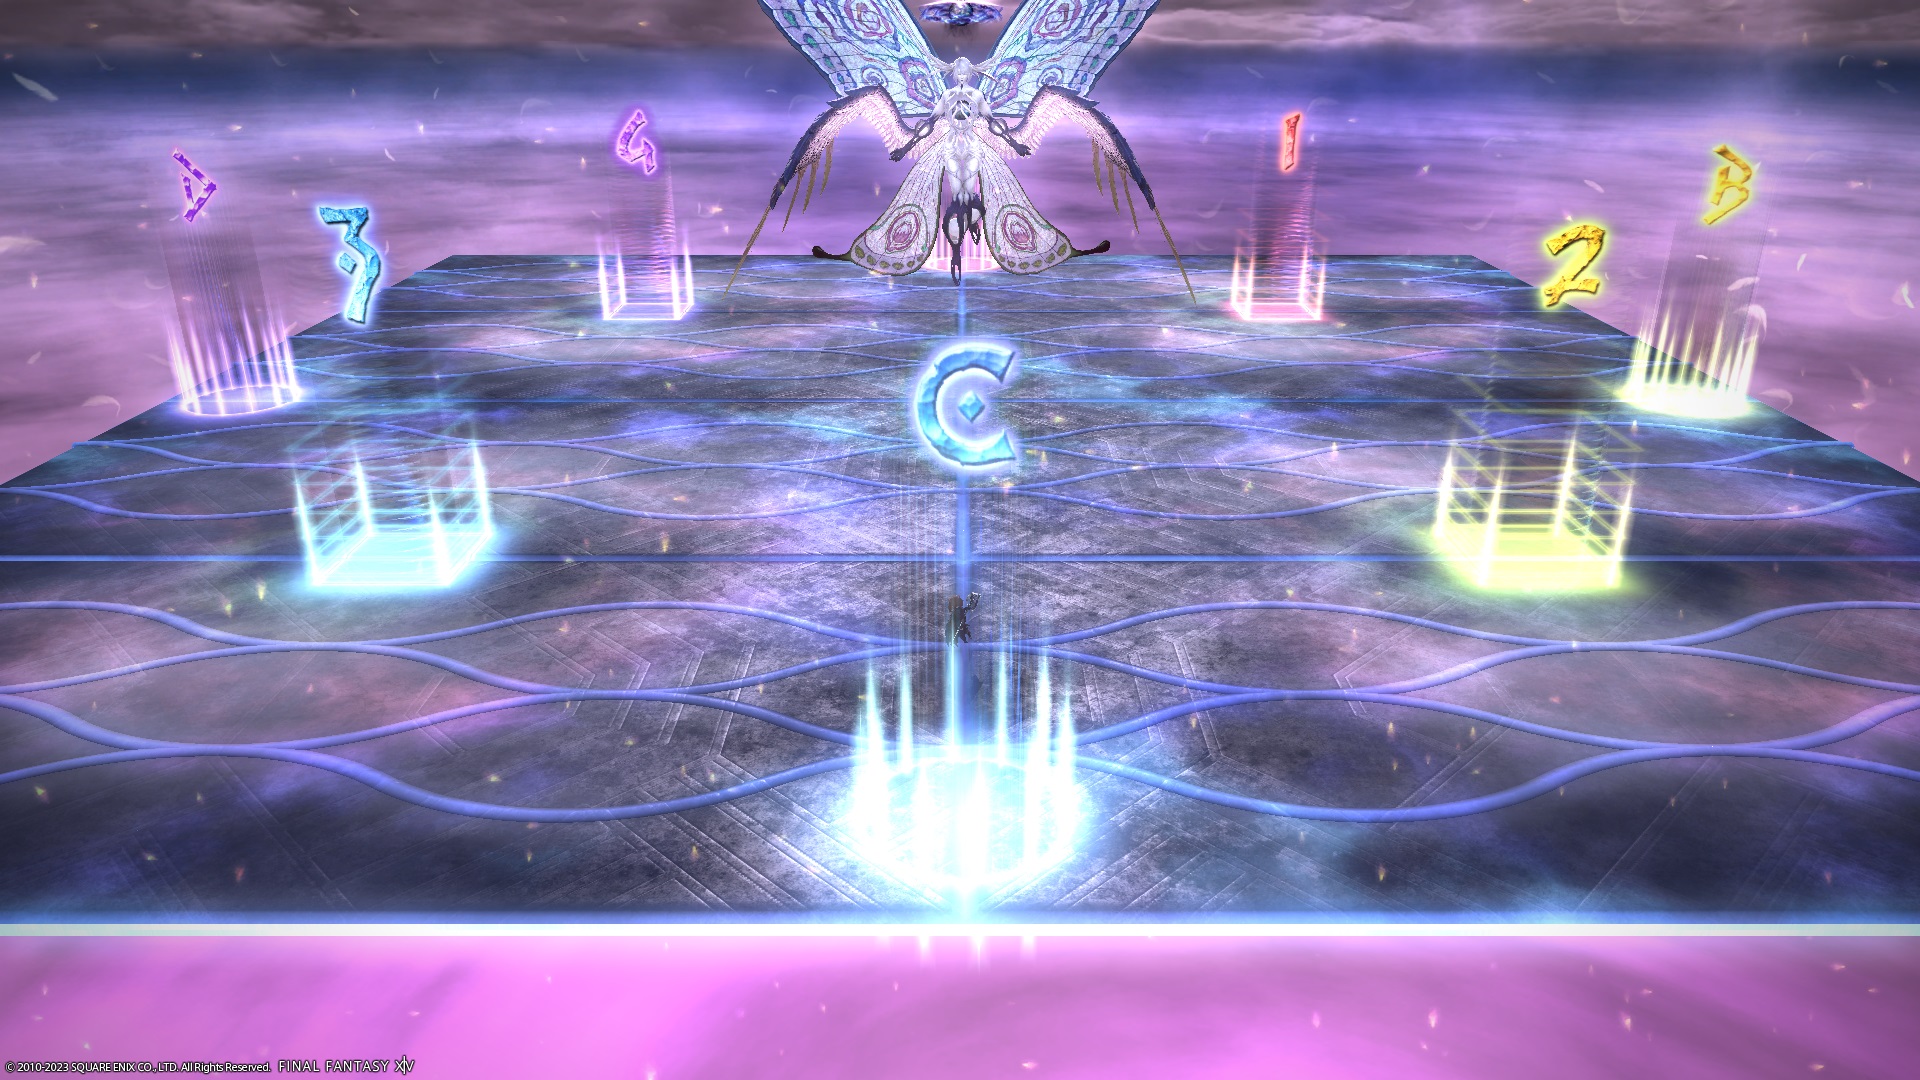
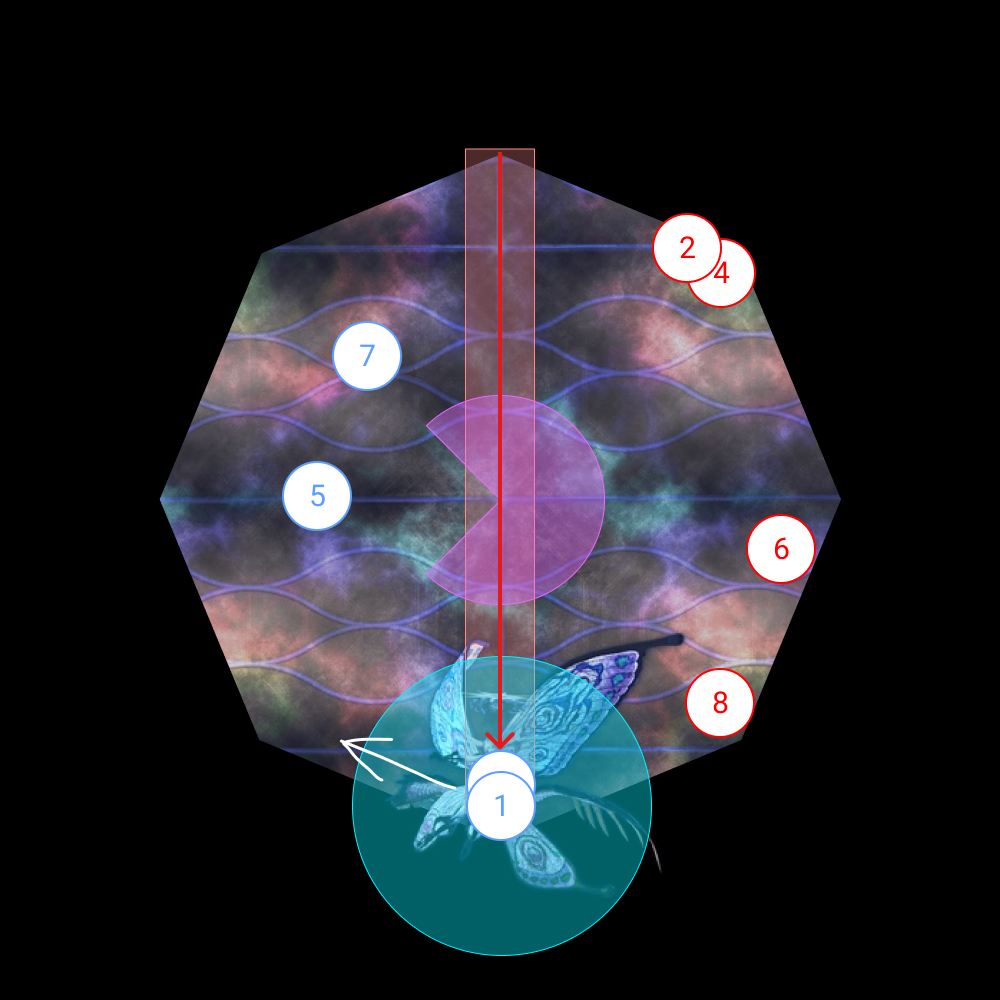
1. Athena appears at a random vertex and all players get numbered. Take up your initial positions, relative to Athena's position.
|  |
2. First set of four dashes. The add in the middle will begin a set of two cleaves, and two pairs of beams in a random order. The boss dashes 1.
|  |
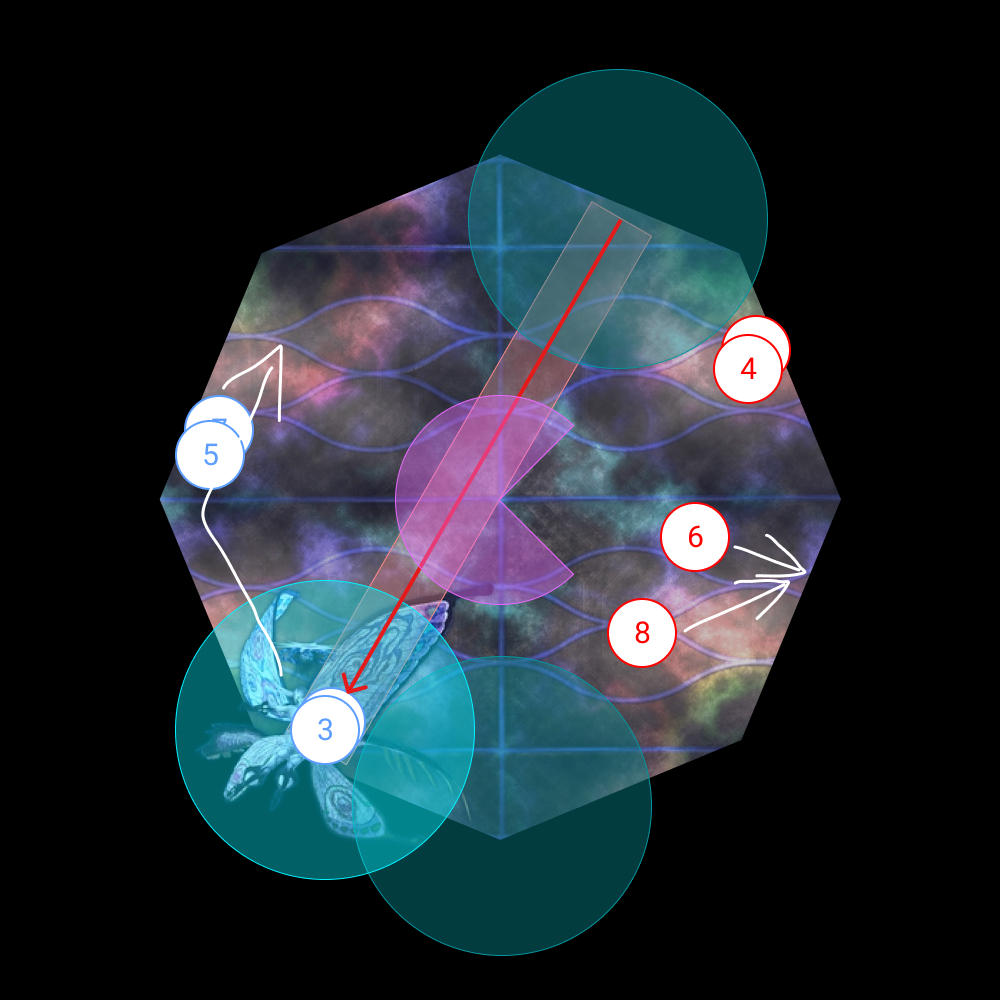
3. The boss dashes 2.
In this example, the center add now fires beams at the two closest players (5 and 7), but this could come earlier or later. When 5 and 7 get hit by the beams, they move out to the edge, while the next pair of players (6 and 8) move in to prepare to bait the next set of beams. | 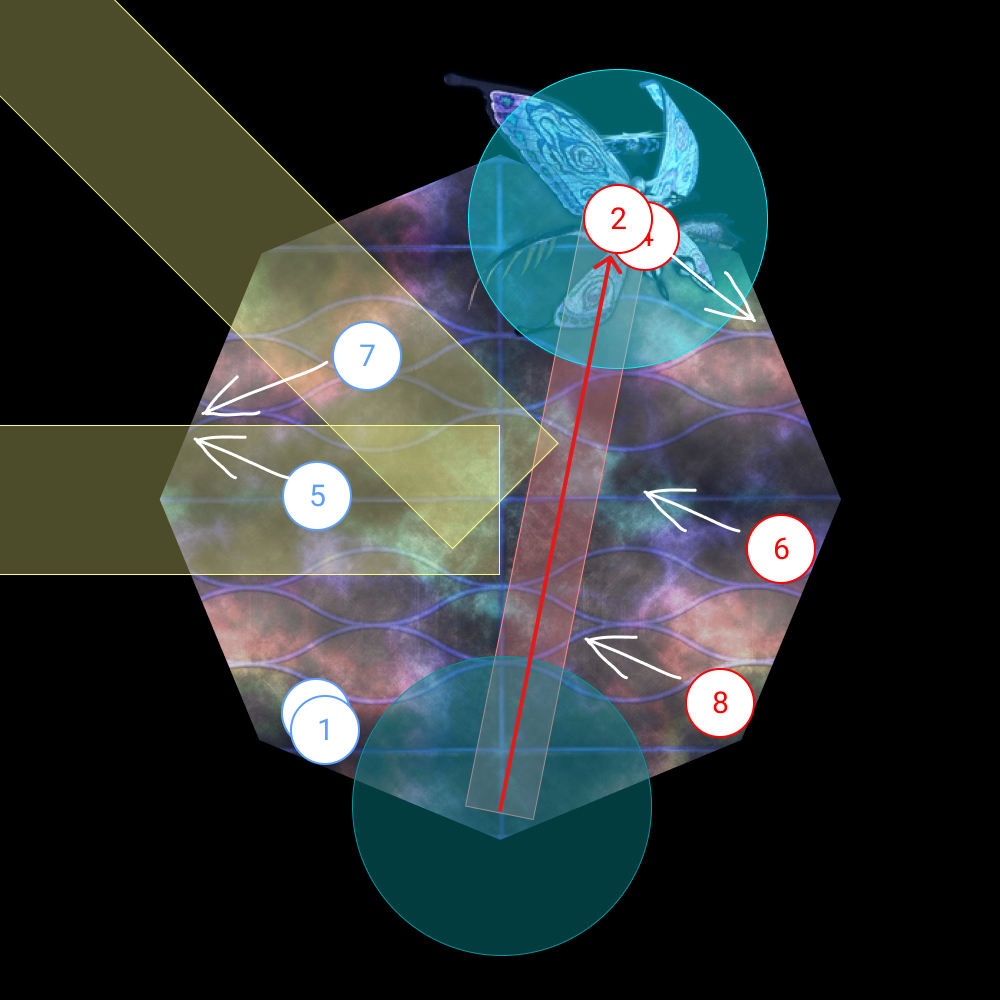 |
4. The boss dashes 3.
|  |
5. The boss dashes 4.
In this example, the center add now fires beams at the two closest players (6 and 8), but this could come earlier. When 6 and 8 get hit by the beams, they move out to the edge, while the next pair of players (1 and 3) move in to prepare to bait the next set of beams. | 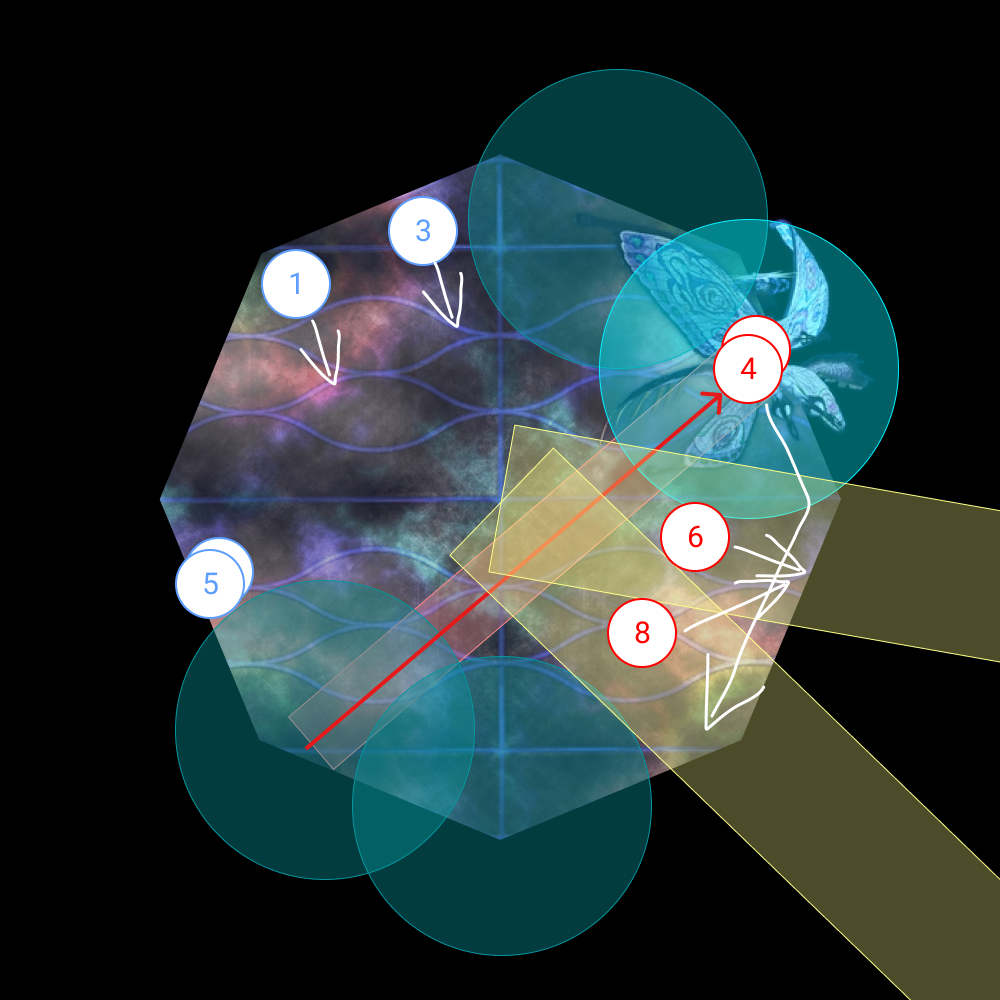 |
6. Second set of four dashes. The add in the middle will begin another set of two cleaves, and two pairs of beams in a random order. The boss dashes 5.
As space is running out, 1 and 3 should try to move as far clockwise as they can to avoid 1's beam clipping 5 and 7. | 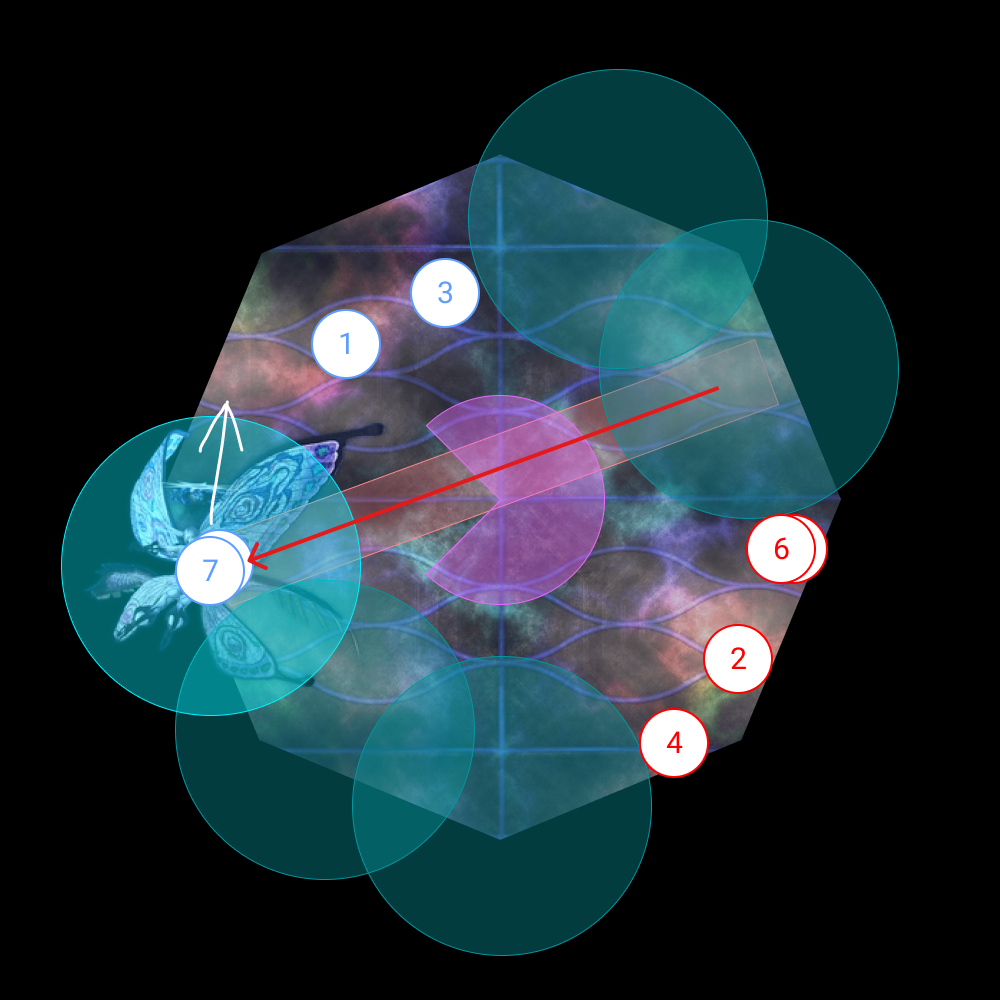 |
7. The boss dashes 6. The first fire puddle left behind when the boss dashed 1 will disappear. In this example, the center add now fires beams at the two closest players (1 and 3), but this could come earlier or later. When 1 and 3 get hit by the beams, they move out to the edge, while the next pair of players (2 and 4) move in to prepare to bait the next set of beams. | 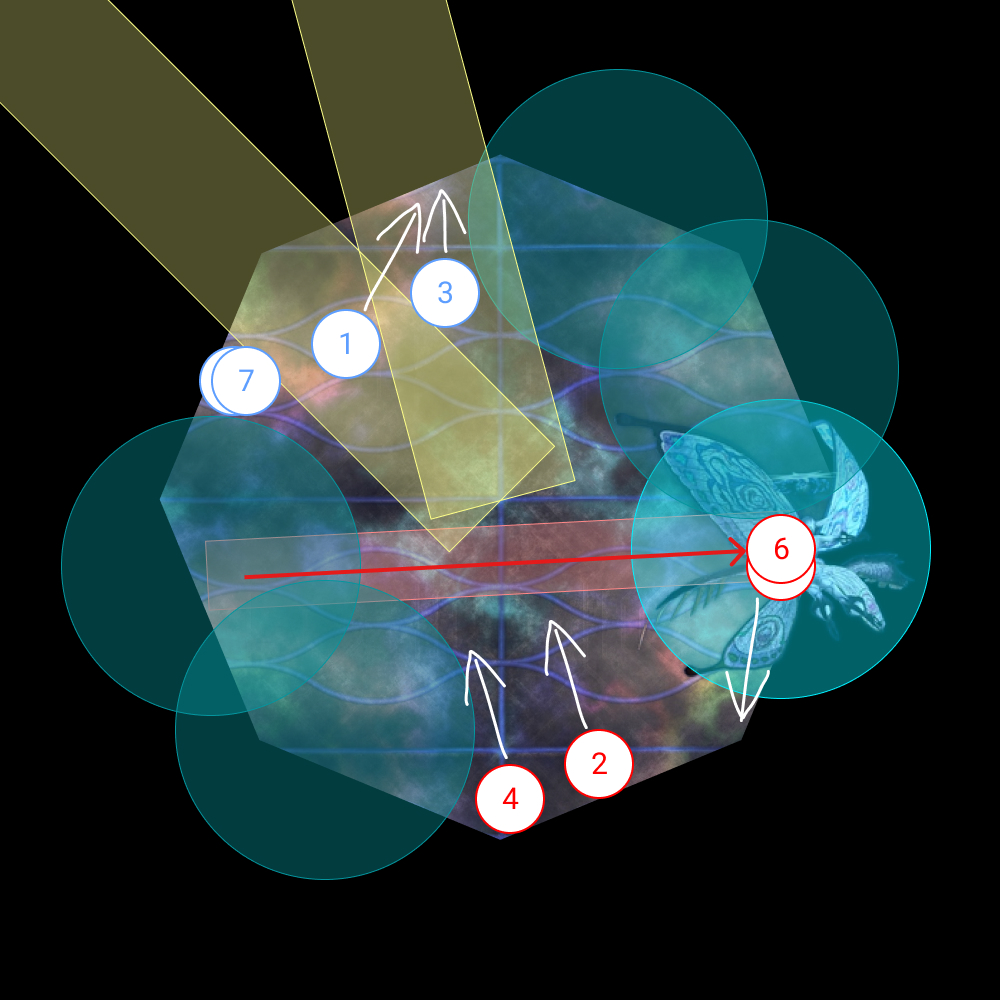 |
8. The boss dashes 7. The second fire puddle left behind when the boss dashed 2 will disappear. 2 and 4 should try to move as far clockwise as they can to avoid 2's beam clipping 6 and 8. | 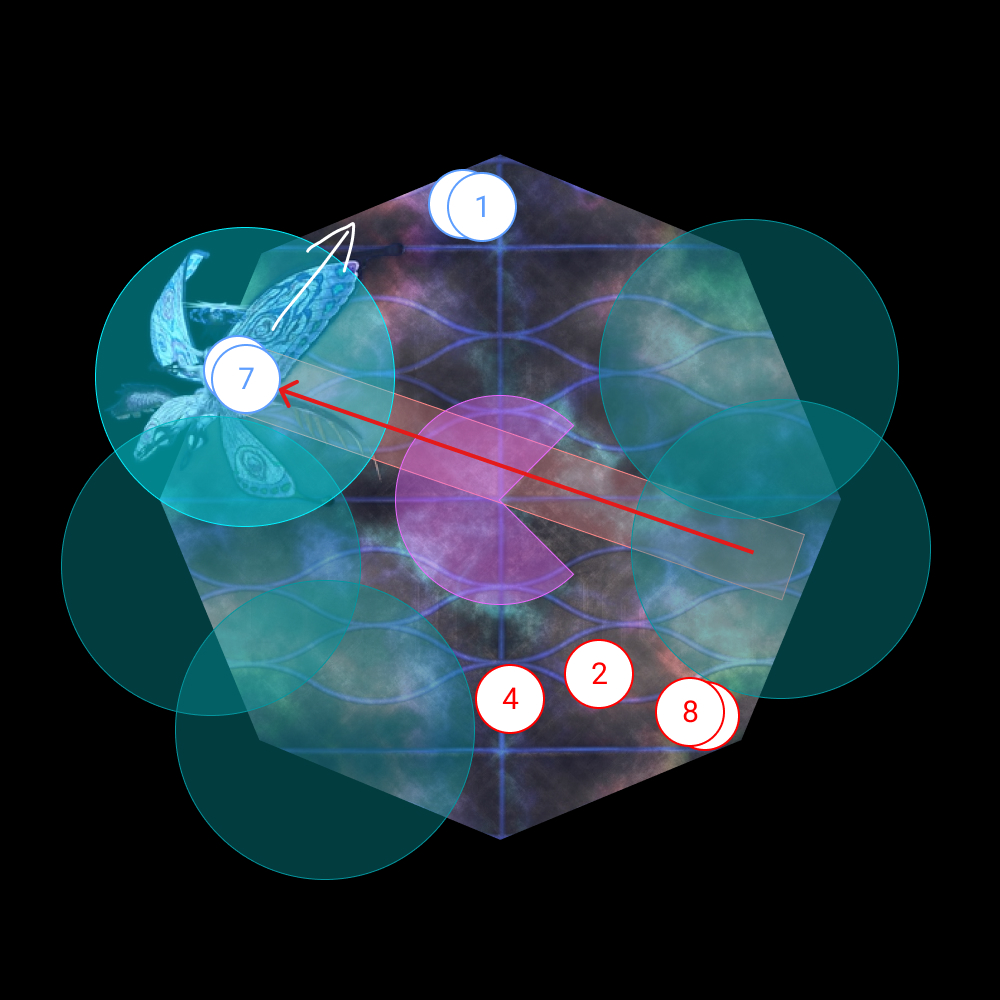 |
9. The boss dashes 8. In this example, the center add now fires beams at the two closest players (2 and 4), but this could happen earlier. All players move to (true) North to prepare for Theos's Ultima. | 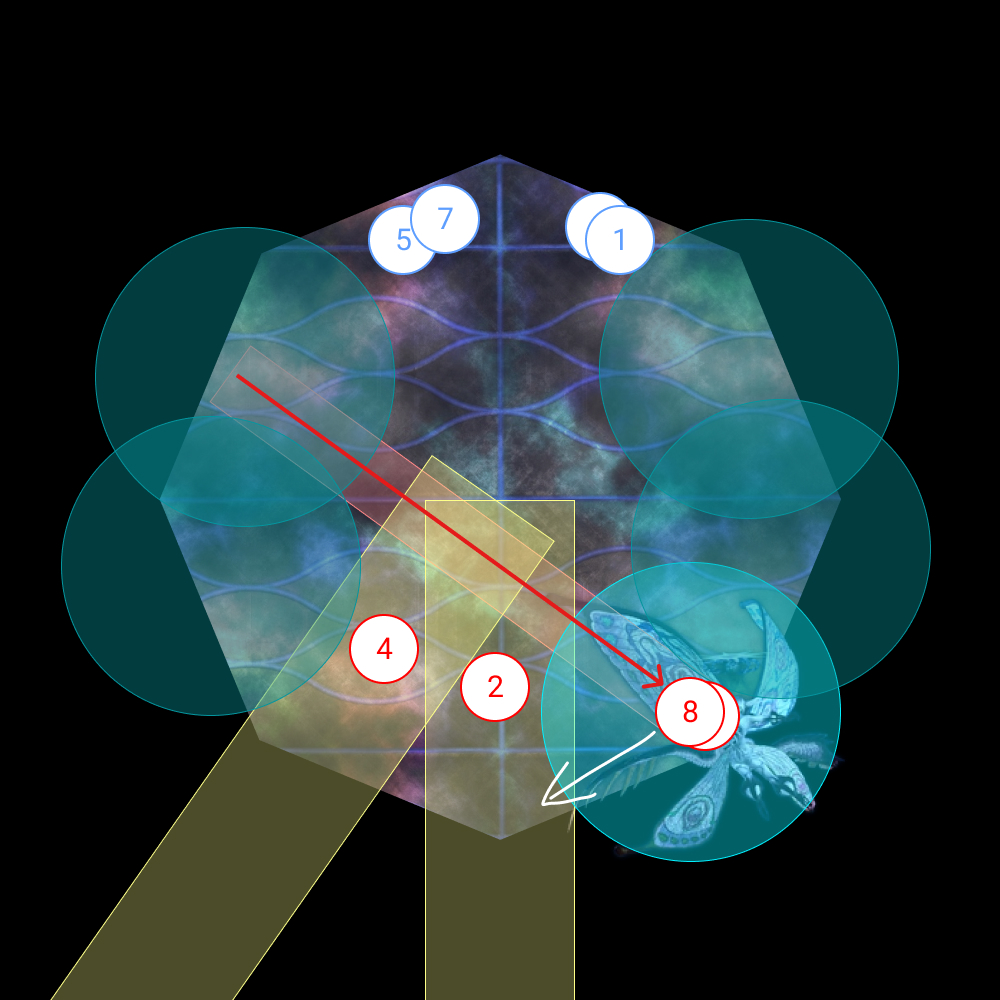 |
Frequently Asked Questions
[Damage Down] How strong is the damage down debuff in this fight?
The Damage Down debuff in this phase lowers a player's damage by 38%. |
[Palladion (Limit Cut)] Why does 2 and 4 resolve their stack along the edge, instead of at the vertex?
Athena's dash deals damage based on how far she had to dash to get to the next player (players take extra damage if they are within a certain distance to Athena). Putting 2 and 4 North results in this dash to 5 (and 7) being close enough to the previous player that 5 and 7 may now get killed as a result. | 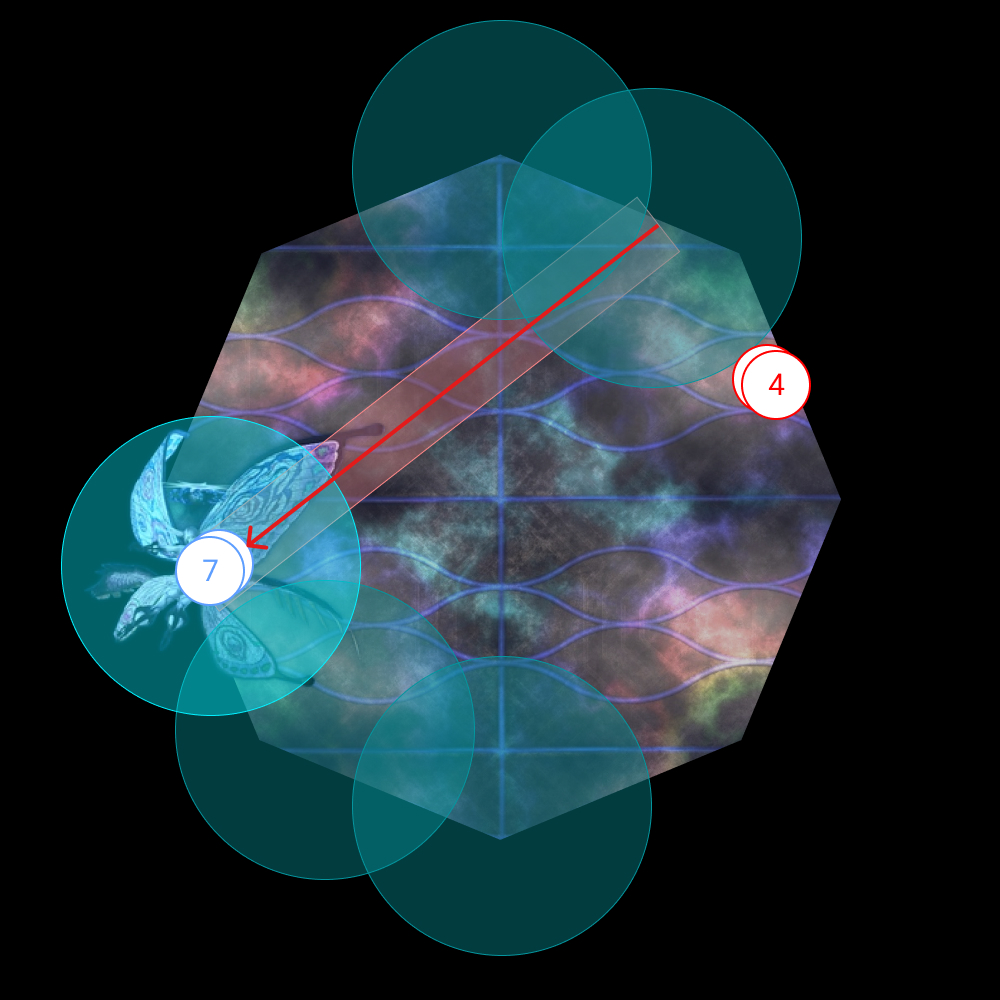 |
[Superchain Theory 2] How am I still getting hit by the angel beams?
The angel beams in the middle of Superchain Theory 2 do not split the arena into four columns of equal width. As you can see from the diagram here, the beams are actually slightly displaced (in this example, the party needed to dodge east). | 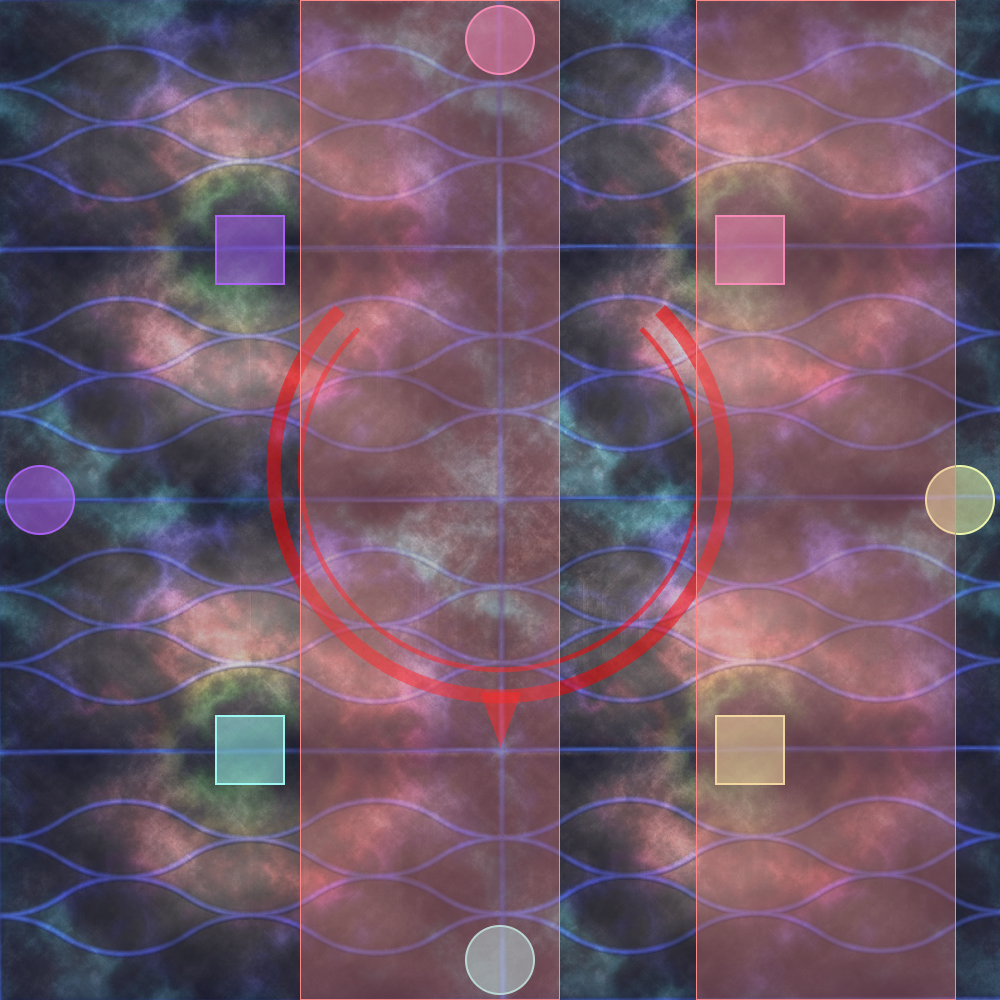 |