Anabaseios: The Eleventh Circle (Savage)
Game8 is using an updated version of Hamkatsu’s strat, with ZizieZip’s updated Light and Darkness strat.
Things to check on Party Finder
- Check the Shadowed Messengers strat:
- Japanese parties will begin Shadowed Messengers with the boss facing true West. This results in two movements while dodging all the AoEs, but doesn’t rely on the MT looking for the Light clone.
- English groups will have the MT face the boss towards the Light clone (or directly opposite), resulting in one less movement from the dodge.
- Check who adjusts for (Dark) Jury Overruling:
- Japanese parties will generally stick to the macro and have the DPS rotate clockwise to their respective T/H partners.
- English parties may opt to have the T/H rotate anti-clockwise to join their DPS partners instead.
English
MT-group:MTH1D1D3 ST-group:STH2D2D4
 【Spread】   【Darkness Pairs/Towers】
  D3 MT D4  |    MTD3
  H1 ★ H2   |  H1D1 ★ H2D4
  D1 ST D2  |     STD2
 ※True North  |×-formation → Rotate CCW
【Arcane Revelation & Shadowed Messengers】
  MT-group:Start West ST-group:Start East
【Divisive Overruling (Dark)】 ※ Facing boss
   ← MTD3/STD2 ▼ H1D1/H2D4 →
 ※ Shadowed Messenger tethers
  Tank:North  Light:Mid
【Divisive Overruling (Lightstream)】
   ← MT-group ▼ ST-group →
【Dark and Light:ZizieZip】※ Rotate CW
  Light ⇒ TH:West  DPS:East
  Dark ⇒ TH:East  DPS:West
【Divisive Overruling (Dark and Light)】
 Wait at a marker → Rotate clockwise
 Dark pairs:
   ← Short tethers ▼ Long tethers →
【Dark Current】
  MT-group:N/W  ST-group:S/E
   T/H:Forward  DPS:Back
   Inside: T + M  Outside:H + R
【Letter of the Law】
  Tank tether:N/E  Others:S/W
  Dark tether:Mid Light tether:Outside
  Towers:Pair positions (use True North)
Japanese
※ボスを見て以外は北(A)基準
MT組:MTH1D1D3 ST組:STH2D2D4
【基本散開】   【アップヘルド闇/ペア散開】
D3 MT D4           MTD3
H1 ★ H2           H1D1 ★ H2D4
D1 ST D2              STD2
※闇ジューリー⇒DPS時計※塔X字⇒反時計
【魔法陣&戒律】
初動⇒MT組:西待機 ST組:東待機
「魔法陣ディスミサル闇:戒律闇ディバイド」
ボスを見て 左:MTD3/STD2 右:H1D1/H2D4
戒律の闇線⇒T線:Aマーカー 光:ボス中央
【ライトストリーム後ディバイド】
ボスを見て MT組:左 ST組:右
【光と闇の調停:ジジー式】
光⇒TH:西側 DPS:東側
闇⇒TH:東側 DPS:西側
【調停ディバイド】
近くのマーカーで待機し位置確定後 時計回り
闇ペア⇒ボスを見て 短い線(異色):左 長い線(同色):右
【ダークストリーム】
MT組:北西 ST組:南東
内:近接(T進行方向側) / 外:遠隔(H進行方向側)
【理法の幻想】
闇線中央捨て 光線その場
塔処理 北(A)基準で塔ペア散開
闇ディスミサル ボスを見て 左:MTD3/STD2 右:H1D1/H2D4
Markers
The colours indicate the pairs positions (MT/D3 are on red, etc).
XIVLauncher WaymarkPresetPlugin positions
{
  "Name":"P11S",
  "MapID":941,
  "A":{"X":100.0,"Y":0.0,"Z":87.0,"ID":0,"Active":true},
  "B":{"X":113.0,"Y":0.0,"Z":100.0,"ID":1,"Active":true},
  "C":{"X":100.0,"Y":0.0,"Z":113.0,"ID":2,"Active":true},
  "D":{"X":87.0,"Y":0.0,"Z":100.0,"ID":3,"Active":true},
  "One":{"X":90.8,"Y":0.0,"Z":90.8,"ID":4,"Active":true},
  "Two":{"X":109.2,"Y":0.0,"Z":90.8,"ID":5,"Active":true},
  "Three":{"X":109.2,"Y":0.0,"Z":109.2,"ID":6,"Active":true},
  "Four":{"X":90.8,"Y":0.0,"Z":109.2,"ID":7,"Active":true}
}
You may see the square markers rotated 90 degrees clockwise in Japanese parties.
XIVLauncher WaymarkPresetPlugin positions
{
  "Name":"P11S (JP)",
  "MapID":941,"A":{"X":100.0,"Y":0.0,"Z":87.0,"ID":0,"Active":true},
  "B":{"X":113.0,"Y":0.0,"Z":100.0,"ID":1,"Active":true},
  "C":{"X":100.0,"Y":0.0,"Z":113.0,"ID":2,"Active":true},
  "D":{"X":87.0,"Y":0.0,"Z":100.0,"ID":3,"Active":true},
  "One":{"X":109.2,"Y":0.0,"Z":90.8,"ID":4,"Active":true},
  "Two":{"X":109.2,"Y":0.0,"Z":109.2,"ID":5,"Active":true},
  "Three":{"X":90.8,"Y":0.0,"Z":109.2,"ID":6,"Active":true},
  "Four":{"X":90.8,"Y":0.0,"Z":90.8,"ID":7,"Active":true}
}
Timeline
 (Credit: u/ExiaKuromonji)
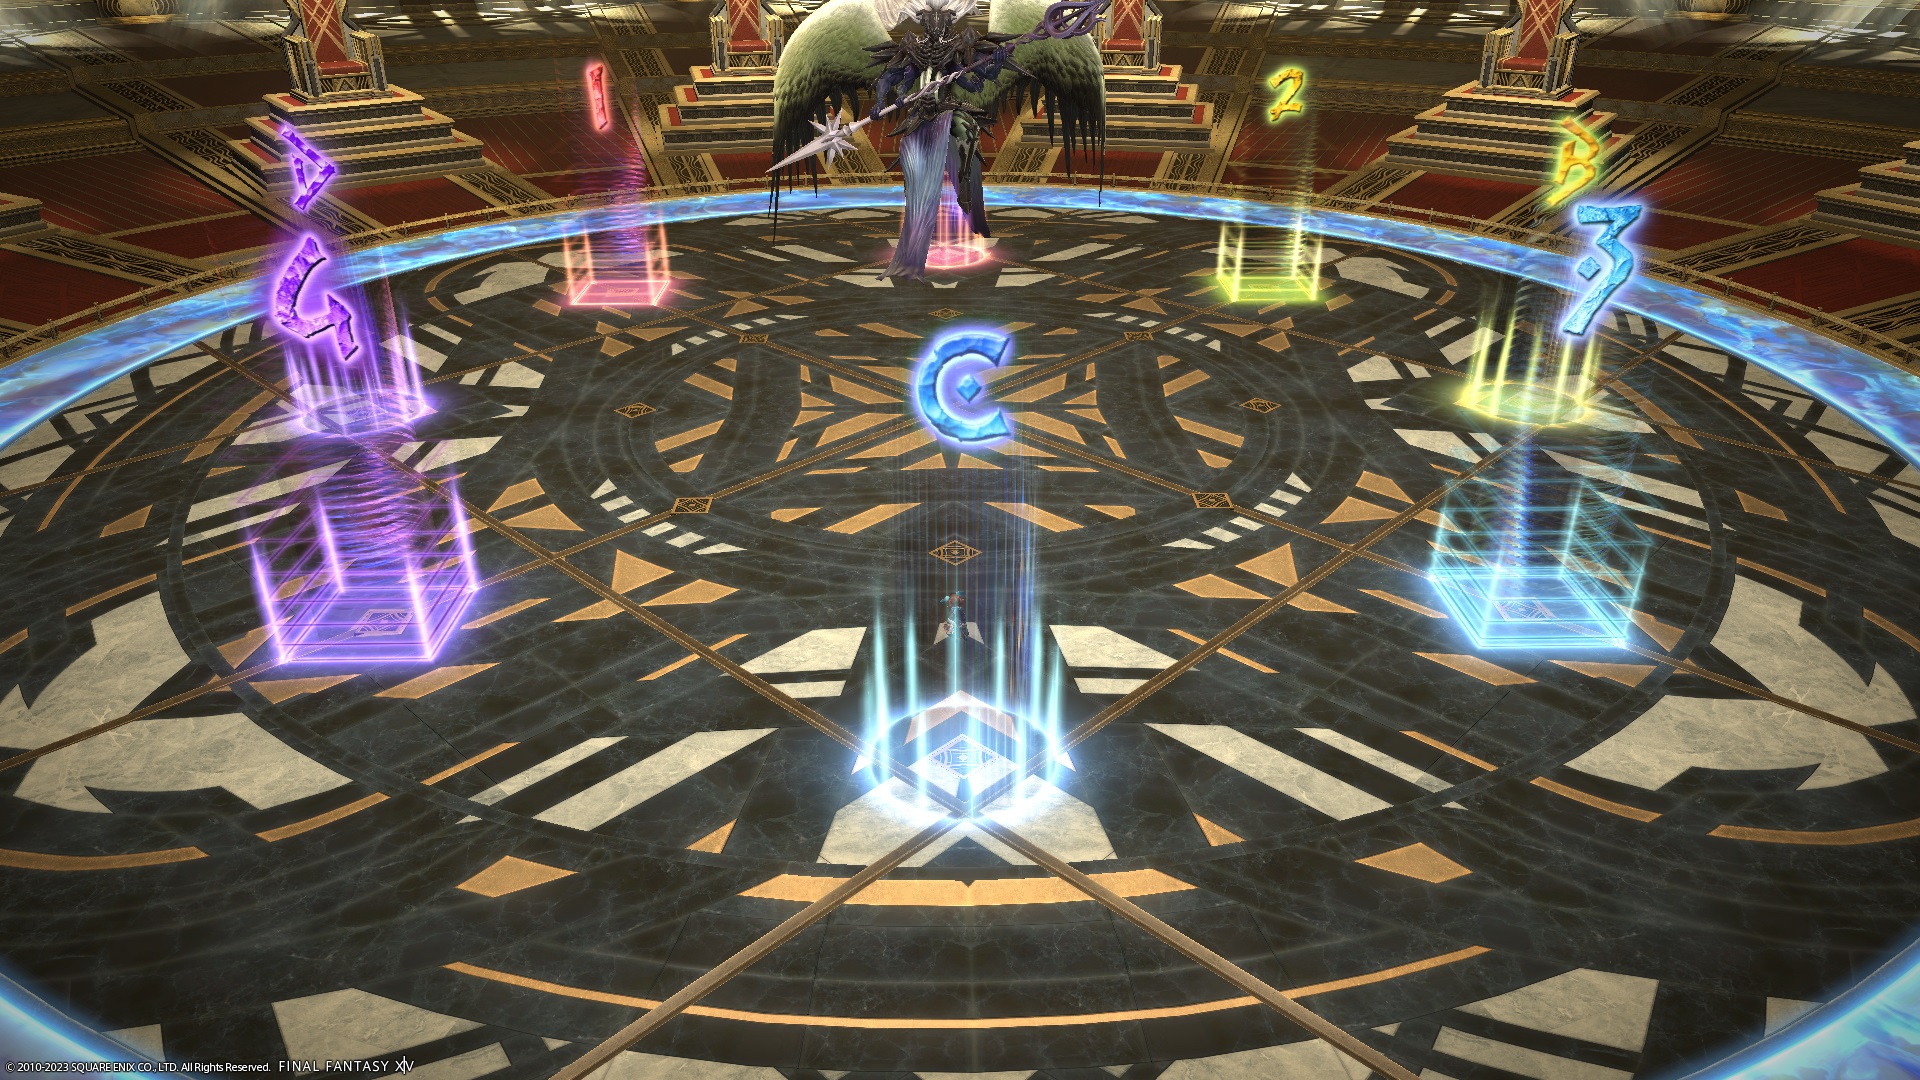
ZizieZip’s Dark and Light
During Dark and Light, the boss will tether the party together with two solid tethers (one light, one dark), and two split tethers (light on one side, and dark on the other).
The boss will then go through the basic mechanics of the fight, which need to be resolved together with the tethers.
The party will always rotate clockwise to resolve the upcoming mechanics.
1. Preposition based on your roles:
Players will get tethered together.
| 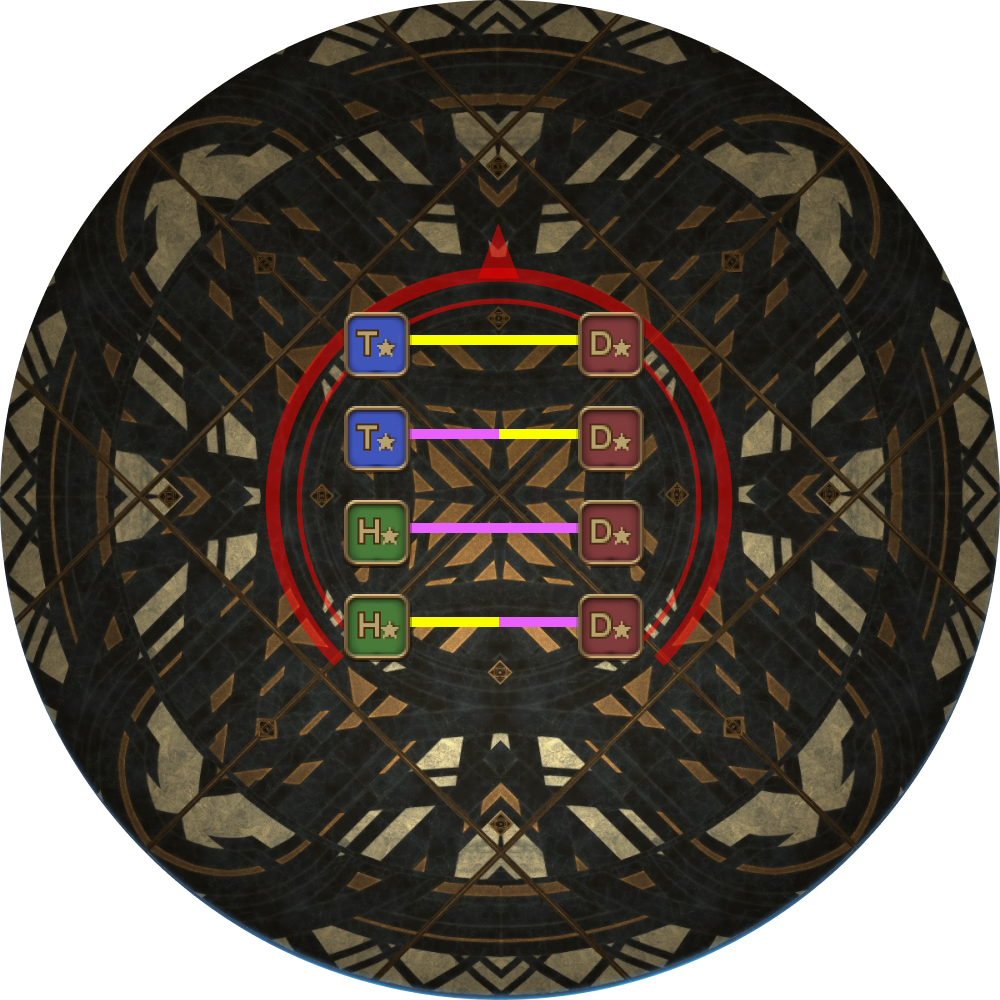 |
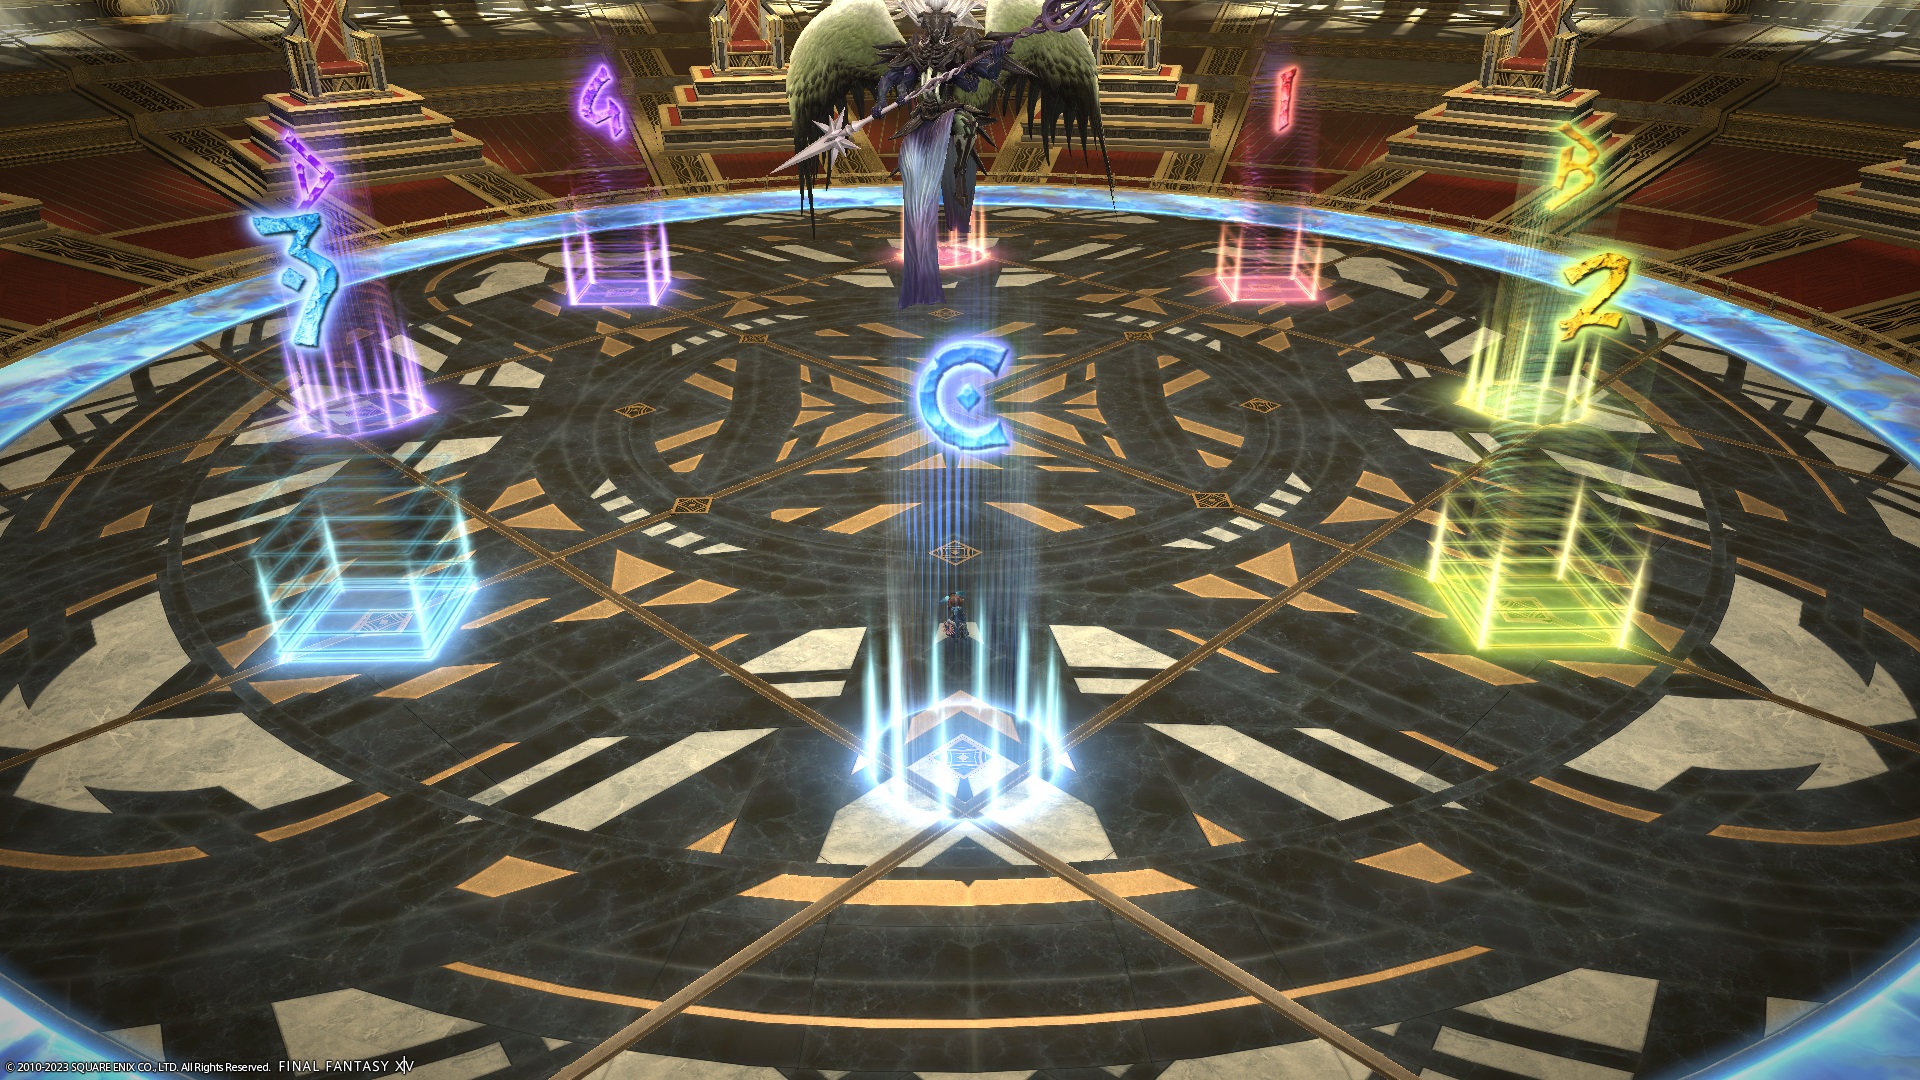
2. If you are connected to a purple tether (dark), swap sides. This is equivalent to:
| 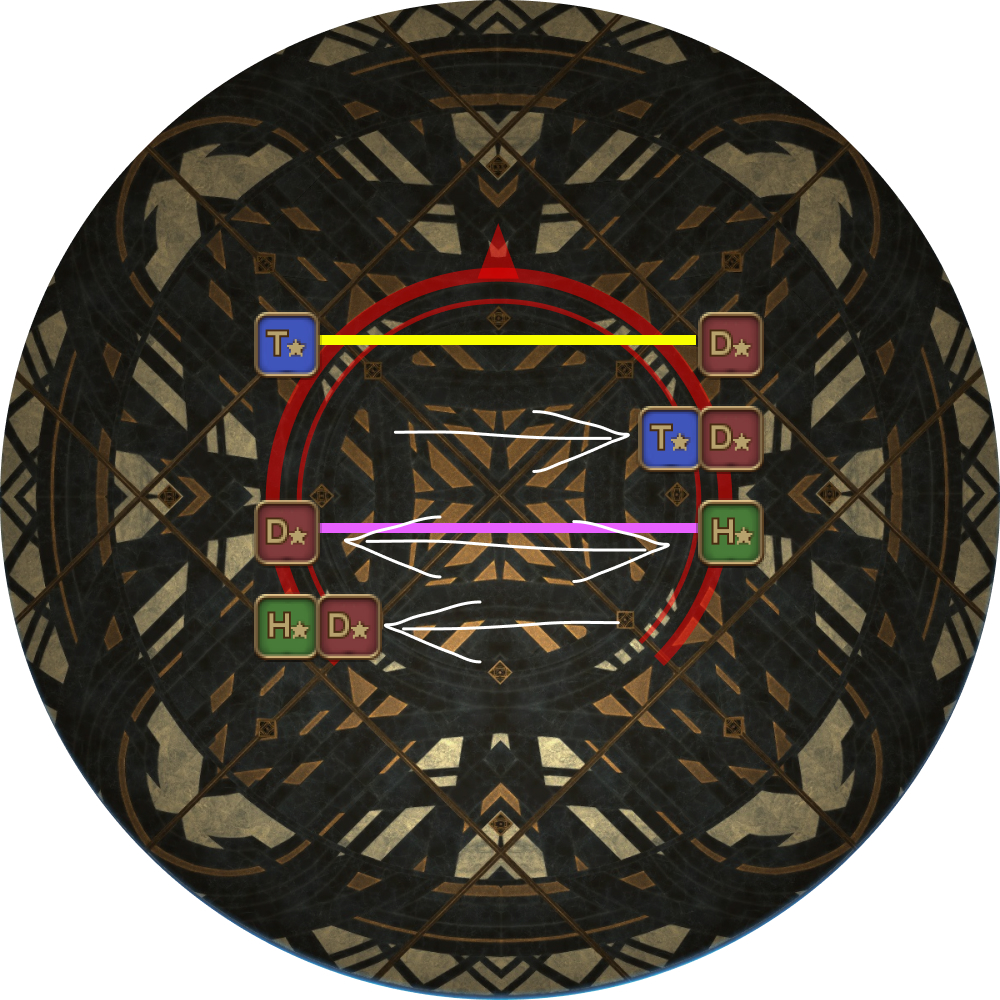 |
3. The boss will cast Arcane Revelation, and glow either light (yellow) or dark (purple). Note which colour the boss glowed. | 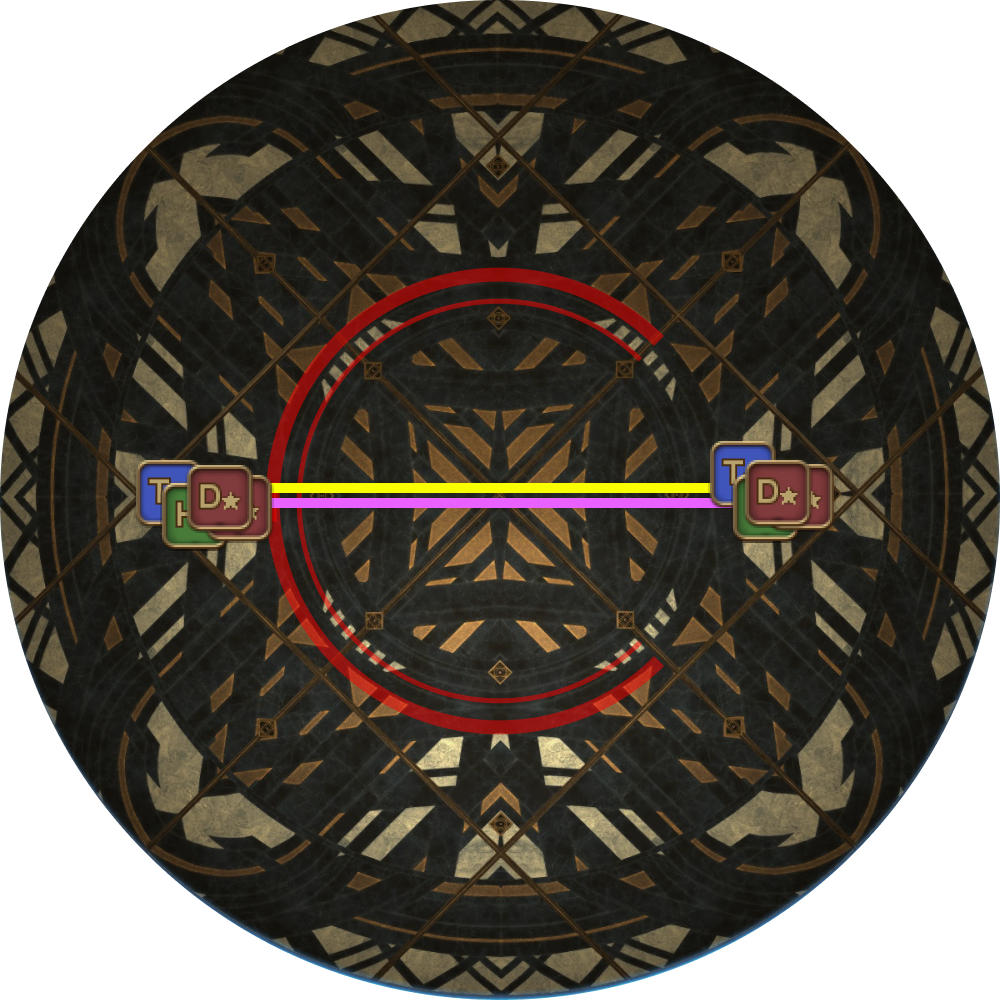 |
4. Orbs will appear at the cardinal locations. Rotate clockwise if needed so that you are standing at the opposite coloured orb to whatever the boss glowed in the previous step. | 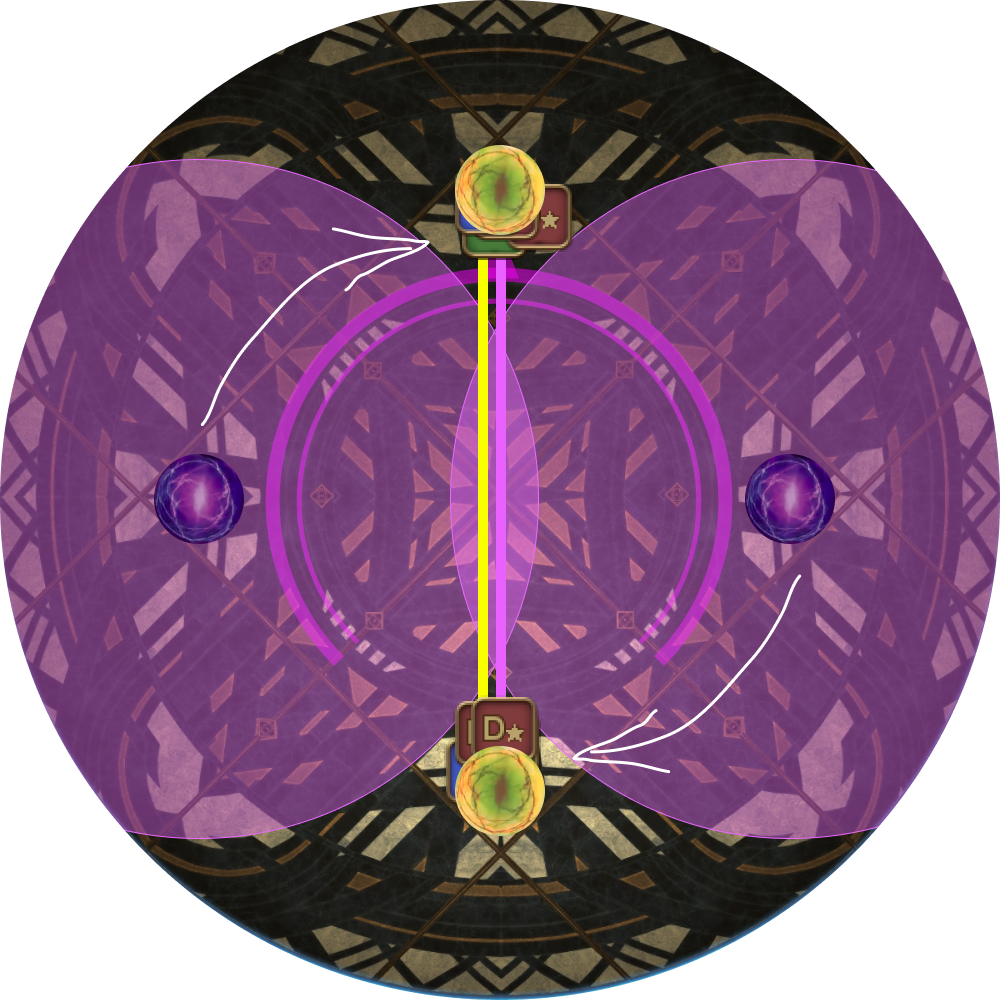 |
5. The boss then casts Jury Overruling (glowing light or dark), requiring the party to spread. (The players will alternate between light and dark.) From the stack positions in the previous step:
The long tethers can use the waymarks on the ground. The short tethers will use the diamond marks on the floor inside the boss's targeting circle. | 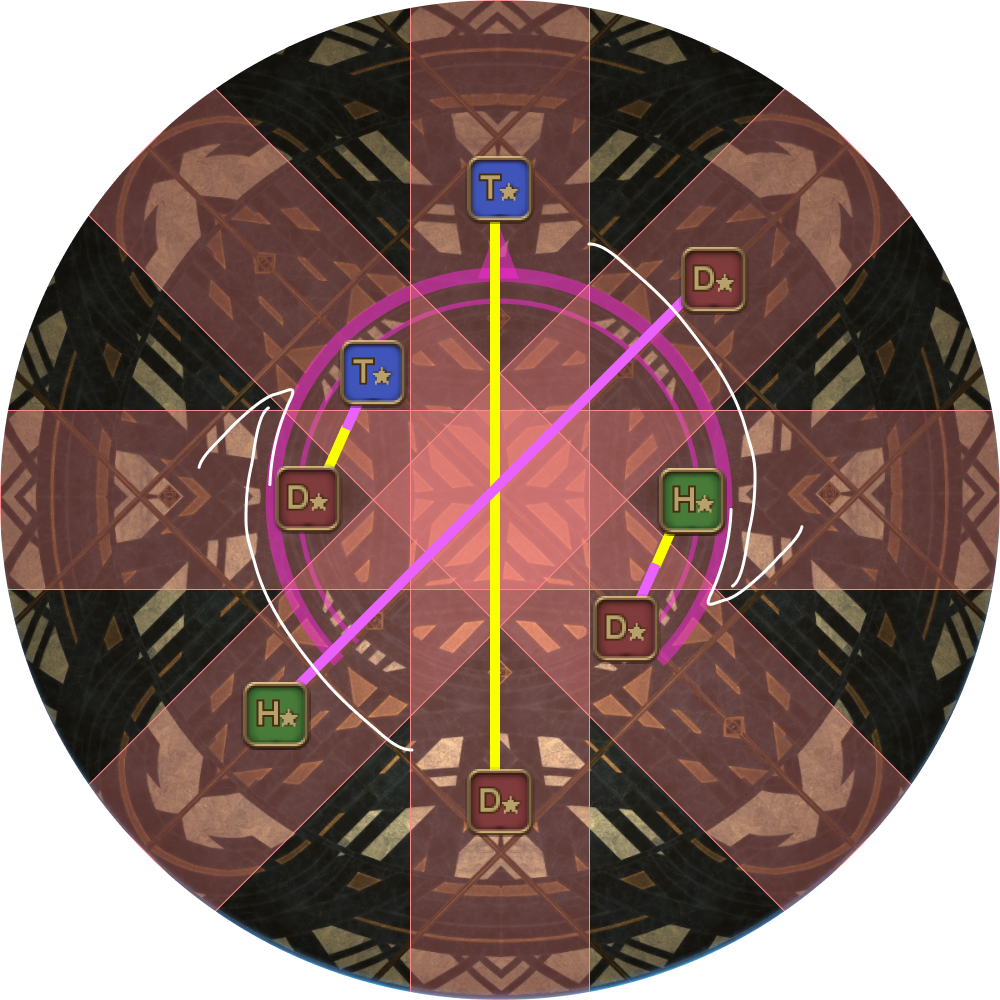 |
6. Resolve the second half of Jury Overruling based on whether the boss is aspected to Light or Dark. | 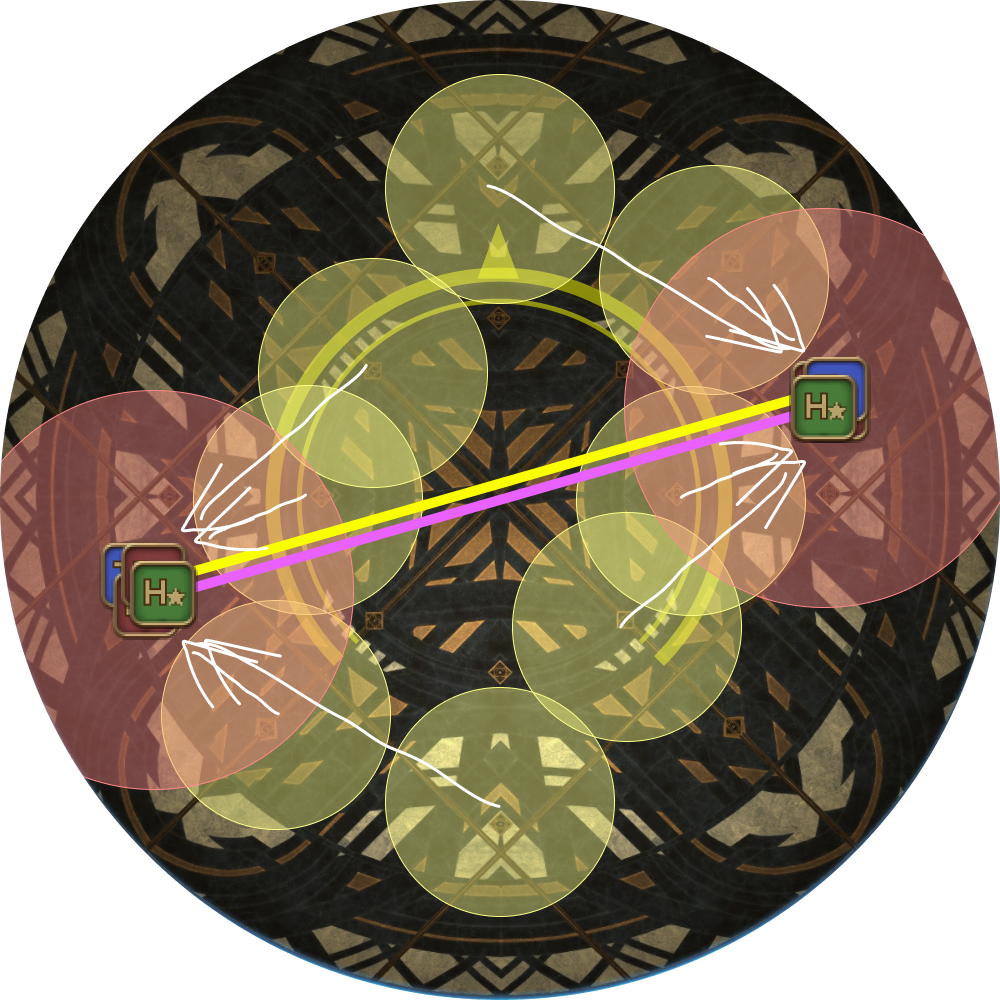 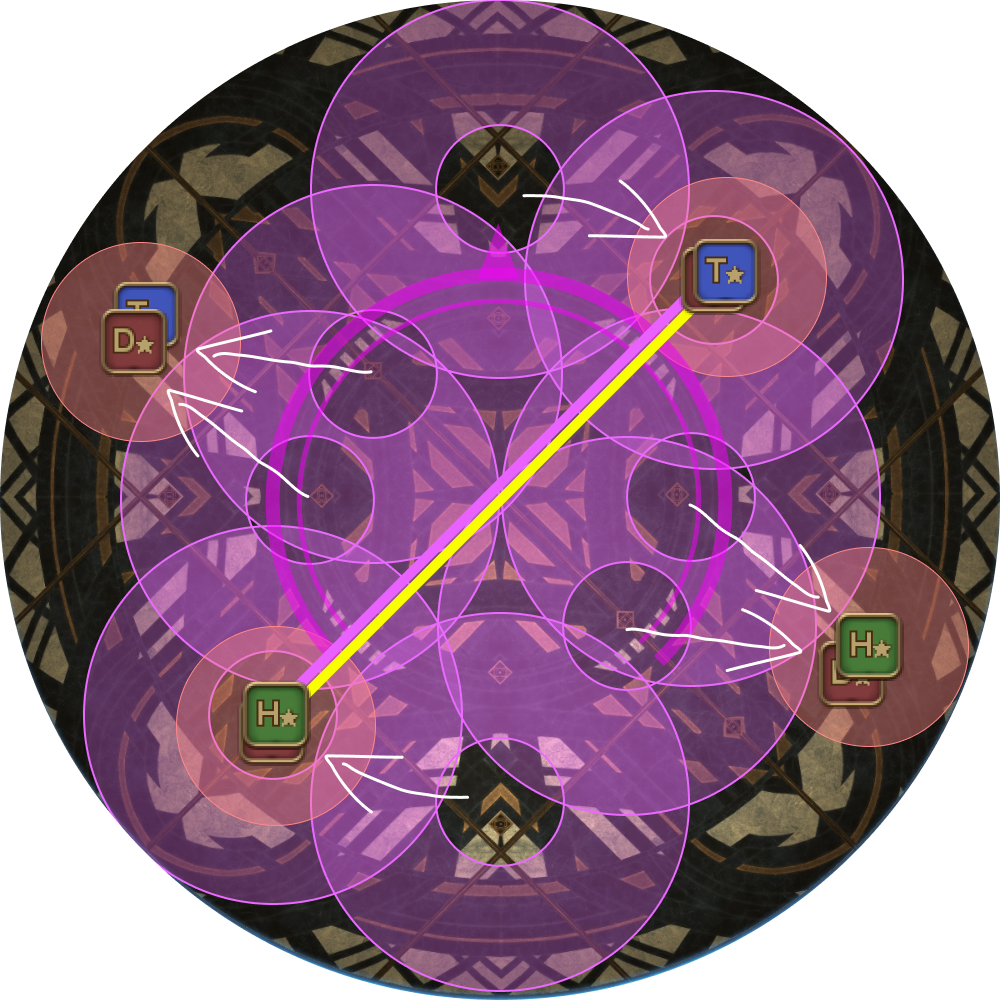 |
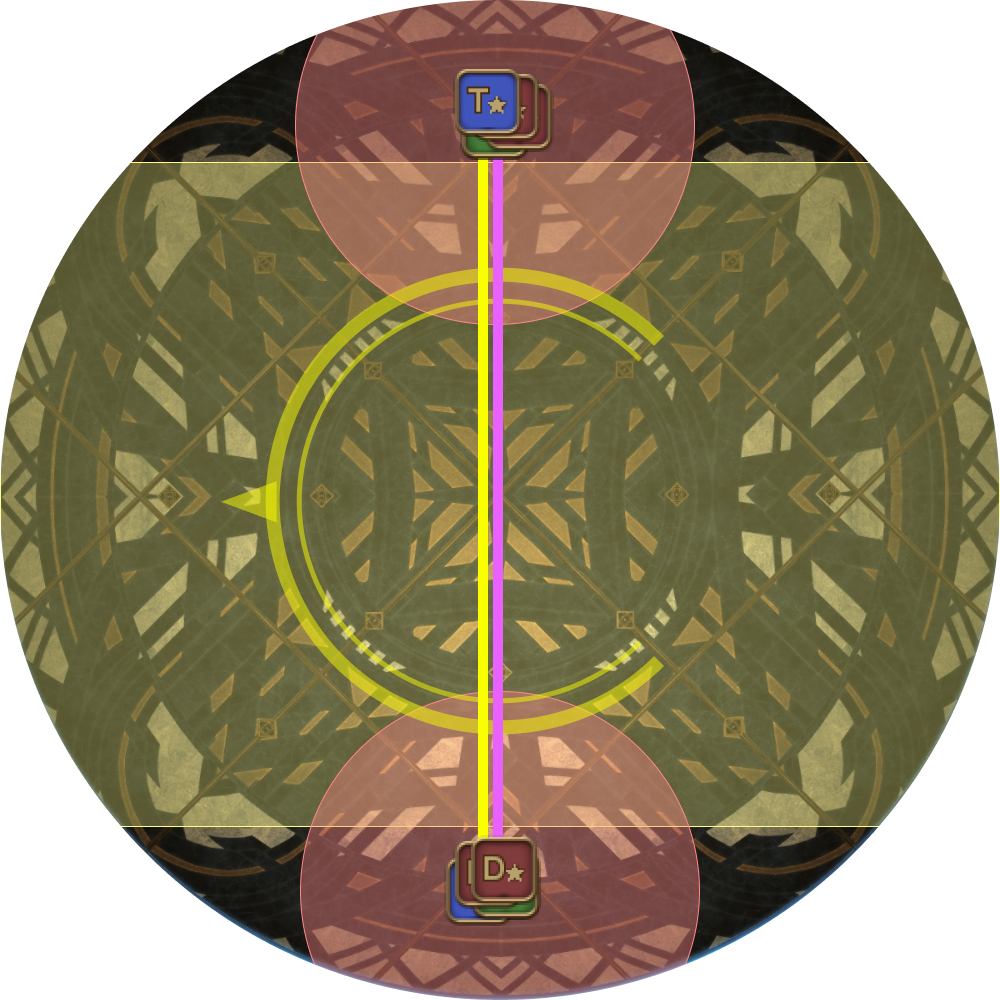
7. Reset your positions on opposite markers. The boss will then cast Divisive Overruling. |  |
8. Rotate 90 degrees clockwise to dodge the first part of Divisive Overruling. | 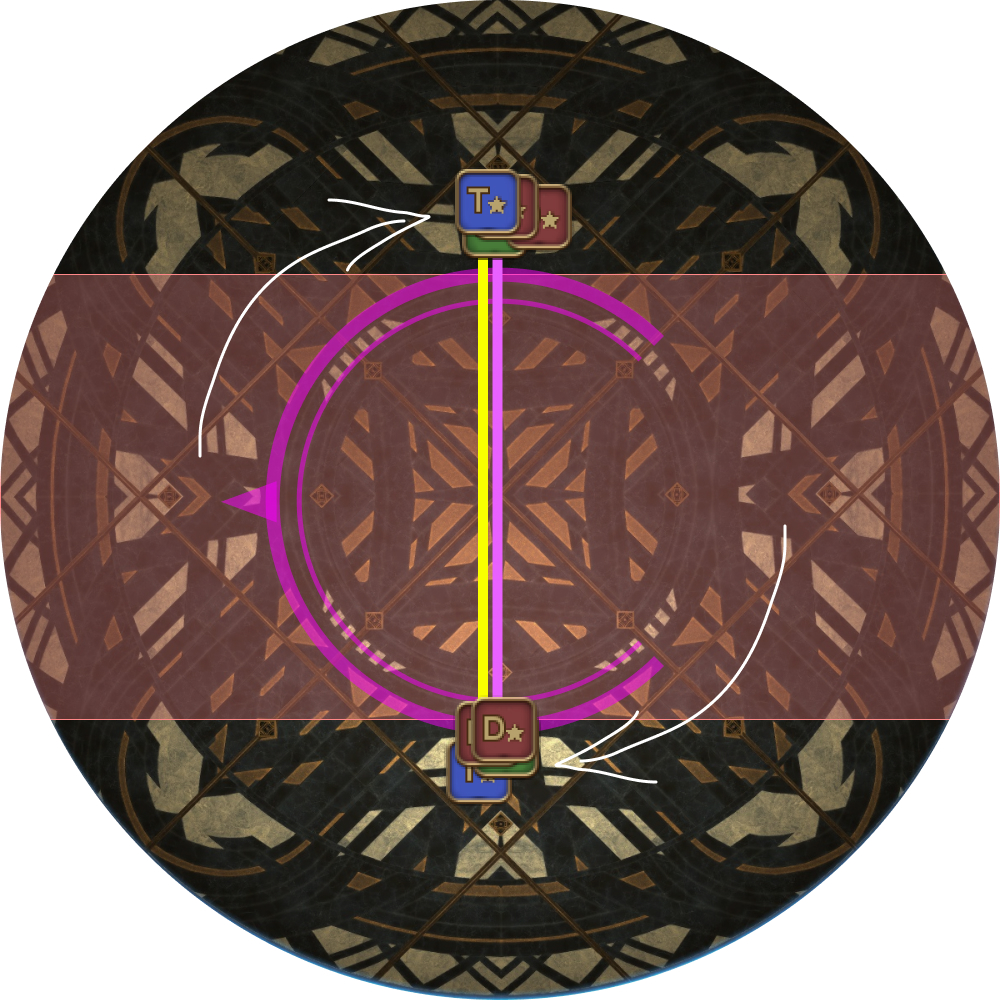 |
9. Resolve the second part of Divisive Overruling based on whether the boss is aspected to Light or Dark.
|  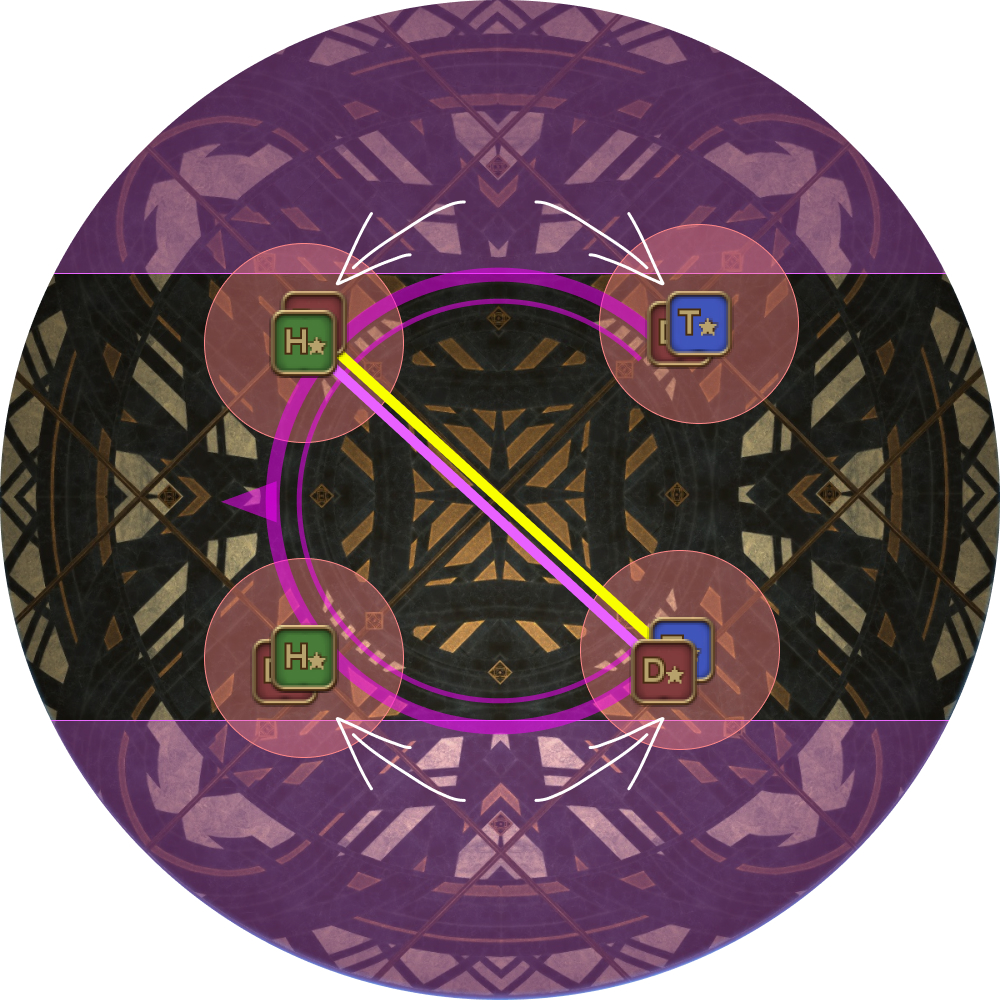 |
Frequently Asked Questions
[Damage Down] How strong is the damage down debuff in this fight?
The Damage Down debuff in this phase lowers a player's damage by 39%. |
[Letter of the Law] Why is the split N/E vs S/W, and not N/W vs S/E like before?
This is because the logic is "from your base positions, rotate clockwise as needed". For most other mechanics, the base positions are E/W, which means the MT group takes W or N, while the ST group takes E or S. With Letter of the Law, the "natural" position there (supposedly) is the usual "tanks North, party South". By then applying the same logic above, you then get "tanks N or E, party S or W". |