Bahamut Prime
Bahamut’s phase is a gauntlet of “Trio” mechanics (which is where the term comes from).
Trios are essentially a mechanics dance, involving mechanics from each of the three bosses (Twintania, Nael, Bahamut) executed together.
Quickmarch Trio
Bahamut opens with a Flare Breath into Flatten (and an auto-attack) before starting the first of many Trios.
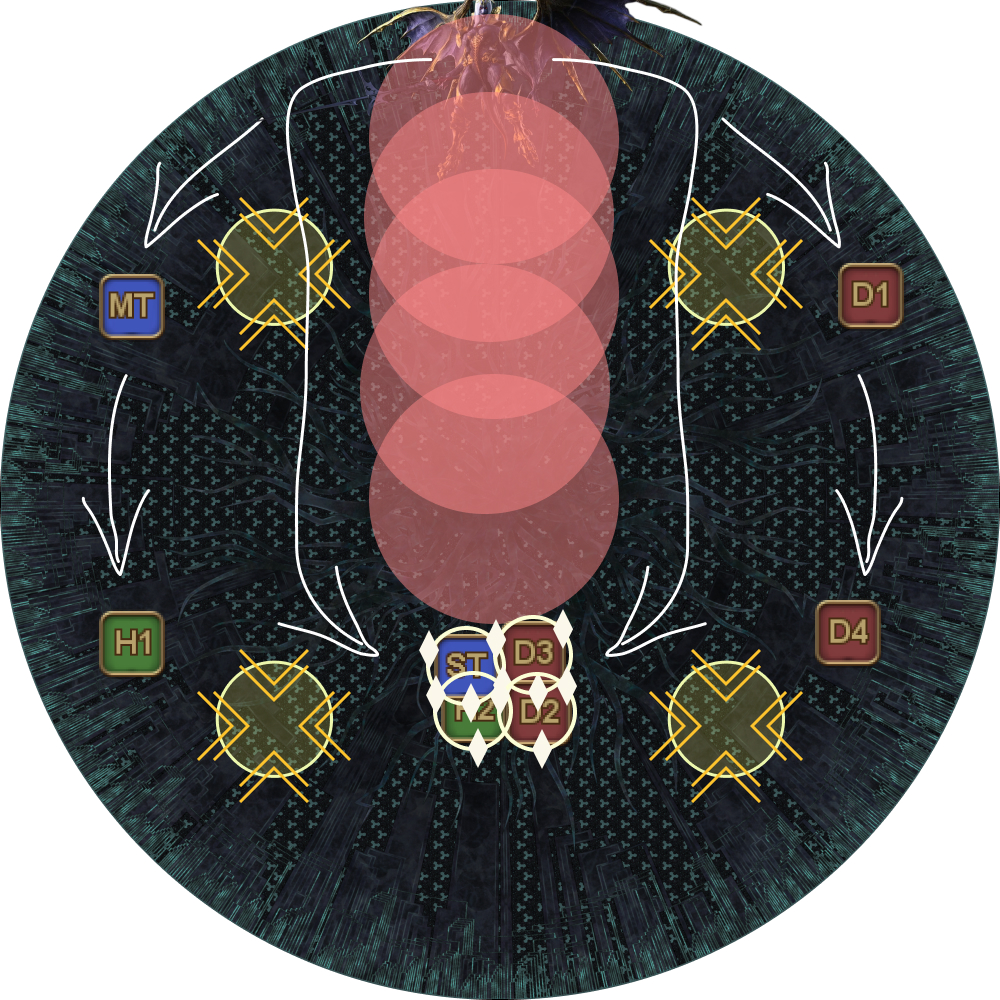
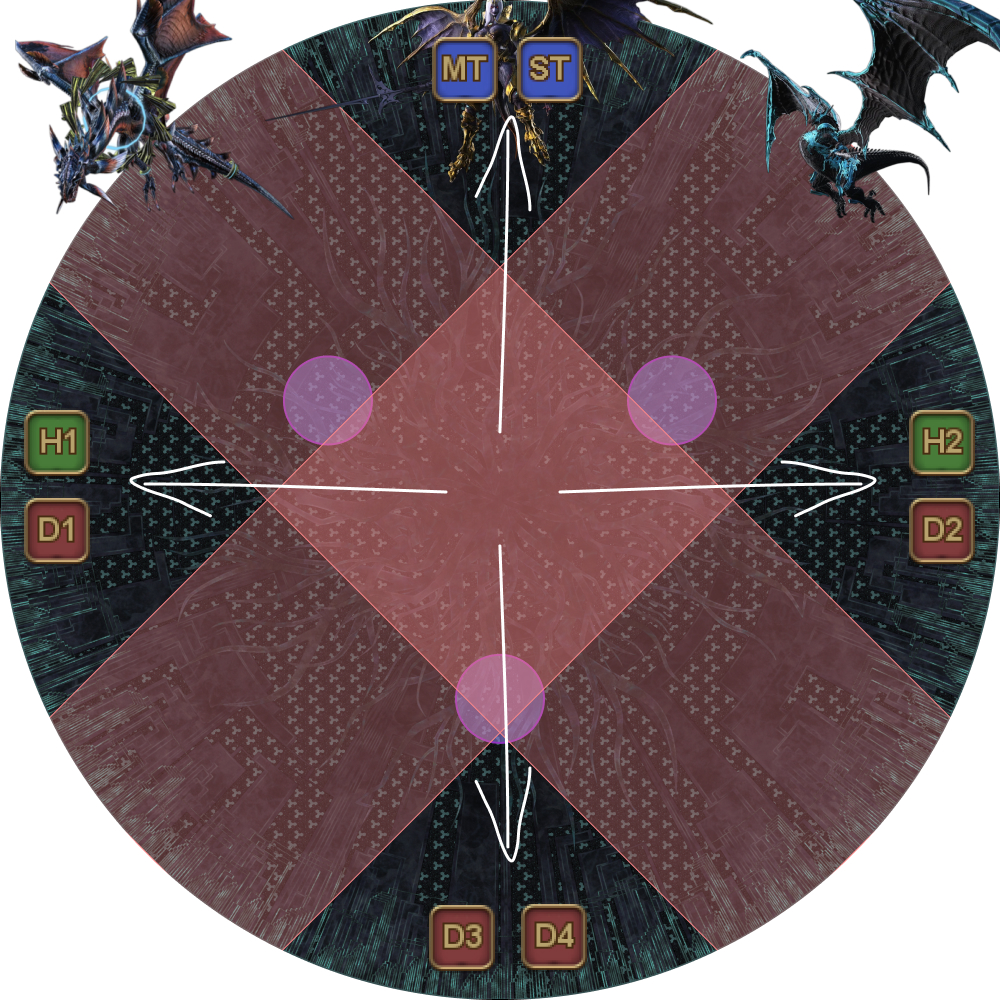
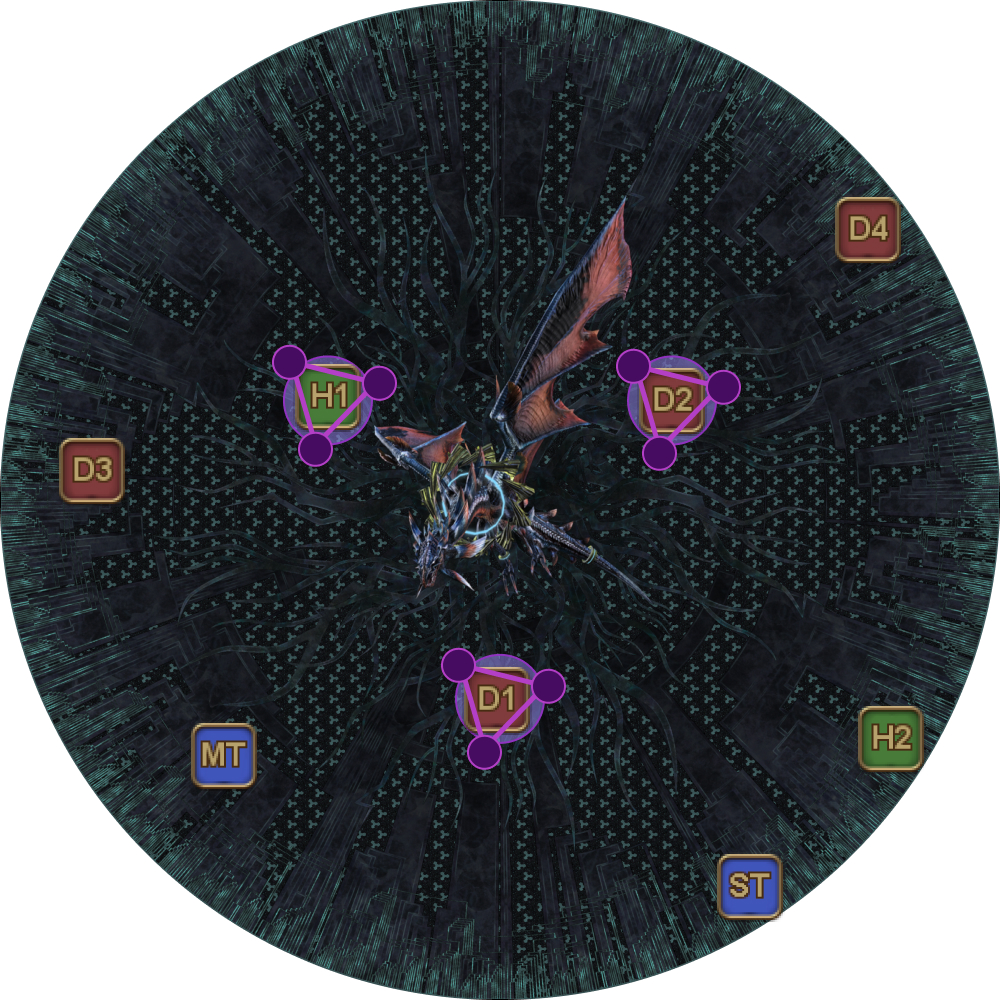
| 1. Using the three dragons as North, spread out along the West and East sides of the arena.
From the dragons, spread in the order:
Note the gap between the middle positions and the top and bottom. It may be difficult for the tanks (and especially) the ranged to judge the boundary of the dive. They don't need to be right up against the dive- the healers and melee just need enough space to dodge along the edge. | 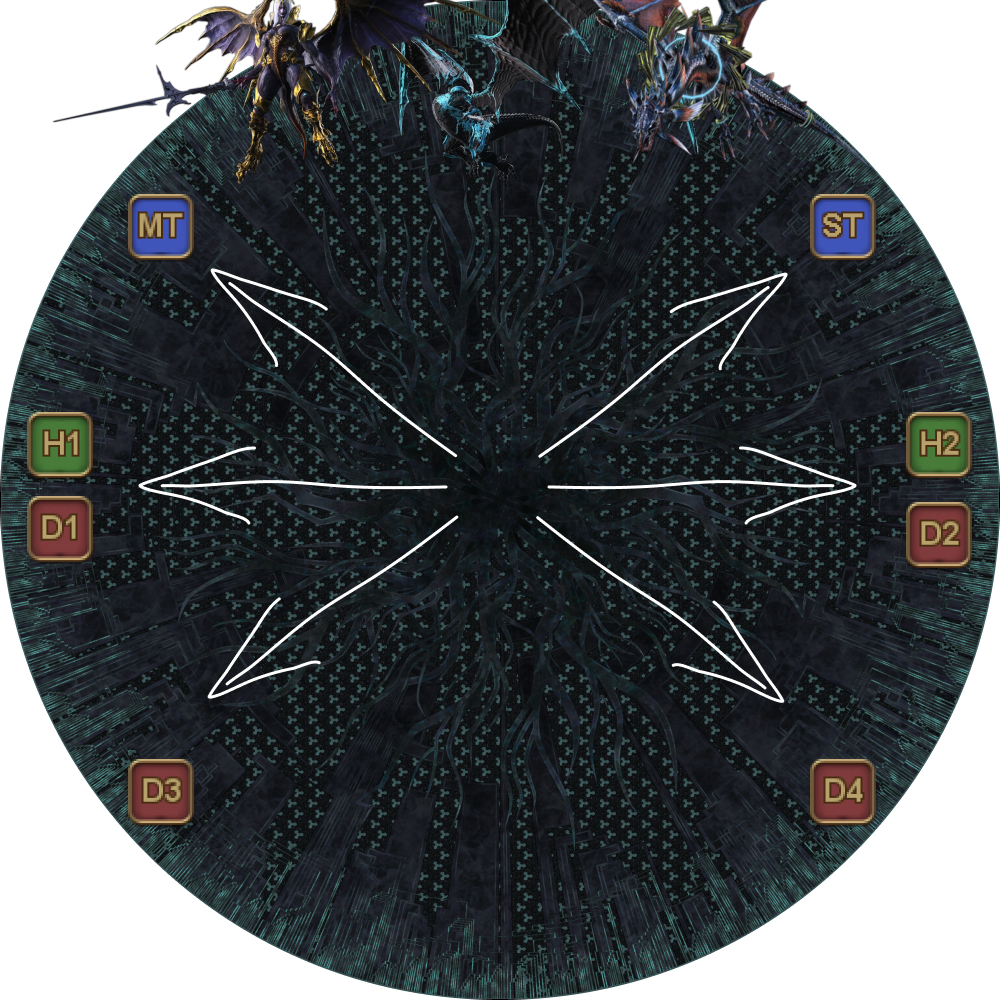 |
| 2. When Bahamut finishes casting Megaflare Dive, all players move along the edge of the arena to dodge Twisters. | 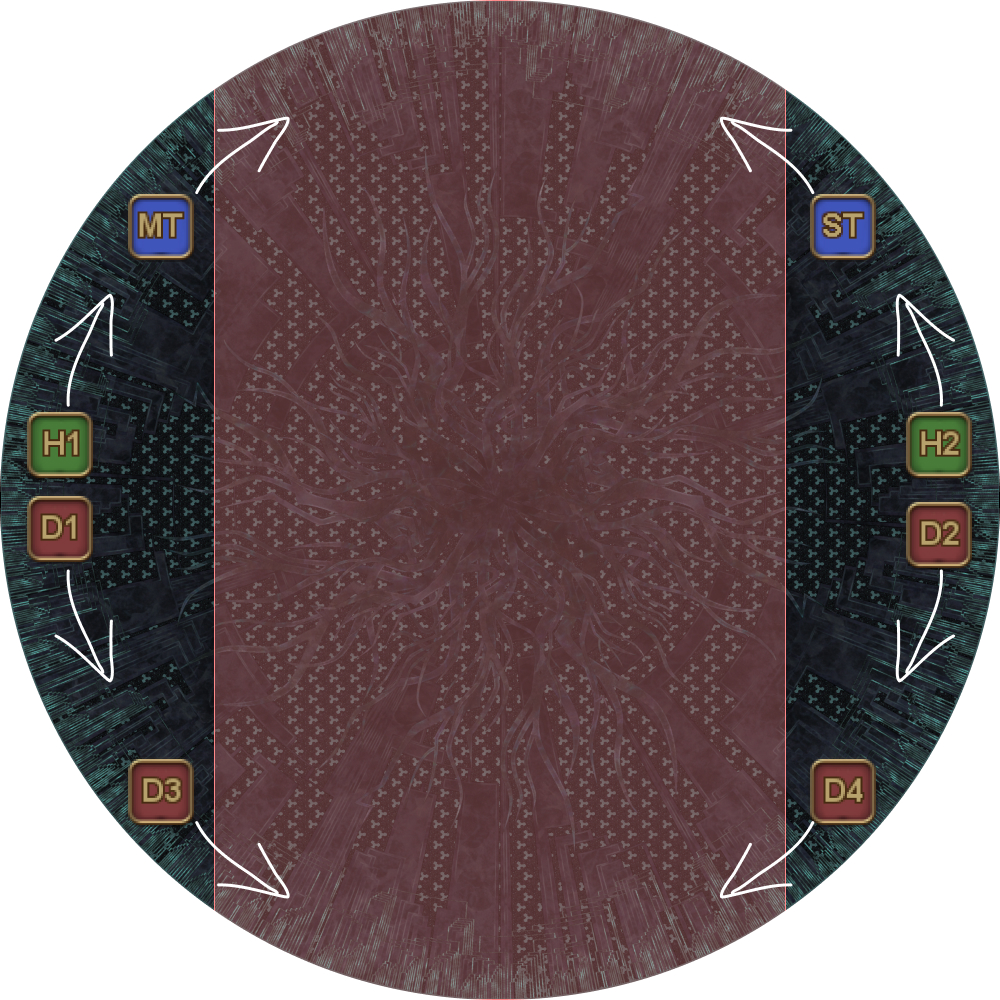 |
| 3. Four random players will have a large Megaflare AoE placed under them. Four random players will also have an untelegraphed Megaflare AoE hitting them (You can be chosen for both). | 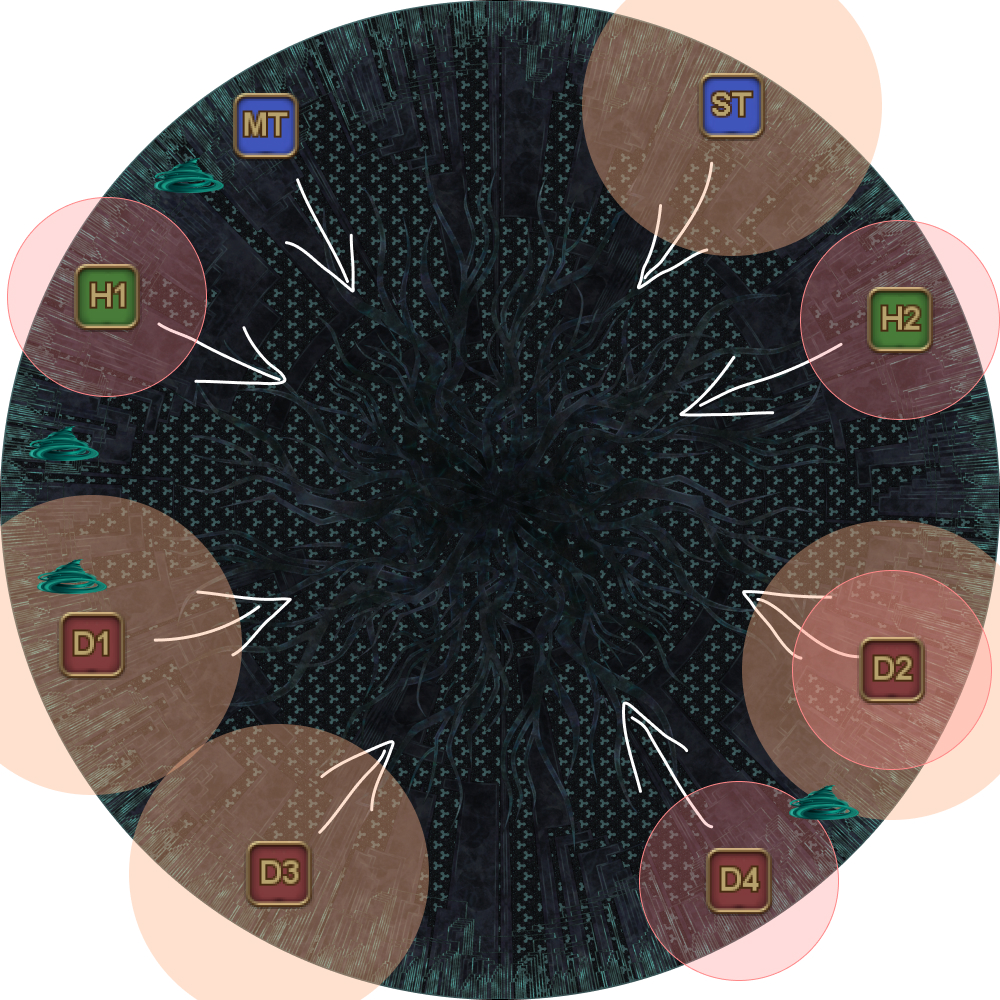 |
| 4. Bahamut appears and tethers to two random (non-tank) players. Three DPS players will get a white Megaflare ring marker around them.
The telegraphed Megaflare AoEs also go off. Healers will need to top up the DPS group as they may have been hit by the Megaflare AoEs from the previous step. | 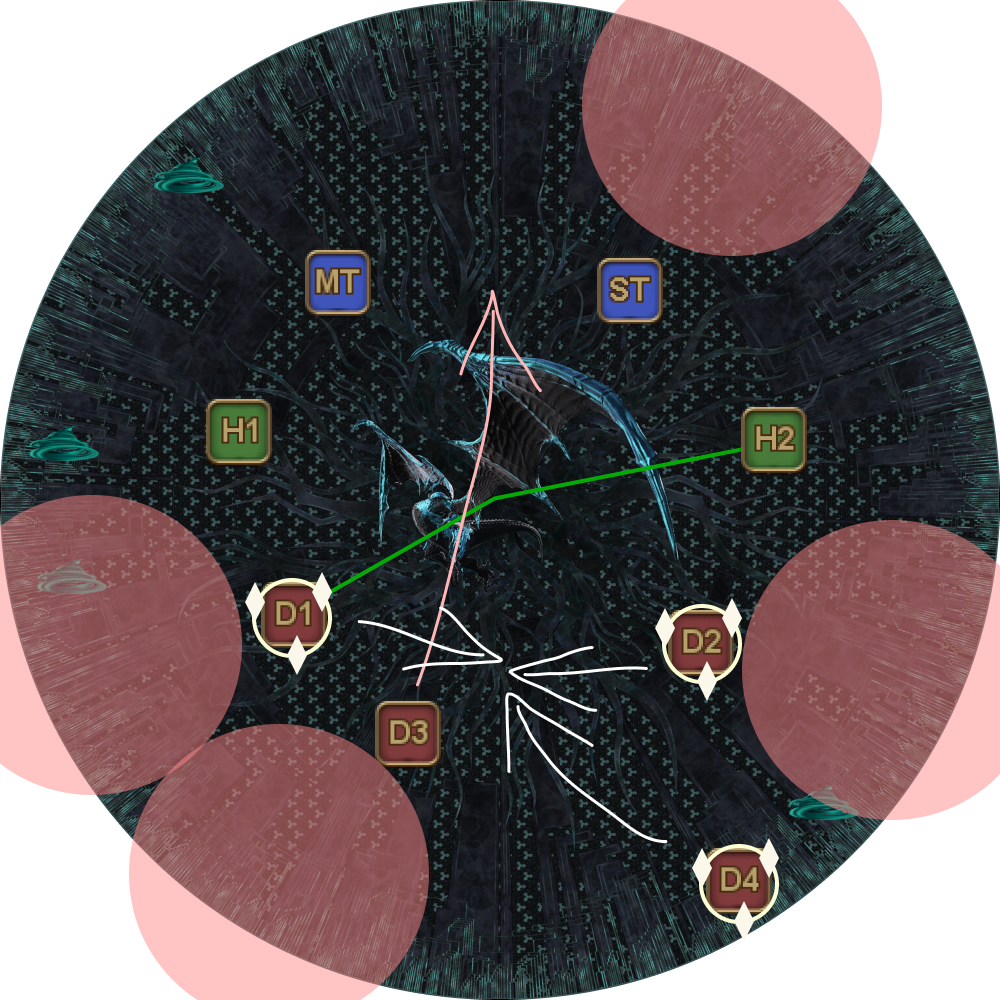 |
| 5. Earthshaker markers appear on the two healers, and the DPS that did not have a Megaflare marker in the previous step. A Megaflare stack hits one of the three marked players at random, which should be split between the three DPS. The tanks should pick up the Tempest Wing tethers either before, or immediately after this Megaflare stack. | 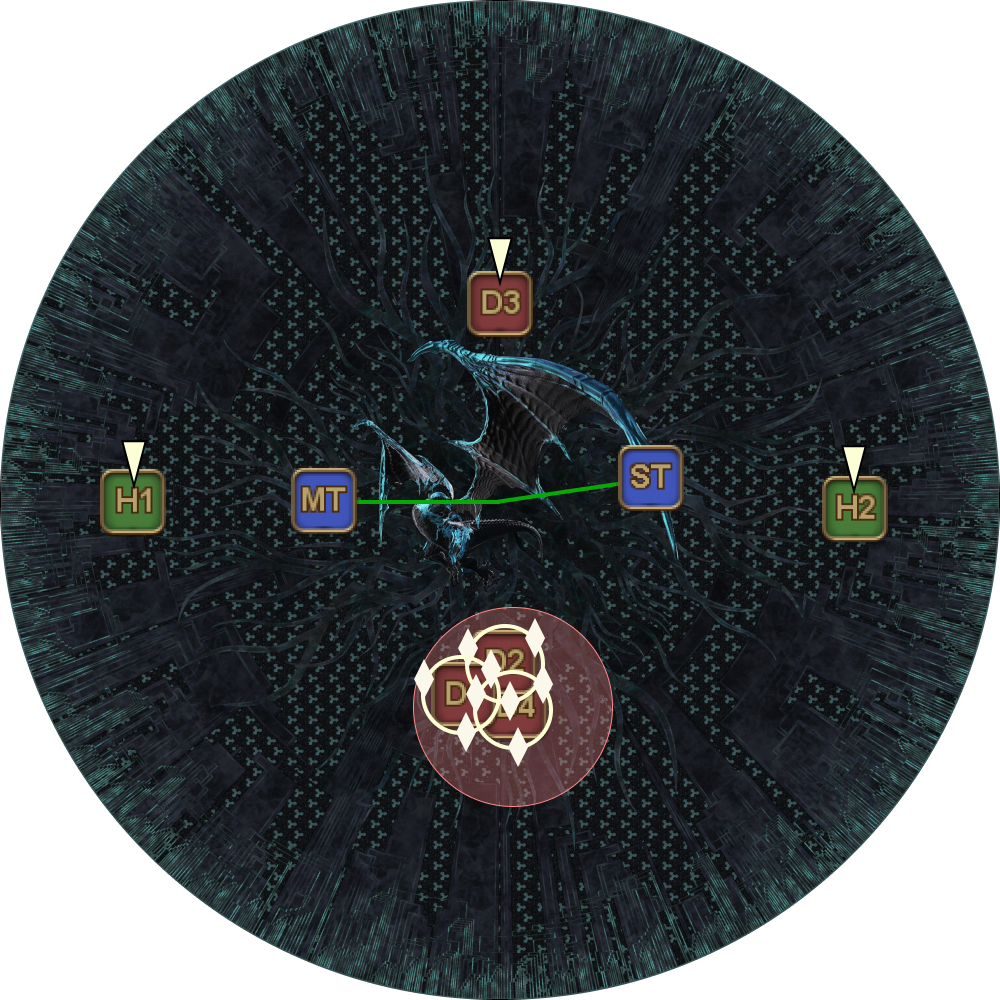 |
| 6. Earthshakers resolve. The tanks are standing in front of the healers, as they will take minimal damage from the Earthshakers, so long as they do not get hit by two. | 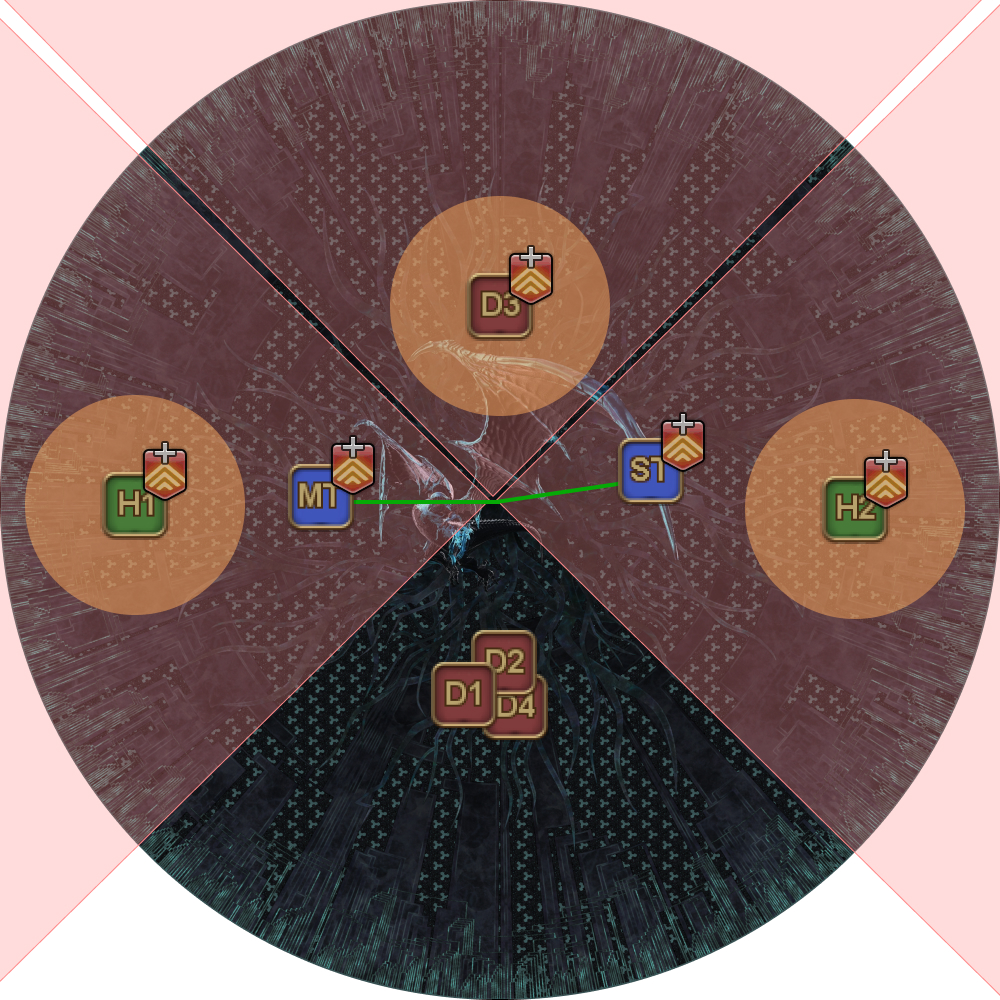 |
| 7. Tempest Wings resolve. |  |
Blackfire Trio
After Quickmarch Trio, Bahamut Flare Breathes into Flatten again, before moving onto the second Trio.
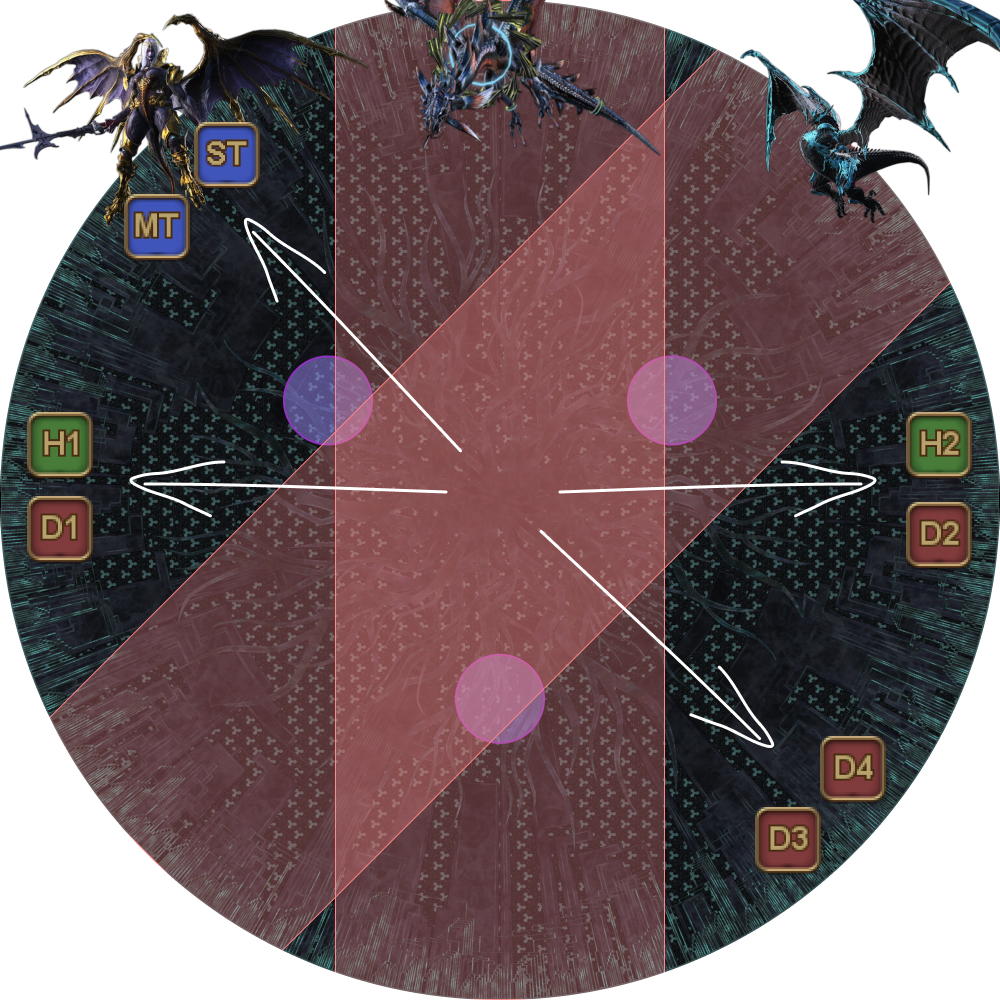
| 1. Stack center, and locate Nael. One player will get marked for Bahamut's dive. Tip: Nael will always be clockwise from Bahamut, and anti-clockwise from Twintania. |  |
| 2. Stagger-step from the center towards Nael, baiting Twintania's Liquid Hell along the way. At around the third Liquid Hell, Nael will cast Thermionic Beam on a random player. |  |
| 3. At around the fifth Liquid Hell, Bahamut's divebomb resolves, which should have been baited through the center of the arena. |  |
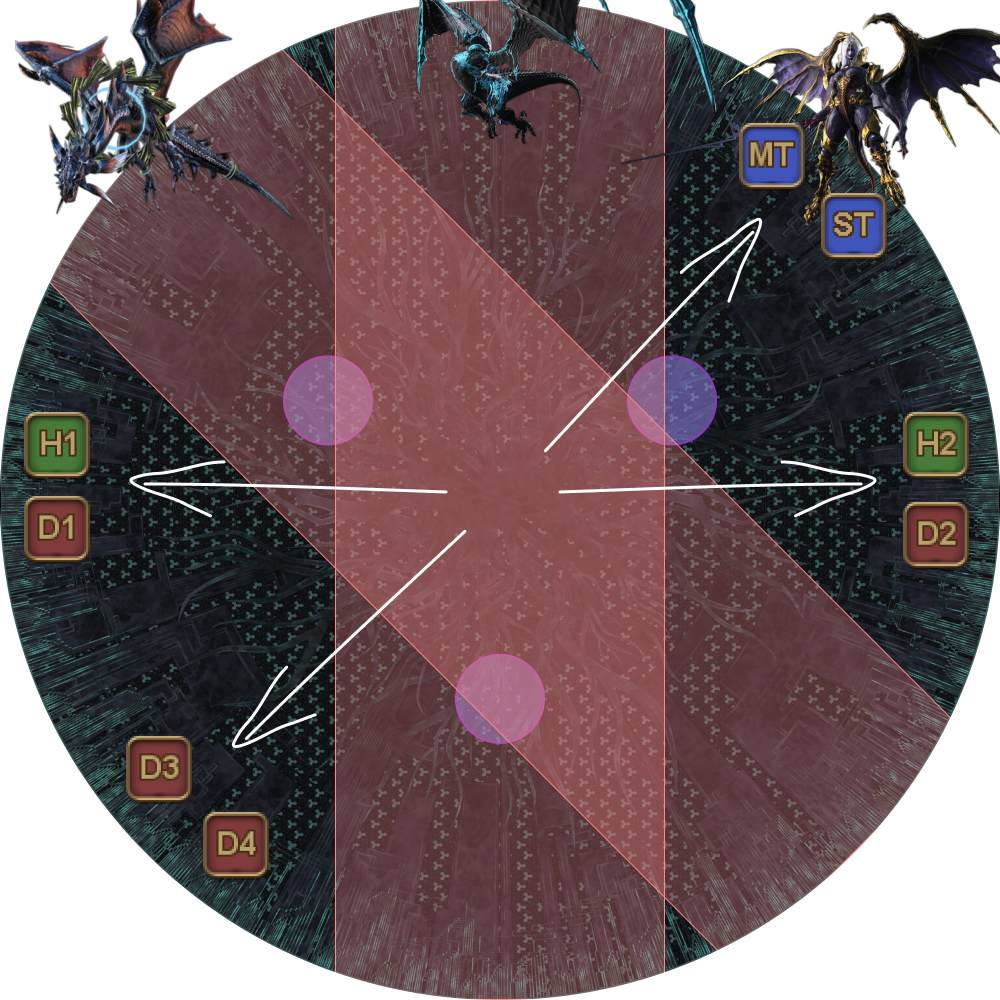
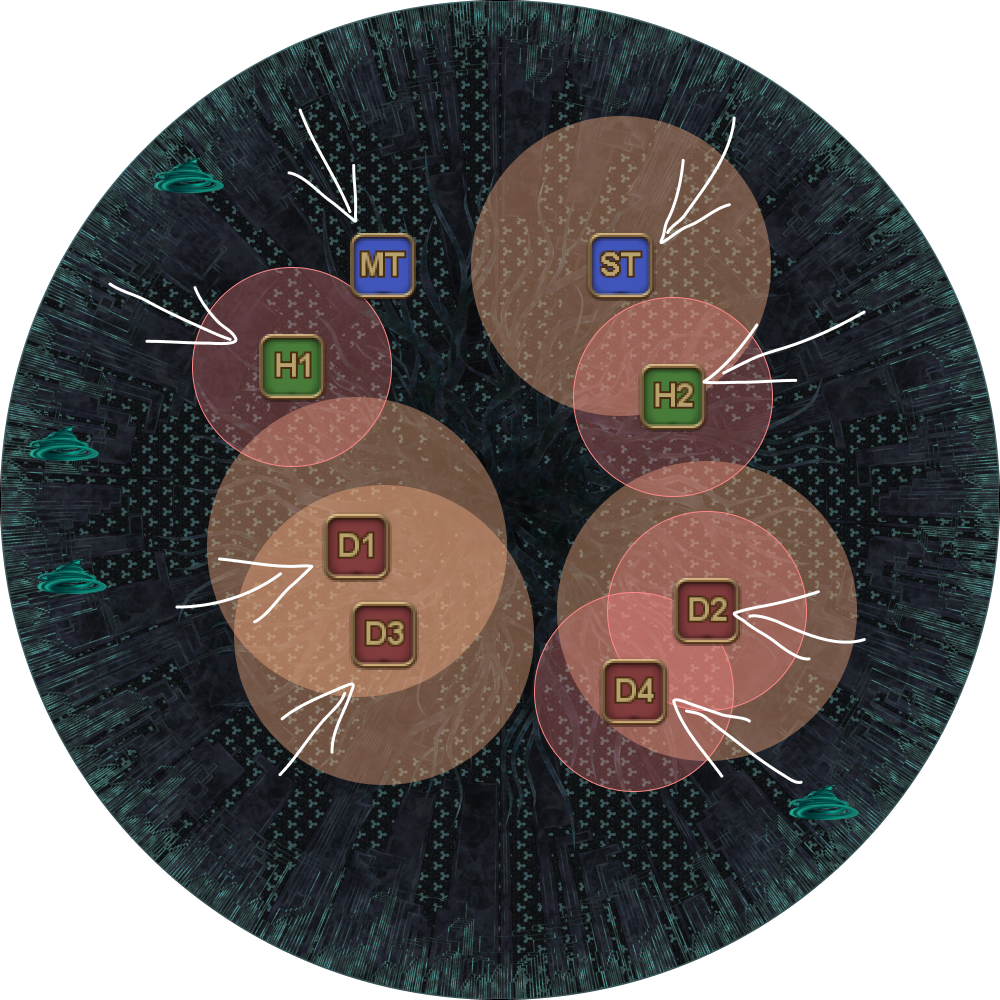
| 4. Four towers appear relative to Nael's position. The party splits into two groups:
One tank, one healer, and two DPS will get the Megaflare ring around their characters. These players will stack between the two towers opposite Nael. Using Nael as North, the players that do not have the Megaflare mark stand beside (not in!) your assigned tower:
|  |
| 5. Nael then targets random players with Hypernova AoEs. On the second Hypernova, the Megaflare stack resolves and all players without Megaflare marks enter their tower. | 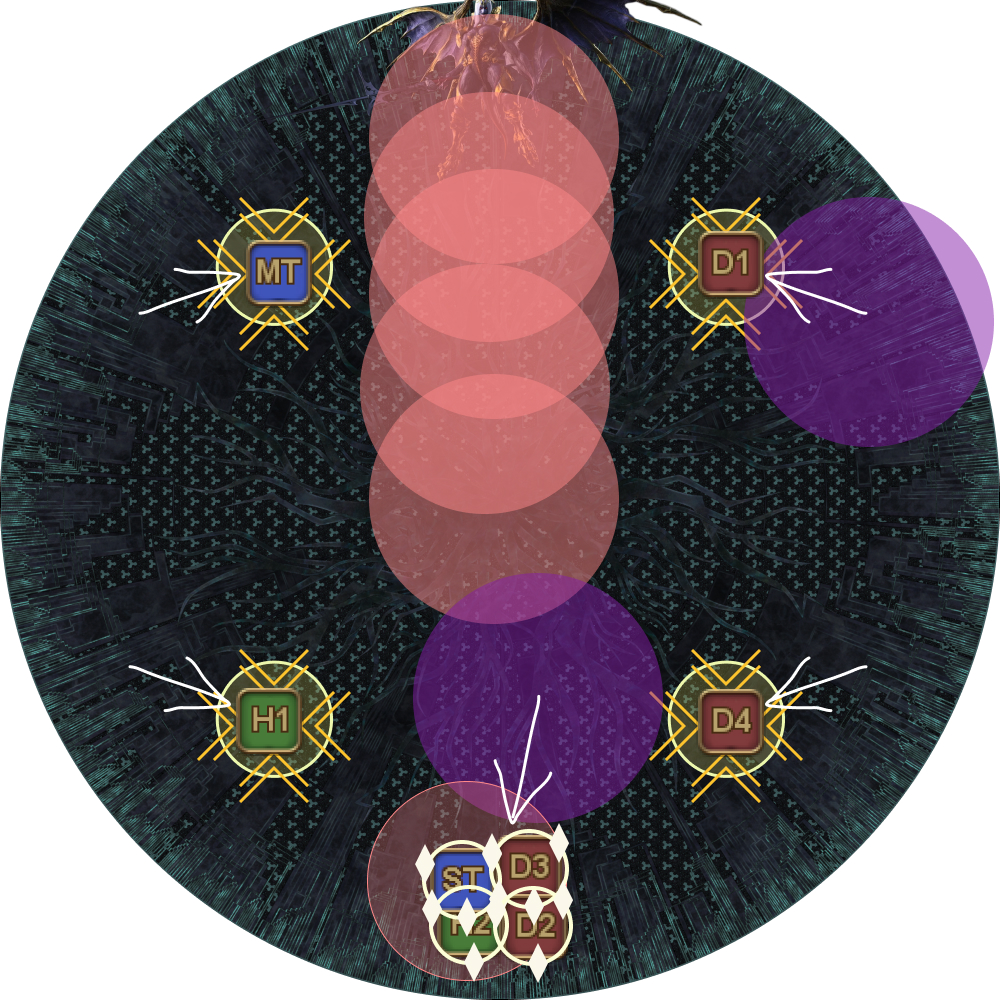 |
| 6. Bahamut reappears in the center of the arena and starts casting Gigaflare, while Nael places her third and fourth Hypernova AoEs. Gather in the center, behind Bahamut. (Be careful of the Hypernovas!) | 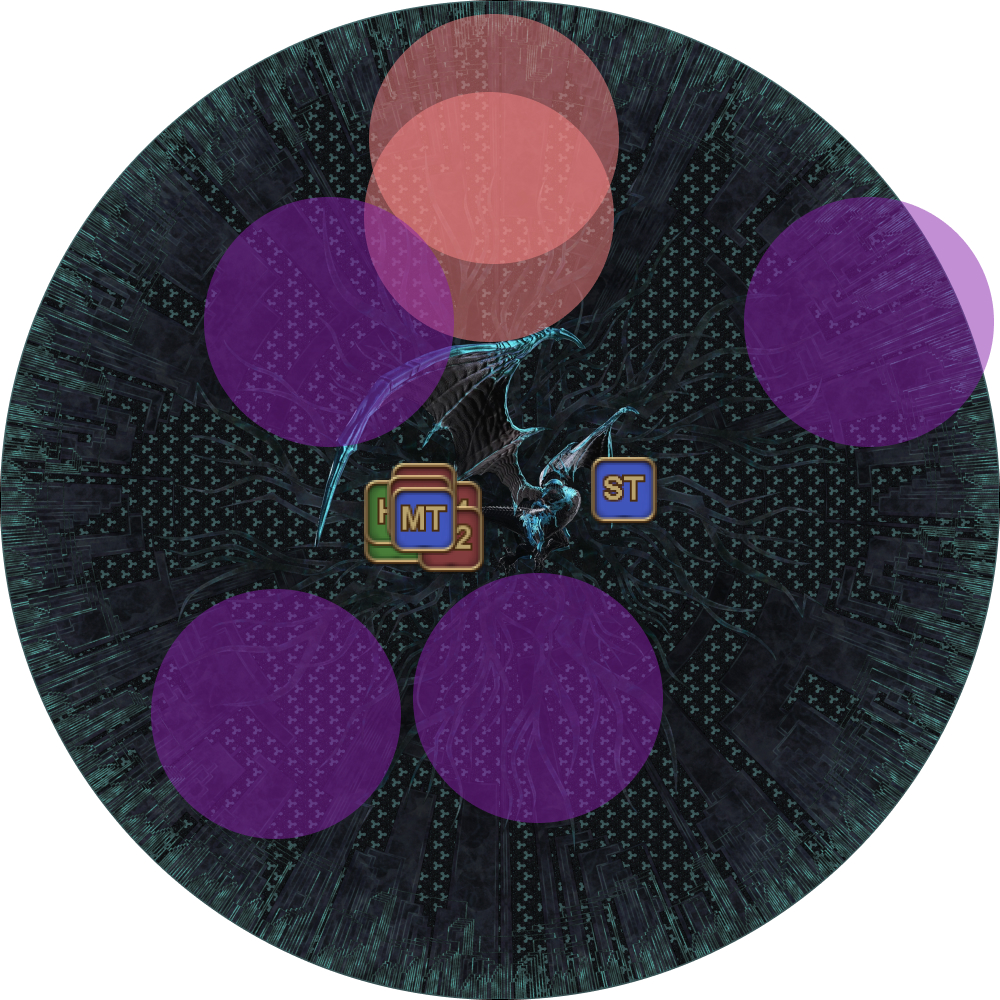 |
Fellruin Trio
After Blackfire Trio, Bahamut Flare Breaths three times, before starting Fellruin Trio.
The two possible quotes Nael will use are:
| From on high I descend, the moon and stars to bring! | Raven's Dive → Lunar Dynamo → Meteor Stream Spread → In → (Neurolinks) → Spread |
| From hallowed moon I descend, a rain of stars to bring! | Lunar Dynamo → Raven's Dive → Meteor Stream In → Spread → (Neurolinks) → Spread |
Note that Nael’s lines now telegraph three mechanics instead of two.
| From hallowed moon I descend, a rain of stars to bring! | From on high I descend, the moon and stars to bring! | |
|---|---|---|
| 1. Find Nael, and either stack or spread around Nael, depending on Nael's line. Tanks should be nearest to the middle of the arena. | 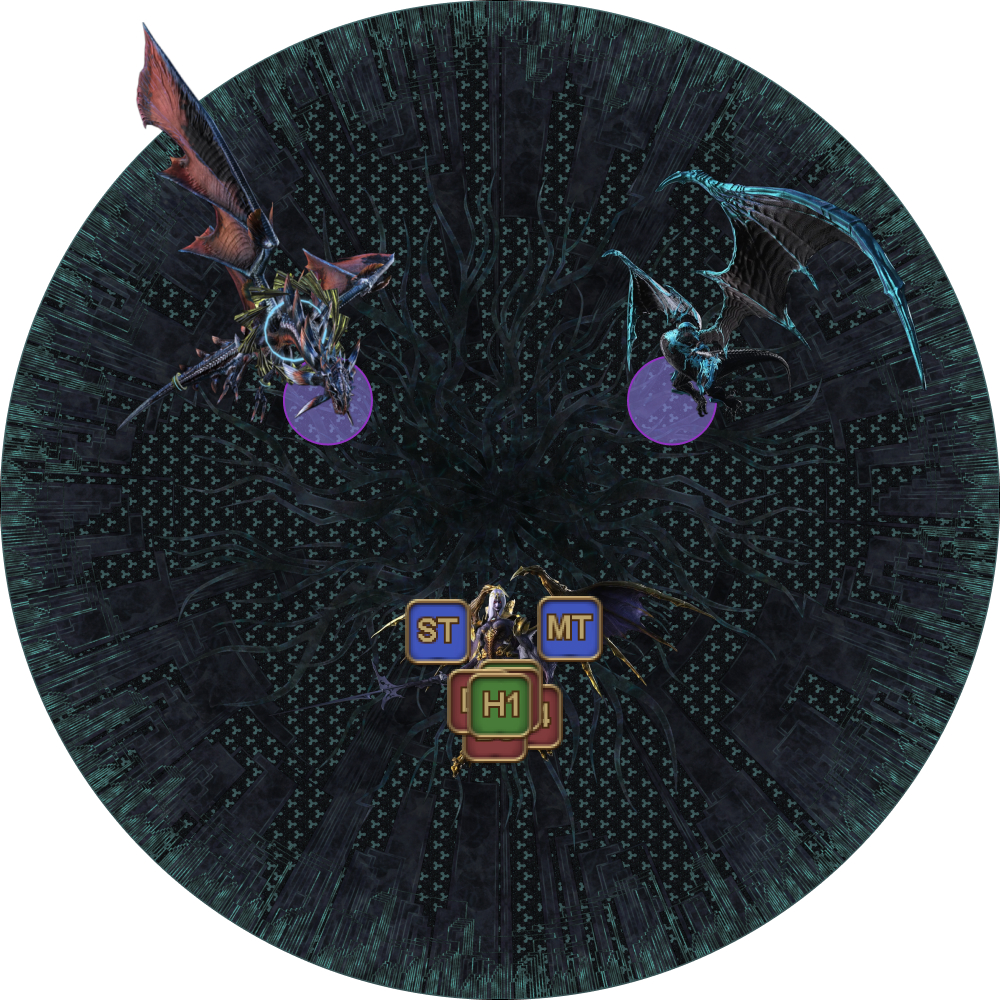 | 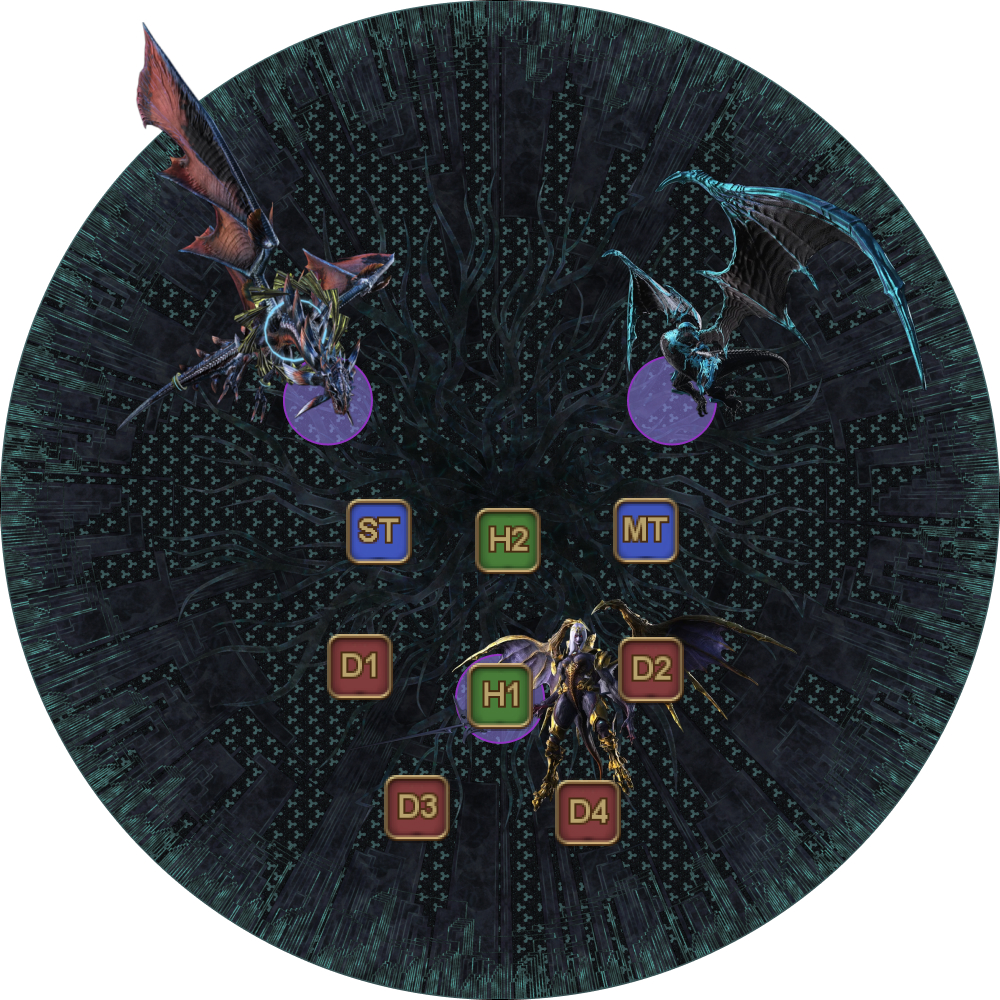 |
| 2. The first mechanic from Nael's line resolves. Tempest Wing tethers appear from Bahamut, and tether to two random players, other than the tanks. | 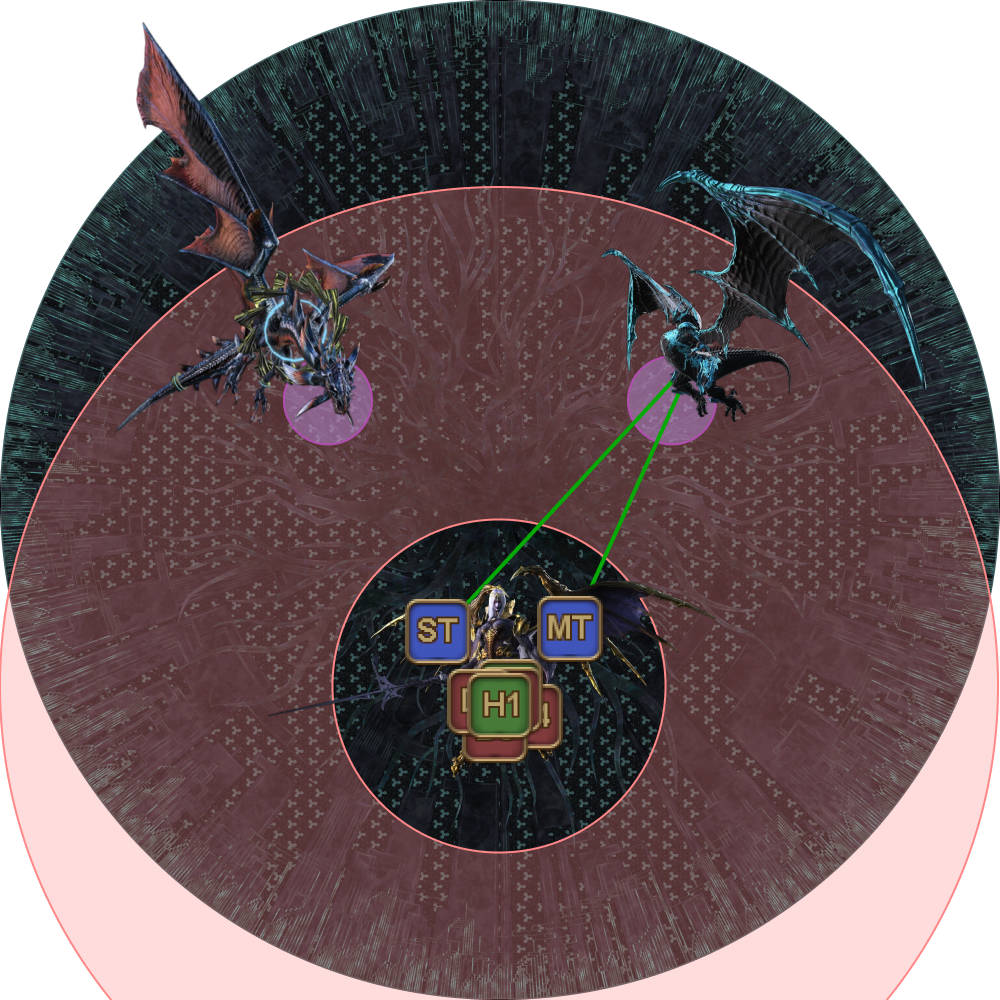 | 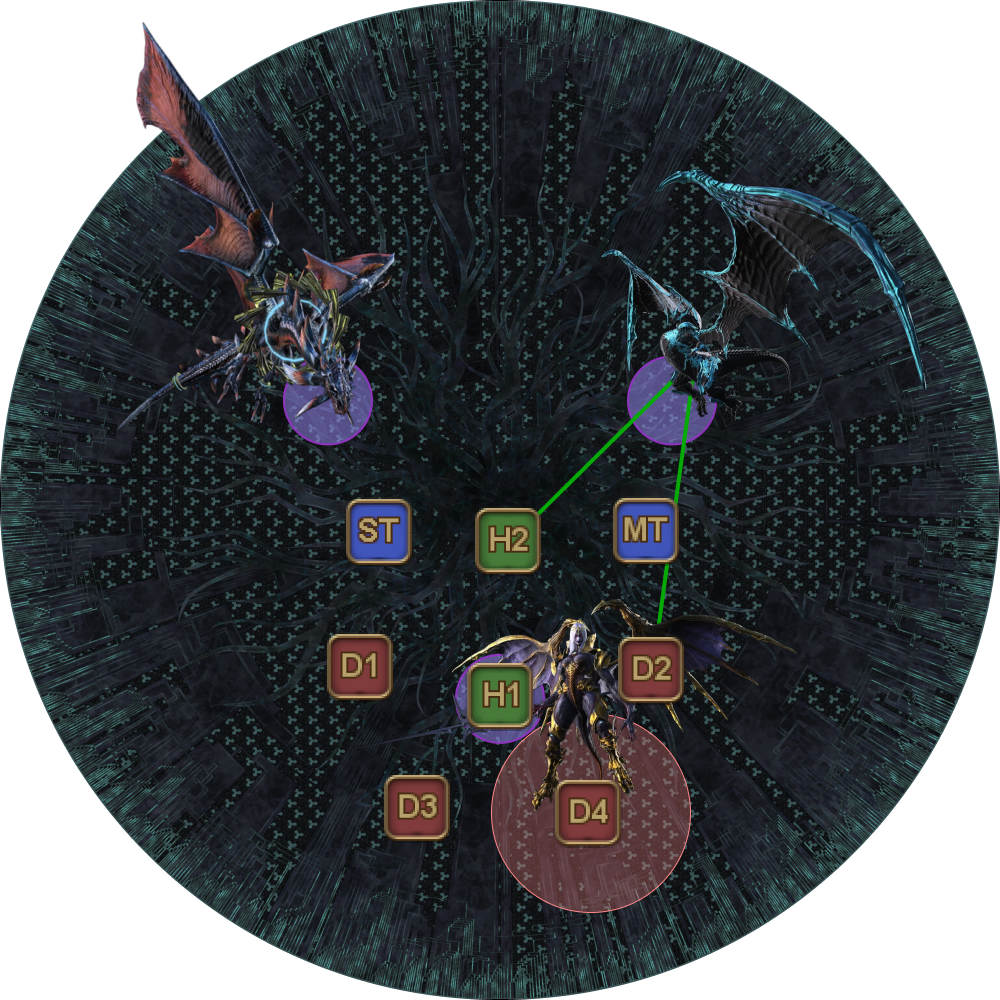 |
| 3. The second mechanic from Nael's line resolves. (This will always be the opposite mechanic.) Tanks should have the Tempest Wing tethers at this point. | 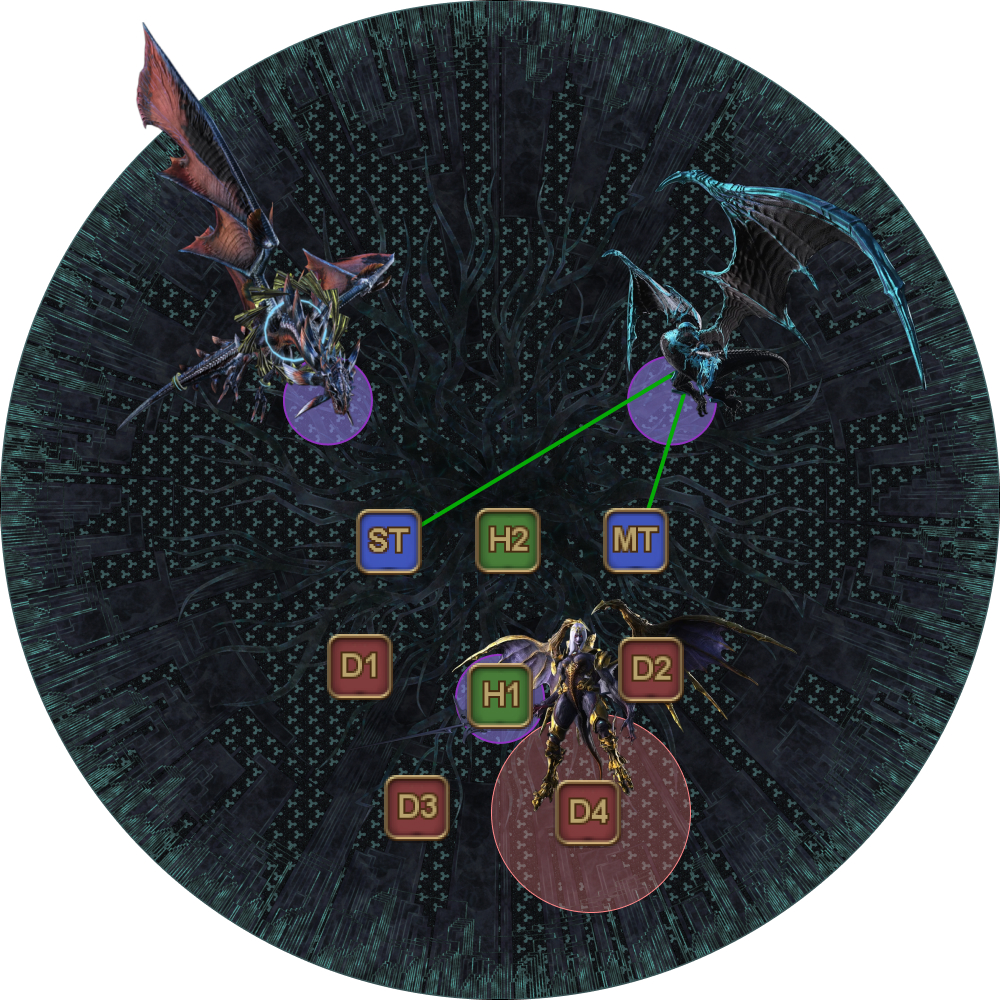 | 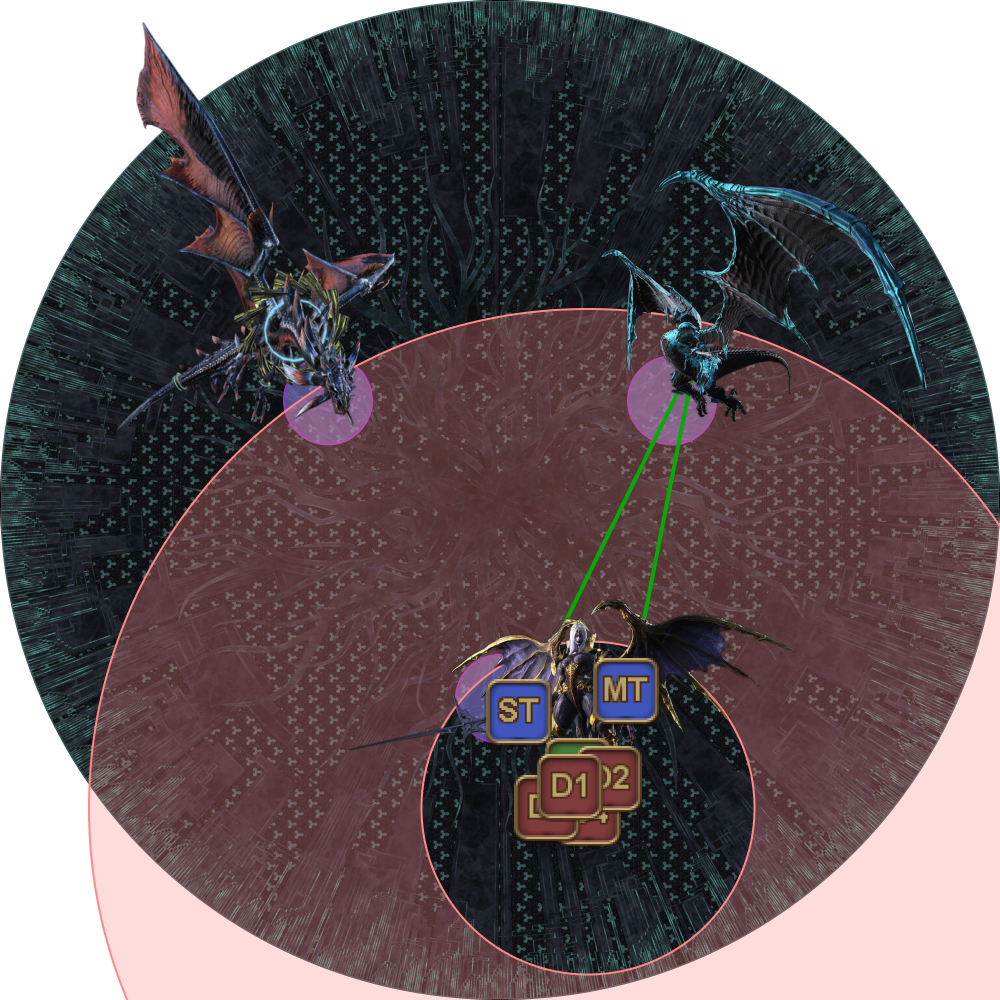 |
| 4. Twintania's Aetheric Profusion resolves together with Bahamut's Tempest Wing. All players must be in a Neurolink. | 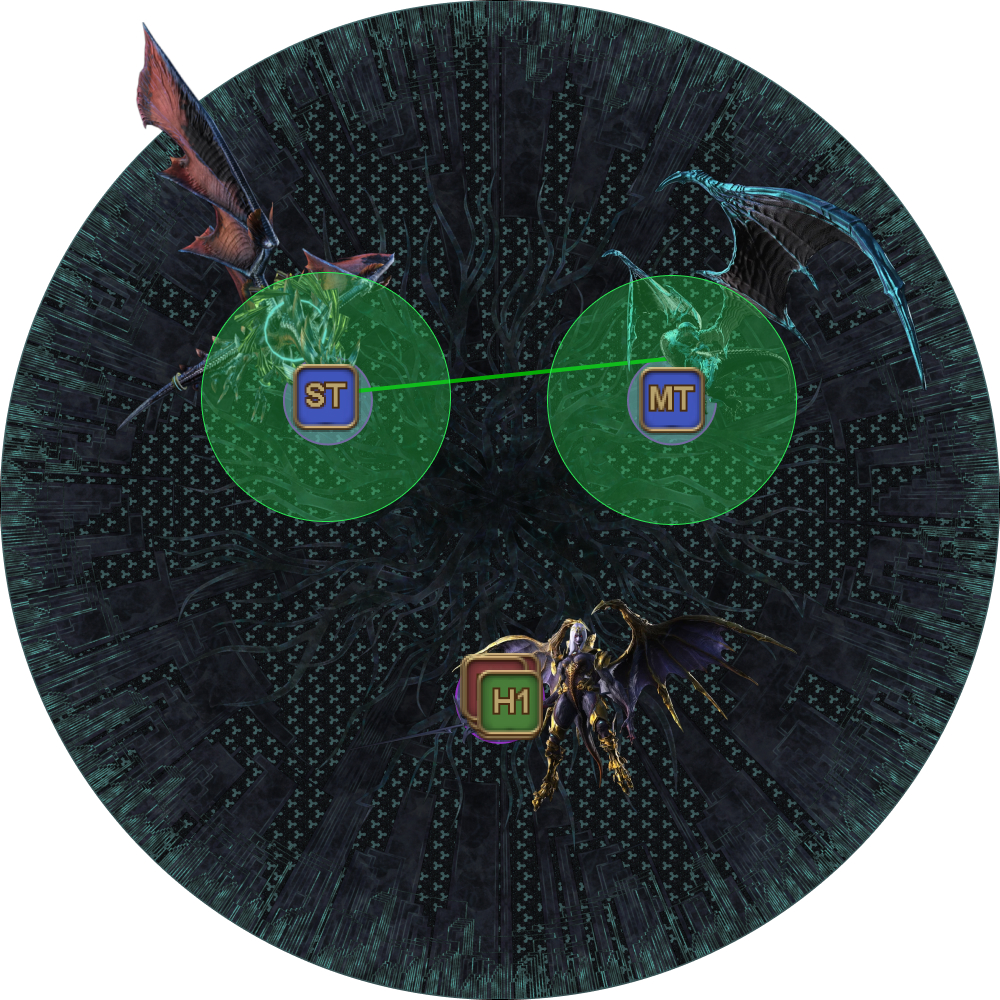 | |
| 5. The third mechanic from Nael's line resolves, which will always be Meteor Stream (AoEs on four random players). Spread out around the Neurolink as shown. | 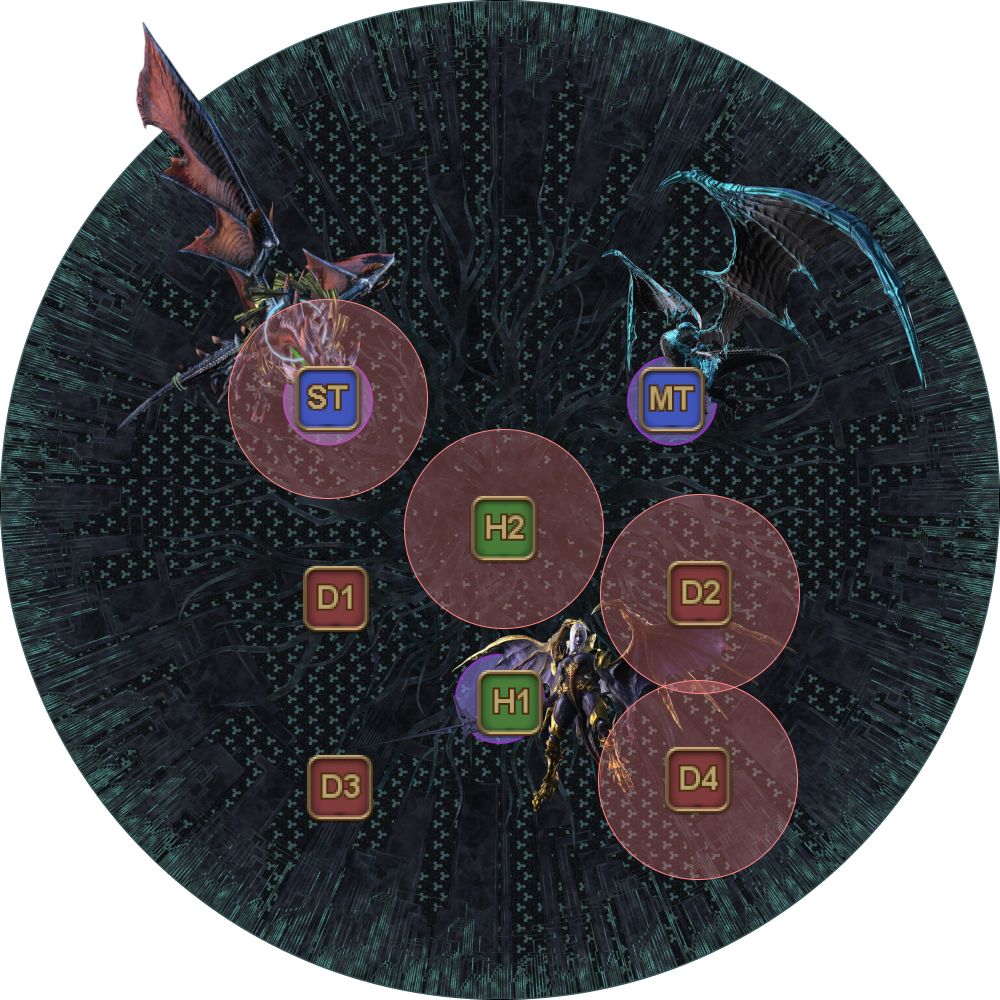 | |
Heavensfall Trio
After Blackfire Trio, Bahamut immediately turns to Flare Breath the tank, before doing Flatten into Flare Breath.
Bahamut then starts Heavensfall Trio, marking the halfway point in the fight.
| 1. Stack center, and locate the three bosses. One player will get marked for Bahamut's dive, while another player will get marked for Twintania's dive. | 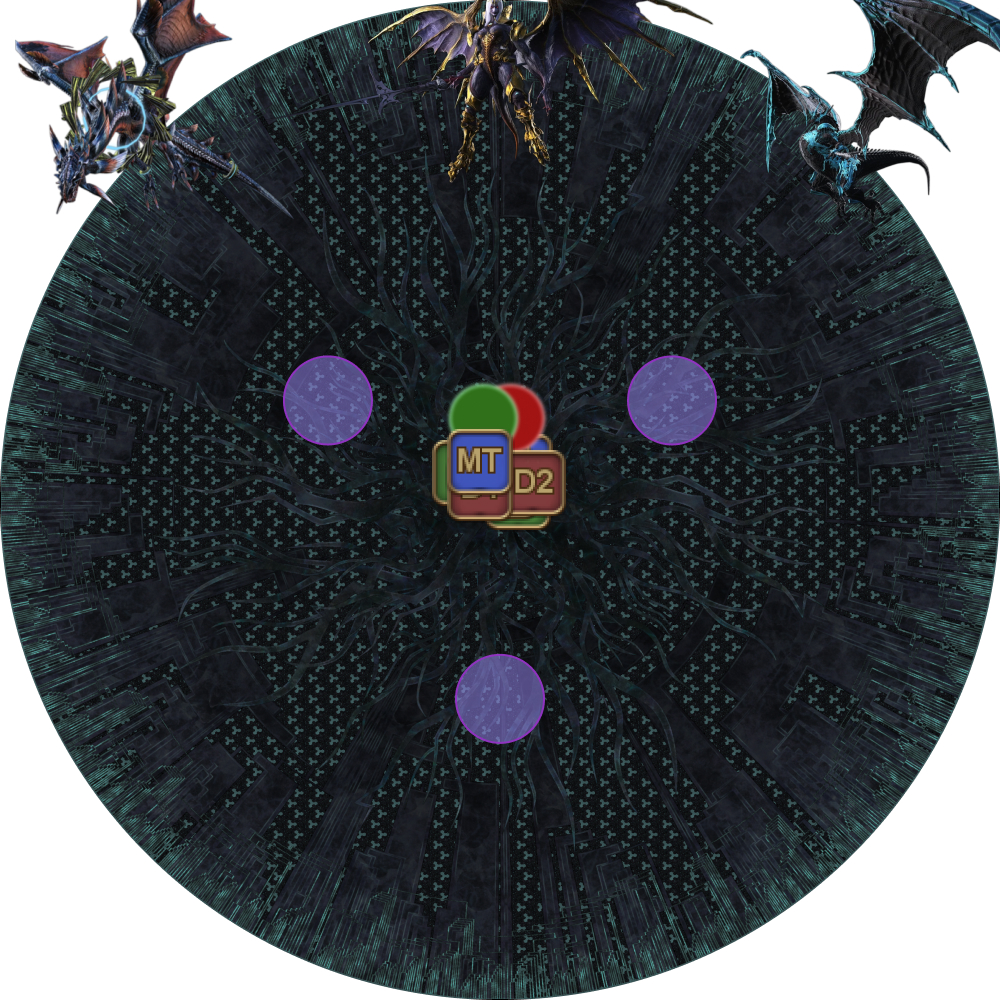 |
| 2. Spread out as follows:
|  |
This will end up looking like one of the three diagrams below:
| Nael left | Nael middle | Nael right |
|---|---|---|
 | |  |
| 3. Twintania and Bahamut dives, leaving Nael behind. Move along the edge to dodge Twisters and bait Megaflare AoEs along the outside of the arena, just like Quickmarch Trio. | 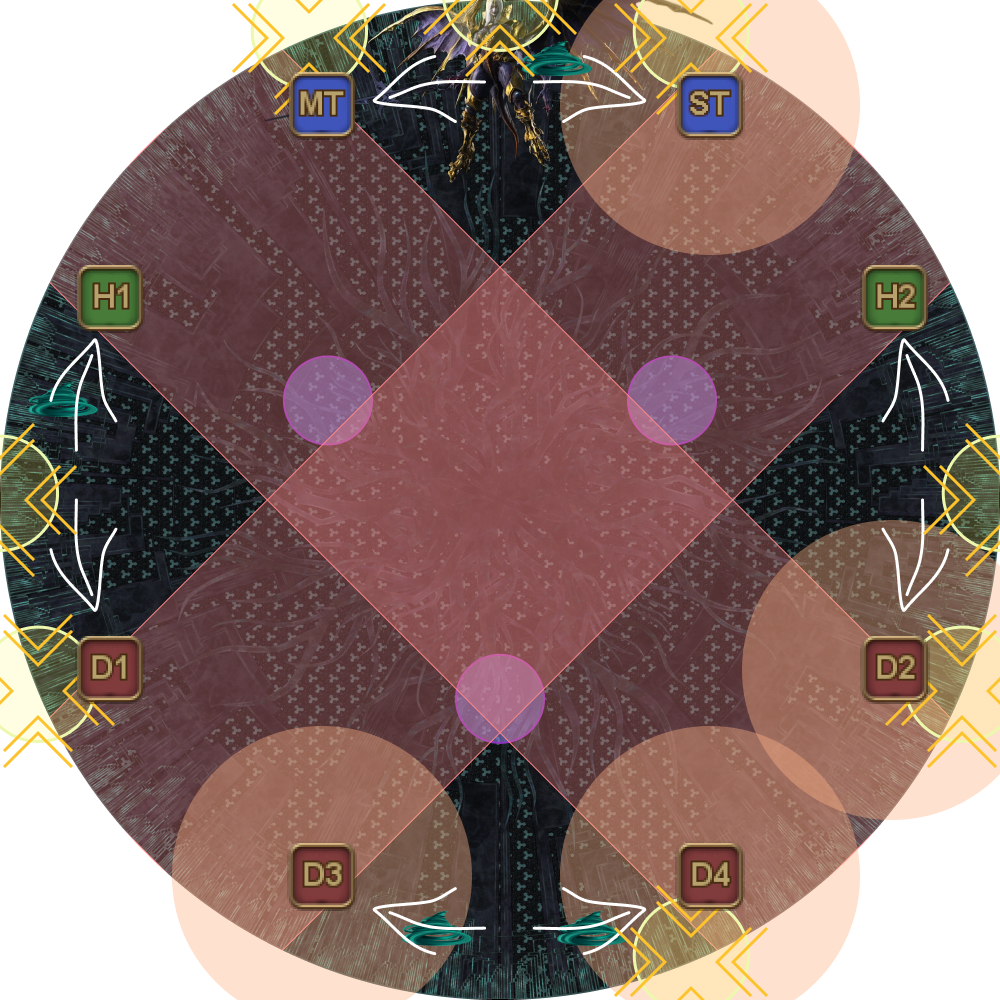 |
| 4. Eight towers will spawn around the edge of the arena. Using Nael as a reference point, identify your tower and stand in front of it.
There may be a tower that spawns at Nael's position. If so, the ST takes that tower. Use the Neurolinks as a rough guide on how close to the center to stand. As getting knocked into the wall is instant-death, err towards being closer to the center of the arena. | 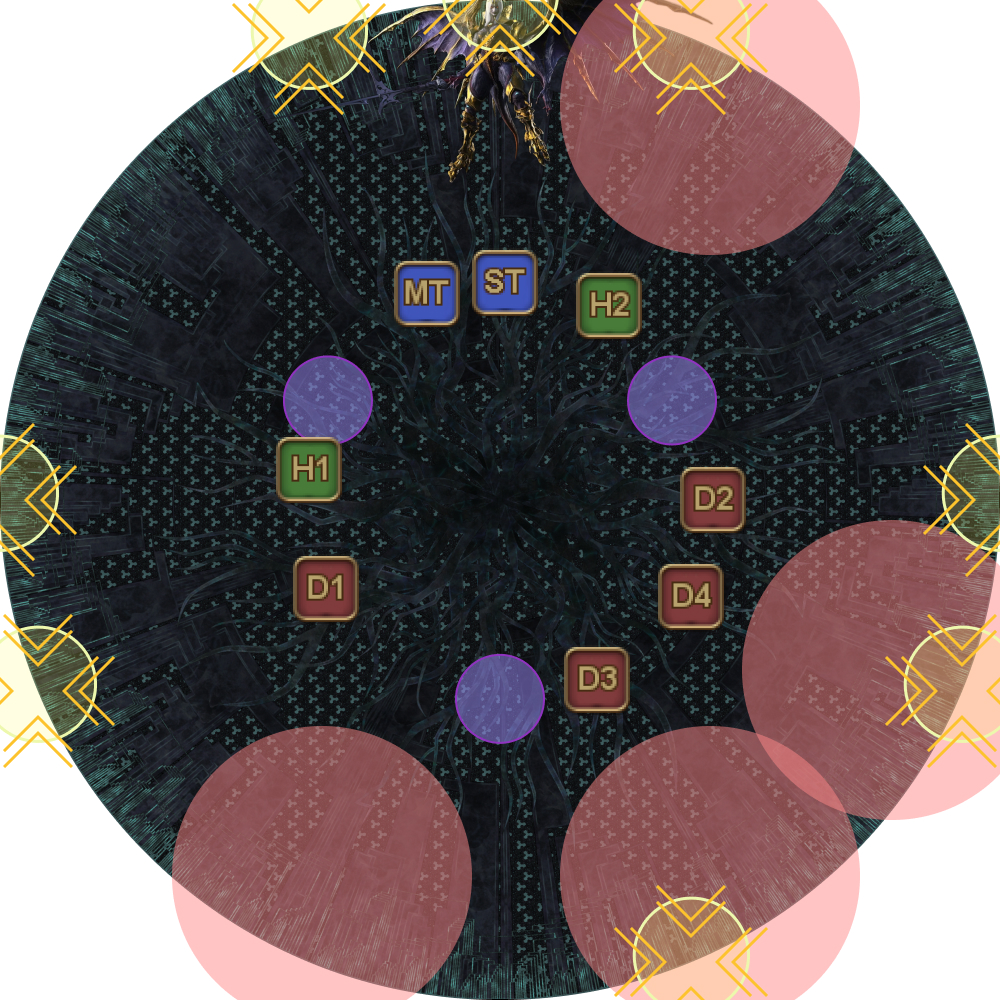 |
| 5. The Heavensfall tower drops in the center of the arena, knocking all players towards the edge into their towers. (You will have about half a second to adjust.) Tip: A Tank LB3 will allow the party to miss at most two towers. You can use Tank LB3 here for prog, but it won't be available later in Grand Octet. | 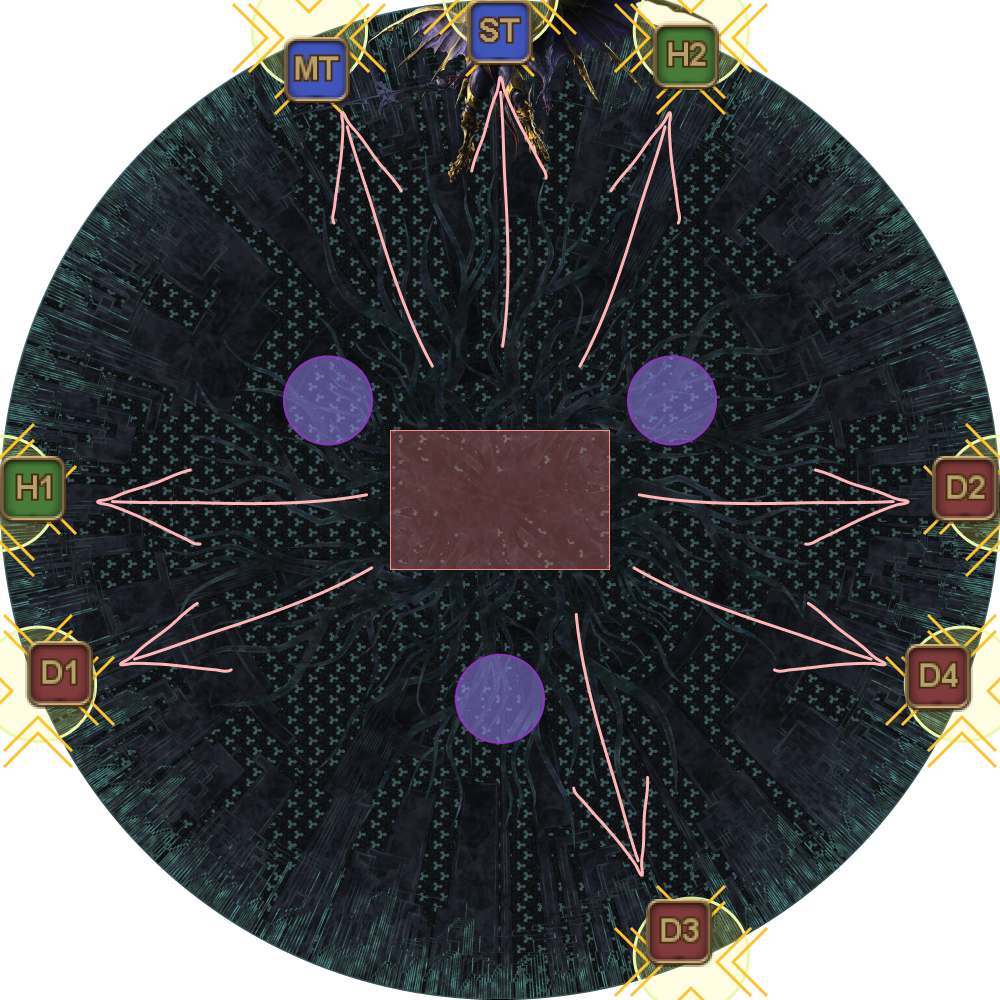 |
| 6. The Heavensfall tower AoEs appear. Unlike the transition to Nael, these AoEs will simply go around either clockwise or anti-clockwise in a full circle. | 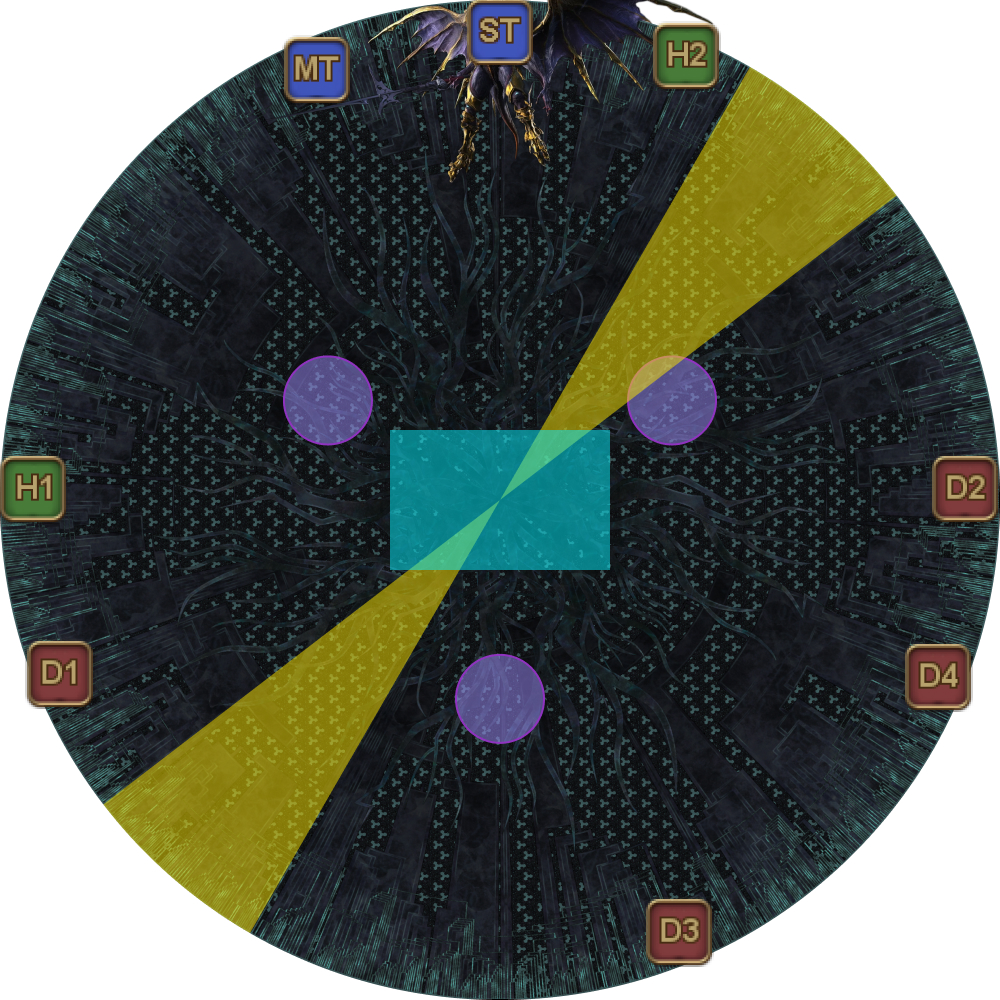 |
| 7. The second set of tower AoEs appear, which will indicate whether the AoEs are traveling clockwise or anti-clockwise. Tip: There is a significantly longer gap in time between the first and second slices (but not the ones after). Use this time to dodge into where the first slice explodes if you're nearby. | 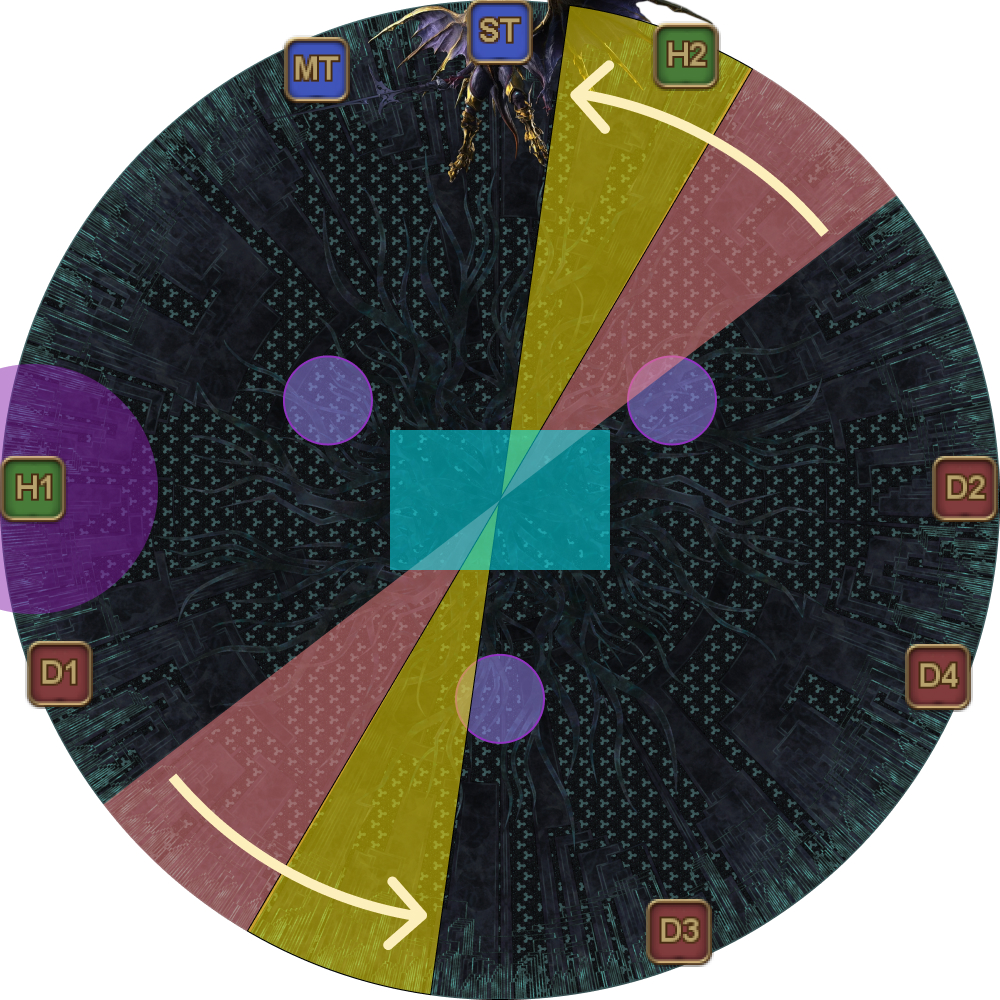 |
| 8. Spiral in towards the center of the arena while Nael drops four Hypernovas on random players. Be sure not to bait a Hypernova in the center of the arena. |  |
9. A random player gets marked for Twintania's Fireball. | 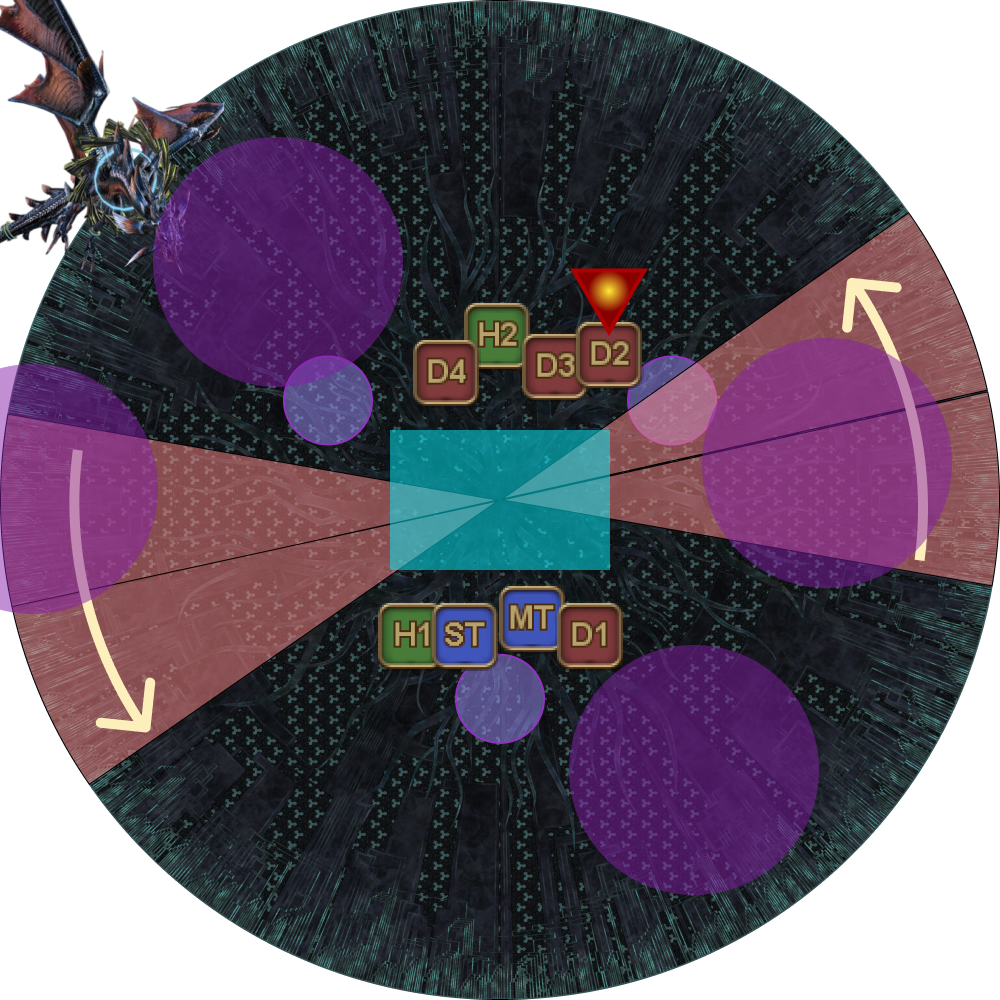 |
| 10. Stack in the middle to share Twintania's Fireball damage. Bahamut appears and starts casting Gigaflare. Tip: If accidents have happened and people are dead, consider sacrificing the Fireball target by having them take the Fireball stack solo, away from the party. | 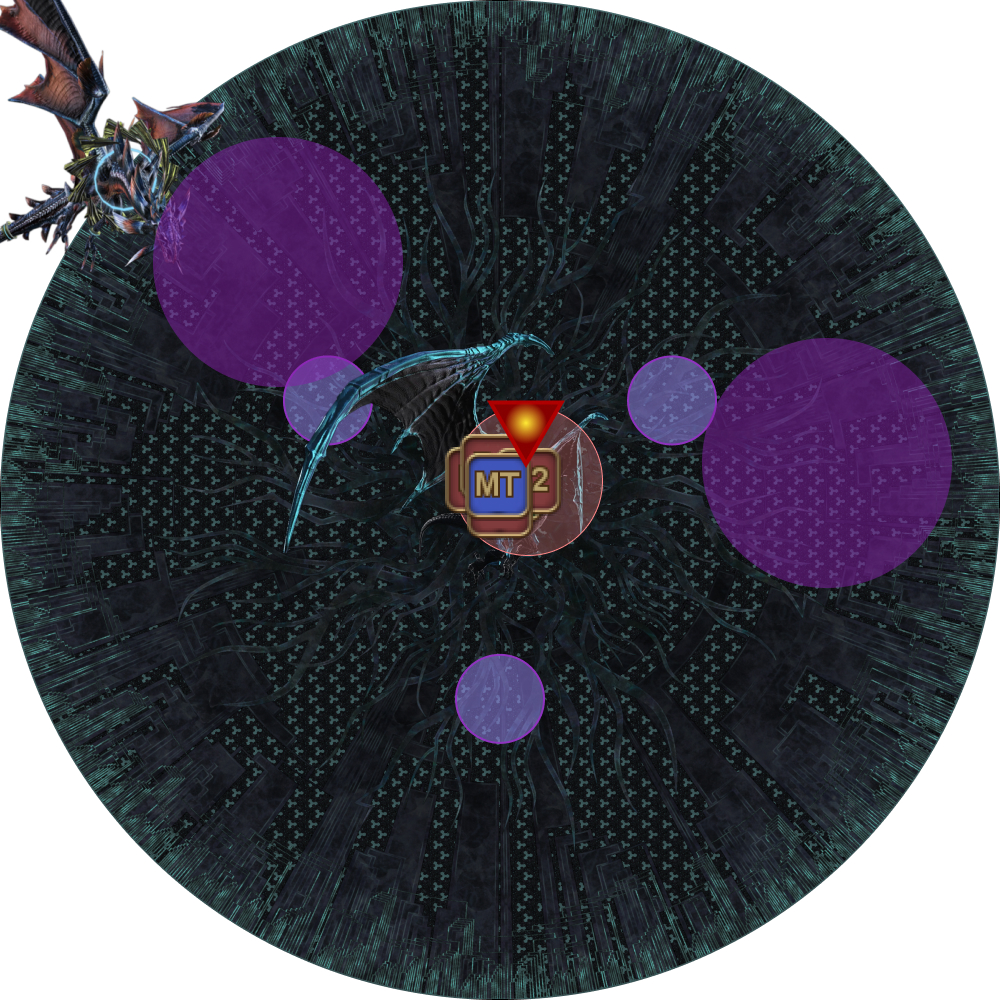 |
Tenstrike Trio
Just like after Blackfire Trio, Bahamut will Flare Breath the tank three times before starting Tenstrike Trio.
| 1. Line up west-to-east. | 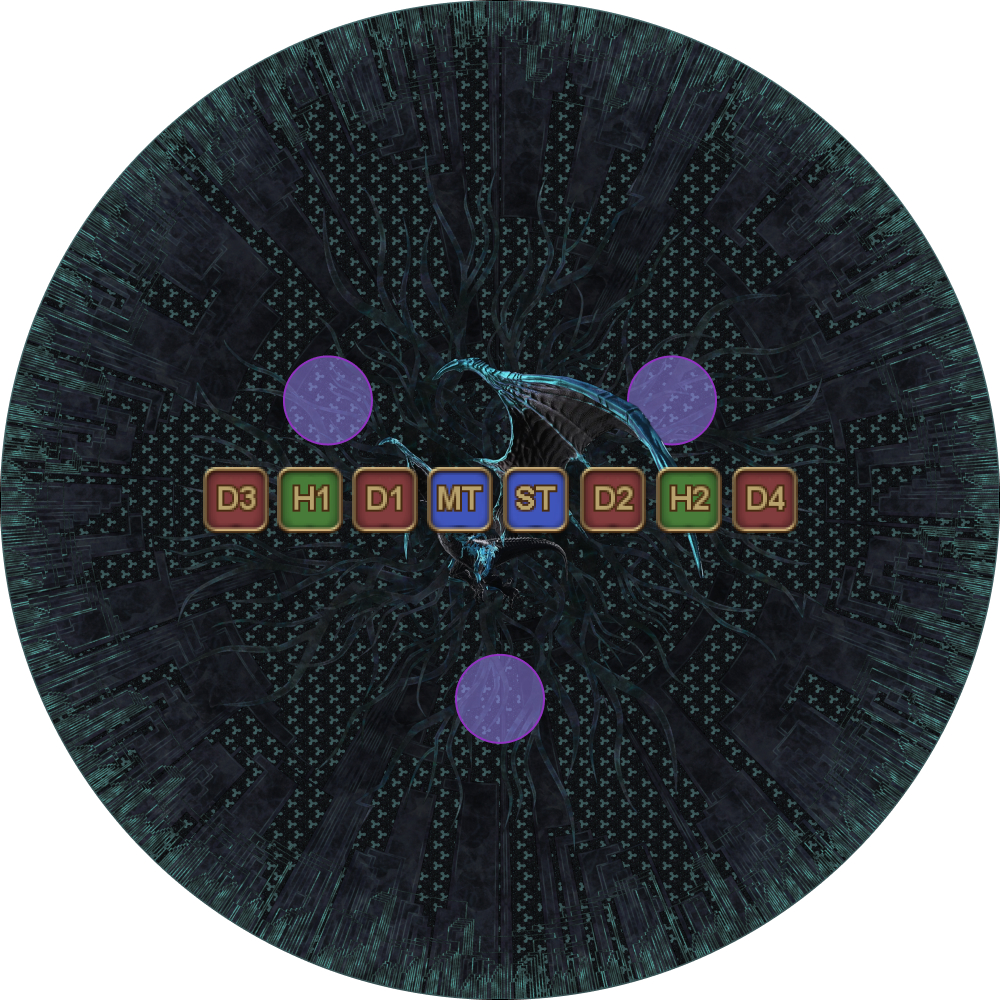 |
| 2. Twintania appears in the center, and three random players (including tanks and healers) get targeted for Hatches. |  |
| 3. In order from left-to-right, the three targeted players take up the NW, S, and NE Neurolinks. Players who are not targeted spread out.
Three of the players not targeted will take the second round of Hatches.
|  |
| 4. The first set of Hatches reach the three targeted players and resolve. In the meantime, Meteor Streams will hit each player, one at a time (although I've shown the first four players here), starting from DPS, followed by the healers, and finally the tanks. | 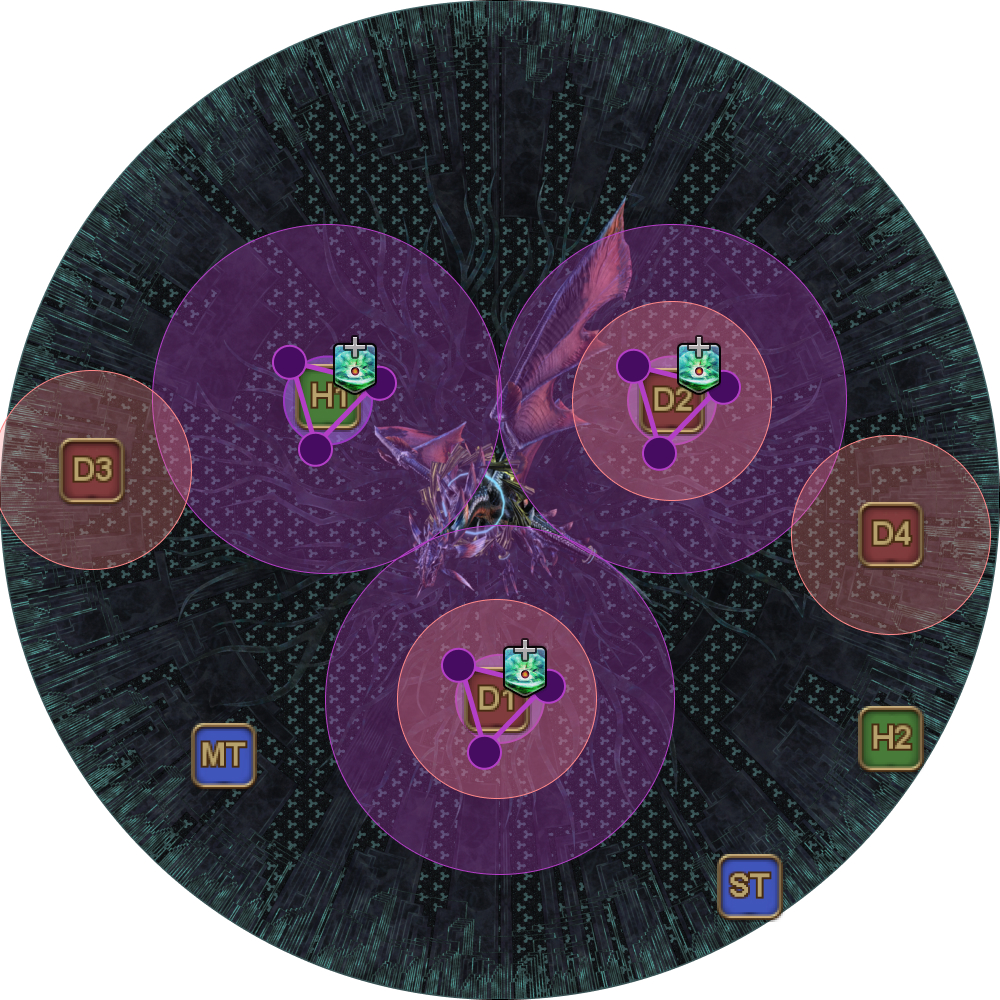 |
| 5. After the first set of Hatches resolve, the players targeted with Hatch move in a straight line to the edge of the arena. The three players that are taking the second set of Hatches move into the Neurolinks. The paths of the player moving in and the player moving out should not cross. Note: For some reason, the south Neurolink is a little finicky- the Hatch tends to curve around the Neurolink (a bit towards the east) instead of moving in a straight line. | 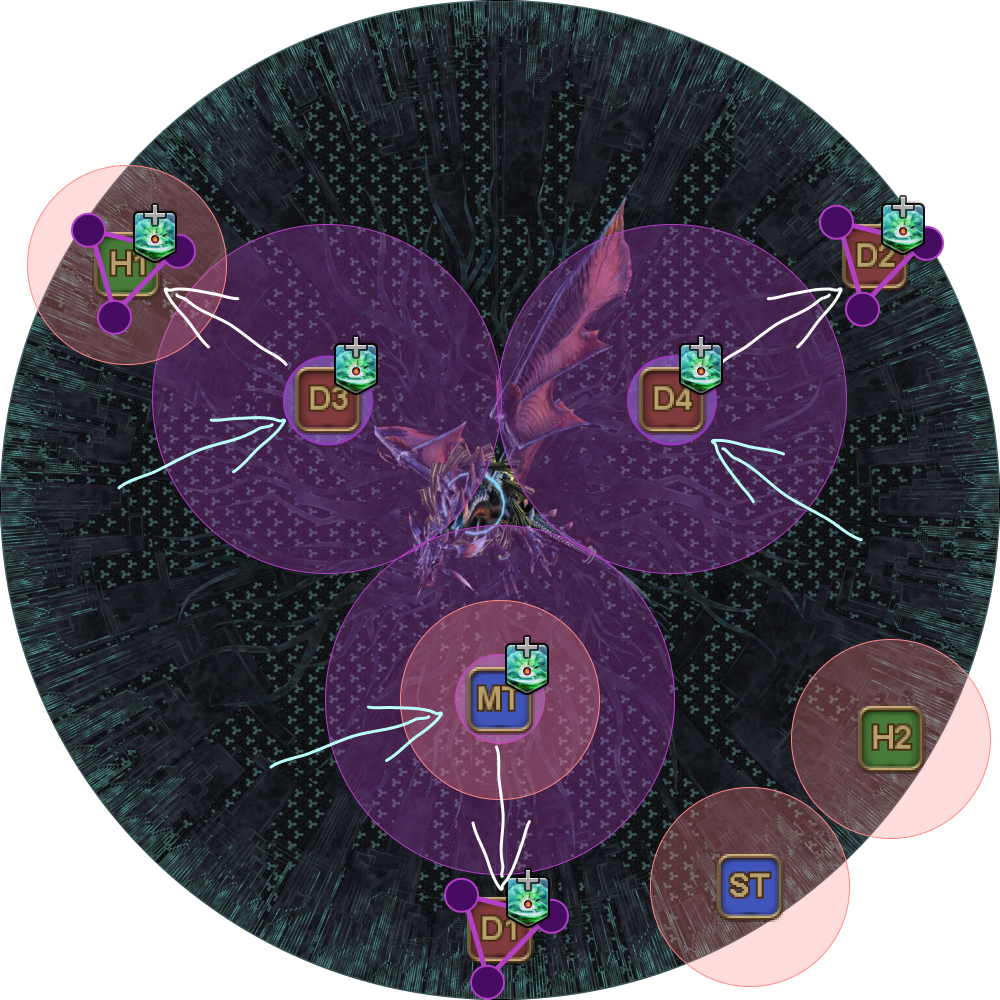 |
| 6. After the second set of Hatches resolve, Twintania disappears and four random players get marked for Earthshakers. |  |
| 7. The four marked players spread out along the north part of the arena to bait Earthshakers. The four unmarked players stand in a square at the south Neurolink. The square indicates which direction the four unmarked players will spread to shortly. Tip: If you used a square marker for the south Neurolink, the four unmarked players can use the four corners of the square. | 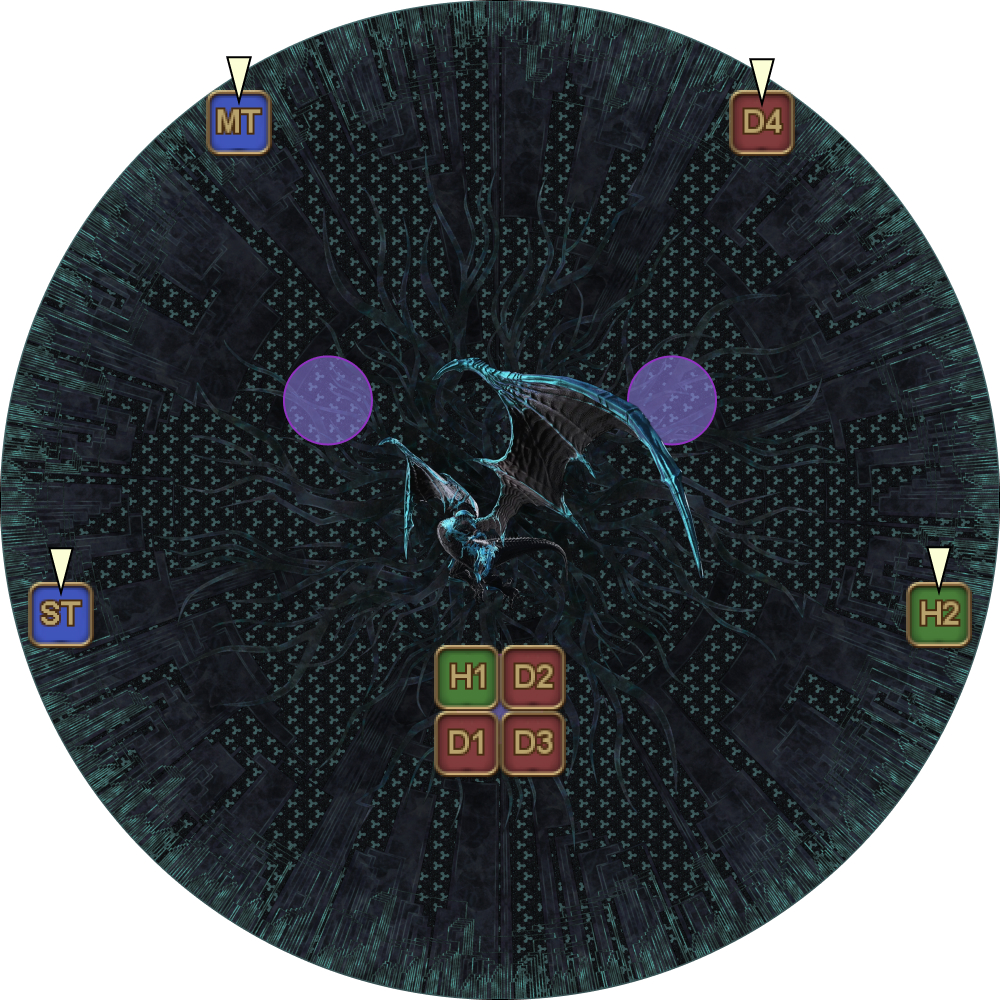 |
| 8. The first set of Earthshakers resolve. The four previously unmarked players get marked for Earthshakers. | 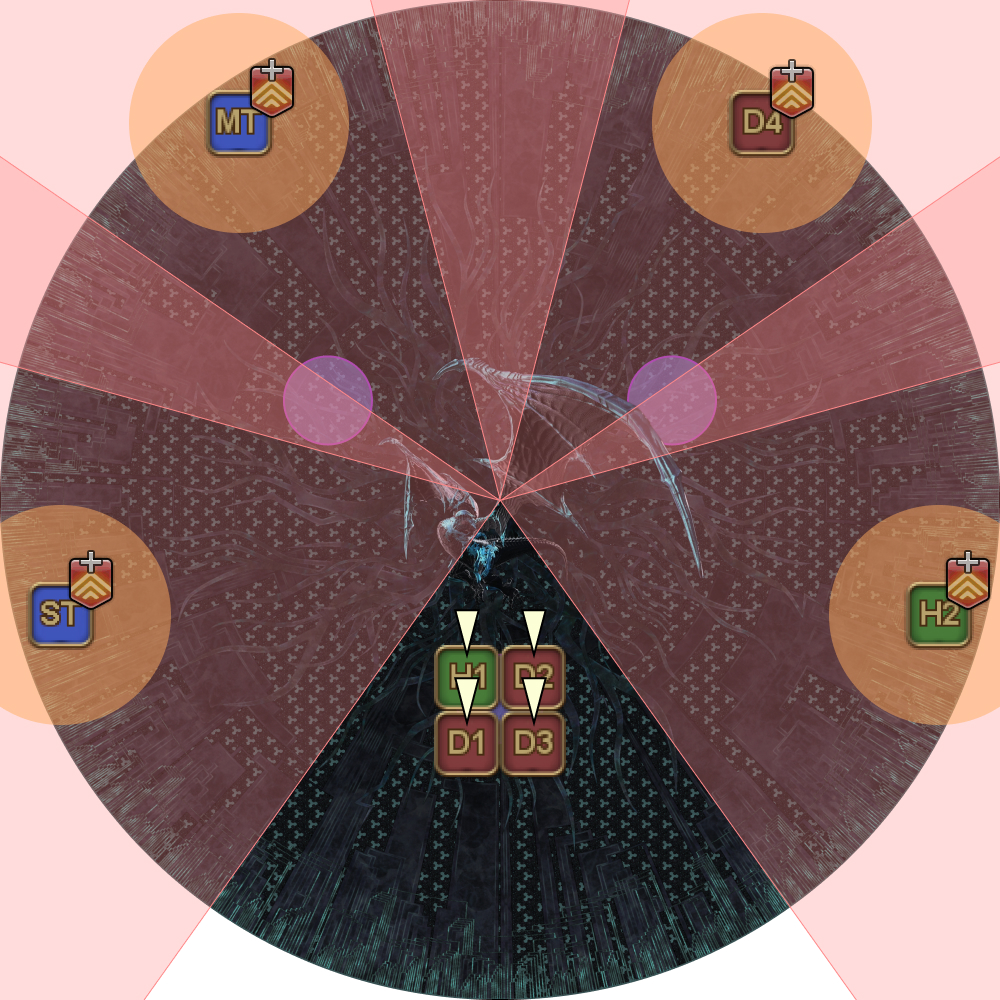 |
| 9. The two sets of four players swap places. | 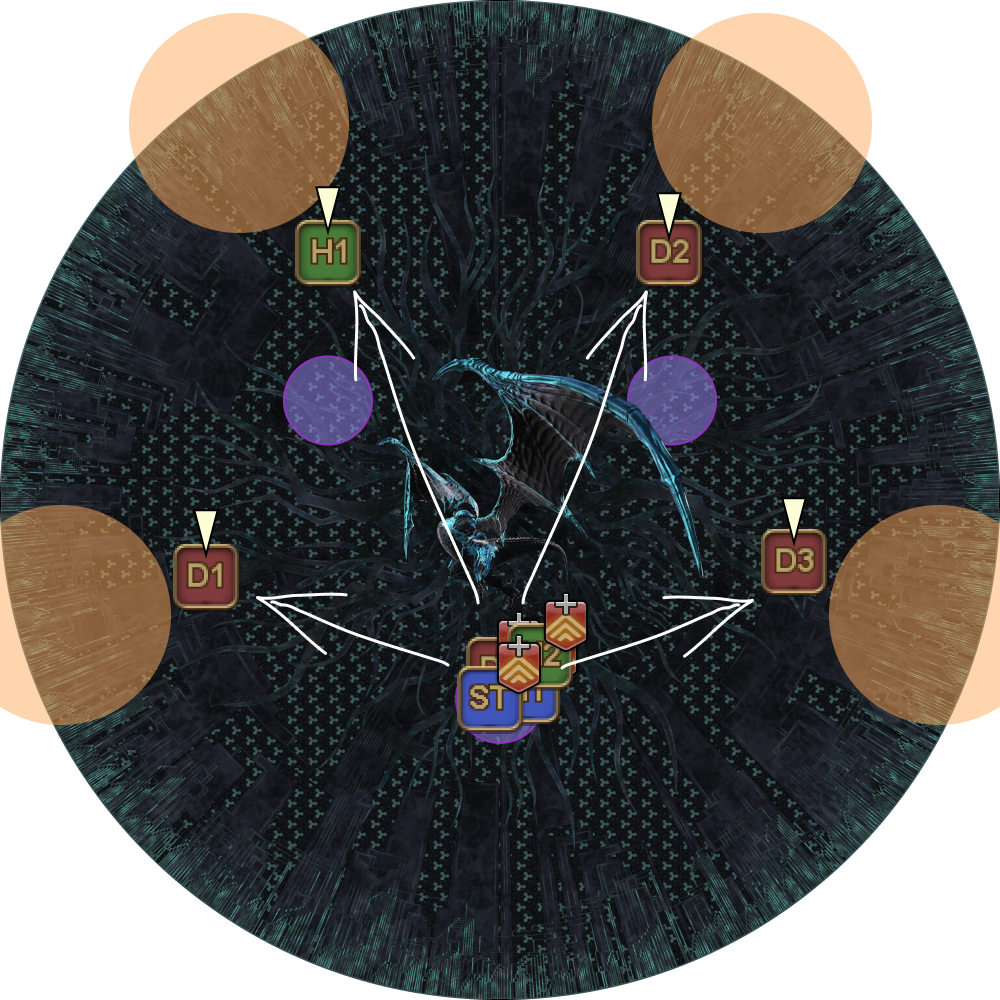 |
| 10. The second set of Earthshakers resolve. Bahamut starts casting Gigaflare. | 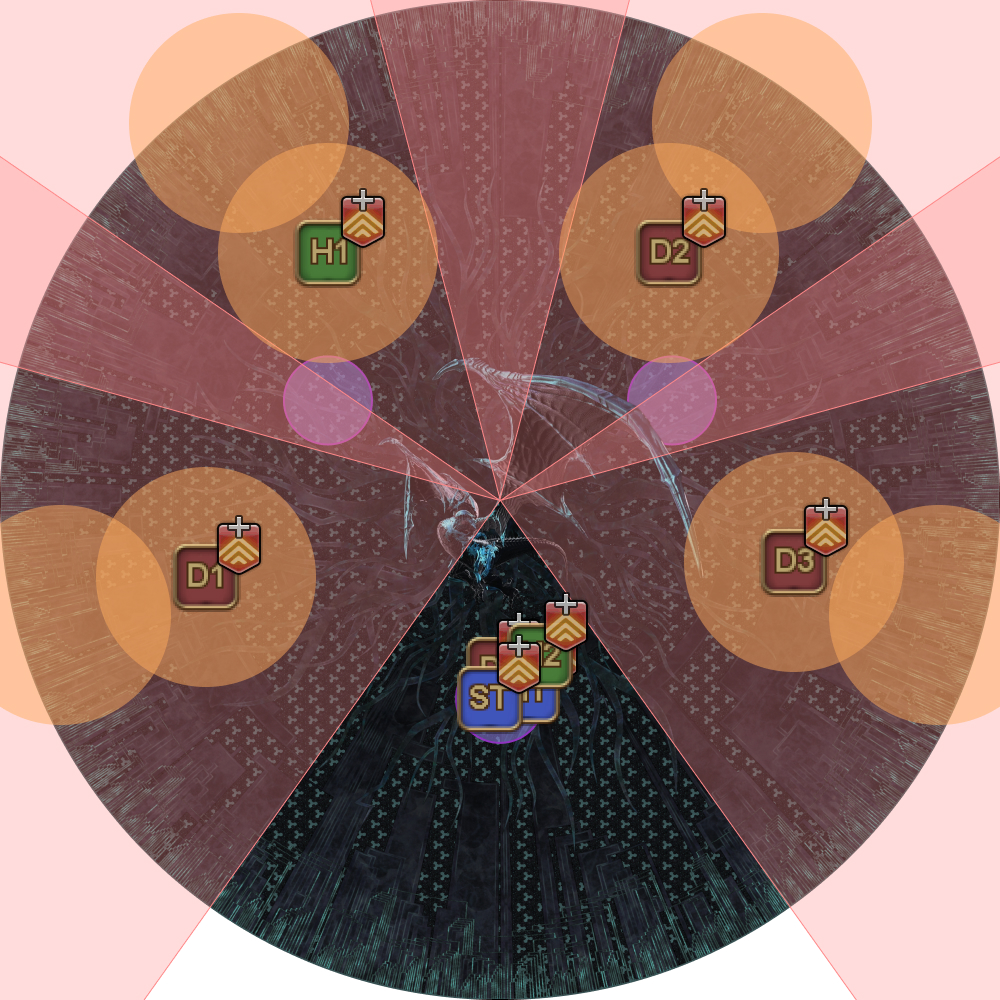 |
Grand Octet (with Tank LB)
After Tenstrike, Bahamut Flattens and Flare Breaths before starting Grand Octet.
Bahamut must be below 60% HP by the time it disappears for Grand Octet, or it will gain a damage-up buff in Golden Bahamut (roughly 5x damage), making it impossible to clear the fight with a standard party (although you will still be able to prog the adds phase).
(This should really not be a problem nowadays.)
| 1. As Bahamut casts Grand Octet, five dragons will appear on the outside of the arena. Turn your camera to look at empty spaces to prepare for the upcoming mechanic. | 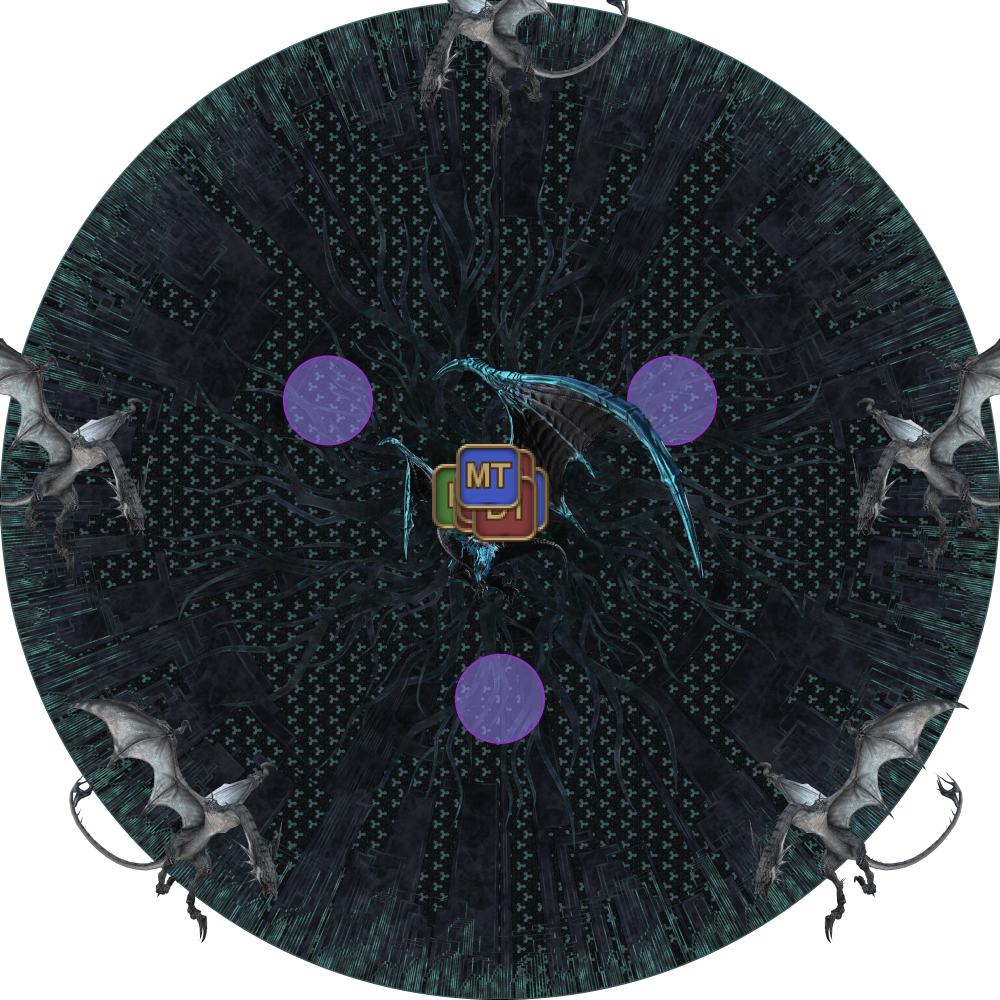 |
| 2. Twintania, Nael, and Bahamut spawn at the remaining three empty spaces.
Tip: You can use a square marker in the middle to help with this. If Bahamut is in line with the edge of the square marker, it's at a cardinal position. Otherwise, Bahamut will be in line with the marker's corner and be at an intercardinal position. | 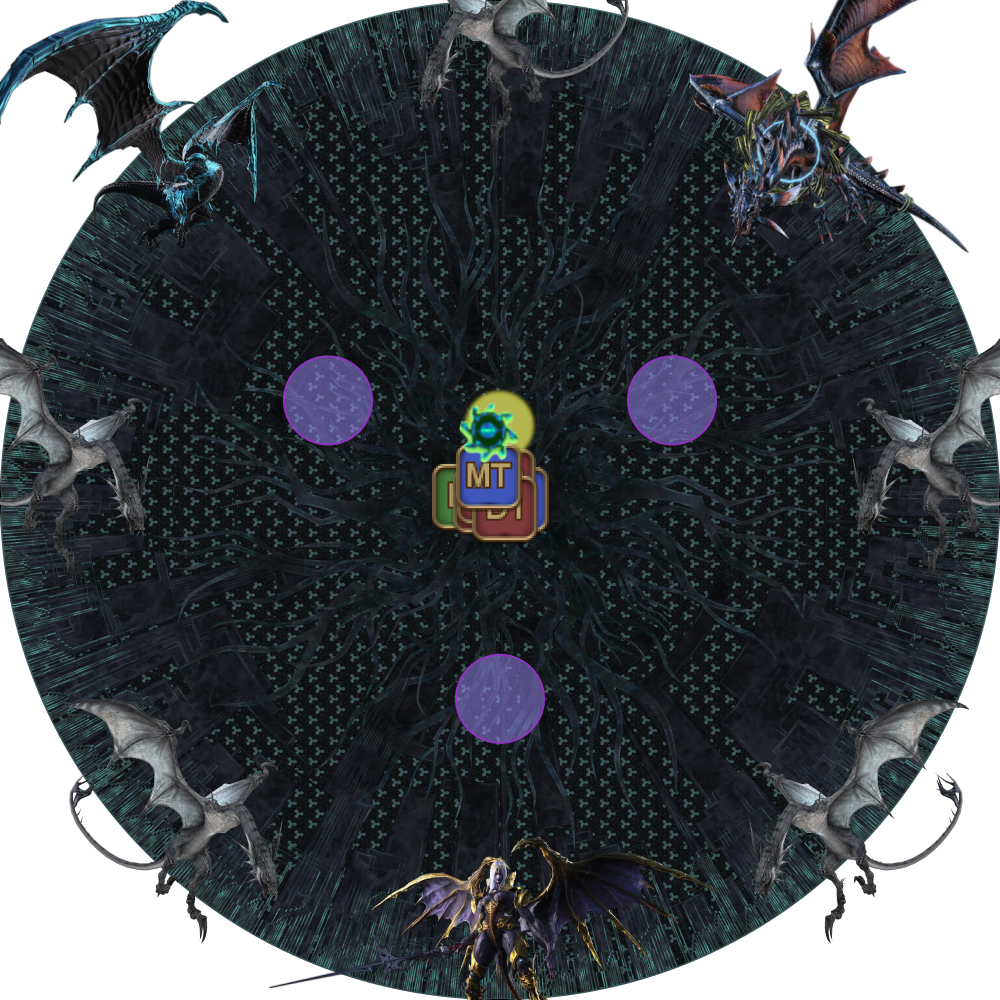 |
| 3. Two players will get divebomb markers- one for Nael (the yellow mark), and one for one of the five dragons. When the markers appear, run opposite Bahamut.
(In the second example, Nael (SE) is opposite Bahamut (NW). Since Bahamut is an an intercardinal, the party moves one spot clockwise from Nael.) | 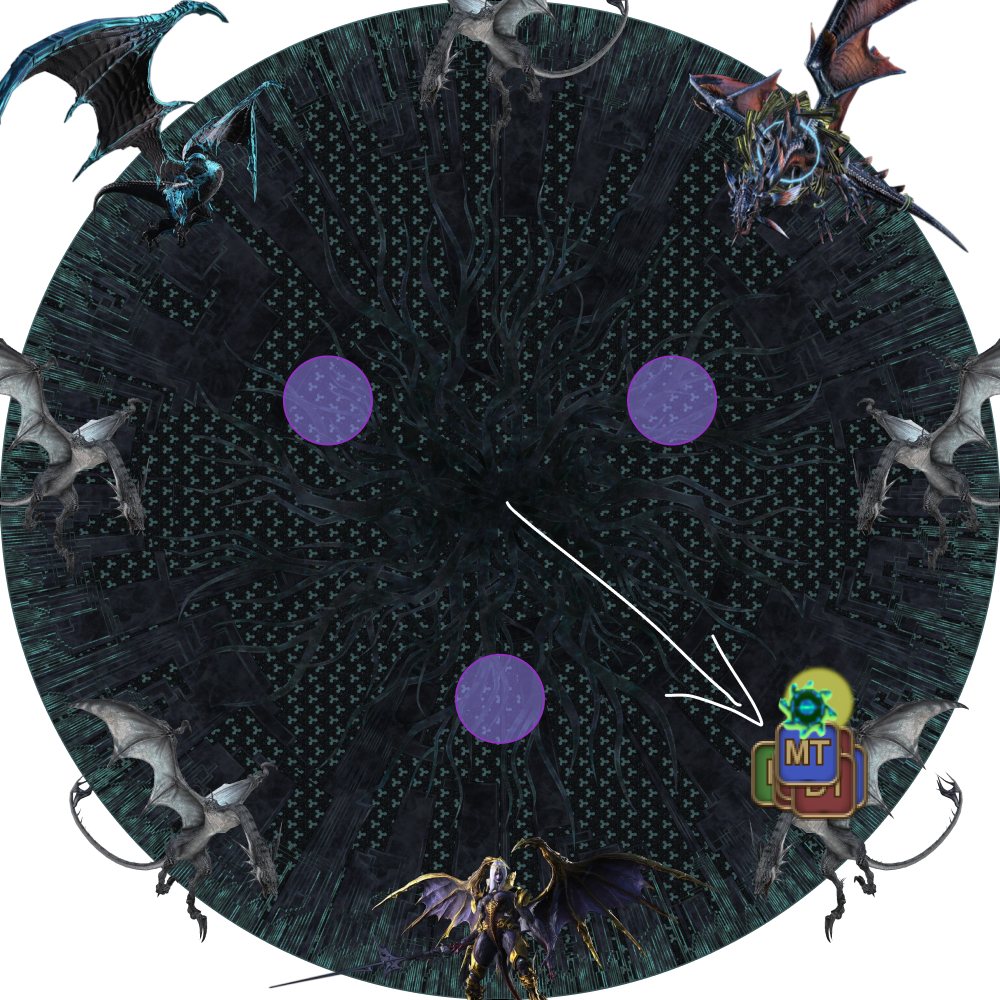 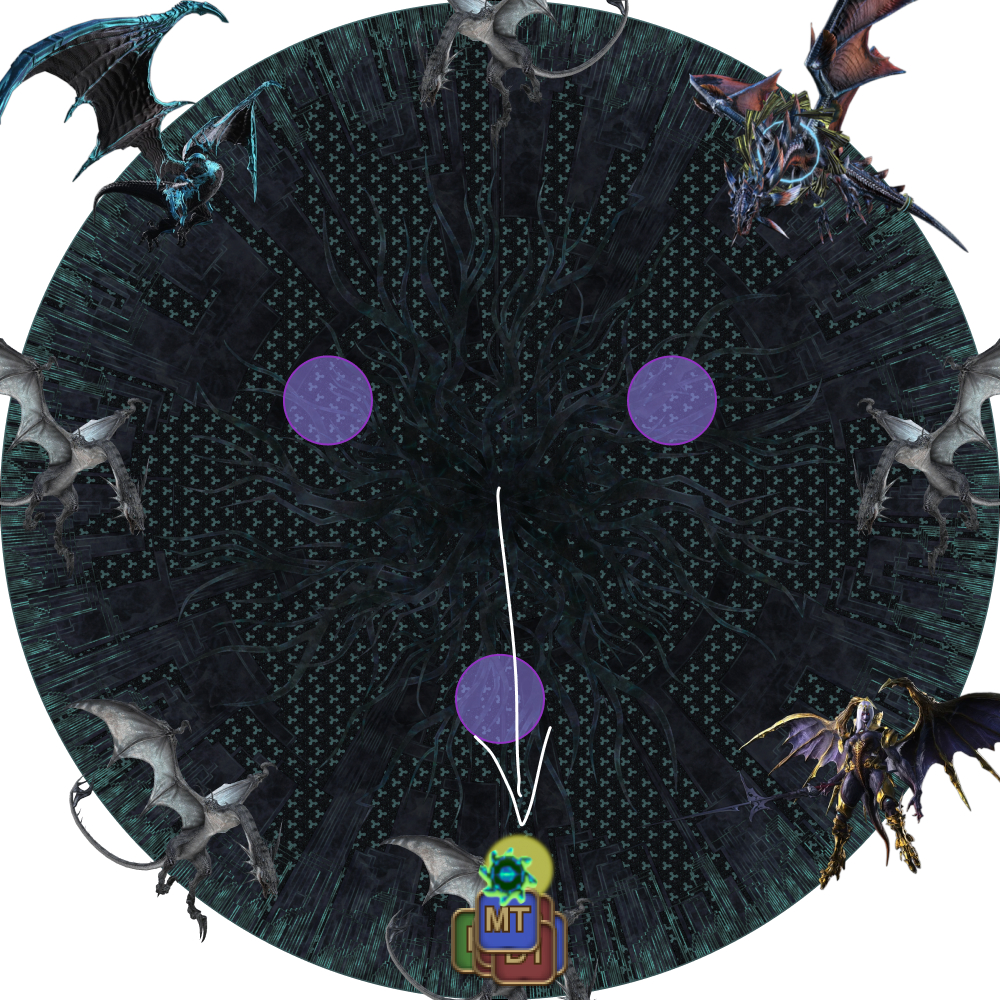 |
| 4. Nael dives. The party then runs clockwise or anti-clockwise depending on Bahamut's position. One by one, players will get targeted for the other four dragon's dives. Take note of whether you receive a divebomb marker as you run around the arena. | 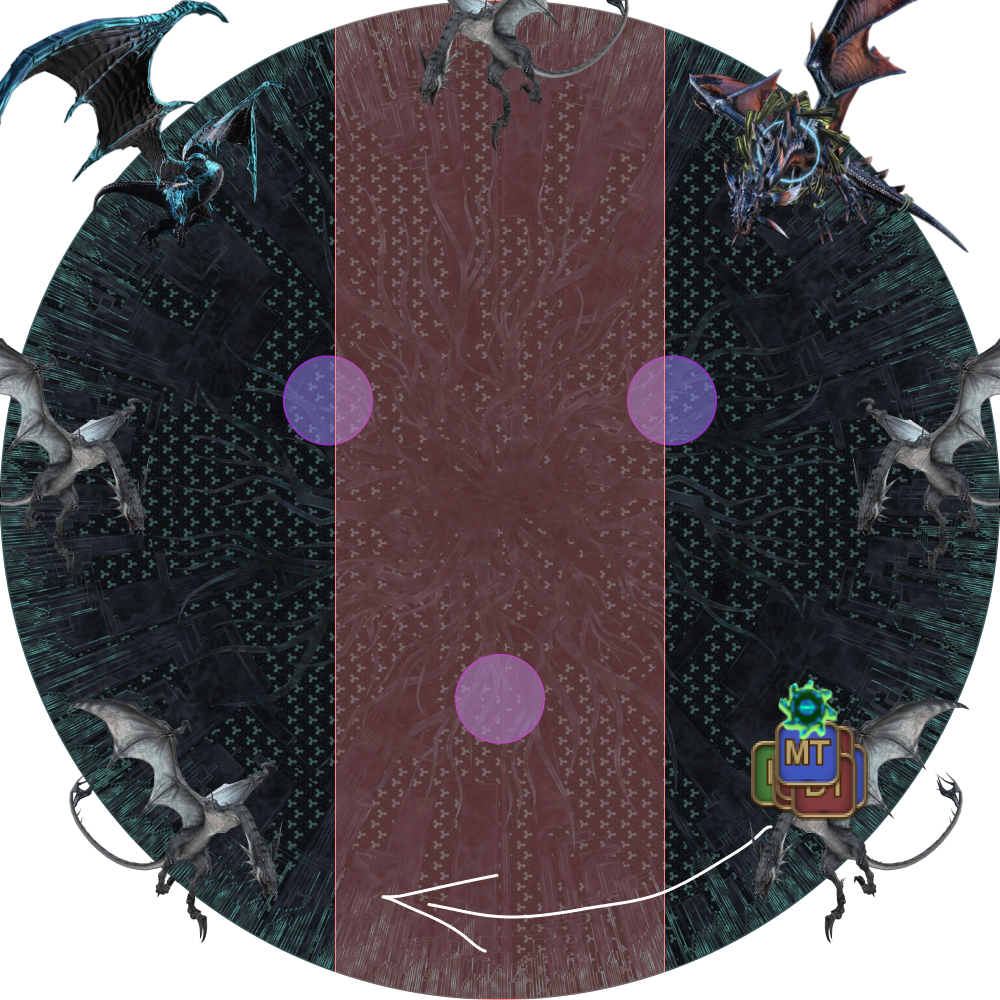 |
| 5. As the party approaches Bahamut, it's advisible to Sprint to make sure you stay ahead of the divebombs. | 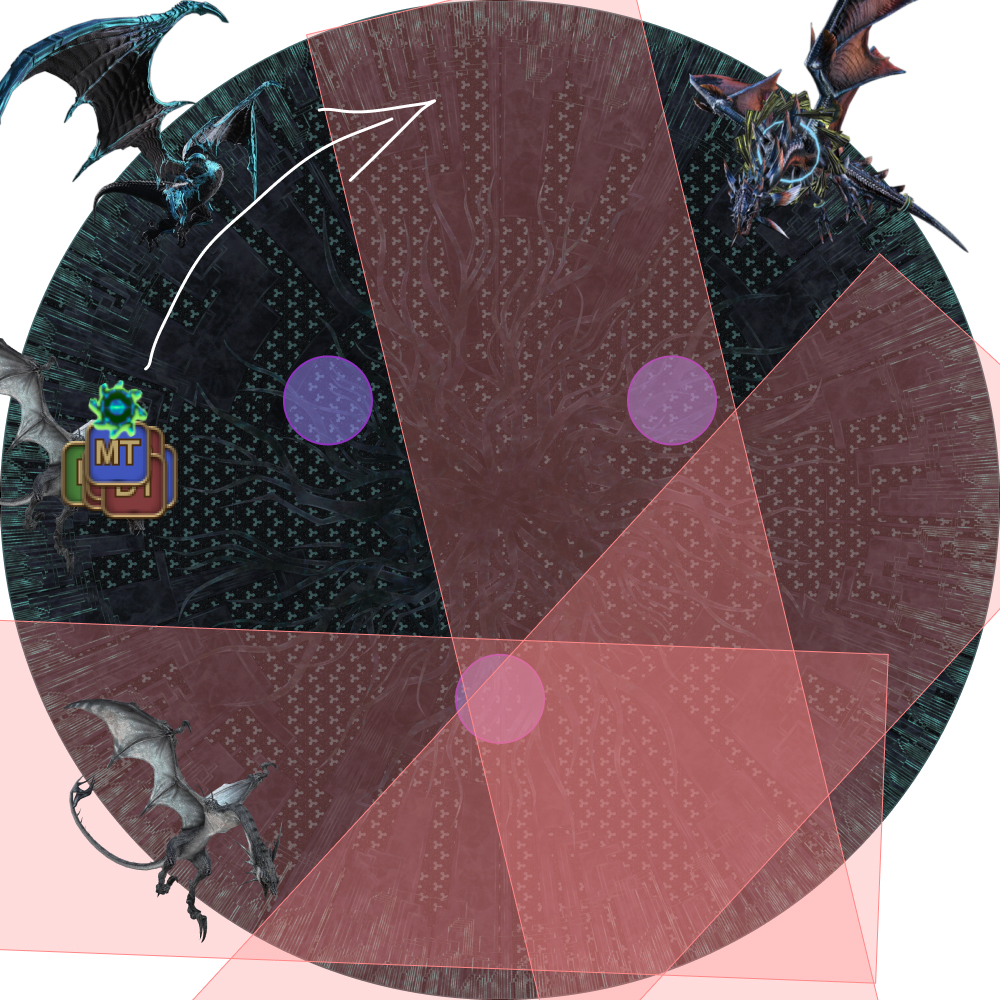 |
| 6. After the five dragons target their players for divebombs, Bahamut targets one of the two remaining players that have not received a divebomb. When the red divebomb marker appears, run to the center of the arena. At this point, only one player would not have received a divebomb. That player prepares to bait Twintania's divebomb. | 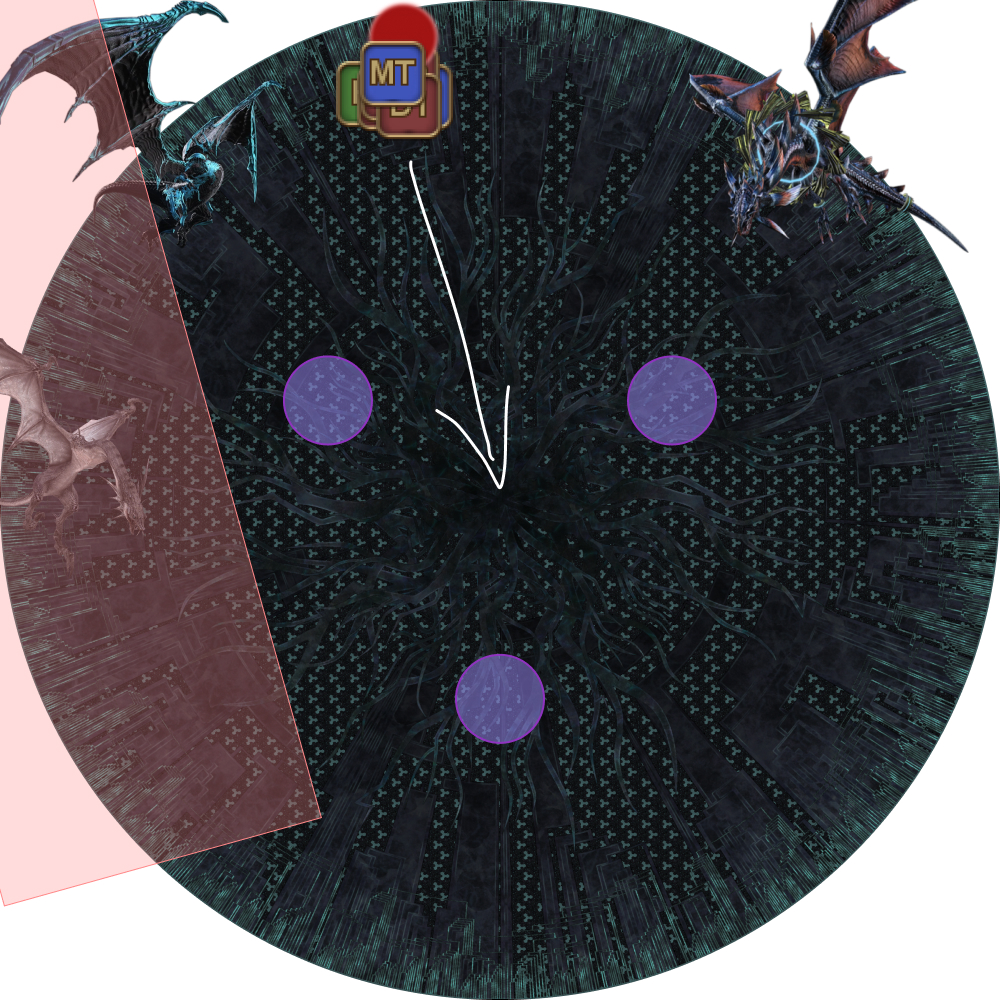 |
| 7. Bahamut dives. Find Twintania. | 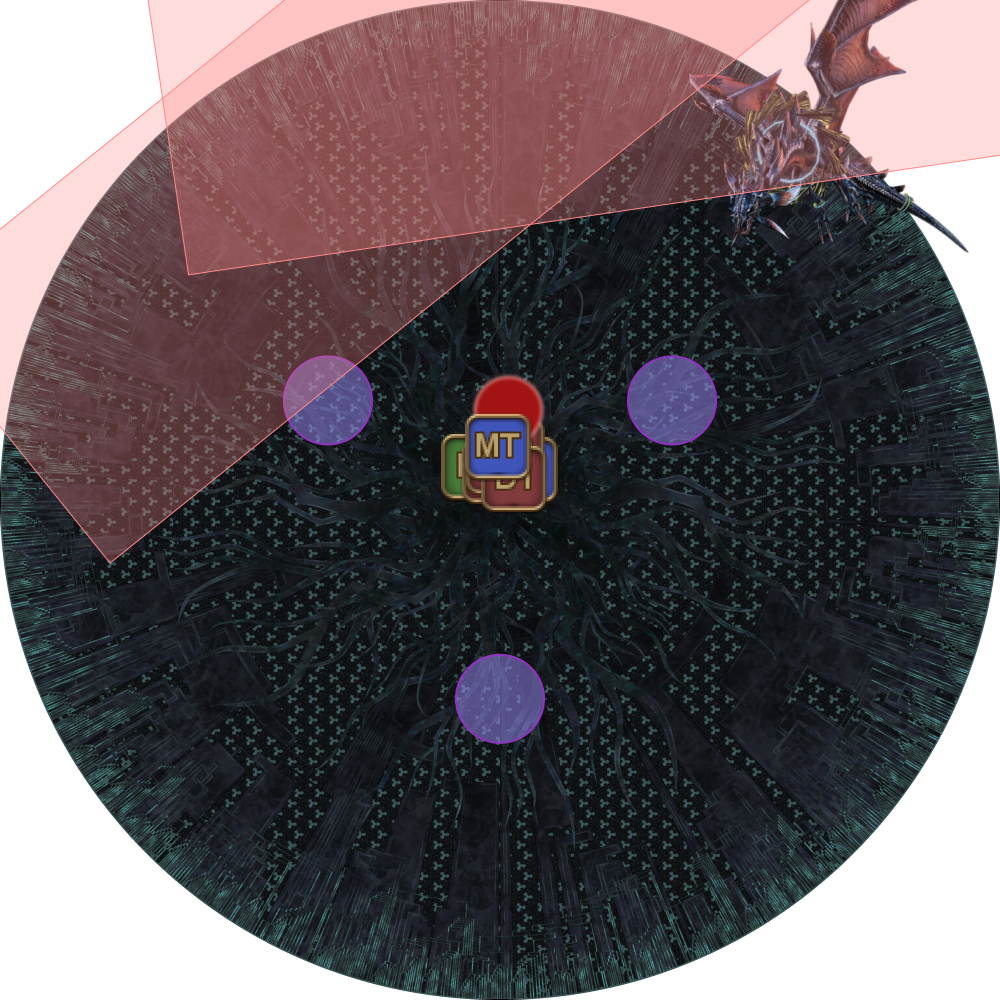 |
| 8. Four random players get marked with the Megaflare marker, and four towers appear.
Have the party spread out and have four players take the four towers. Ignore the Megaflare markers. | 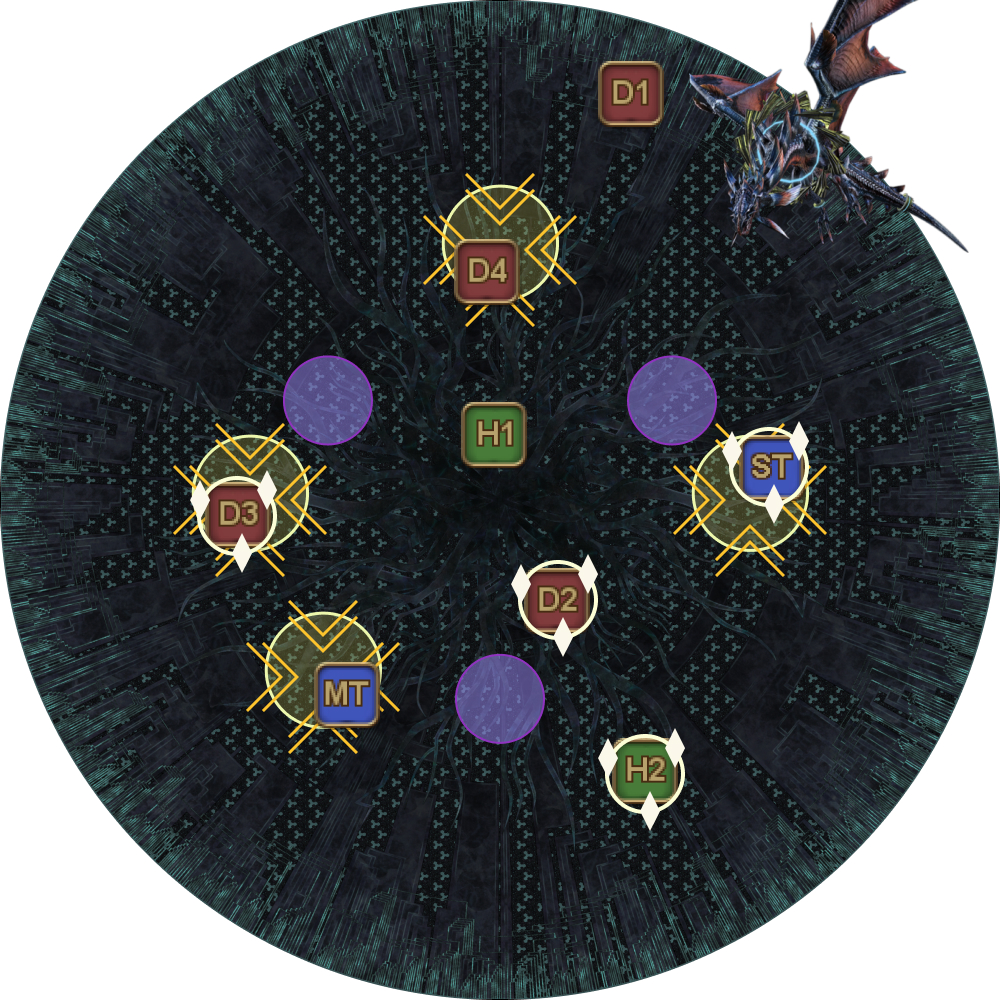 |
| 9. When Twintania's (green) divebomb marker appears, that player dodges to the other side of Twintania. | 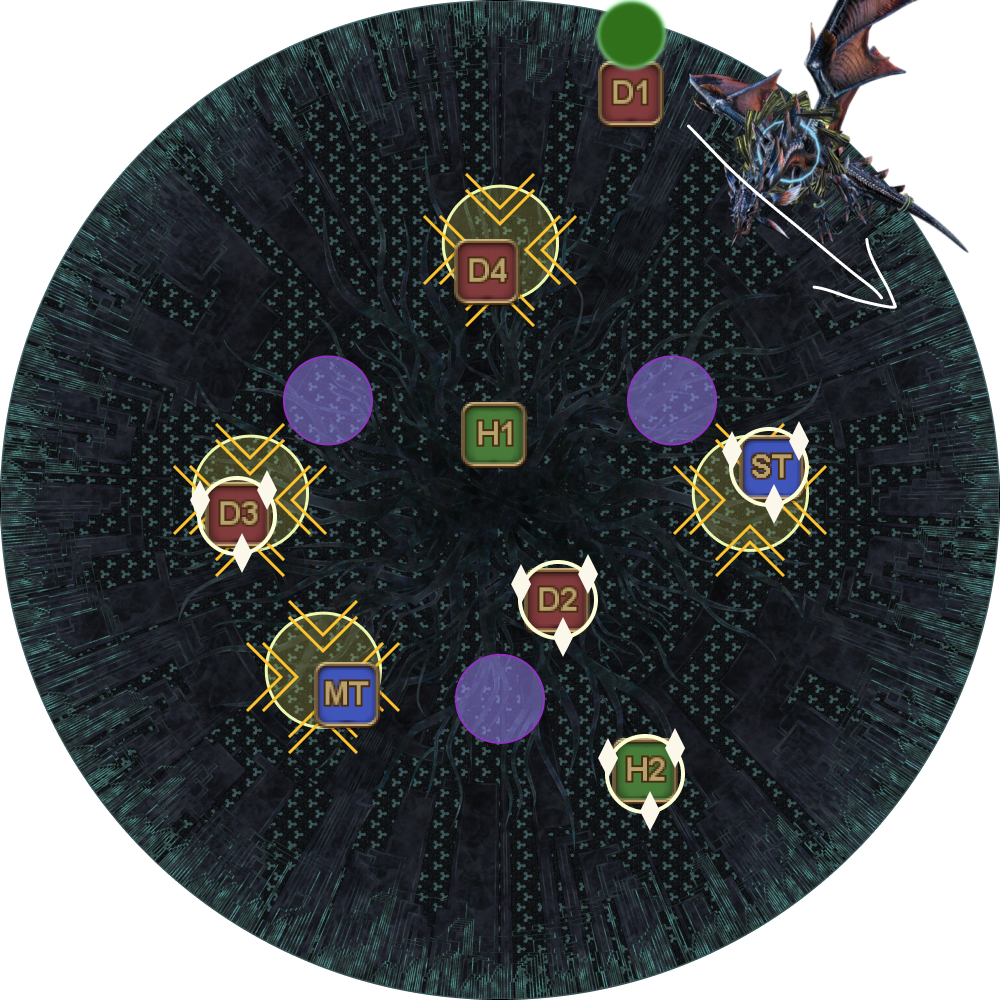 |
| 10. Twintania dives together with the towers, the Megaflare "stack" and Twisters resolving. Watch for Twisters, and gather together to prepare for the adds phase. | 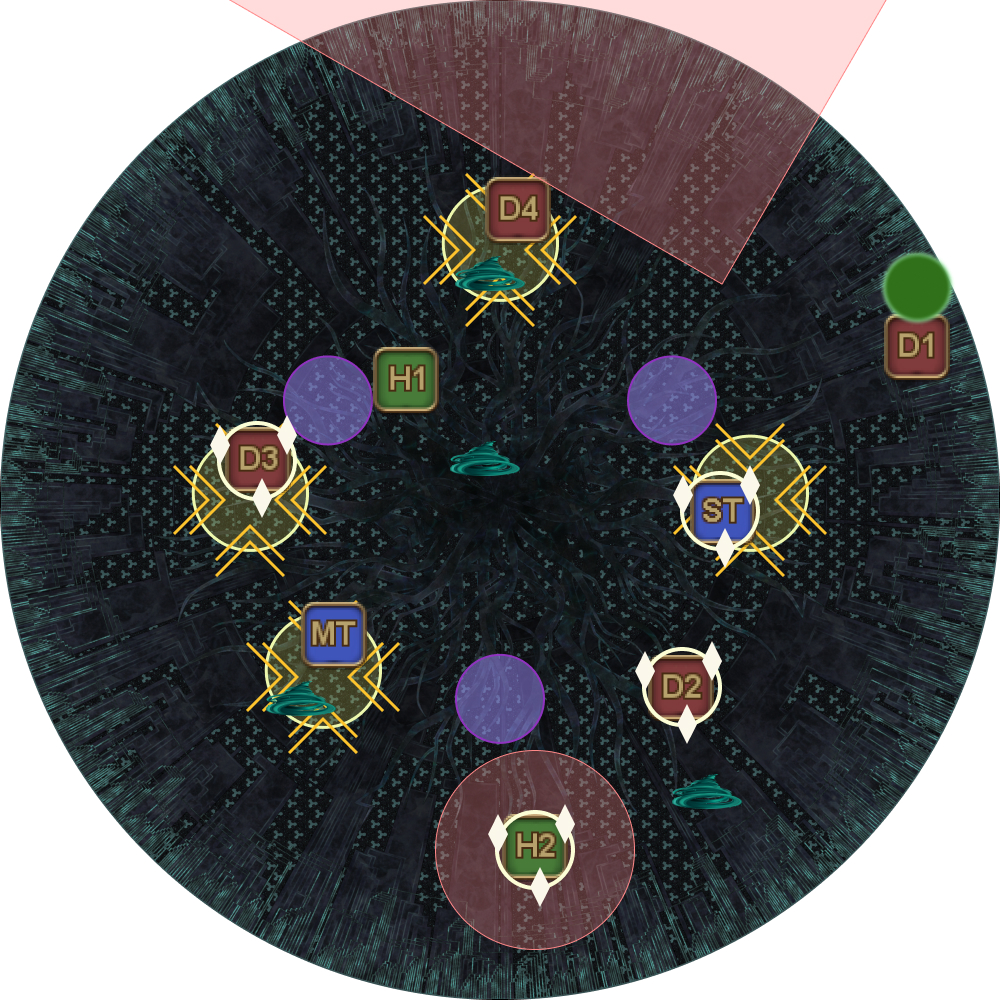 |
Grand Octet (without Tank LB3)
If you don’t have tank LB3, then Grand Octet becomes significantly harder.
Everything stays the same for the last part, except player roles are now fixed.
- The Twintania player still goes to Twintania’s left.
- Megaflare players stack on Twintania’s right.
- Non-Megaflare players take towers.
However, the Twintania player may be part of the Megaflare group, or the towers (non-Megaflare) group.
| If the Twintania player does not have Megaflare
When Twintania's divebomb marker appears, the Twintania player goes to the empty tower. | 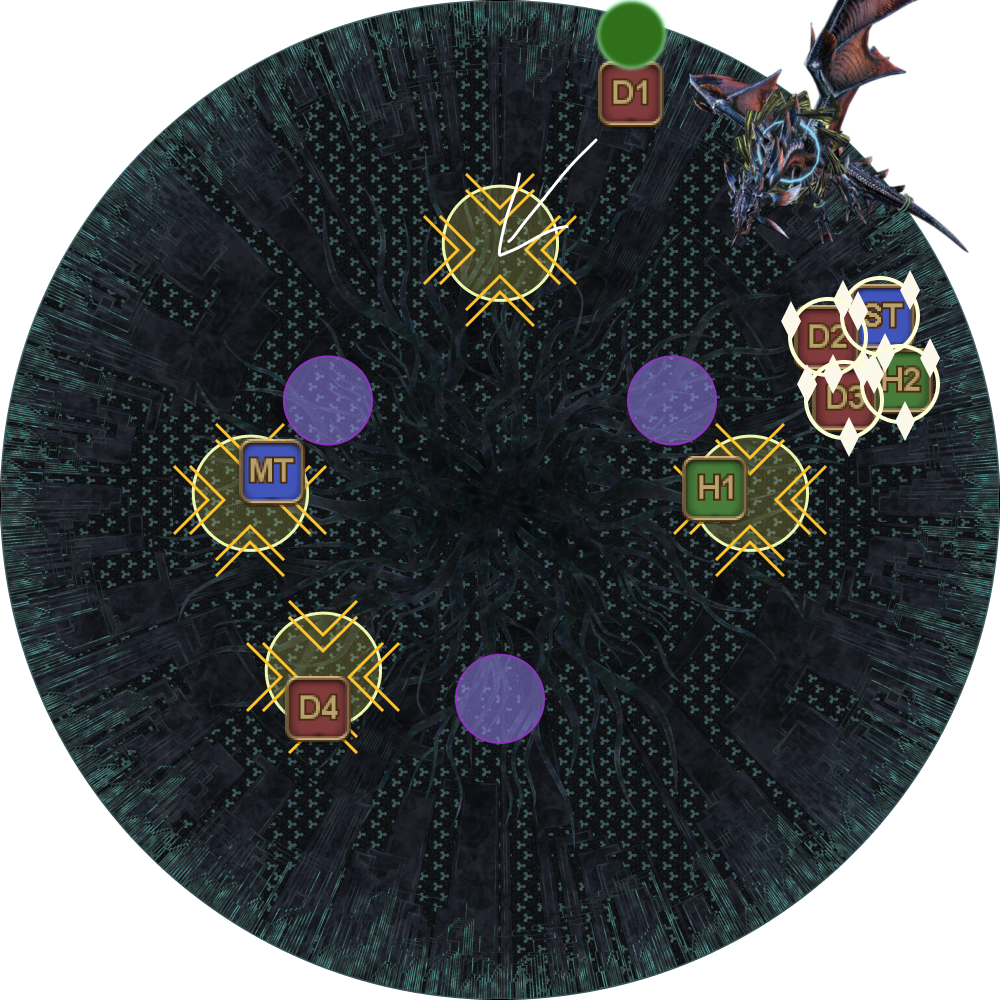 |
| If the Twintania player has Megaflare
When Twintania's divebomb marker appears, the Twintania player goes to join the Megaflare stack. | 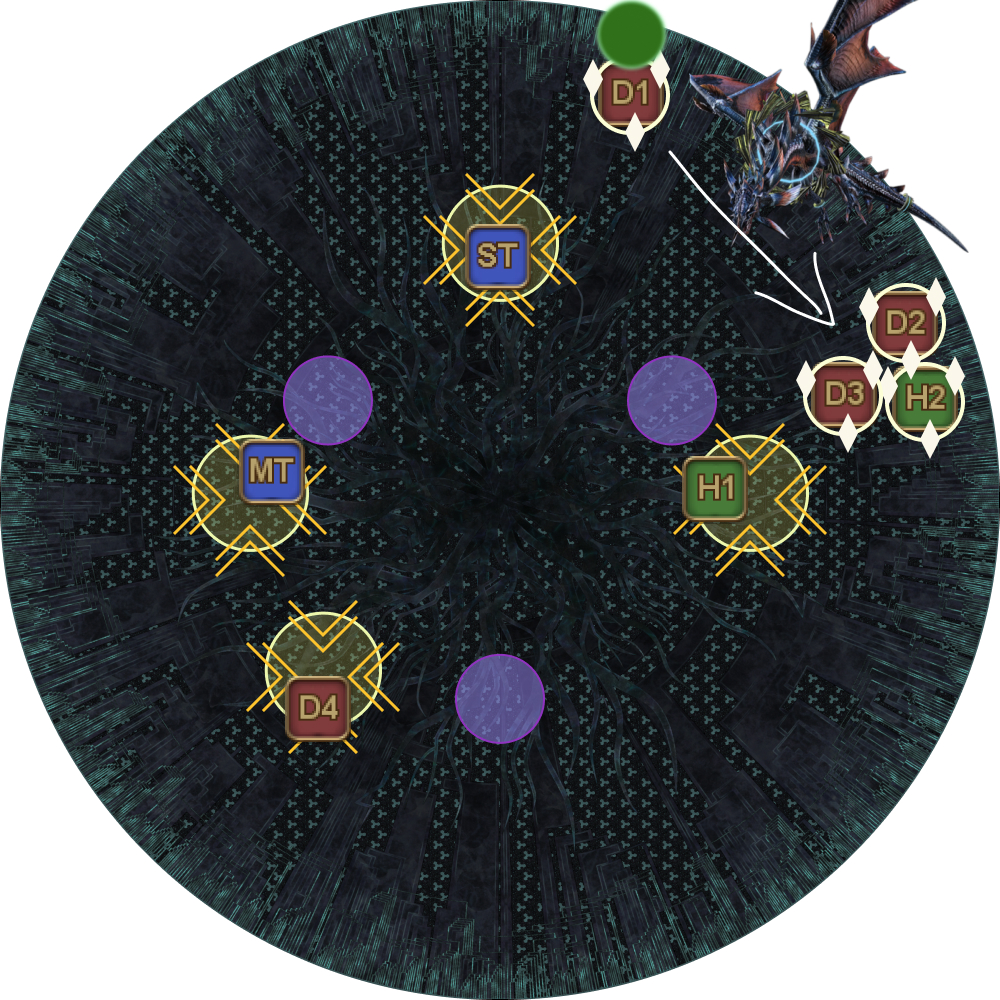 |
Frequently Asked Questions
[Quickmarch Trio] Why do we dodge Twisters by moving along the edge?
| Dodging Twisters this way accomplishes two things:
|  |
[Heavensfall Trio] Are there really small gaps between the divebomb AoEs?
Yes, there are. Don't use them. | 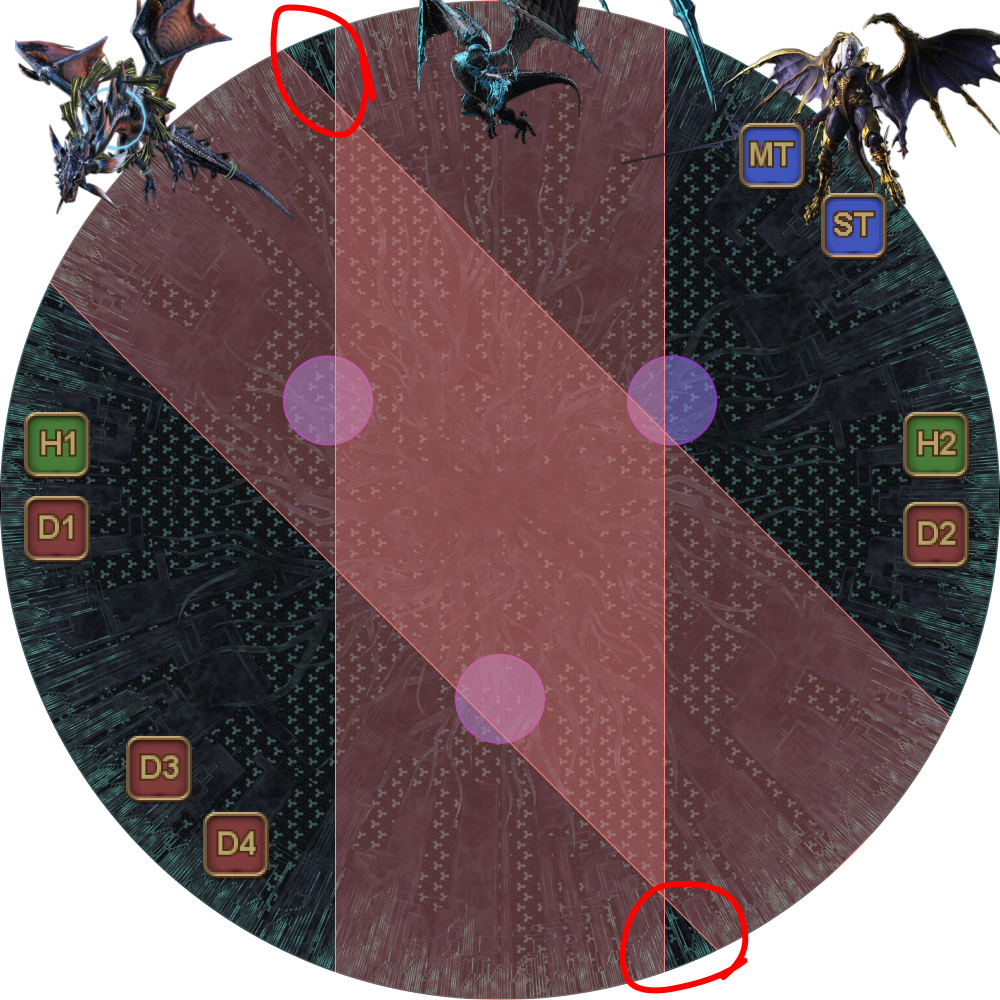 |
Troubleshooting
[Fellruin Trio] The tanks can't get to the Neurolinks in time to survive Aetherial Profusion!
This can happen if Nael's line goes Raven's Dive → Lunar Dynamo and the person they dive to is too far back (towards the edge of the arena). Tanks can save Sprint for this part to help. |