Anabaseios: The Twelfth Circle (Savage) - Part 2
Game8 has listed out a strat, but oddly did not published a macro.
Nukemaru has published a video outlining the PF strat:
(English subtitled)
Things to check on Party Finder
- Check the Caloric Theory 1 strat.
- Japanese parties will go with Mochibe’s strat
- English parties will go with Papan’s original strat.
- Check whether the party will line up for Pangenesis (パンゲ整列).
- Parties that will not line up for Pangenesis will mention something like 非整列 or 整列なし.
Japanese (Nukemaru + Mochibe’s Caloric 1)
Japanese parties will do Mochibe’s strat for Caloric Theory 1.
【パラスの手】  T:西 他:東
【サモンダークネス】北>西:TH 南>東:DPS
 【デミハルペリオン】
         MT   ST               MT   ST
    H1              H2           H1      H2    H1  MT  ST  H2
               ●                ●              ●
   D3               D4           D3   D4        D3  D1  D2  D4
          D1   D2           D1   D2
【イデア】 西←〇×△□→東  α:北 β:南
【パラスレイX処理】
  ●  ●  ●  ●
  〇α ★ ×α  △α ★ □α  2回目は〇×△□反転
  ●  ●  ●  ●   ※誘導後→★に入る
  〇β ★ ×β  △β ★ □β
  ●  ●  ●  ●
【カロリック1】※もちべ式
  炎マーカー頭割り・・・西:TH 東:DPS
  風炎:MTSTH1H2D1D2D3D4の順でAから時計
【エクピロシス】
   MT  ST
   D1  D2    MT  D1  D2  ST
   H1  H2    D3  H1  H2  D4
   D3  D4
【パンゲネシス】MT:西無敵、他:南(東側)
   極性なし:西←MTSTH1H2D1D2D3D4→東
   無職:スライム 西:1マーカー、東:2マーカー
【カロリック2回目】
   H2     マーカー:MTと交代
 D1   D4     ※反時計/最後中央行かずに2回移動
   MT
 ST   D2
   H1
      D3
【サモンダークネス+デミ2】(MTD1が奥まで走る)
   安置の逆側>MT/D1 ST/D2 H1/D3 H2/D4<安置
【サモンダークネス(線)】
 MT/D1 ST/D2 H1/D3 H2/D4ペアで処理
English translation
【Palladian Grasp】Tank → W Others → E
【Summon Darkness】N/W → T/H S/E → DPS
【Demi Parhelion】
  MT  ST   MT  ST
 H1   H2  H1  H2  H1 MT ST H2
     ●       ●       ●
 D3   D4  D3  D4  D3 D1 D2 D4
  D1 D2   D1  D2
【The Classical Concepts】
 ※ Go to Blue:West ← 〇×▽□ → East
 α → Block Red ▲  β → Block Yellow ■
【Palladian Ray - X-formation】
  ●  ●  ●  ●  2nd round:Flip 〇×▽□
  〇α ★ ×α  △α ★ □α ※ Bait then go to ★
  ●  ●  ●  ●
  〇β ★ ×β  △β ★ □β
  ●  ●  ●  ●
【Caloric Theory 1 (Mochibe strat)】
 Fire stacks: TH → West  DPS → East
 Fire + Wind debuffs:
  CW from A: MT ST H1 H2 D1 D2 D3 D4
【Ekpyrosis】
 MT ST
 D1 D2  MT  D1  D2  ST
 H1 H2  D3  H1  H2  D4
 D3 D4
【Pangenesis】 MT:Invuln West Others: East
  Colourless:W ← MTSTH1H2D1D2D3D4 → E
 No stacks:Slimes → W to 1, E to 2
【Caloric Theory 2 (Starting positions)】
   H2     Red Marker: Swap with MT
 D1   D4  ※Pass CCW - last player moves
   MT      twice without going mid
 ST   D2
   H1
     D3
【Summon Darkness + Demi Parhelion】
 ※ MTD1 runs to the other side
 Moves> MTD1 STD2 H1D3 H2D4 <Stays
【Summon Darkness (Tethers)】
 Resolve in pairs: MTD1 STD2 H1D3 H2D4
Markers (Mochibe)
The following markers are for Mochibe’s Caloric Theory 1 strat:
XIVLauncher WaymarkPresetPlugin positions
{
  "Name":"P12S-2 (Mochibe)",
  "MapID":943,
  "A":{"X":97.67,"Y":0.0,"Z":92.67,"ID":0,"Active":true},
  "B":{"X":102.33,"Y":0.0,"Z":92.67,"ID":1,"Active":true},
  "C":{"X":102.33,"Y":0.0,"Z":97.33,"ID":2,"Active":true},
  "D":{"X":97.67,"Y":0.0,"Z":97.33,"ID":3,"Active":true},
  "One":{"X":99.0,"Y":0.0,"Z":81.0,"ID":4,"Active":true},
  "Two":{"X":119.0,"Y":0.0,"Z":91.0,"ID":5,"Active":true},
  "Three":{"X":105.67,"Y":0.0,"Z":101.0,"ID":6,"Active":true},
  "Four":{"X":94.33,"Y":0.0,"Z":101.0,"ID":7,"Active":true}
}
English (Nukemaru + Papan’s Caloric 1)
This is the preferred strat by EN, and follows Papan’s Original Toolbox.
Take note that Papan’s strat has updated versions going around in other data centers, so take note if you are going to reference other guides.
English (Papan)
【Palladian Grasp】Tank → W Others → E
【Summon Darkness】N/W → T/H S/E → DPS
【Demi Parhelion】
MT ST MT ST
H1 H2 H1 H2 H1 MT ST H2
● ● ●
D3 D4 D3 D4 D3 D1 D2 D4
D1 D2 D1 D2
【The Classical Concepts】
※ Go to Blue:West ← 〇×▽□ → East
α → Block Red ▲ β → Block Yellow ■
【Palladian Ray - X-formation】
● ● ● ● 2nd round:Flip 〇×▽□
〇α ★ ×α △α ★ □α ※ Bait then go to ★
● ● ● ●
〇β ★ ×β △β ★ □β
● ● ● ●
【Caloric Theory 1 (Papan)】
D3 T/M: Preposition at ★
H1 ★ D4 T/H mark:Swap with H1
H2 DPS mark:Swap with D4
■ Players at ★ fill in *empty* spots:
W (ccw) ← H1 MT ST D2 D1 D4 → N (cw)
■ 2x Fire stacks:
Rotate to E + W stacks, CW priority
【Ekpyrosis】
MT ST
D1 D2 MT D1 D2 ST
H1 H2 D3 H1 H2 D4
D3 D4
【Pangenesis】 MT:Invuln West Others: East
Colourless:W ← MTSTH1H2D1D2D3D4 → E
No stacks:Slimes → W to , E to
【Caloric Theory 2 (Starting positions)】
H2 Red Marker: Swap with MT
D1 D4 ※Pass CCW - last player moves
MT twice without going mid
ST D2
H1
D3
【Summon Darkness + Demi Parhelion】
※ MTD1 runs to the other side
Moves> MTD1 STD2 H1D3 H2D4 <Stays
【Summon Darkness (Tethers)】
Resolve in pairs: MTD1 STD2 H1D3 H2D4
Japanese translation
【パラスの手】  T:西 他:東
【サモンダークネス】北>西:TH 南>東:DPS
 【デミハルペリオン】
         MT   ST               MT   ST
    H1              H2           H1      H2    H1  MT  ST  H2
               ●                ●              ●
   D3               D4           D3   D4        D3  D1  D2  D4
          D1   D2           D1   D2
【イデア】 西←〇×△□→東  α:北 β:南
【パラスレイX処理】
  ●  ●  ●  ●
  〇α ★ ×α  △α ★ □α  2回目は〇×△□反転
  ●  ●  ●  ●   ※誘導後→★に入る
  〇β ★ ×β  △β ★ □β
  ●  ●  ●  ●
【カロリック (Papan式)】
    D3   タンク近接:★に立っておく
 H1 ★ D4   T/H:H1と入れ替わり
    H2   DPS:D4と入れ替わり
 ■ ★にいる方が空いてるところへ:
   西から半時計周り:H1 > MT > ST
   北から時計周り:D4 > D1 > D2
 最後に時計回り優先で東西でペア処理する
【エクピロシス】
   MT  ST
   D1  D2    MT  D1  D2  ST
   H1  H2    D3  H1  H2  D4
   D3  D4
【パンゲネシス】MT:西無敵、他:南(東側)
   極性なし:西←MTSTH1H2D1D2D3D4→東
   無職:スライム 西:1マーカー、東:2マーカー
【カロリック2回目】
   H2     マーカー:MTと交代
 D1   D4     ※反時計/最後中央行かずに2回移動
   MT
 ST   D2
   H1
      D3
【サモンダークネス+デミ2】(MTD1が奥まで走る)
   安置の逆側>MT/D1 ST/D2 H1/D3 H2/D4<安置
【サモンダークネス(線)】
 MT/D1 ST/D2 H1/D3 H2/D4ペアで処理
Markers (Papan)
The following markers are for Papan’s Caloric Theory 1 strat.
- The
BDmarkers are 9 yalms away from the corresponding east/west markers, which indicate the distance a player can travel before gaining a Close Caloric stack.
XIVLauncher WaymarkPresetPlugin positions
{
  "Name":"P12S-2 (Papan)",
  "MapID":943,
  "A":{"X":100.0,"Y":0.0,"Z":89.0,"ID":0,"Active":true},
  "B":{"X":104.0,"Y":0.0,"Z":93.0,"ID":1,"Active":true},
  "C":{"X":100.0,"Y":0.0,"Z":97.0,"ID":2,"Active":true},
  "D":{"X":96.0,"Y":0.0,"Z":93.0,"ID":3,"Active":true},
  "One":{"X":99.0,"Y":0.0,"Z":81.0,"ID":6,"Active":true},
  "Two":{"X":113.0,"Y":0.0,"Z":93.0,"ID":5,"Active":true},
  "Three":{"X":119.0,"Y":0.0,"Z":91.0,"ID":7,"Active":true},
  "Four":{"X":87.0,"Y":0.0,"Z":93.0,"ID":4,"Active":true}
}
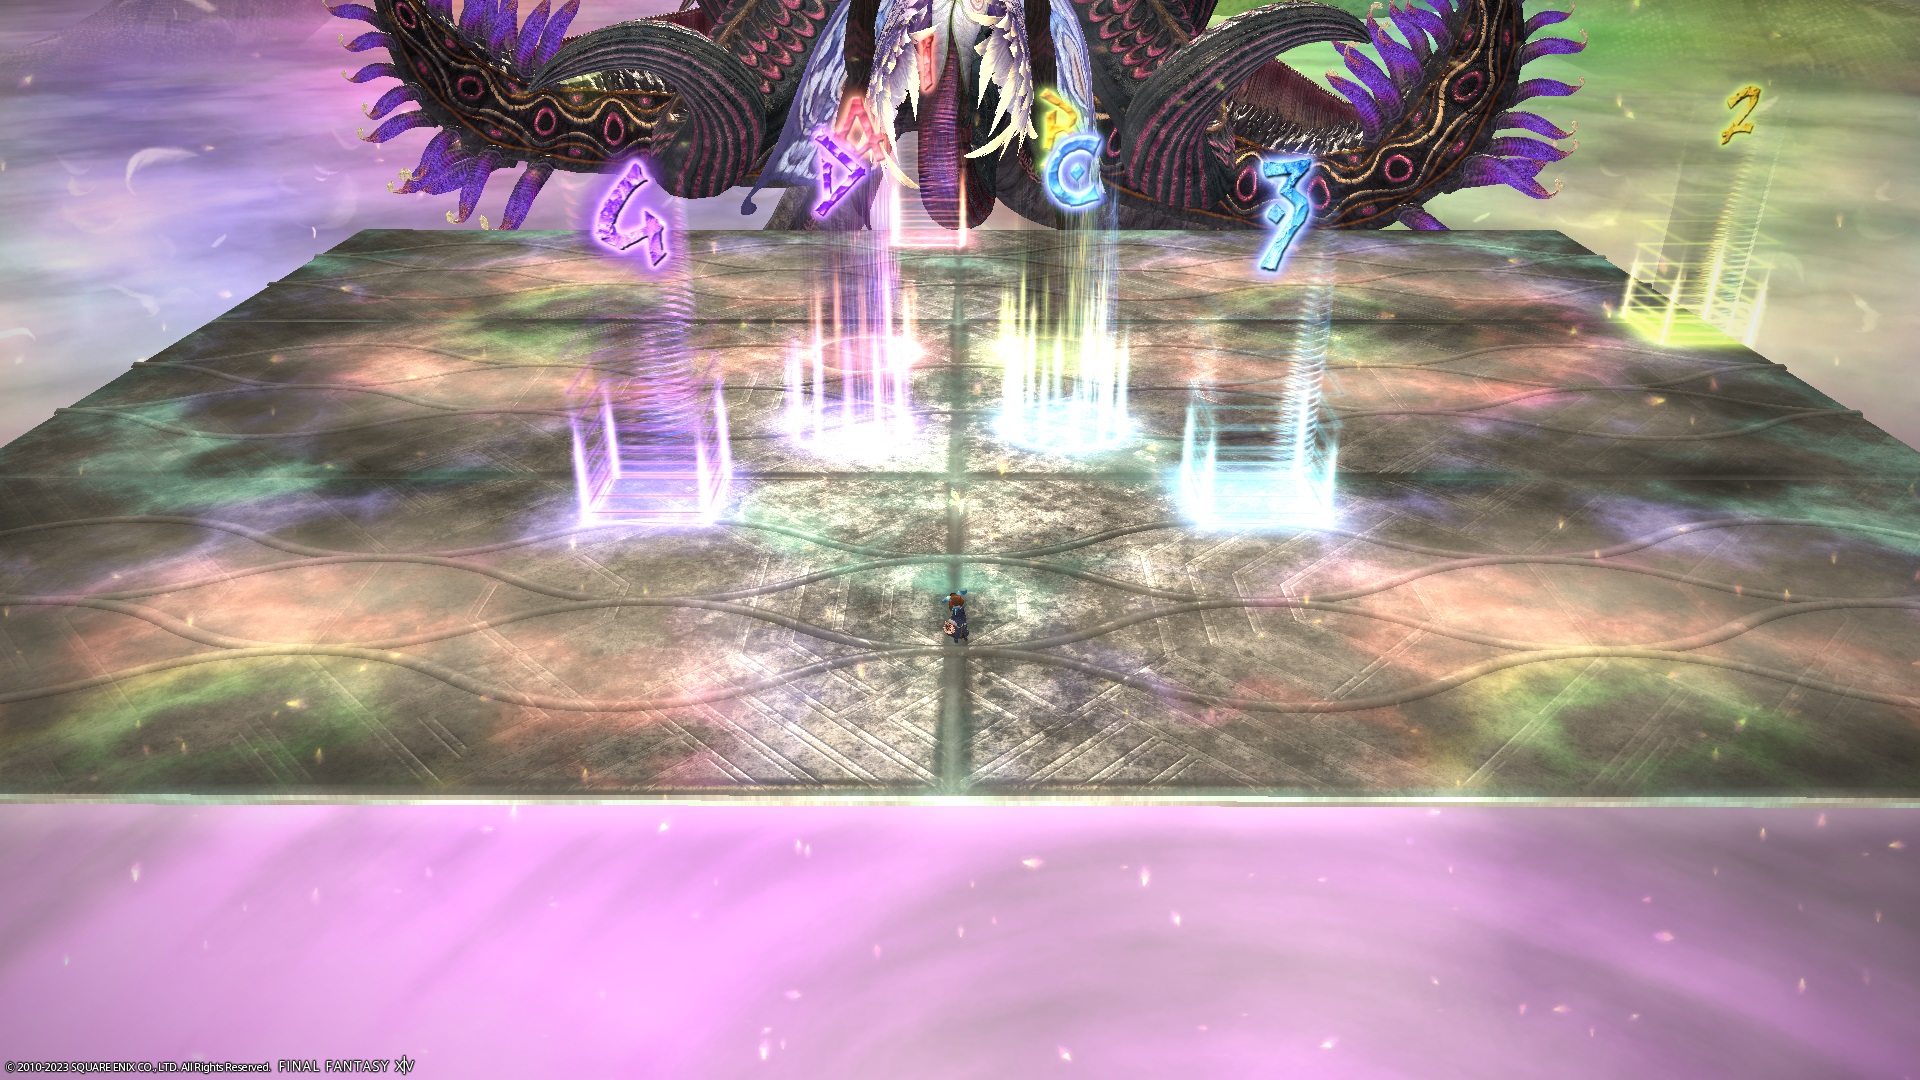
Classical Concepts
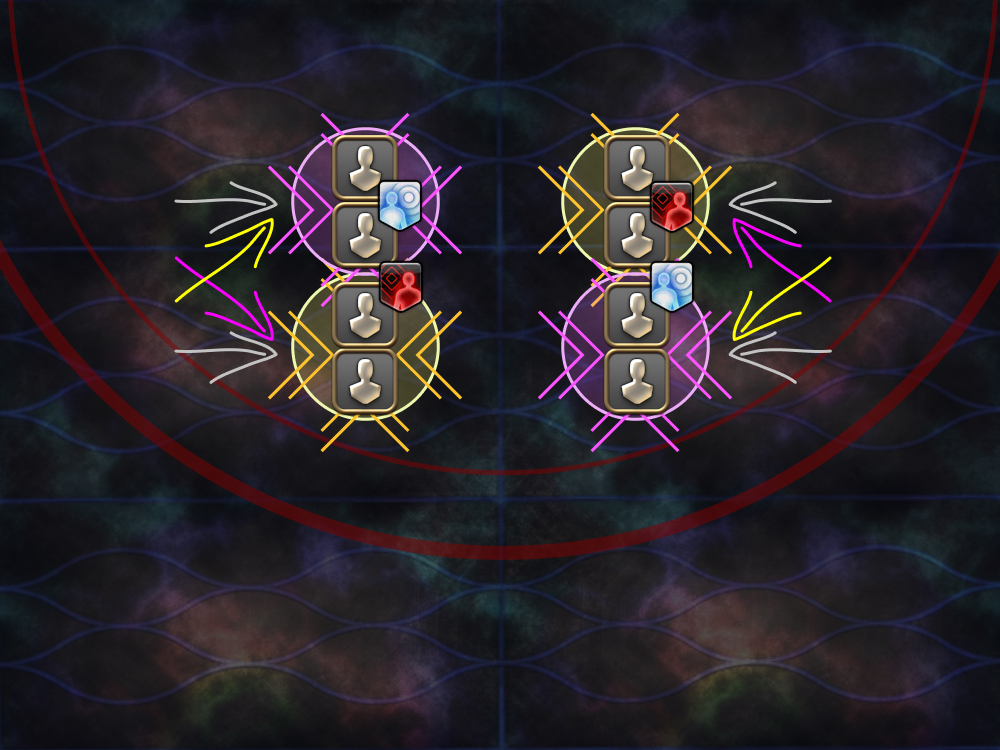
The first part of both Classical Concepts will be determining where you stand.
A bunch of shapes will appear on the arena. When the mechanic resolves, each blue icosahedron will tether to an adjacent red pyramid and an adjacent yellow cube.
If two shapes tether together, the raid wipes. The objective is to have all eight party members block the shapes from tethering together by standing in between the shapes.
| Each column will have one blue icosahedron. Identify your column's blue icosahedron based on your Playstation marker:
Then, stand between your column's blue icosahedron and an adjacent shape based on your α or β debuff:
If your blue icosahedron has two adjacent shapes of the same type, stand between the one that does not have another blue icosahedron next to it. |  |
Classical Concepts #2 adds a Panta Rhei just before the mechanics resolve, which rotates all the shapes around 180 degrees. Players will first determine where they stand before the rotation happens, before moving to their positions post-rotation.
There is a site built for Classical Concepts that you can use for practice:
https://idea-elemental.pages.dev/
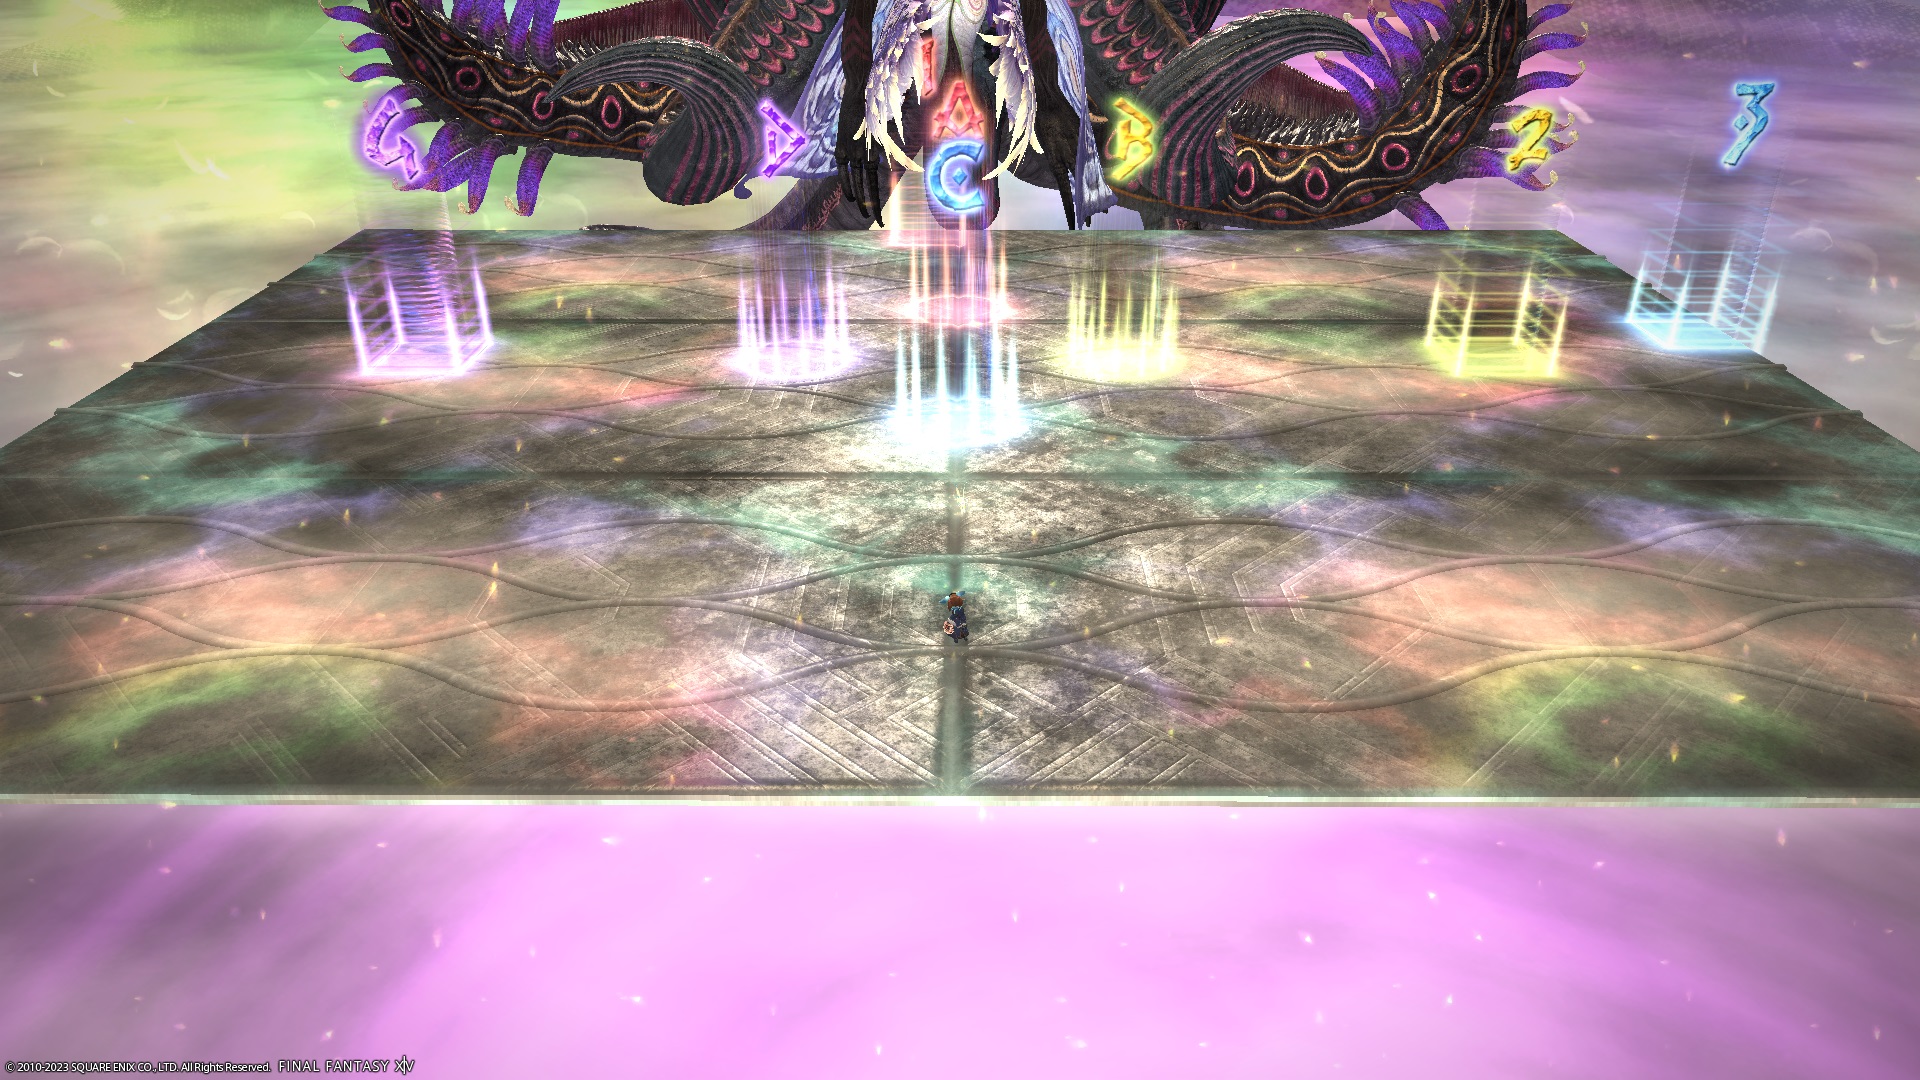
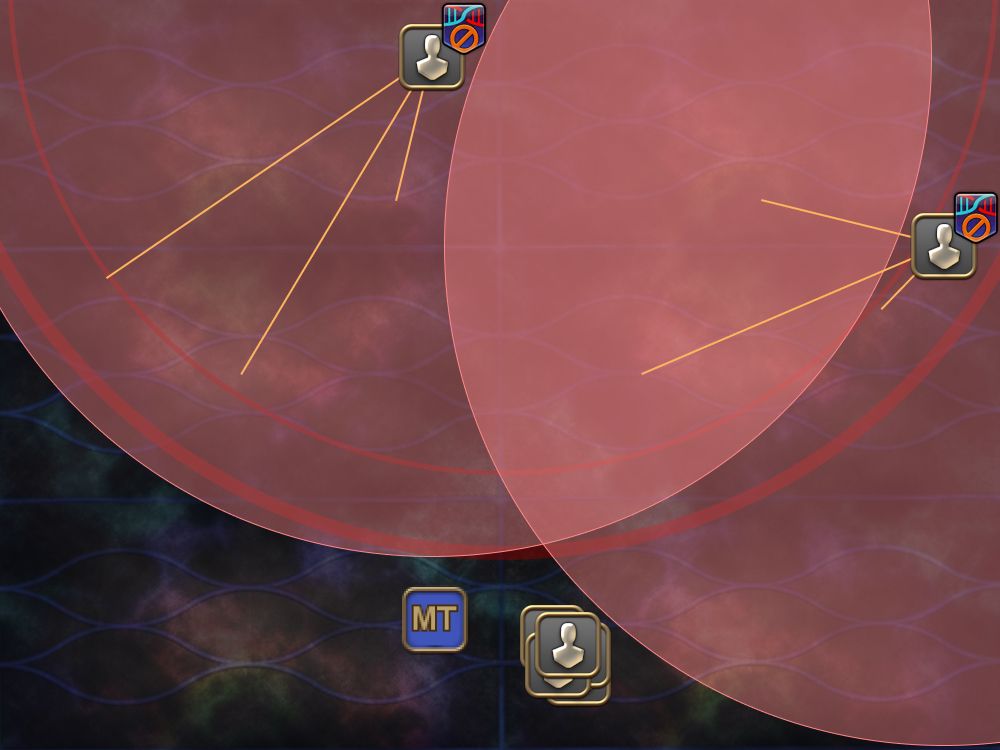
Palladian Ray
Palladian Rays need to be baited at the end of each Classical Concepts. However, because the mechanics resolve in a different order each time, the way the Rays are baited will also change.
The most common way to bait the rays is:
- Baiting the first Rays in a ‘K’-formation.
- Baiting the second Rays in an ‘X’-formation.
| Palladian Ray #1 Players will dodge the shapes' AoEs first, then bait the Palladian Rays in this formation (that looks like the letter 'K'). | 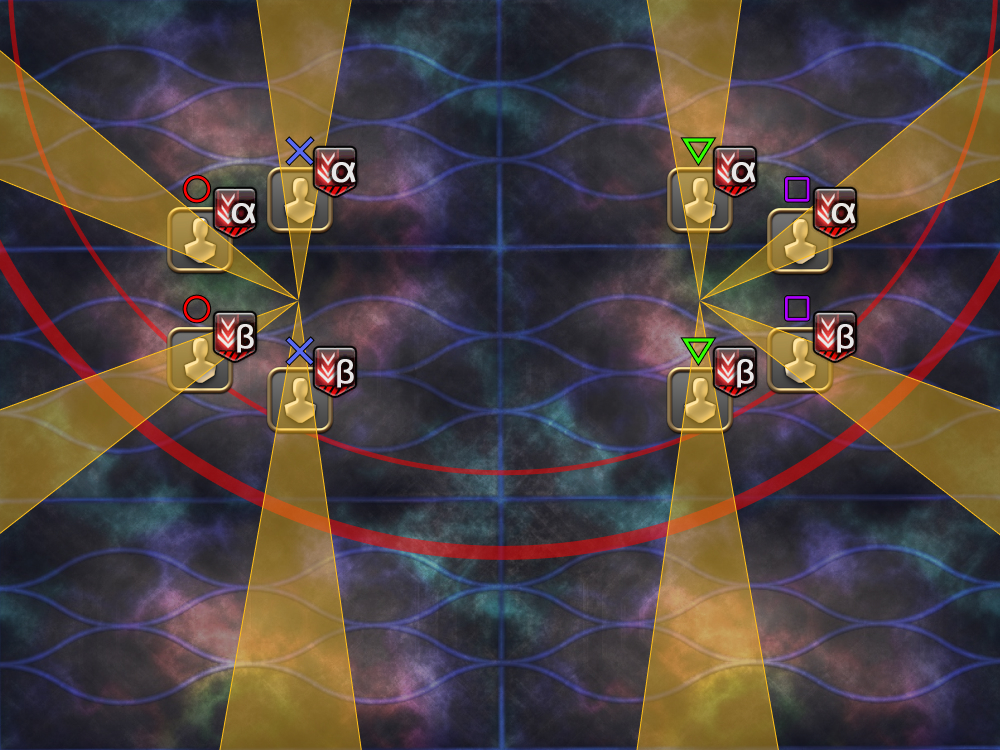 |
| Palladian Ray #2 Players will bait the Palladian Rays between the shapes in this formation (which will looks like the letter 'X') first, then dodge the shapes' AoEs (which also avoids the lingering cone AoEs). Note that because of Panta Rhei (which rotated all the shapes), the 〇×▽□ order is flipped (although α still takes the north, and β takes the south). | 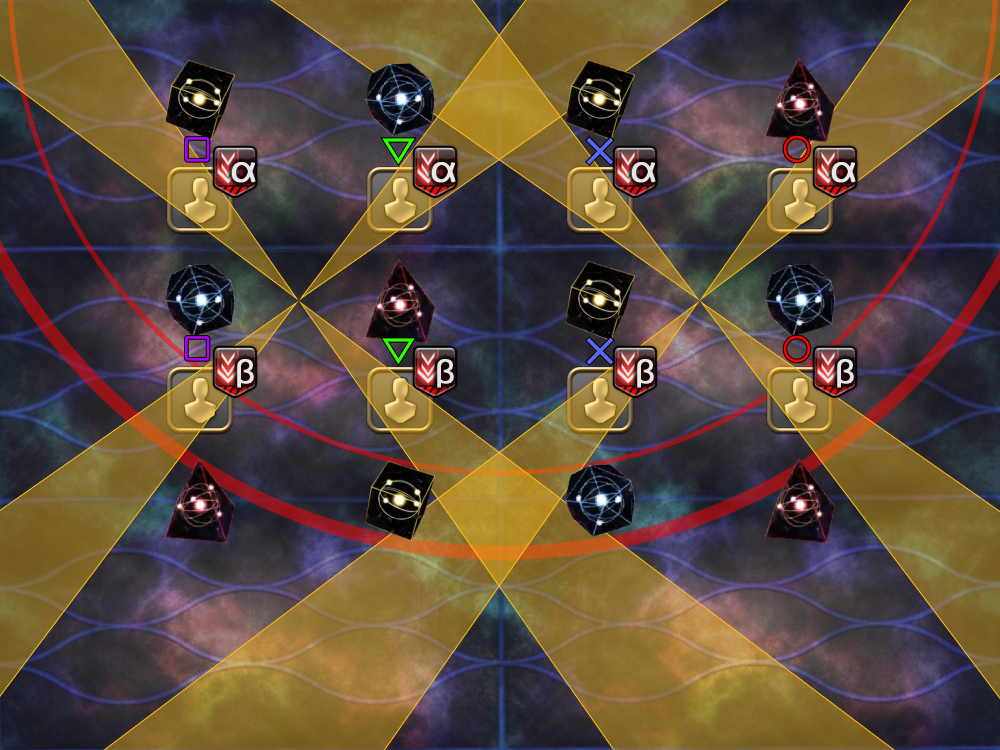 |
Caloric Theory 1
There are two strategies used for Caloric Theory 1.
Mochibe’s Caloric Theory 1
This is the strategy favoured by Japanese parties.
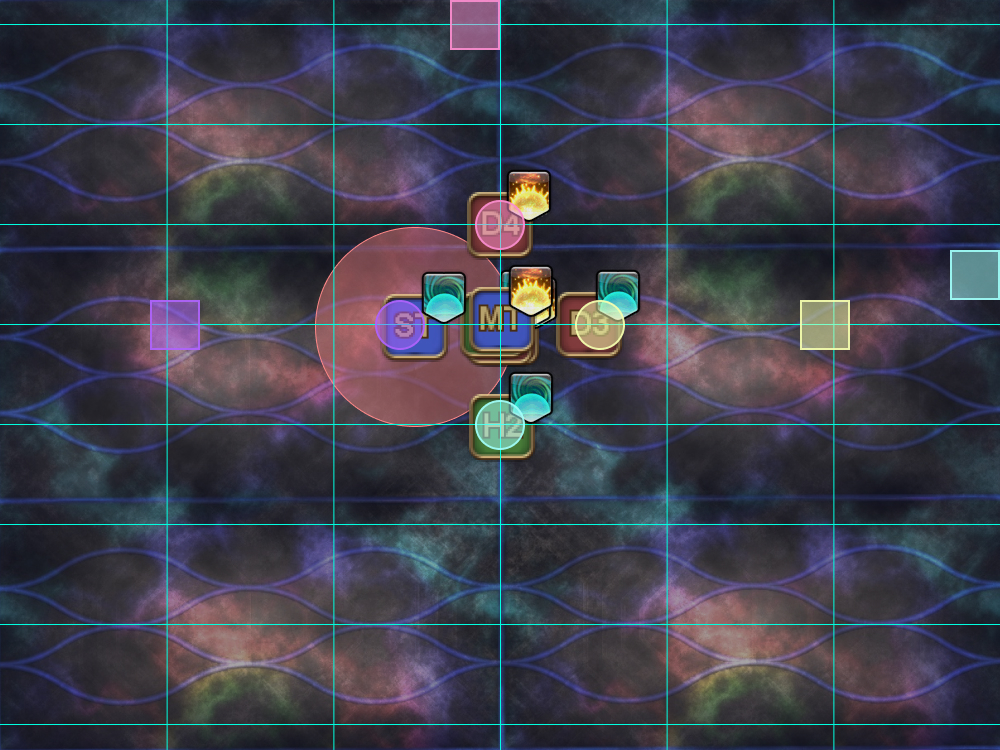
1. One random tank/healer and one random DPS will be targeted with a Fire mark. In this example, ST and D3 are marked for Fire.
| 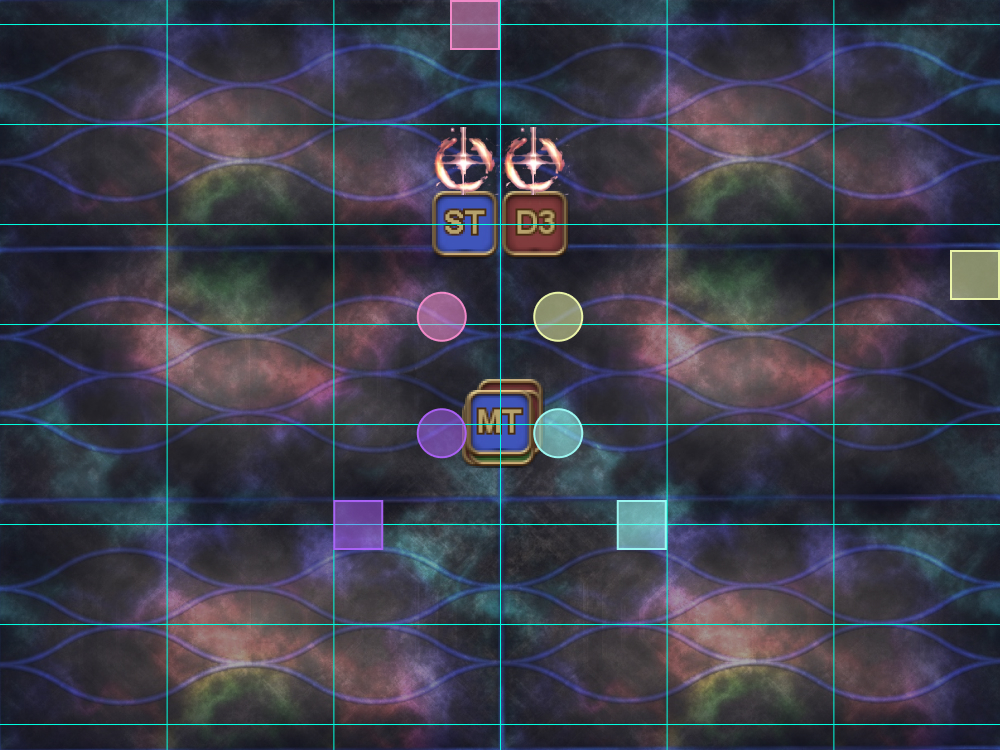 |
2. One of the marked players (at random) will be targeted for a shared damage AoE (shared between both marked players). The party also takes raid-wide damage. All party members get marked with either Pyrefaction (Fire
In this example:
| 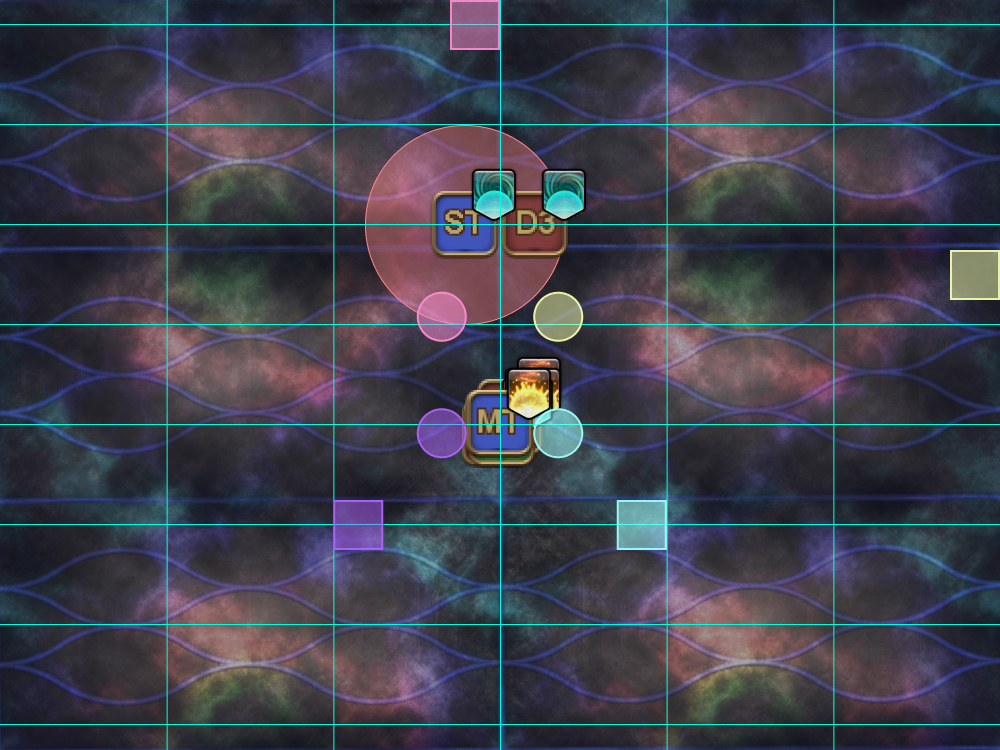 |
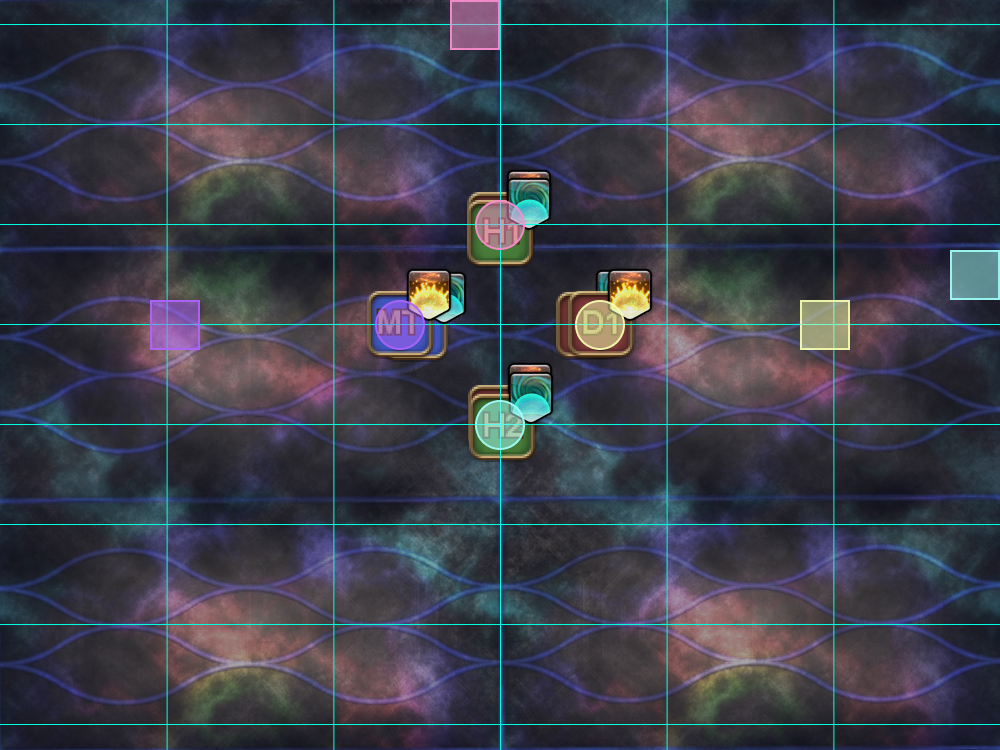
3. Move to create four pairs of Fire + Wind.
Clockwise from A: MT ST H1 H2 D1 D2 D3 D4 The pairs on the north side should stand in the markers, but above the blue line. Similarly, the pairs on the south side should stand in the markers, but below the blue line. In this example, we have:
| 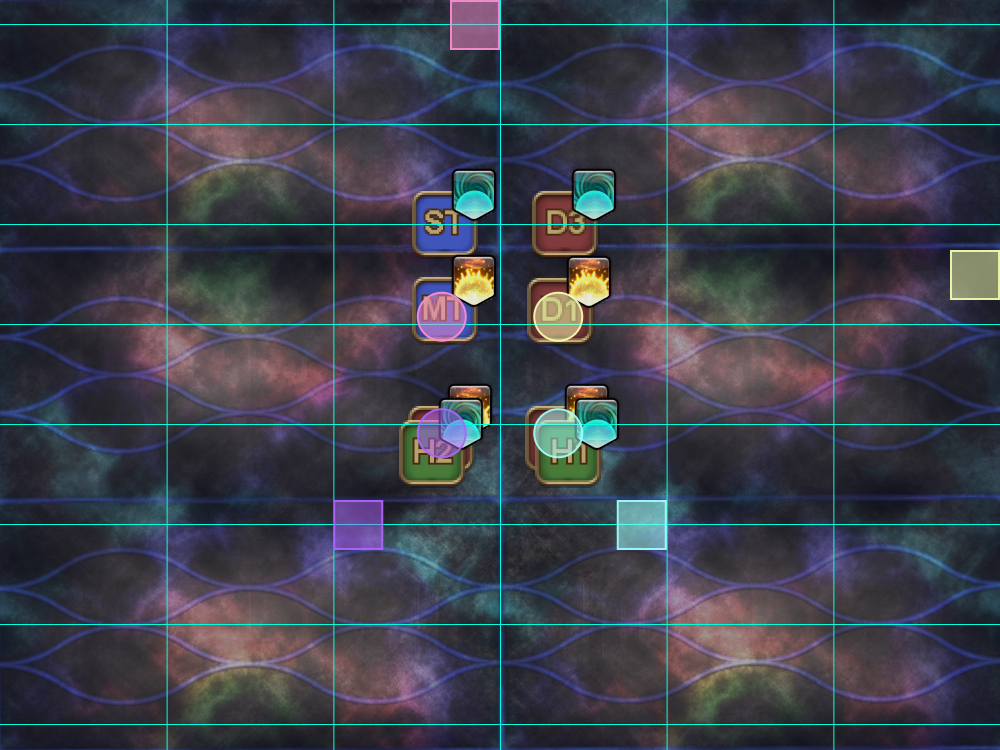 |
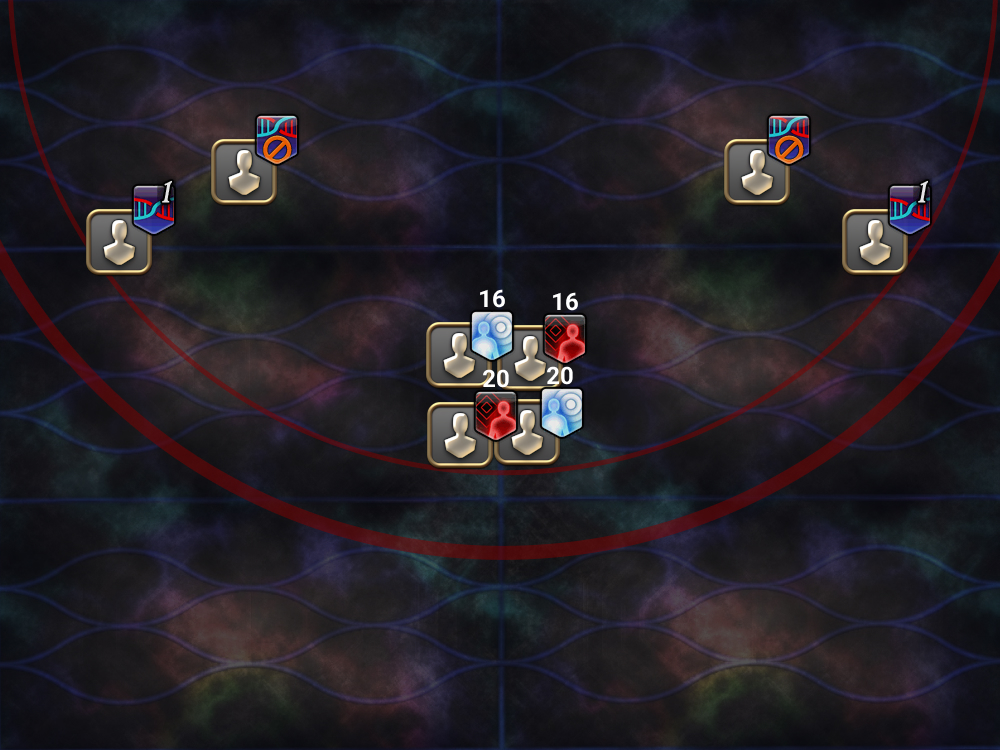
4. Fire stacks resolve. Two of the four players that had Fire (at random) will keep their Fire debuffs. In this example, MT and D4 kept their Fire debuff. | 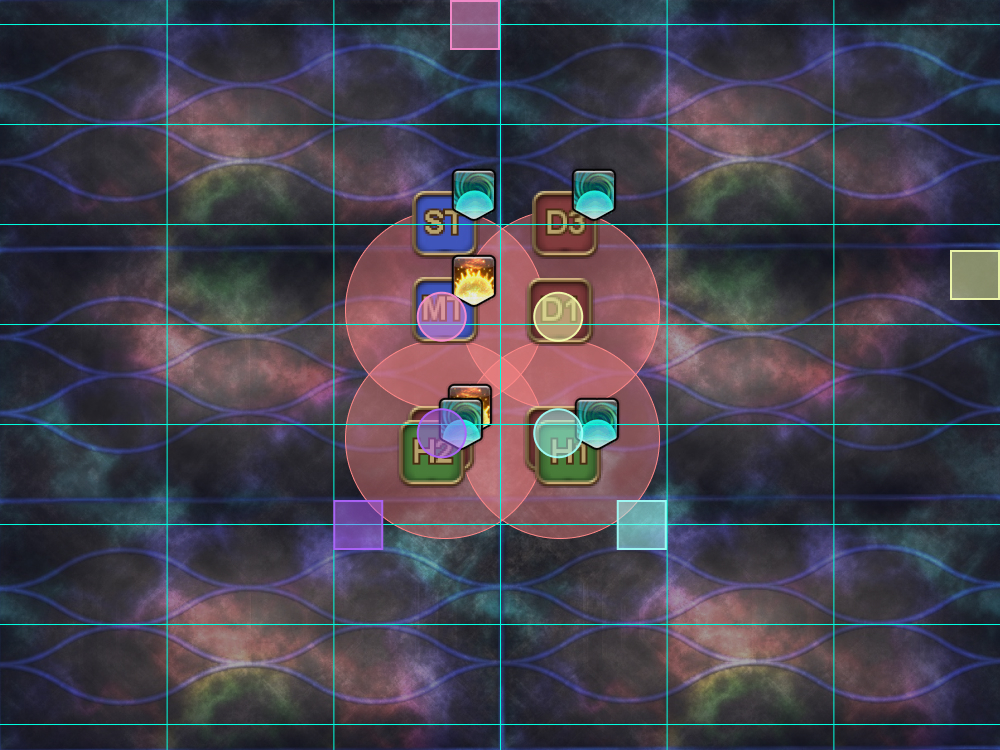 |
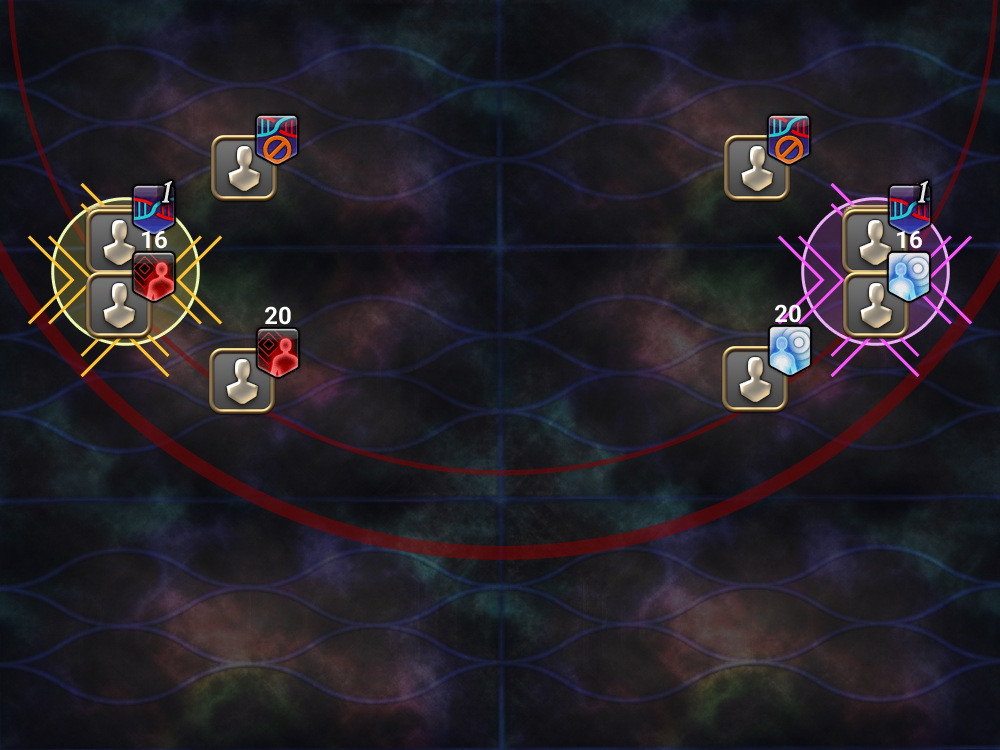
5. Wind players move out, while (previously) Fire players rearrange themselves to create two Fire + no-debuff pairs at the B and D markers.
In this example, D4 and D2 have to cross diagonally (the worst-case scenario). | 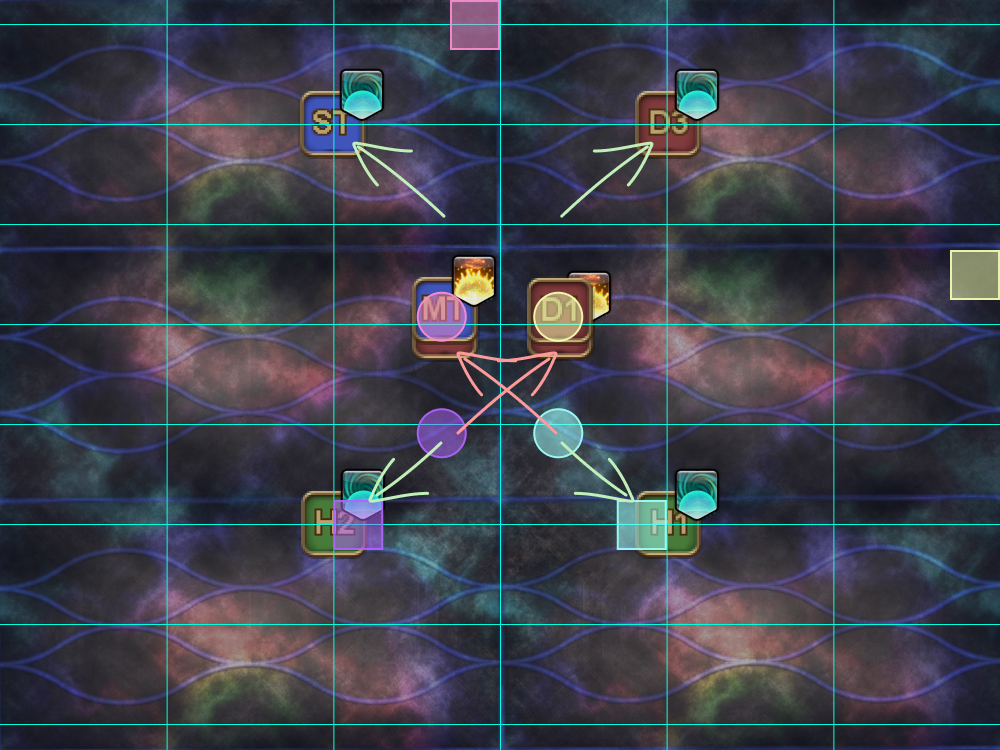 |
6. Fire stacks and Wind AoEs resolve. | 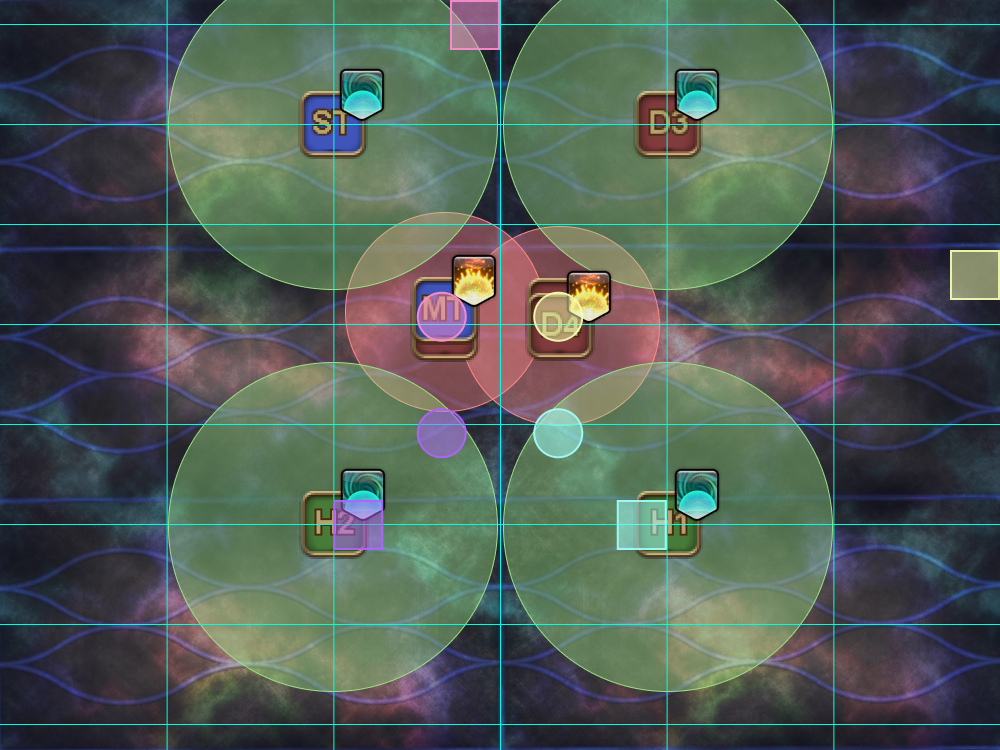 |
 ) or Atmosfaction (Wind
  ) debuffs.
Papan’s Original Caloric Theory 1
This is the strategy favoured by English parties. Note that there are many versions of Papan’s Caloric Theory 1 strat. The one used here is not the same version used in NA.
1. Preposition with the healers + ranged at their assigned spots, and the tanks + melee in the middle of all the markers. One random tank/healer and one random DPS will be targeted with a Fire mark. In this example, ST and D3 are marked for Fire. | 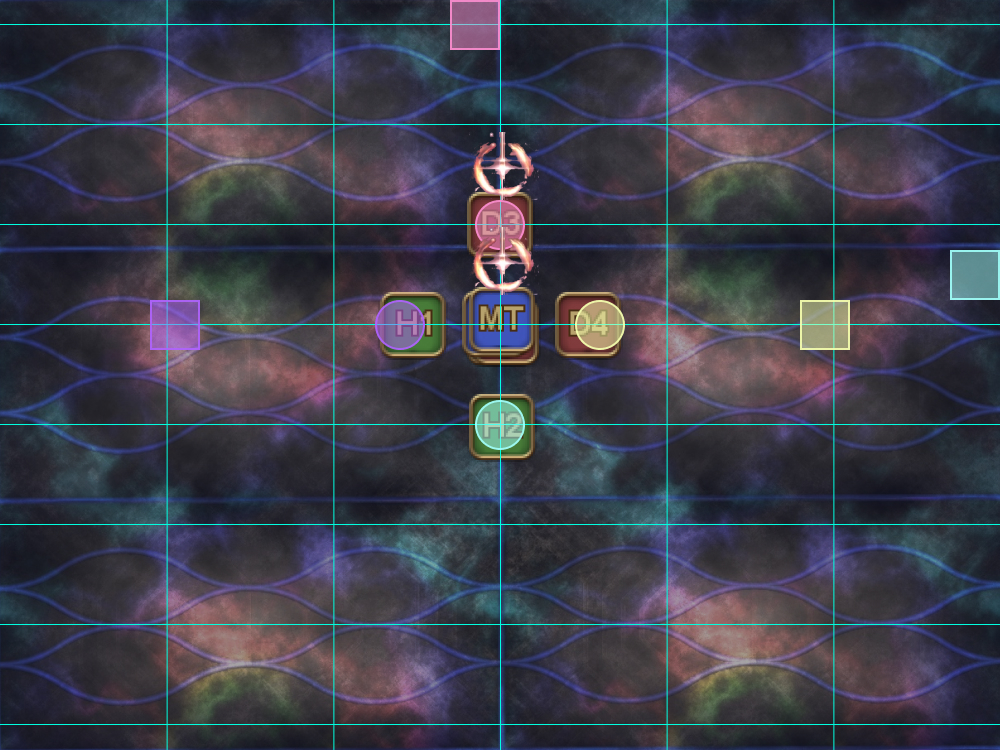 |
2. Swap positions as needed to get the marked players on the east (B) and west (D) markers.
The players on the B and D markers should stand in the markers, but towards the party in the middle. | 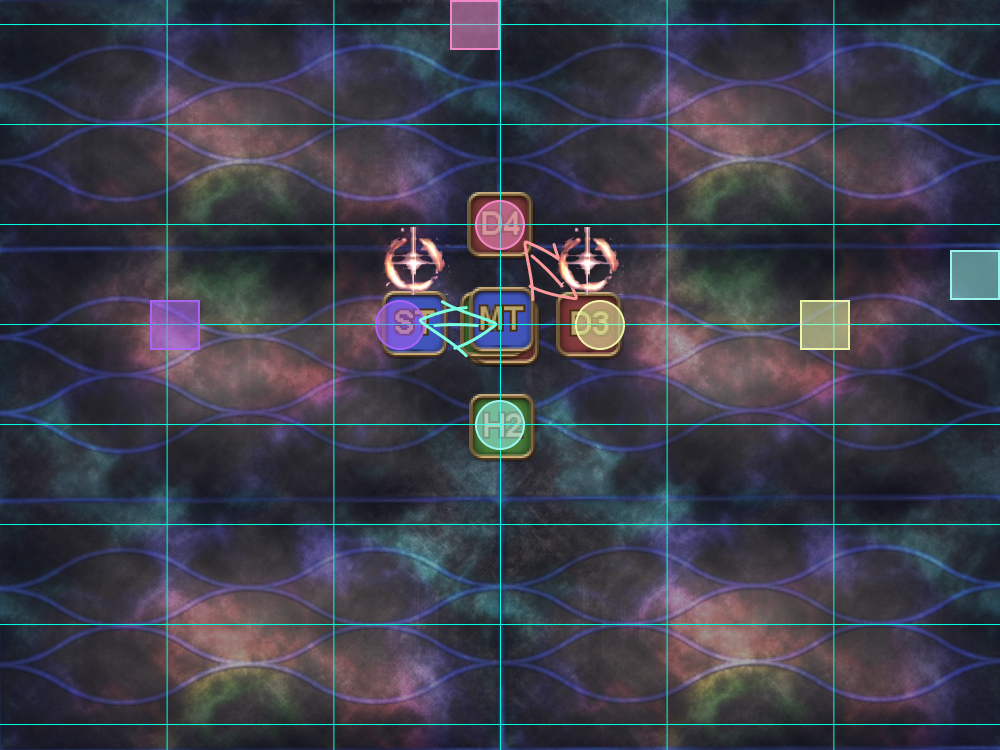 |
3. One of the marked players (at random) will be targeted for a shared damage AoE (shared with all the players in the middle). The party also takes raid-wide damage. All party members get marked with either Pyrefaction (Fire
In this example:
|  |
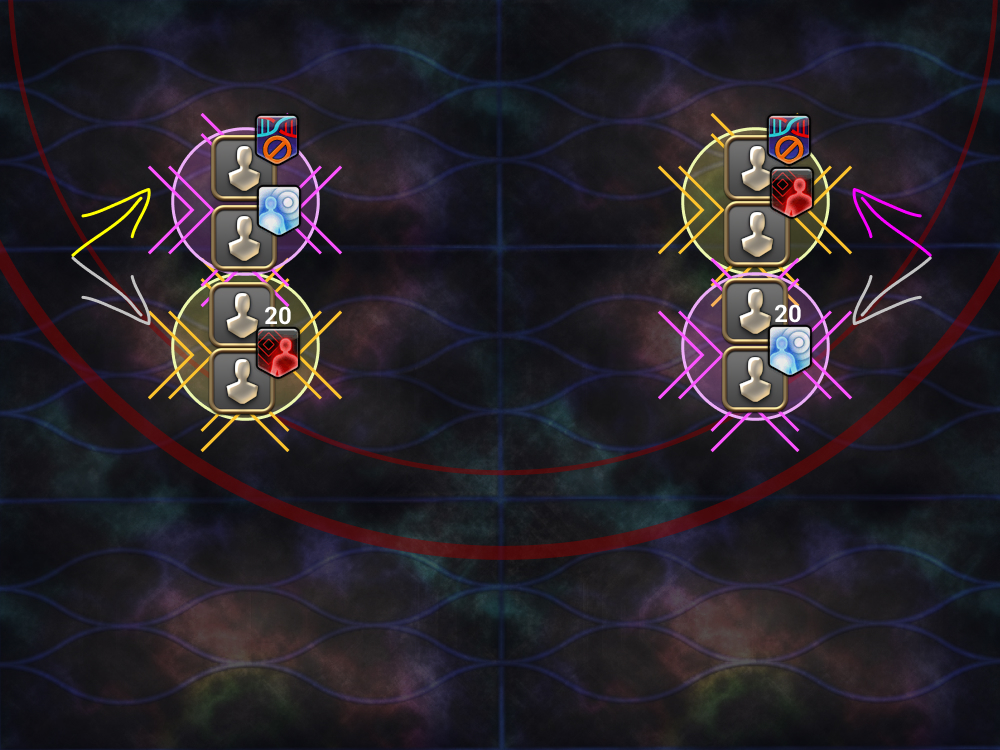
4. Move to create four pairs of Fire + Wind. Take turns moving into position, following the priority order. CCW from West: H1 MT ST D2 D1 D4 :CW from North (This is essentially ranged adjust first, then melee, with the MT group going first.) In this example, we have:
|  |
5. Fire stacks resolve. Two of the four players that had Fire (at random) will keep their Fire debuffs. In this example, MT and D4 kept their Fire debuff. | 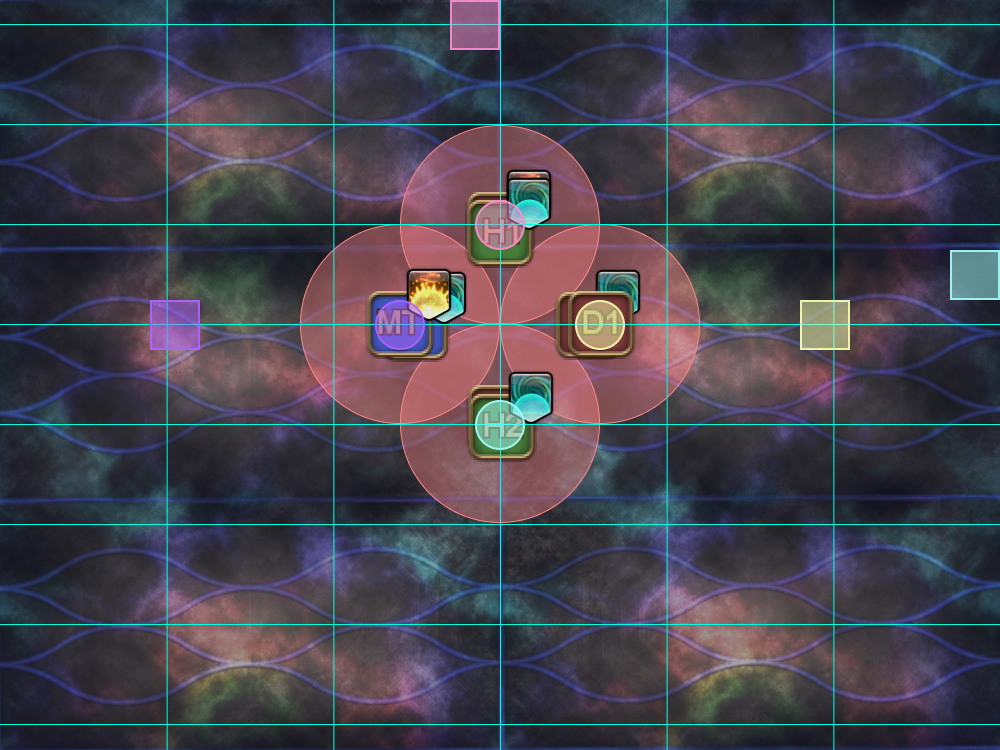 |
6. Wind players move out, while (previously) Fire players rearrange themselves to create two Fire + no-debuff pairs at the B and D markers.
In this example, D4 and D2 rotate clockwise. | 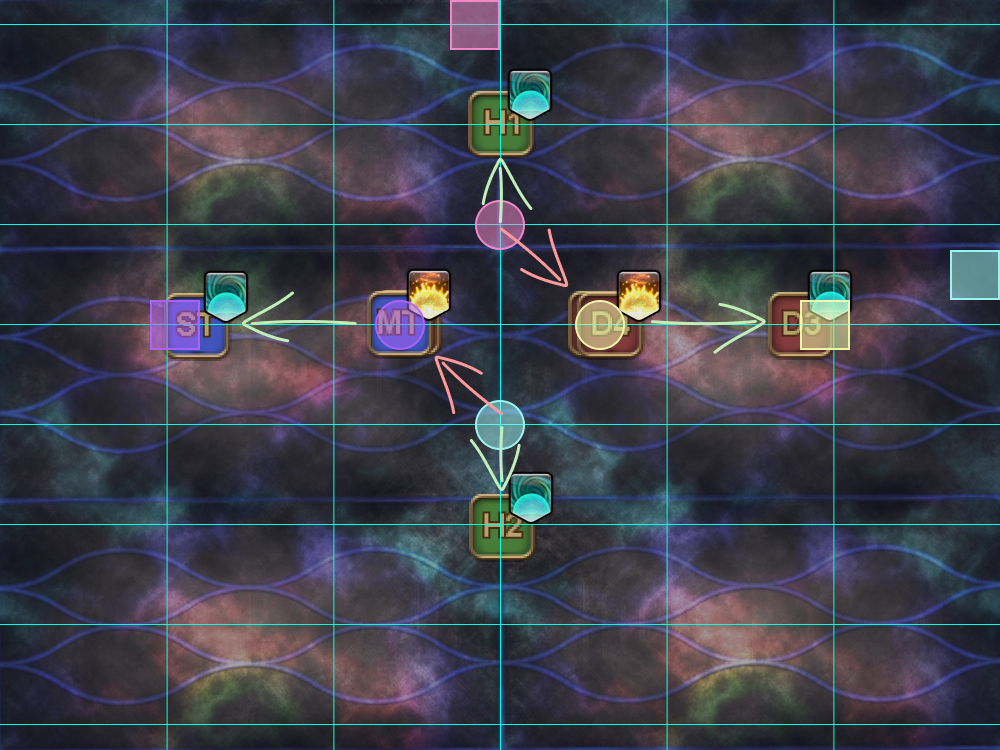 |
7. Fire stacks and Wind AoEs resolve. | 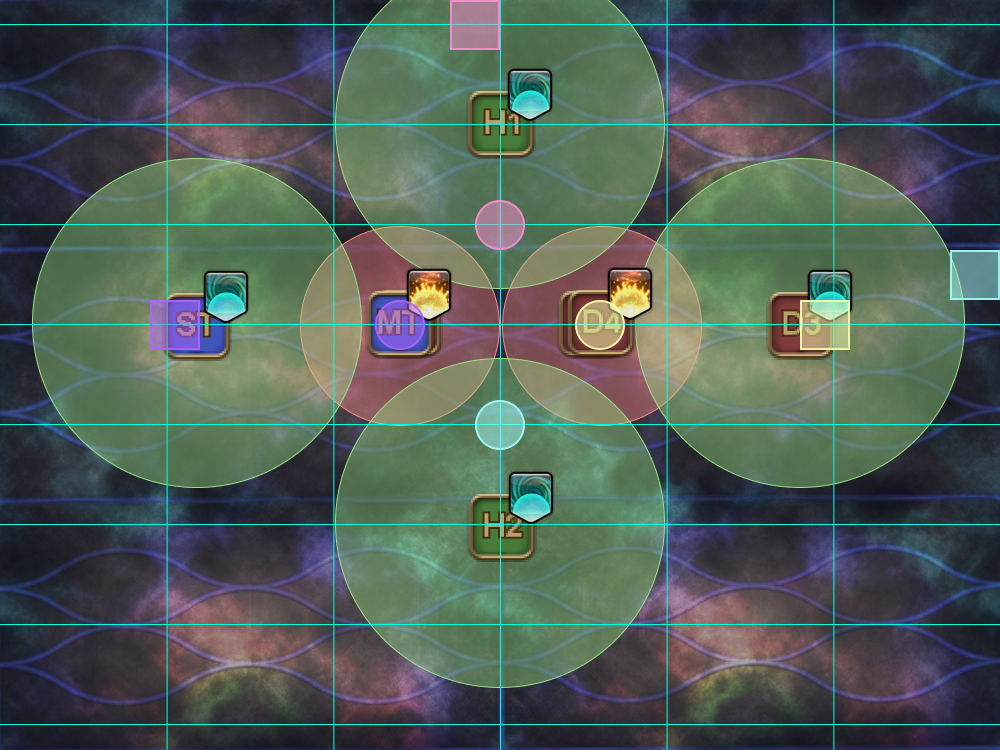 |
Pangenesis
The Pangenesis strat done here is the “2+1” variant. The numbers refer to the number of stacks of the two players that take the first towers (in this case, the players with two stacks, and one stack).
One variation between EN and JP is whether players will line up prior to Pangenesis’ cast, the idea being that by having the relevant debuffed players move forwards or backwards, it would be easier to identify your partner.
- English parties prefer lining up, and have the players with 1 stack move forward, and no stacks move backwards. You can then identify your partner, and then the player on the west side of each pair takes the west tower, etc.
- Japanese parties will often not line up (you’ll see 非整列 in PF comments), instead choosing to identify your partner via the party list.
1. Raid-wide damage and debuffs appear. Players take up their initial positions.
|  |
2. First set of coloured towers appear.
|  |
3. First towers resolve. Wait for the slime to form before moving to the next tower. One of the two players in each tower (at random) will get a coloured debuff, and the other will not.
|  |
4. Second towers resolve. Wait for the slime to form before moving to the next tower. One of the two players in each tower (at random) will get a coloured debuff, and the other will not.
|  |
5. Third towers resolve. Wait for the slime to form before moving south. There will be three slimes on each side as the result of all the fusions.
|  |
Caloric Theory 2
The strat used passes the Fire anti-clockwise around the arena, skipping the player in the center (you’ll often see 非経由 written in PFs).
These are the starting positions for all players:
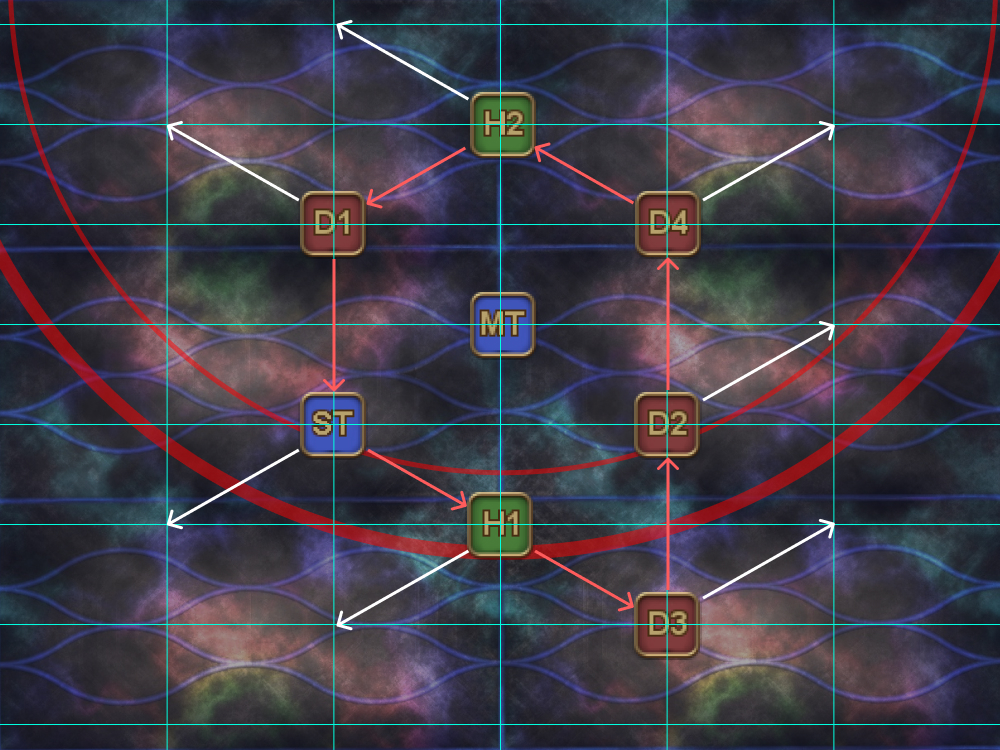
- The player with the red mark will swap positions with the MT.
- Each player (except the one in the center) will move exactly twice:
- Follow the red arrow anti-clockwise around the arena when the first AoE telegraph appears.
- Follow the next white arrow when the second AoE telegraph appears.
Timeline
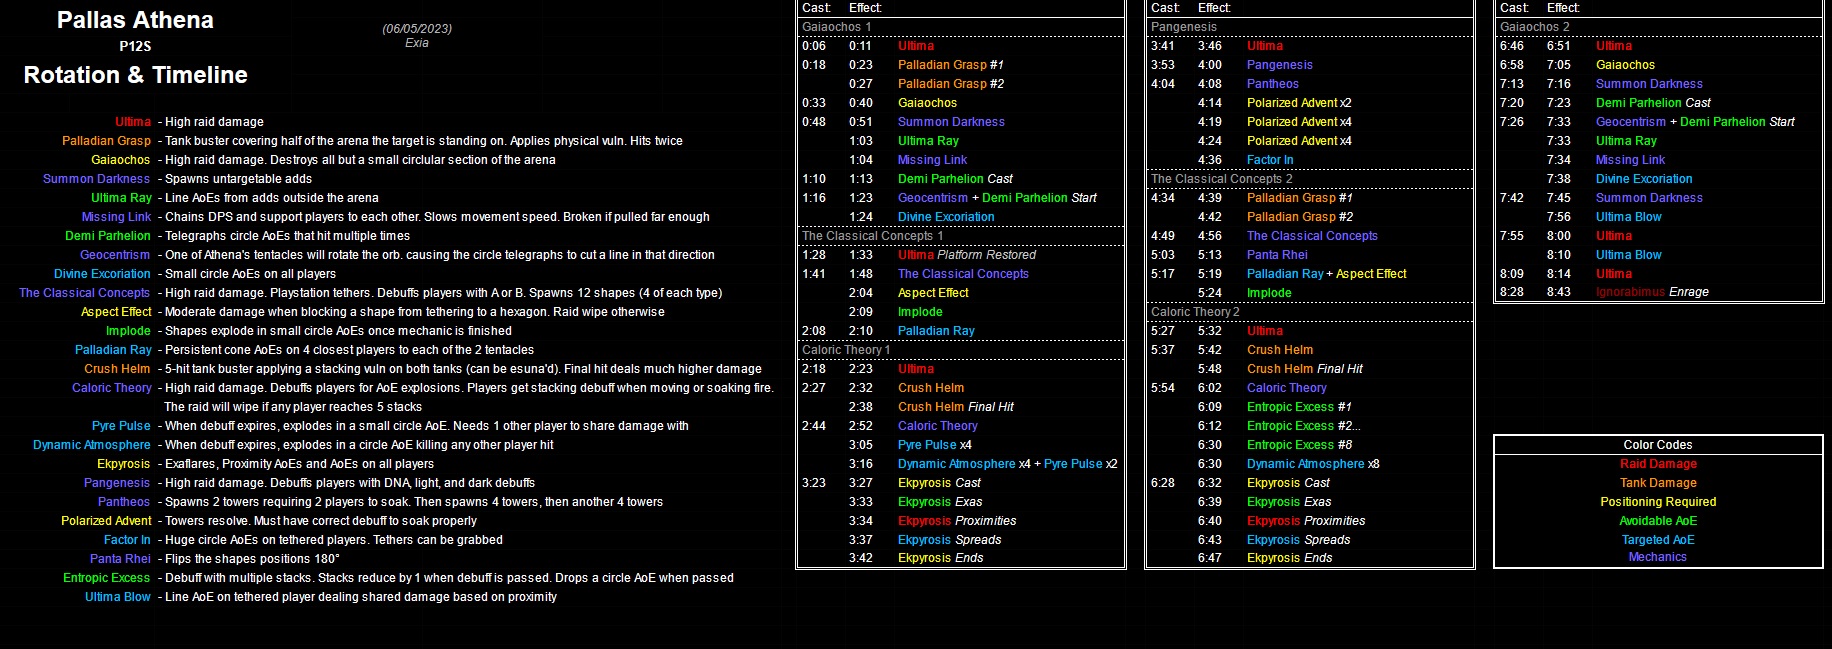 (Credit: u/ExiaKuromonji)
Frequently Asked Questions
[Damage Down] How strong is the damage down debuff in this fight?
The Damage Down debuff in this phase lowers a player's damage by 42%. |
[Caloric Theory] How does Close Caloric gain stacks?
Close Caloric accumulates the total distance a player has moved with the debuff active. Players gain a stack of Close Caloric when they first move, and then gain additional stacks from:
The diagram on the right illustrates how far 9 yalms is on the arena, assuming you move in a straight line outwards. |  |
[Caloric Theory 1 (Papan)] Why is the priority order so strange? Why is H2 and D3 missing from the priority?
Papan's strat does quite a lot of things that do not follow historical convention for some reason. The idea behind Papan's priority is that starting from the two end points (West for tanks and healers, and North for DPS), ranged have priority before melee, with the MT group going first, over the ST group. Put another way, it is effectively the same as:
As for why H2 and D3 are missing from the priority, recall that the priority applies to the players in the middle that need to fill in waymarked positions. Since H2 and D3 start on a marker, and will only ever swap with H1 and D4 (who are also on markers), H2 and D3 will never be in the middle group, so there is no need for them to be in the priority list. H1 and D4, on the other hand, do need to be in the priority order, because they may potentially swap with a melee and putting them in the middle to fill in empty spots later. |
[Caloric Theory 2] Why are the starting positions like this?
This is an unfortunate case of PF converging on a suboptimal solution:
Unfortunately, it's the one that's standard, so we're stuck with it for the time being. |