The Unending Coil of Bahamut (Ultimate)
PF largely follows Clees’ UCoB guide with a few differences:
- Neurolinks are placed in an inverted triangle.
- Blackfire Trio towers are flipped for tanks and healers (healers take the tower closer to the Megaflare stack).
- Heavensfall Trio spread positions are different (both tanks always go towards Nael, both ranged always opposite Nael).
 |  |  |
- Tenstrike Trio is done with one safe spot (the south marker) instead of two.
BiS Notes
- Any gear at or above i470 will have their substats capped.
- Relic weapons will have their substats capped at 127.
- The lowest potions you can use and still get maximum benefits are HQ Grade 3 Tinctures.
English
―《Twintania》――――――――――――――――
【Neurolinks】 【1st Phase Fireballs】
MT, ST, D3 stay out
【Liquid Hell】D3 > H2 baits
―《Nael》―――――――――――――――――――
【1st Thunder Priority (1st line)】
Left:MT ST H1 H2 D1 D2 D3 D4:Right
【Fire】In → Out → In (except 2nd Fire) → In
【Spread Positions (3rd line)】
MT ST ※ Ranged spread out
▲ appropriately
D1 D2
―《Bahamut》―――――――――――――――――
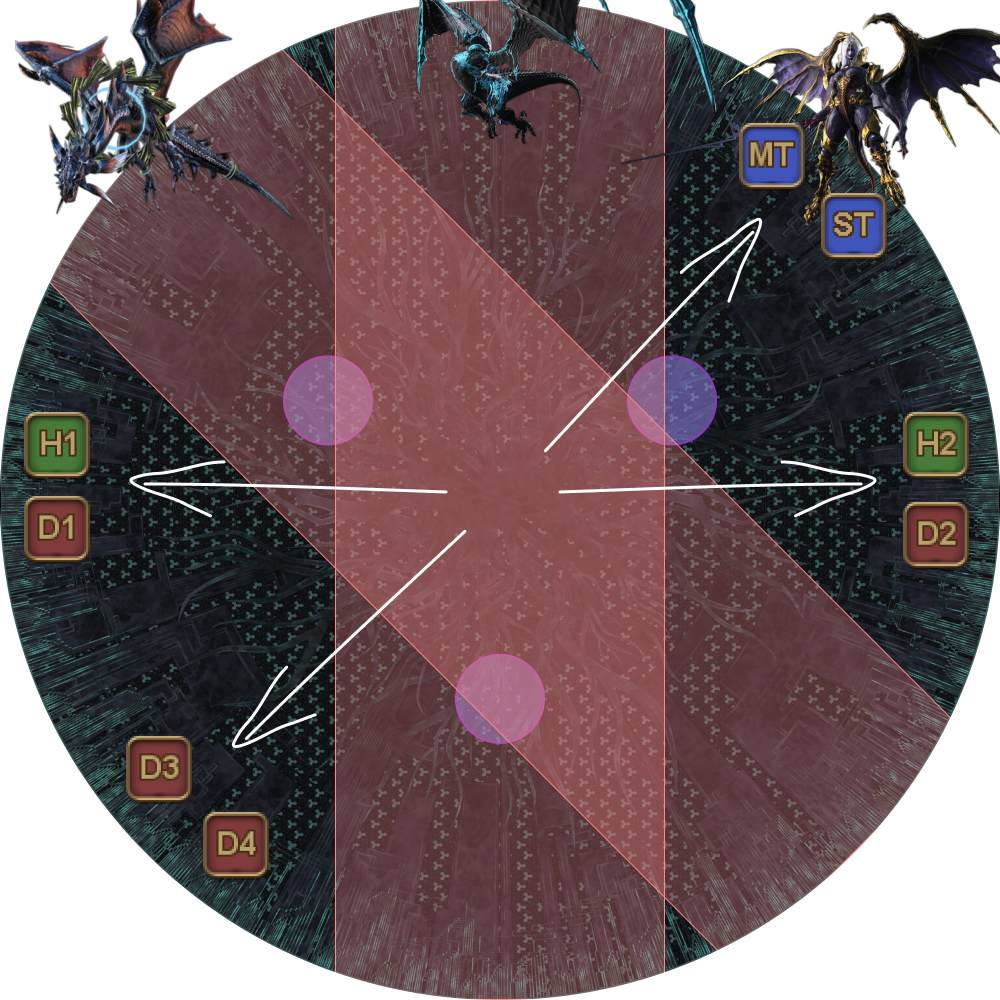
■ Quickmarch Trio
※ Divebomb relative positions
MT▼ST (DPS)
H1 H2 → (H1)MT★ST(H2)
D1 D2 ◎
D3 D4 DPS stack
■ Blackfire Trio
Tower priority: MT ▼ D1
ST D2
H1(stack)D3
H2 D4
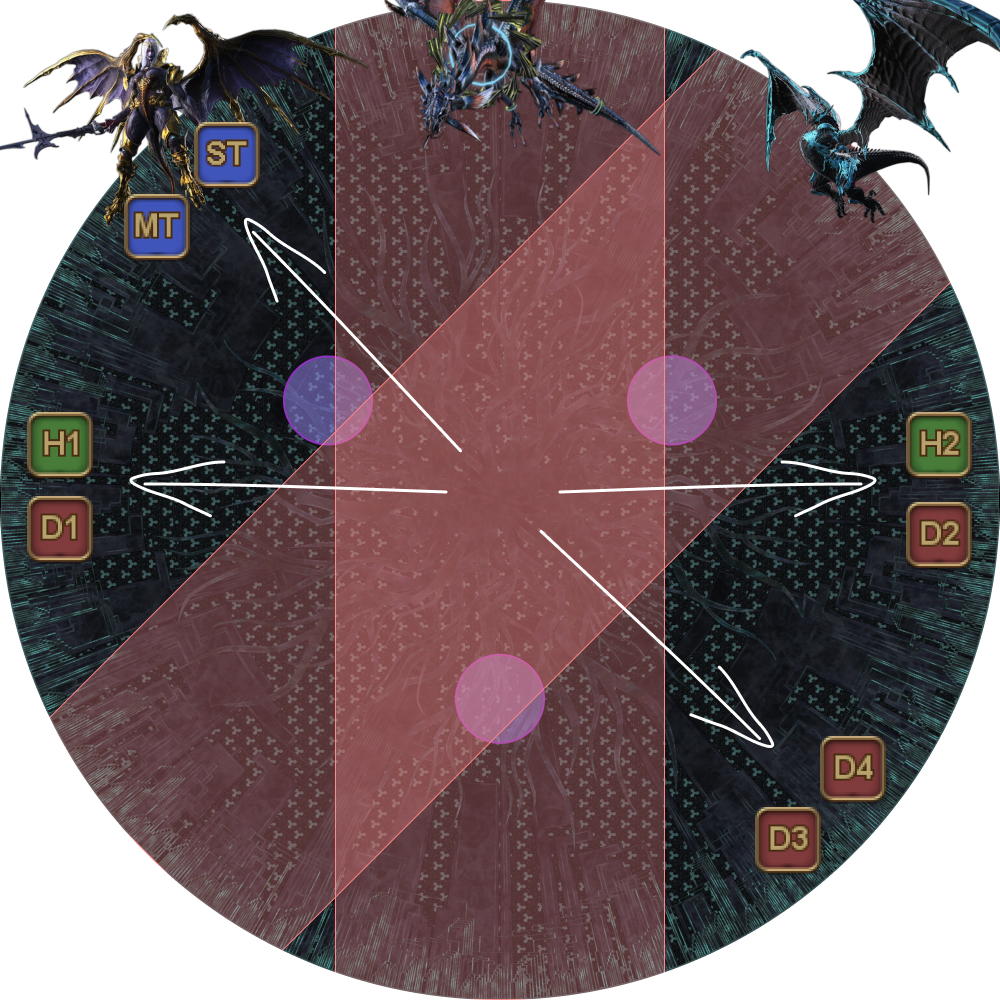
■ Fellruin Trio
Spread around Nael:
T H2 T ※ H1 → on Neurolink
D1 H1 D2 MT → Bahamut
D3 D4 ST → Twintania
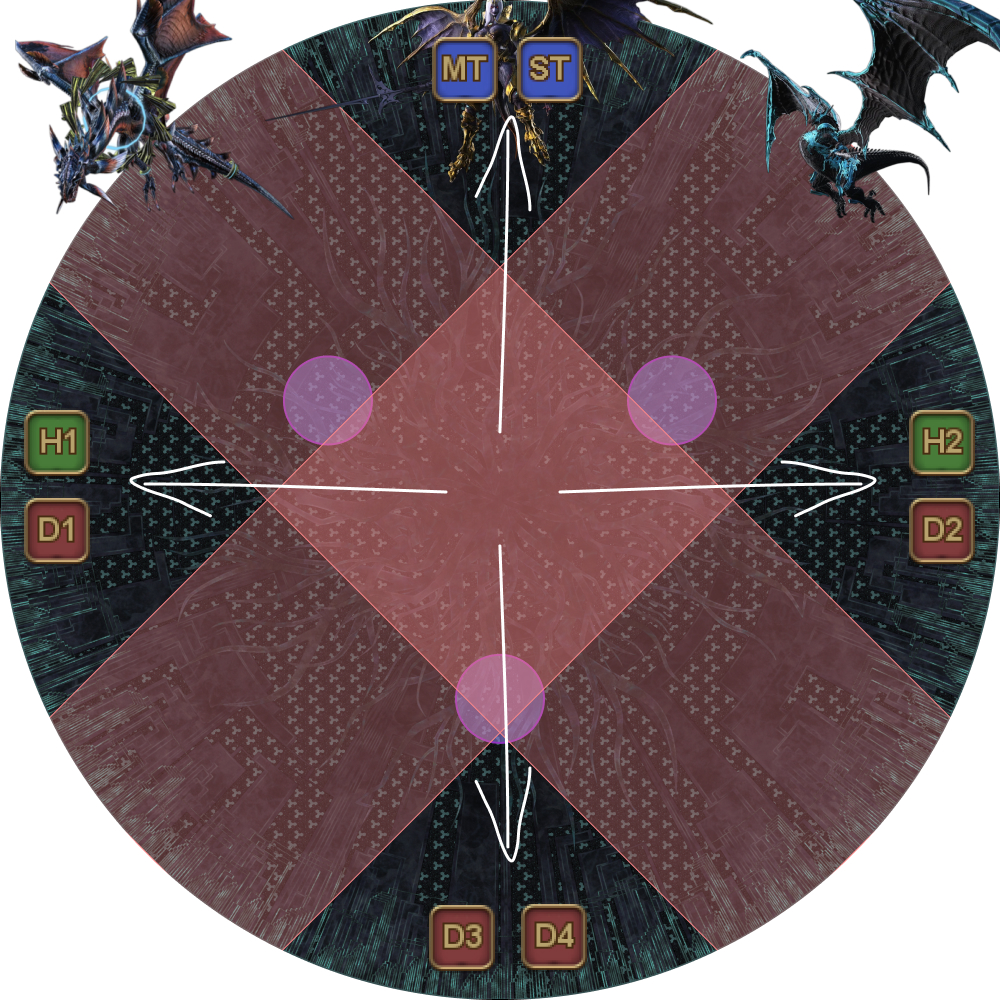
■ Heavensfall Trio
MTST ※ ST takes tower on Nael
H1 H2 MTST→Towards Nael
D1 D2 H1D1→Left H2D2→Right
D3D4 D3D4→Opposite Nael
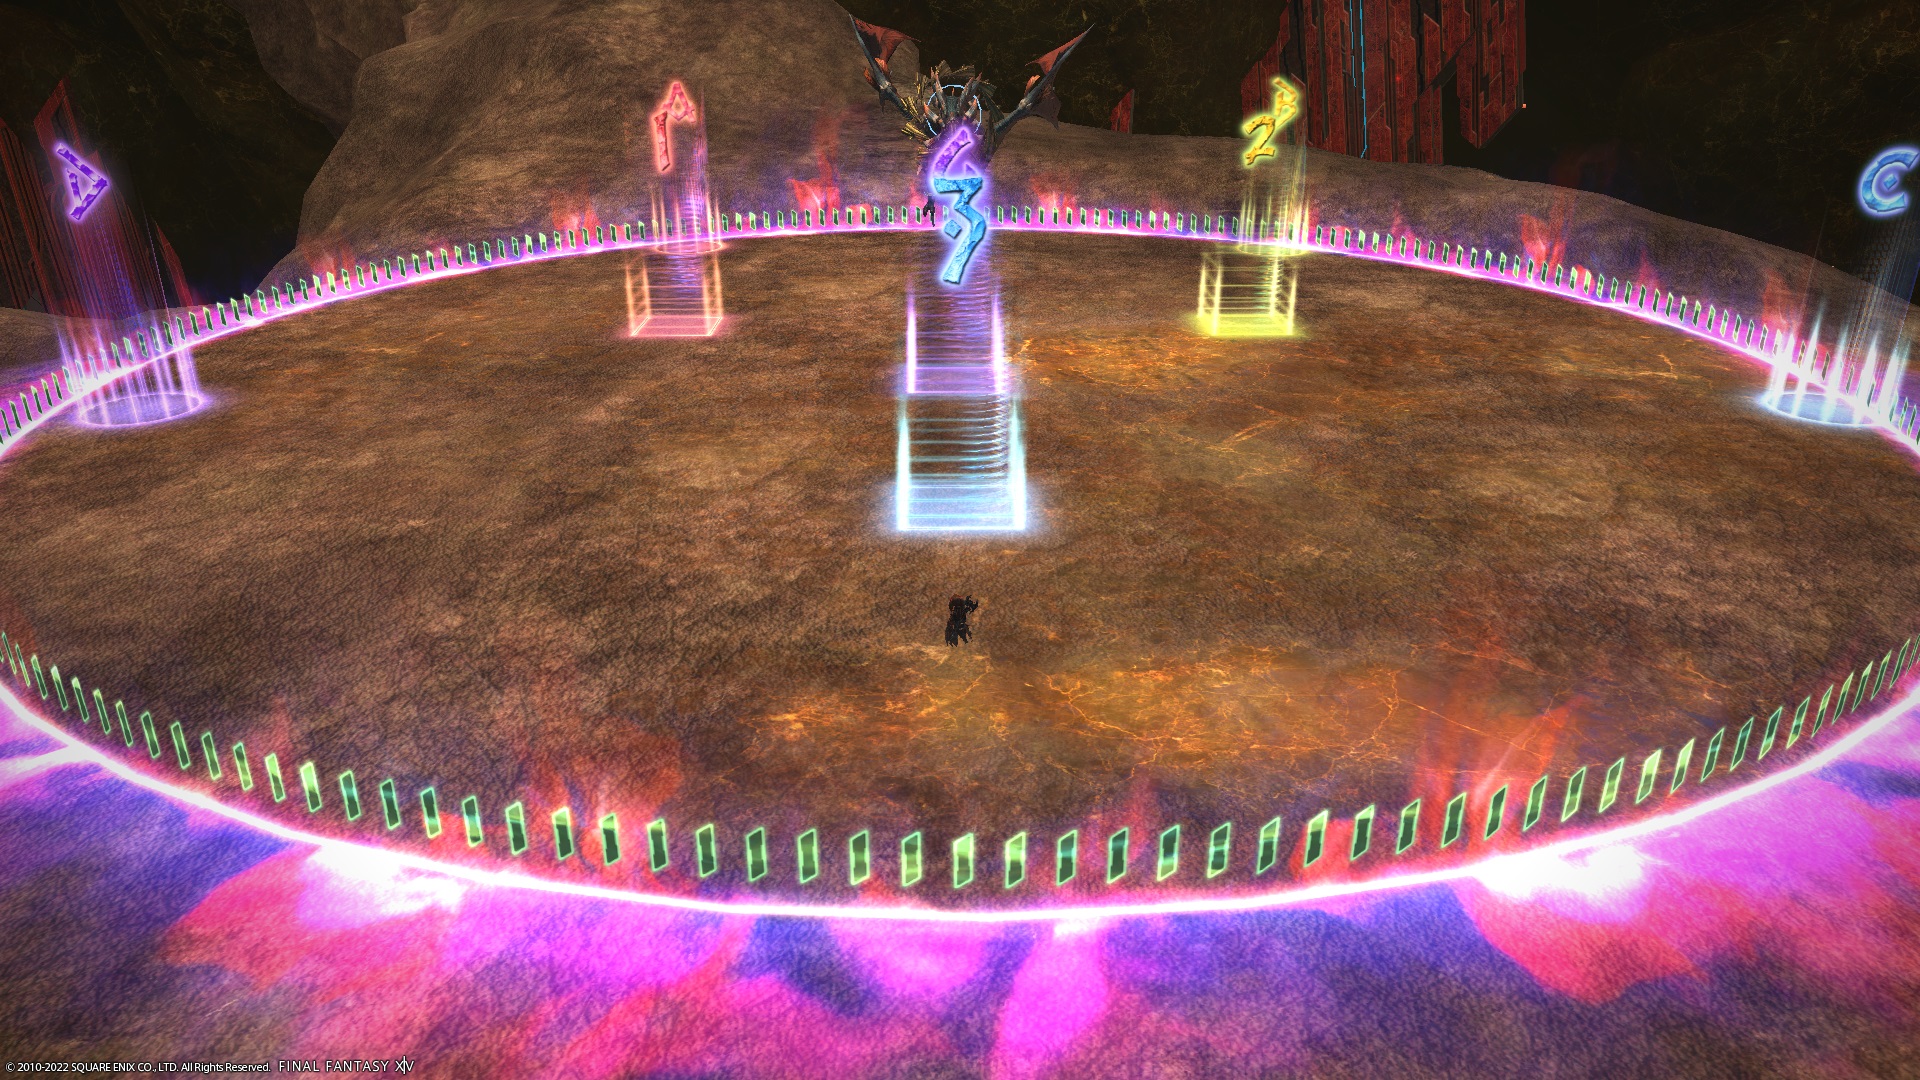
■ Tenstrike Trio
Lineup:D3 H1 D1 MT ST D2 H2 D4
1st Hatches:L > R targeted players
2nd Hatches:L > R first three non-targeted
Earthshakers:North (south Neurolink safe)
■ Grand Octet
(Divebomb)▼(Megaflare)
※ Megaflare stack if no Tank LB3
―《Adds phase》――――――――――――――――
MT→Twintania ST→Nael
【Liquid Hell】D3 baits
【Neurolinks】
D1 D2 ※ D4 switches with
untargeted DPS
D3
【Spread positions】
MT ST
D1 D2
H1 H2
D3 D4
―《Golden Bahamut》―――――――――――――
【Morn Afah】(Tank LB if needed)
※ All with shields + H2 mitigation and:
1. MT90s, ST Reprisal, D4
2. ST90s, MT Reprisal, D3
3. MT90s, ST Reprisal, D4
4. ST90s, MT Reprisal
5. MT90s, ST Reprisal, D3, D4
【Akh Morn】
※ Party at edge, tanks towards center
1. Share (full buff) ※ at South waymark
2. MT invuln
3. ST invuln
4. Share (full buff)
日本語
―《ツインタニア》――――――――――――――――
【拘束具の配置】 【最初の頭割り】
MT, ST, D3は入らない
【リキッド誘導】D3 > H2
―《ネール》―――――――――――――――――――
【一回目雷デバフ 優先順位 】
左:MT ST H1 H2 D1 D2 D3 D4:右
【炎】全員で受ける → 避ける → 全員で受ける (二回目で炎を受けた人を除く) → 全員で受ける
【散開位置 (三回目セリフ時)】
MT ST ※遠隔は周りをみて調整
▲
D1 D2
―《バハムート》―――――――――――――――――
■ 進軍の三重奏
※ 三体が出現した場所を北とする。
MT▼ST (DPS)アースシェイカー
H1 H2 → (H1)MT★ST(H2)
D1 D2 ◎
D3 D4 DPS 頭割り
■ 黒炎の三重奏
塔の優先順位 : MT ▼ D1
ST D2
H1頭割り D3
H2 D4
■ 厄災の三重奏
ネールを中心として散開:
T H2 T ※ H1 → 拘束具上
D1 H1 D2 MT → バハ
D3 D4 ST → ツインタニア
■ 天地の三重奏
MTST ※ STはネールの塔をとる
H1 H2 MTST→ネール前
D1 D2 H1D1→三体の左 H2D2→三体の右
D3D4 D3D4→ネール反対側
■ 連撃の三重奏
整列:D3 D1 H1 MT ST H2 D2 D4
アースシェイカー:北 (南側の拘束具安置)
■ 群竜の三重奏
タンクLBがない場合はカータライズをツインタニア右に誘導
左側で頭割り
―《二体フェーズ》――――――――――――――――
MT→ツインタニア ST→ネール
【リキッド誘導】D3
【魔力錬成】
D1 D2 ※ D4 マーカーがつかなかったDPSの拘束具をとる調整役
D3
【散開位置】
MT ST
D1 D2
H1 H2
D3 D4
―《金バハ》―――――――――――――
【モーンアファ】(必要な場合はタンクLB)
※ すべてバリア + H2の軽減を入れること
1. MT90秒, ST リプ, D4
2. ST90秒, MT リプ, D3
3. MT90秒, ST リプ, D4
4. ST90秒, MT リプ
5. MT90秒, ST リプ, D3, D4
【アク・モーン】
※ パーティはボス端, タンクはボスの前へ
1. 頭割り (フルバフ) ※ 南のマーカー上で受ける
2. MT 無敵
3. ST 無敵
4. 頭割り (フルバフ)
Markers
Twintania:
123: Neurolink positions.3: Stack position for transition to Nael.
Nael:
3: Stack position for transition to Bahamut.4: Stack position for Thermionic Beam, Fire tethers.
Bahamut Prime:
- The
ABCDmarkers are for Earthshakers in Tenstrike Trio. 123: Spawn positions for bosses during Fellruin Trio. Knockback boundary for Heavensfall Trio.3: Safe spot for Tenstrike Trio. It should be a square for players to communicate their second Earthshaker positions.4: Stack point at the start of Blackfire Trio and the end of Heavensfall Trio. It is also used to see whether Bahamut is on a cardinal or intercardinal position during Grand Octet (edge = cardinal, corner = intercardinal).
Golden Bahamut:
3: Where tanks will stack for the first Akh Morn in Golden Bahamut.
XIVLauncher WaymarkPresetPlugin positions
{
  "Name":"UCoB",
  "MapID":280,
  "A":{"X":-11.472,"Y":0.0,"Z":-16.383,"ID":0,"Active":true},
  "B":{"X":11.47153,"Y":0.0,"Z":-16.383,"ID":1,"Active":true},
  "C":{"X":19.31852,"Y":0.0,"Z":5.176381,"ID":2,"Active":true},
  "D":{"X":-19.319,"Y":0.0,"Z":5.176,"ID":3,"Active":true},
  "One":{"X":-7.57,"Y":0.0,"Z":-4.38,"ID":4,"Active":true},
  "Two":{"X":7.57,"Y":0.0,"Z":-4.38,"ID":5,"Active":true},
  "Three":{"X":0.0,"Y":0.0,"Z":8.75,"ID":6,"Active":true},
  "Four":{"X":0.0,"Y":0.0,"Z":0.0,"ID":7,"Active":true}
}