Alpha Omega
Mitigations
This phase requires planning out and coordinating mitigations. One such mitigation plan is:
[Click to Expand] Mitigation Notation
| Party mitigations | |
| MT 90s, ST 90s | Shake It Off, Dark Missionary, Heart of Light, Divine Veil |
| H1 120s | Temperance, Neutral Sect |
| H2 30s | Sacred Soil, Kerachole |
| H2 90s | Deployment Tactics, Zoe |
| H2 120s | Expedient, Holos |
| D1, D2 | Feint |
| D3 | Troubadour, Tactician, Shield Samba |
| D4 | Addle |
| Tank mitigations | |
| 30% | Vengeance, Shadow Wall, Nebula, Sentinel |
| 3rd | Thrill of Battle, Oblation, Camouflage, Bulwark |
| short | Bloodwhetting/Nascent Flash, The Blackest Night, Heart of Conundrum, Sheltron/Intervention |
| Attack | Party mitigations | Tank mitigations | |
|---|---|---|---|
| Cosmo Memory | Tank LB3 (Tank LB priority: WAR > PLD > DRK > GNB)
| ||
| Cosmo Dive #1 | MT Reprisal, H1 120s, H2 30s, D4 | Rampart, 3rd, short | |
| Wave Cannon #1 | Spread | H2 30s, D3 | |
| Stack | + ST Reprisal, ST 90s, D2
| MT Mitigate, ST Invuln 30%, short, co-tank's short | |
| Wave Cannon #2 | Spread | H2 30s, H2 120s | |
| Stack | + MT Reprisal, MT 90s, D1
| MT Invuln, ST Mitigate 30%, short, co-tank's short | |
| Cosmo Dive #2 | ST Reprisal, H2 30s, D4 | Rampart, 3rd, short | |
| Cosmo Meteor | Meteors | MT Reprisal, ST 90s, H1 120s, H2 30s, D3 | |
| Flares | H2 90s, D2 | ||
The above mitigation plan is a bare-bones framework that was made in the absence of jobs that provide more than one sort of mitigation such as PLD’s Passage of Arms, AST’s Collective Unconsciousness, MCH’s Dismantle, or RDM’s Magick Barrier.
It was also made in the absence of other healer mitigations, such as Divine Benison, Aquaveil/Exaltation, Consolation/Panhaima or Fey Illumination. While the above framework will still work without any of these abilities, healers should supplement the plan with these abilities for comfort.
Note: There is an edge case where you specifically have a PLD MT with a GNB ST.
In such a scenario, the two tanks will need to swap their invuln vs mitigation for the two Wave Cannons (i.e: MT invuln first).
Preparation
This phase has a number of things that need to be decided in advance. This is usually either done at the start of the encounter, or during the cutscene before the phase begins.
- Decide the Tank LB3 order.
- Decide the Melee LB3 order.
- Decide which healer will go middle for Cosmo Meteor.
It’s also recommended that both D3 and D4 prepare a Limit Break macro targeting the player’s target to avoid needing to aim/position the LB3 manually.
/macroicon "limit break"
/ac "limit break" <t>
Cosmo Memory
Cosmo Memory is a Tank LB3 check- it also needs at least shields in addition to the Tank LB3 for the party to survive.
As far as priorities go, the tank that LB3s should go:
WAR > PLD > DRK > GNB
This will also convert everyone with three stacks of Quickening Dynamis into a stack of Brilliant Dynamis.
 | Brilliant Dynamis Burning with dynamis inspired by Omega's passion and exceeding own limits.
|
 | Spark of Dynamis Burning with dynamis inspired by Omega's passion.
|
The Dynamis buffs are lost when a player dies, which will end up killing that player for all of Alpha’s Omega’s mechanics thereafter.
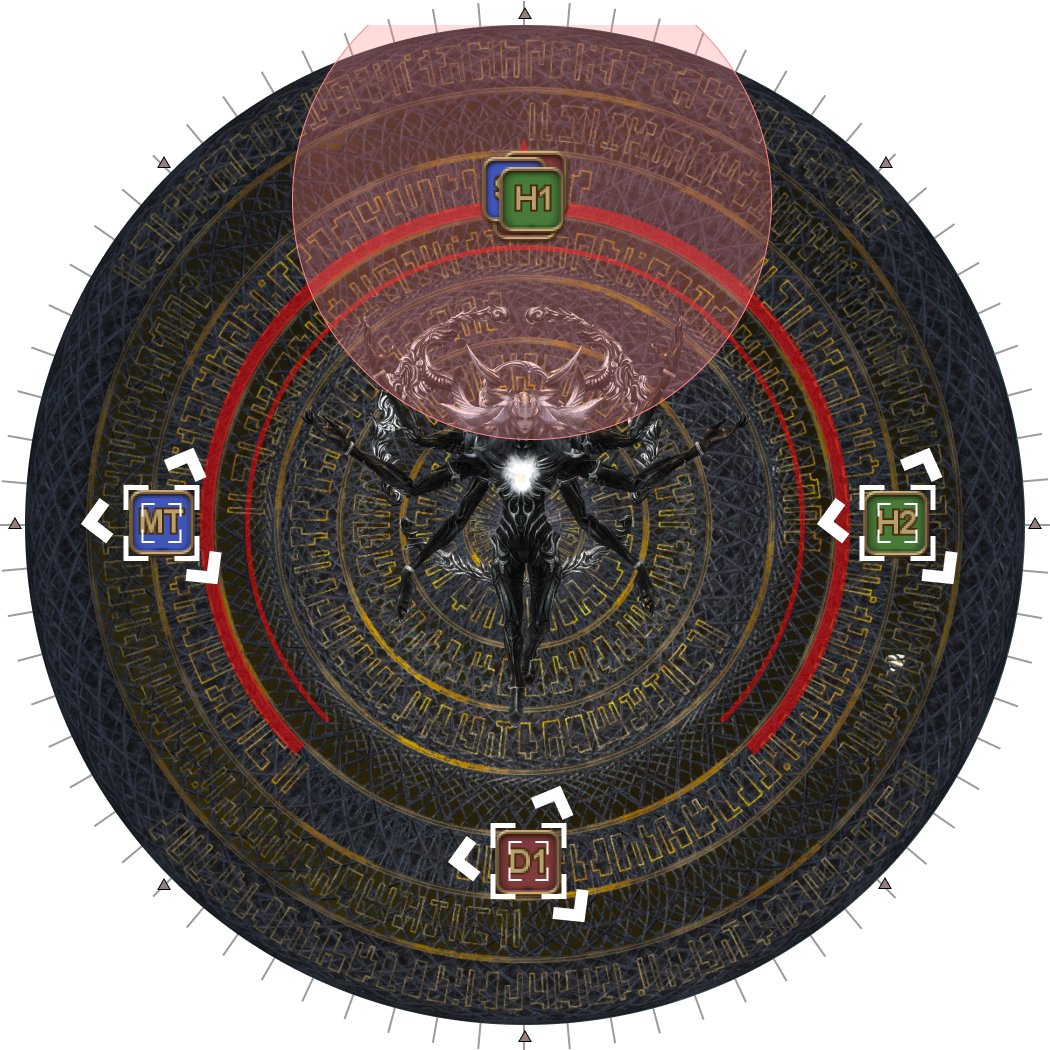
Auto-attacks
Before each mechanic combo starts, Alpha Omega will autoattack twice.
| Alpha Omega's autoattack hit two players:
Ensure the ST is the furthest player taking the autoattacks by having them stand outside the targeting circle, while the party stays inside. | 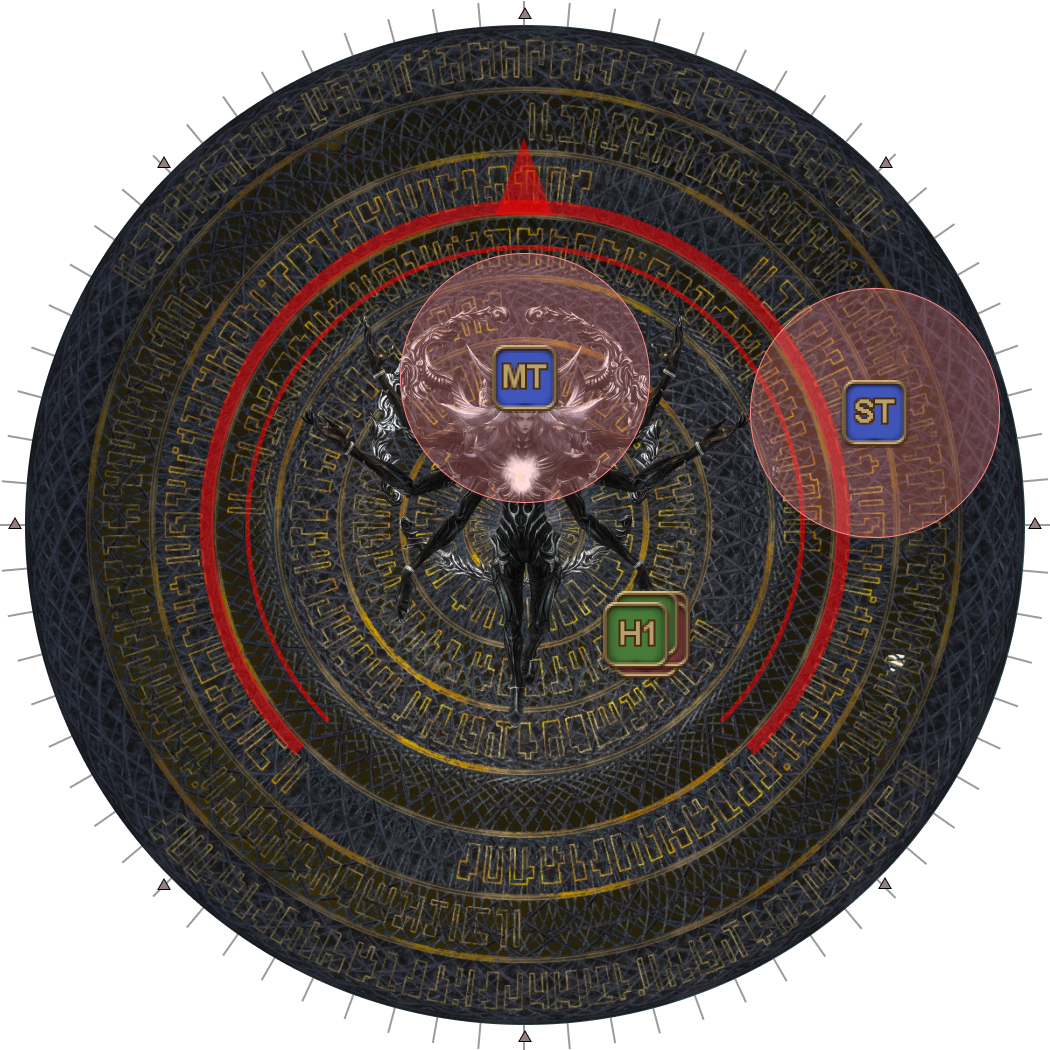 |
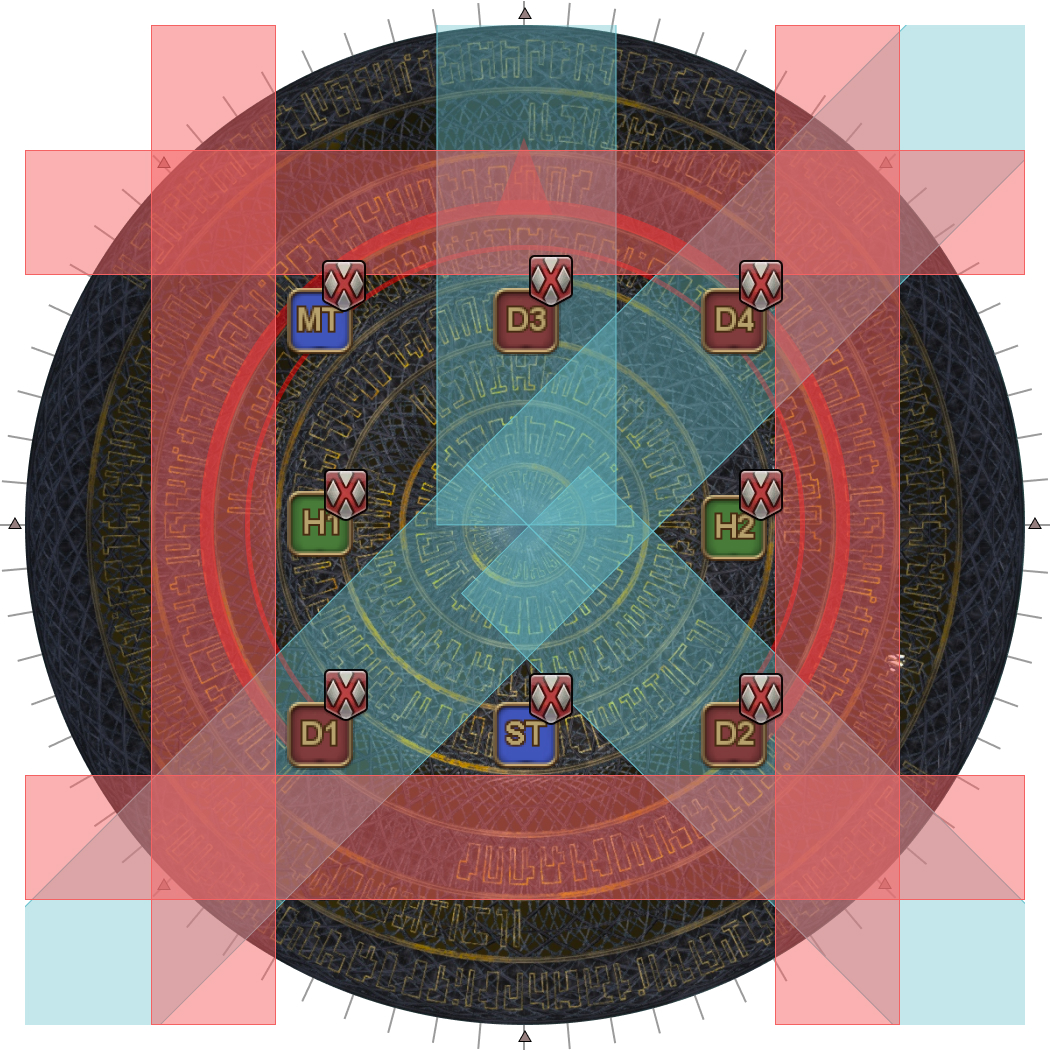
Cosmo Arrow → Cosmo Dive
Alpha Omega autoattacks twice before starting its first mechanic combination.
The first combination of mechanics is Alpha Omega’s version of the BRD and DRG LBs.
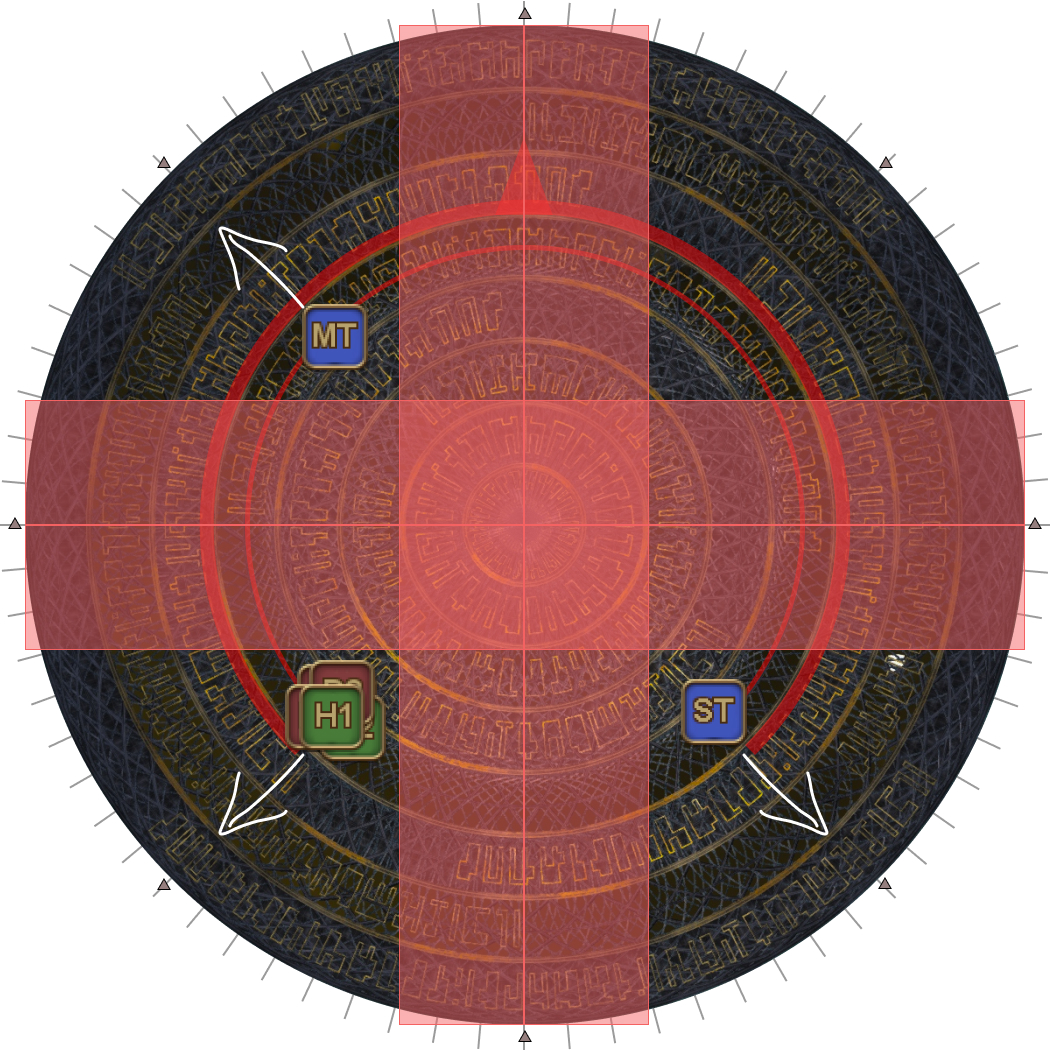
- Cosmo Arrow fires two sets of line AoEs that travel sideways with each hit. How the party dodges these is determined by which set of AoEs appeared first.
- Cosmo Dive targets the two closest players with a high-damage AoE (which
should be taken by the tanks), and the furthest player with a stack AoE (the rest of the party).
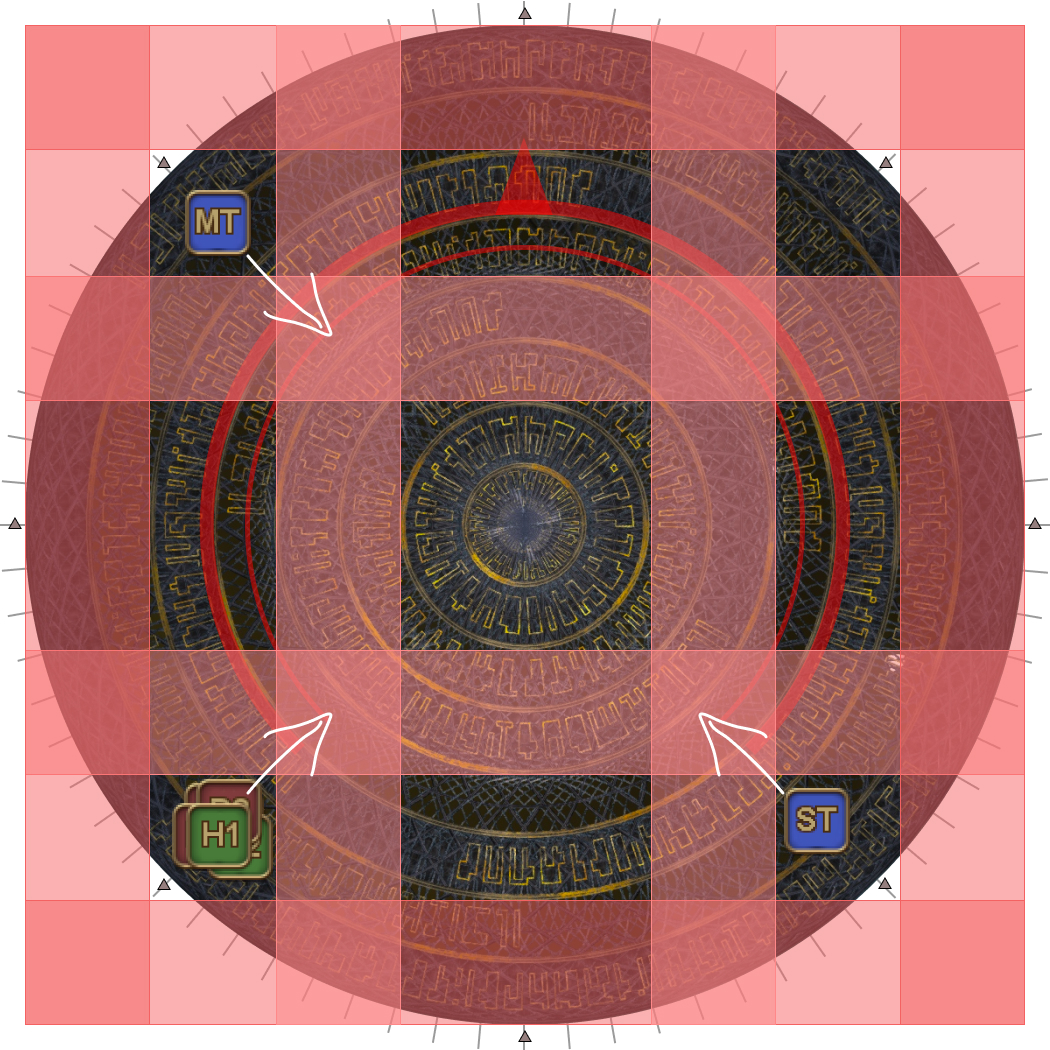
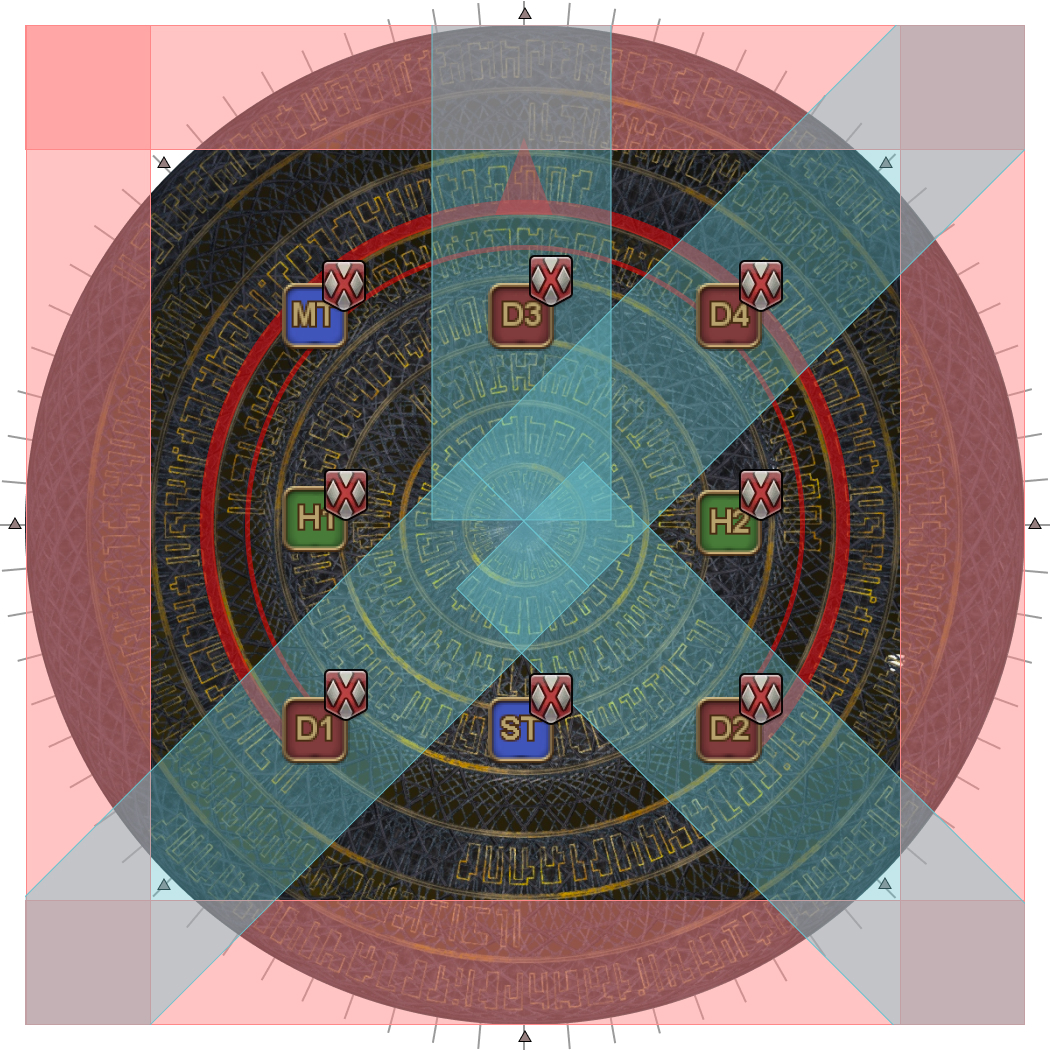
| Inside first | Outside first | ||
|---|---|---|---|
1. Inside telegraphs appear. |  | 1. Outside telegraphs appear. | 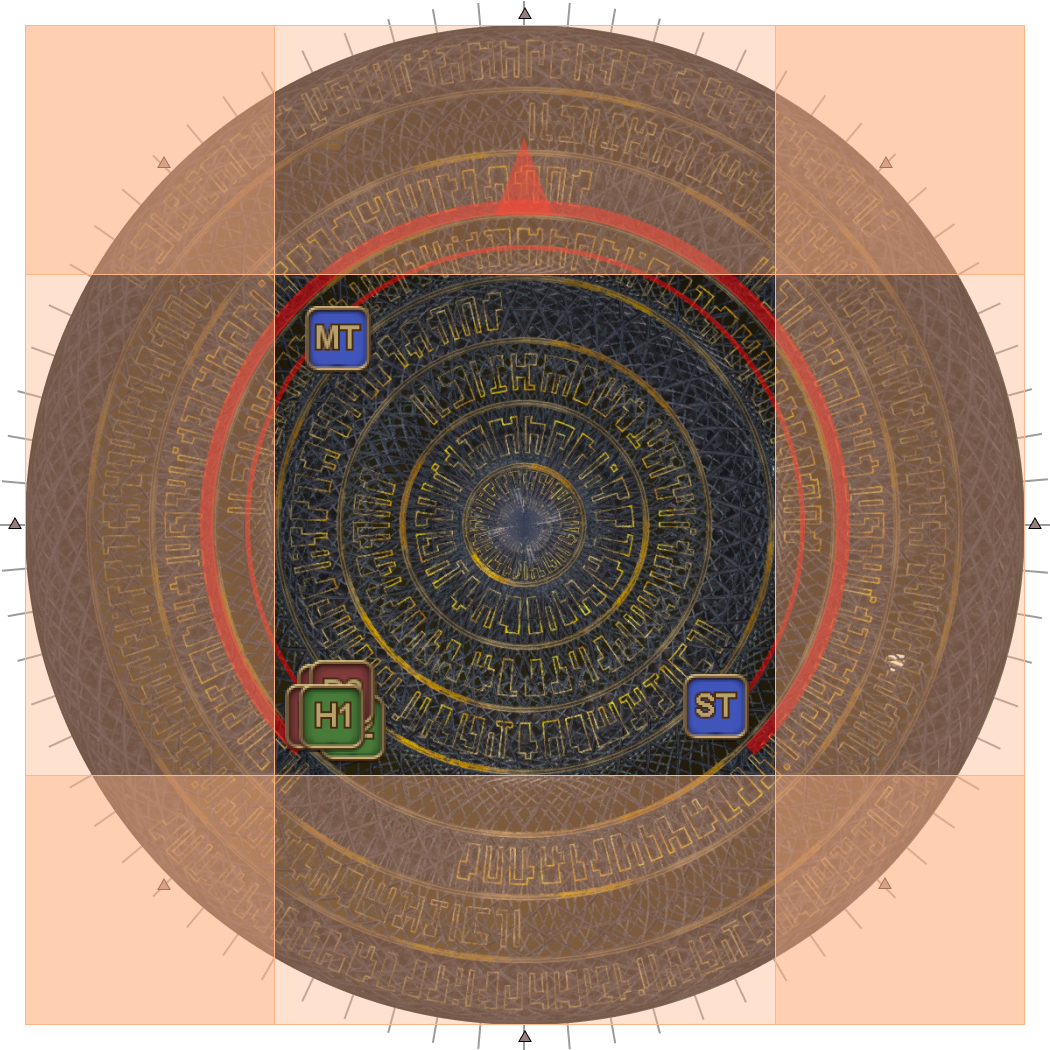 |
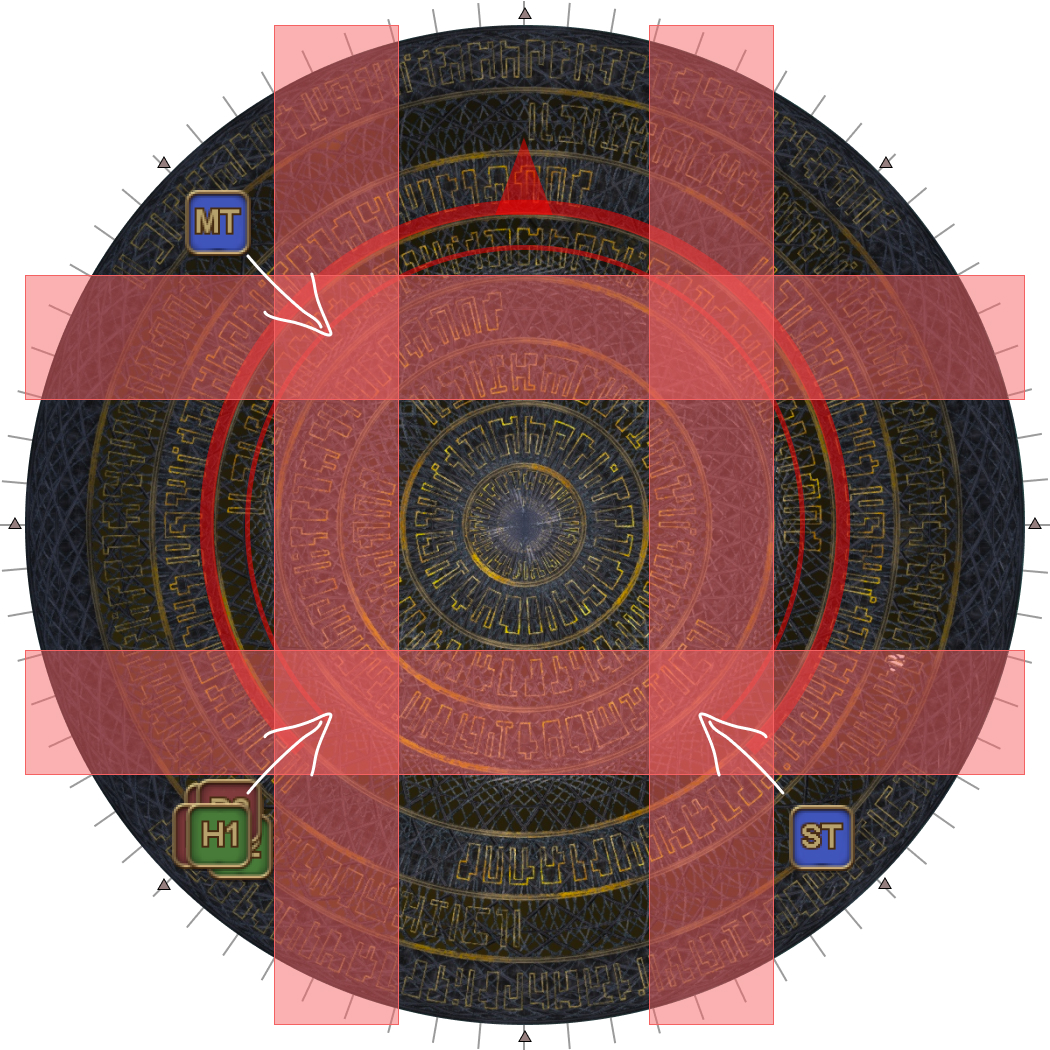
2. Outside telegraphs appear. | 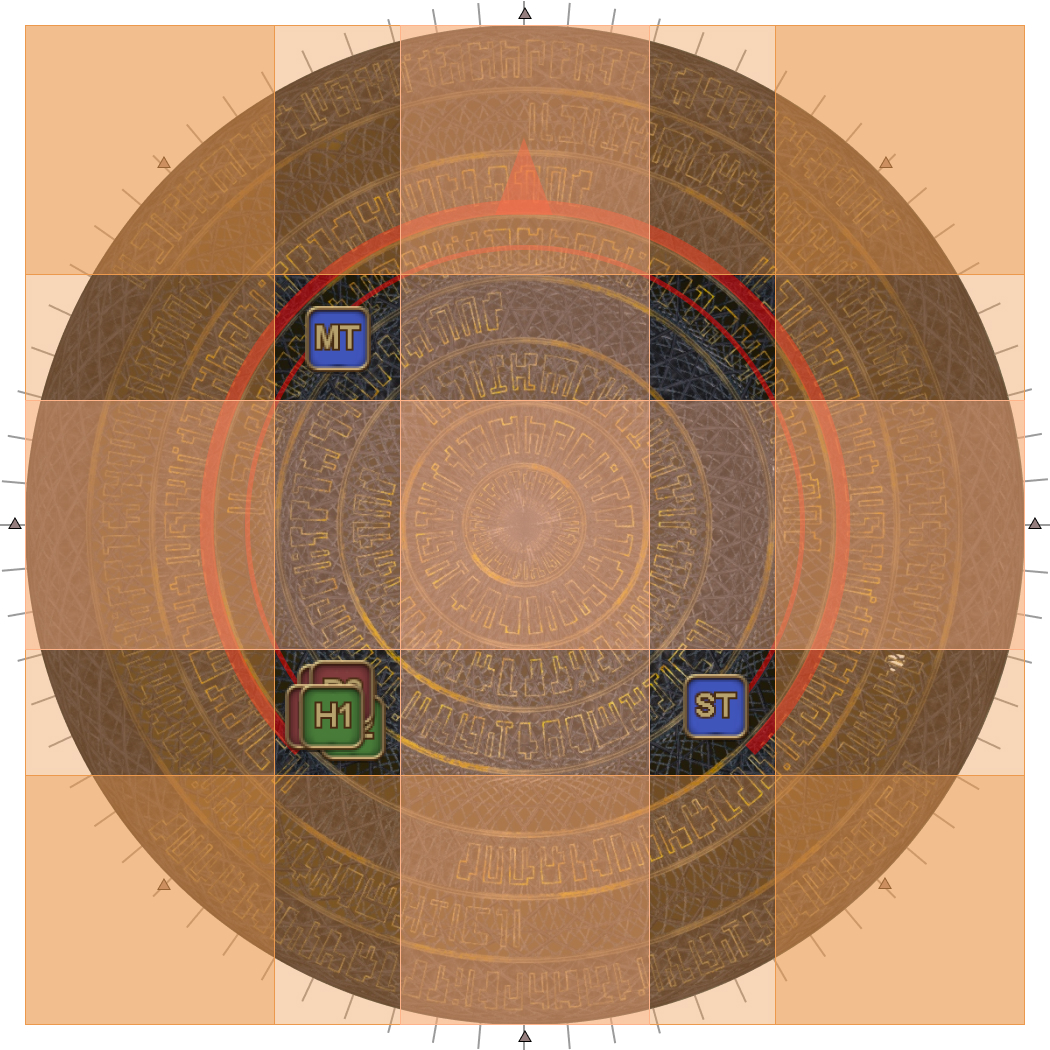 | 2. Inside telegraphs appear. | 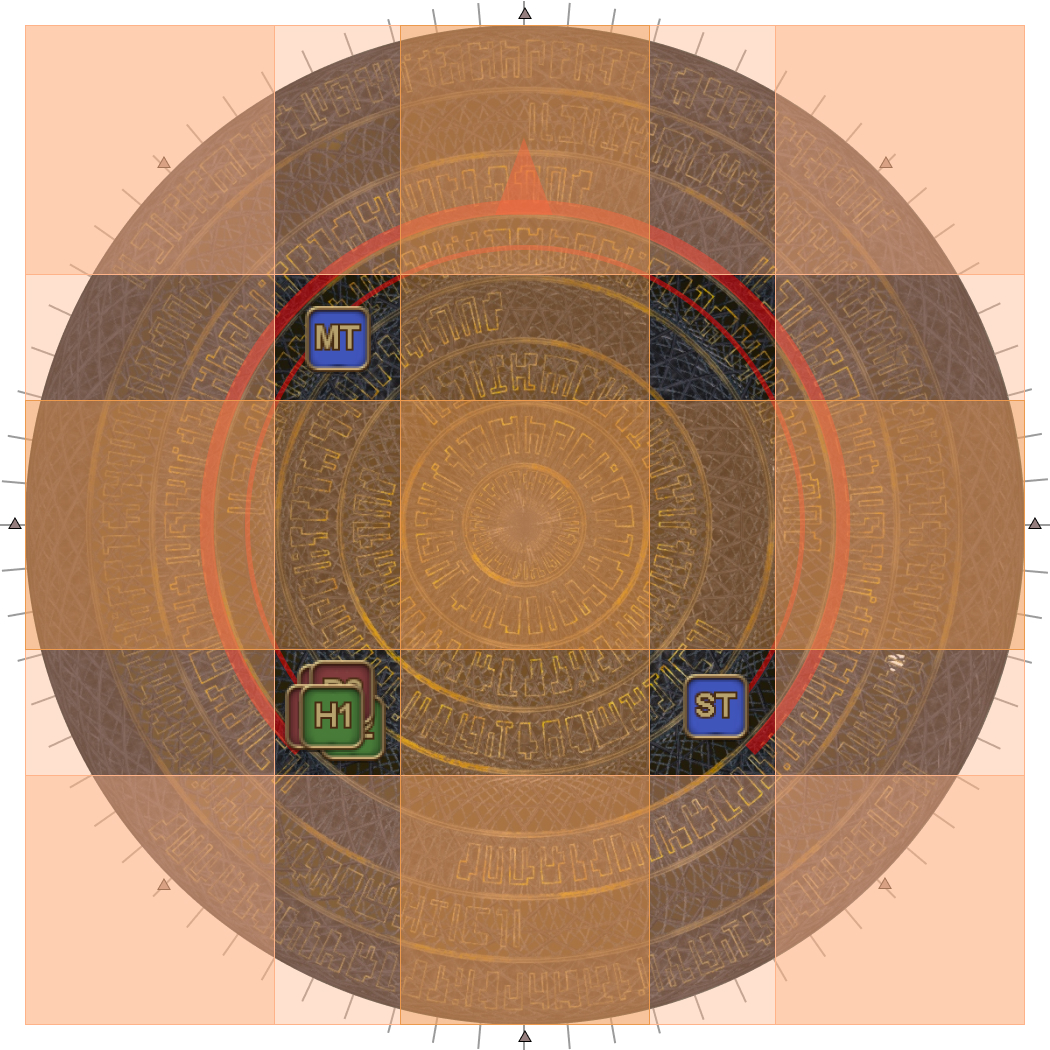 |
| 3. Inside AoEs resolve.
|  | 3. Outside AoEs resolve.
|  |
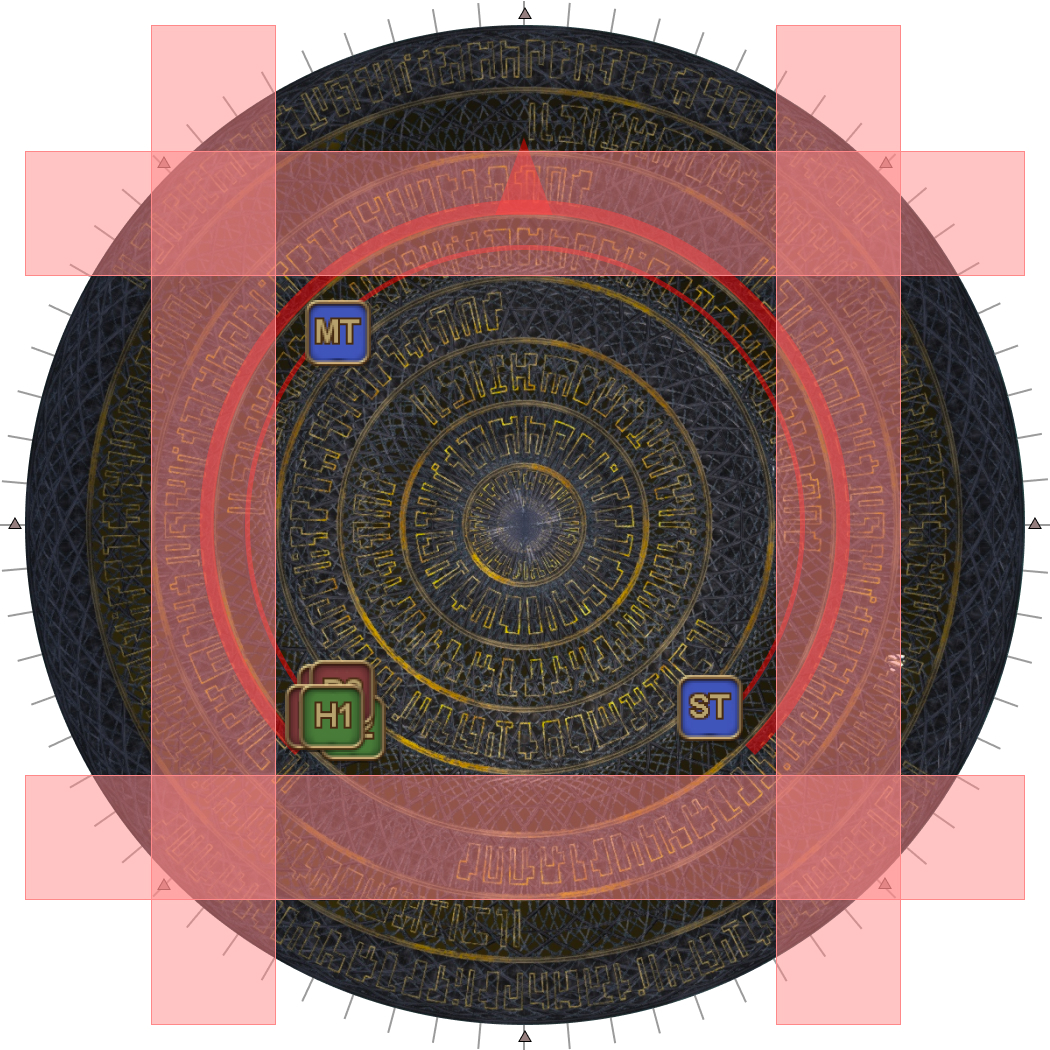
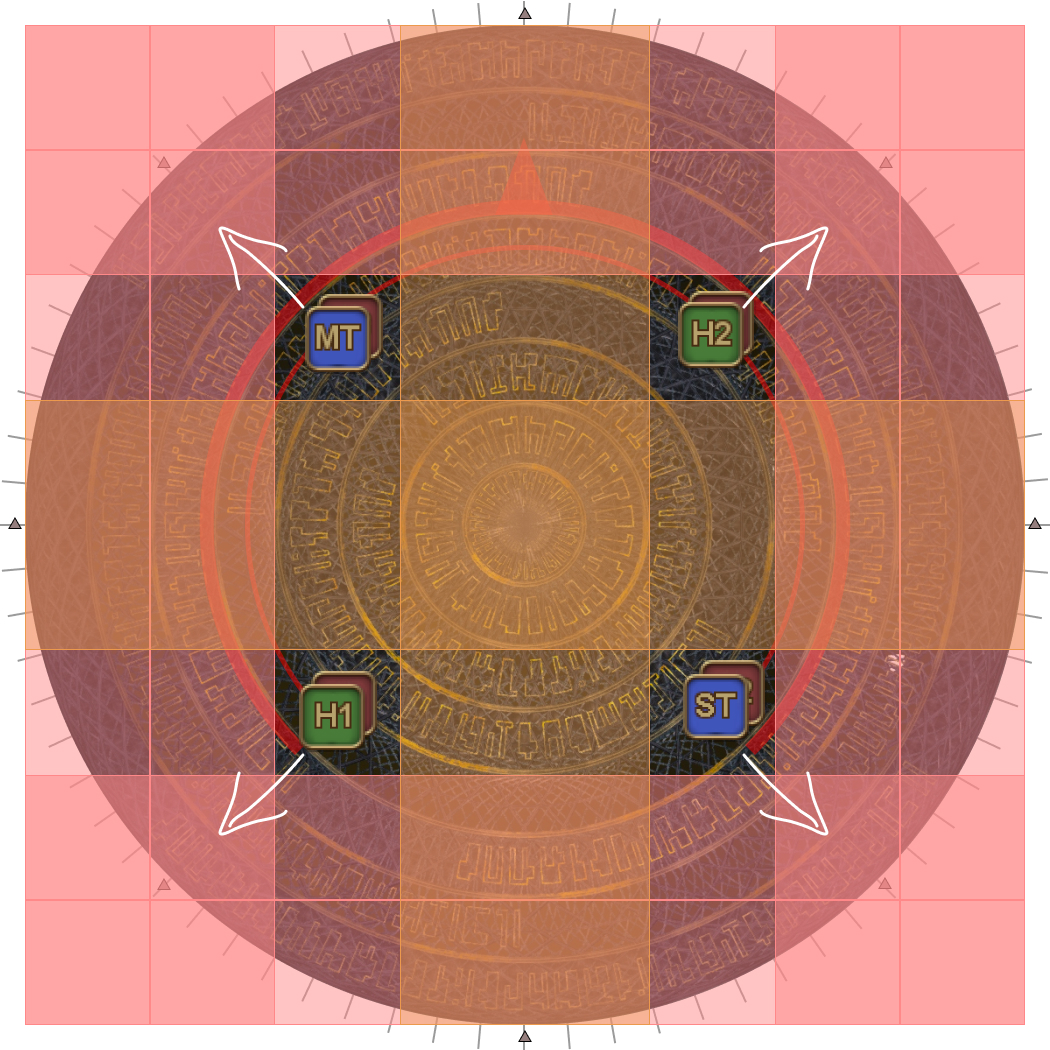
| 4. Dodge AoEs.
|  | 4. Dodge AoEs.
|  |
| 5. Dodge AoEs.
|  | 5. Dodge AoEs.
|  |
| 6. Dodge AoEs.
|  | 6. Dodge AoEs.
|  |
| 7. Dodge AoEs. Alpha Omega will start casting Cosmo Dive.
|  | 7. Dodge AoEs. Alpha Omega will start casting Cosmo Dive.
|  |
| 8. Dodge AoEs.
|  | 8. Dodge AoEs.
|  |
| 9. Take up Cosmo Dive positions. | 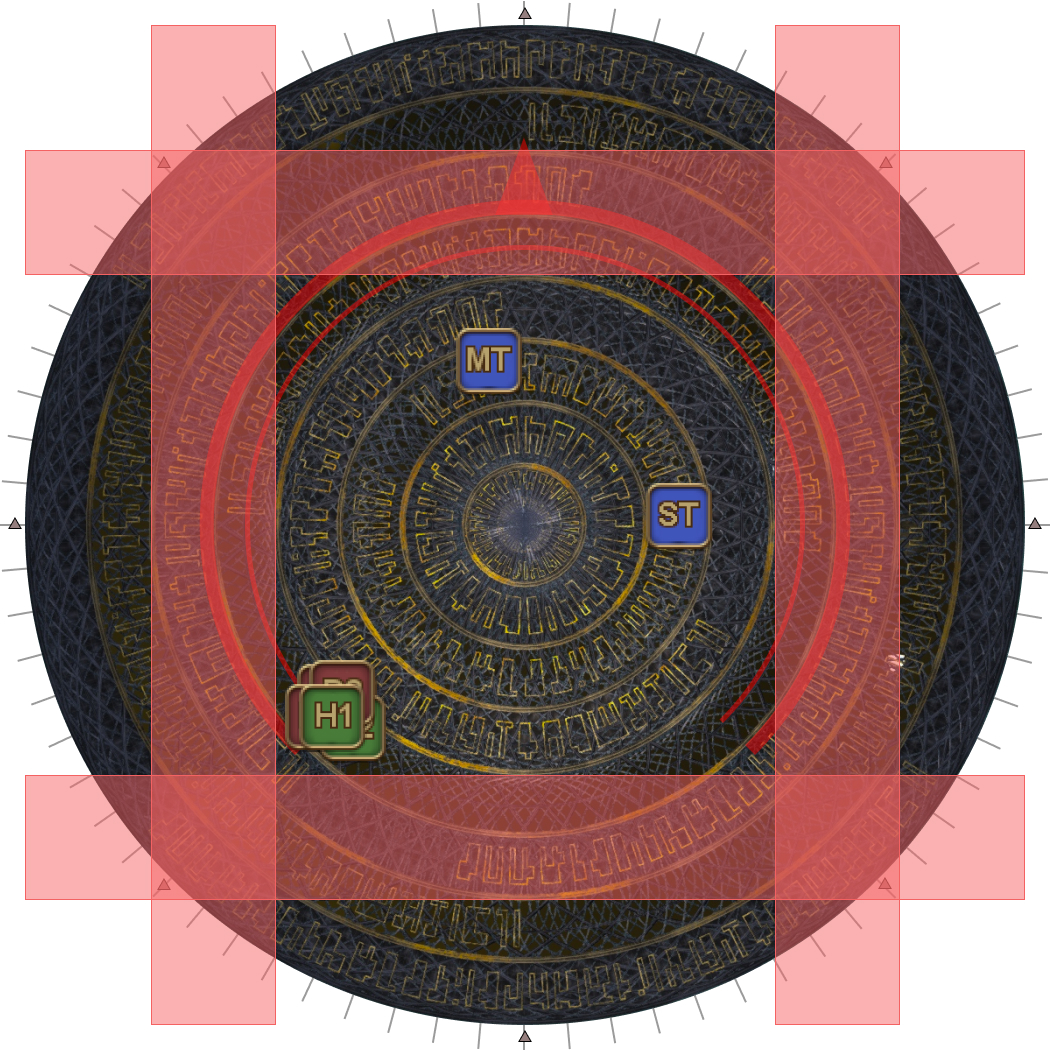 | 9. Last AoEs. Take up Cosmo Dive positions. | 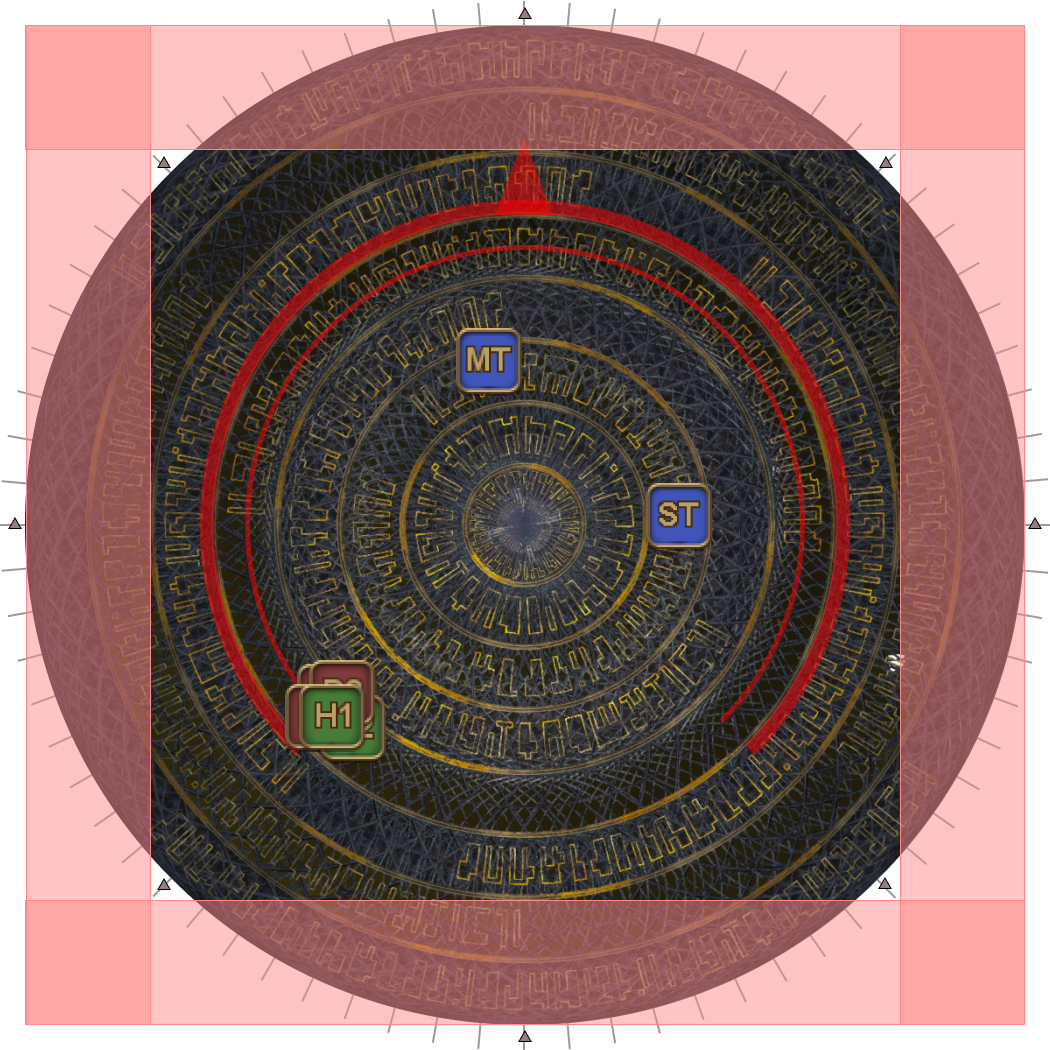 |
| 10. Last AoEs. Cosmo Dive resolves shortly after. | 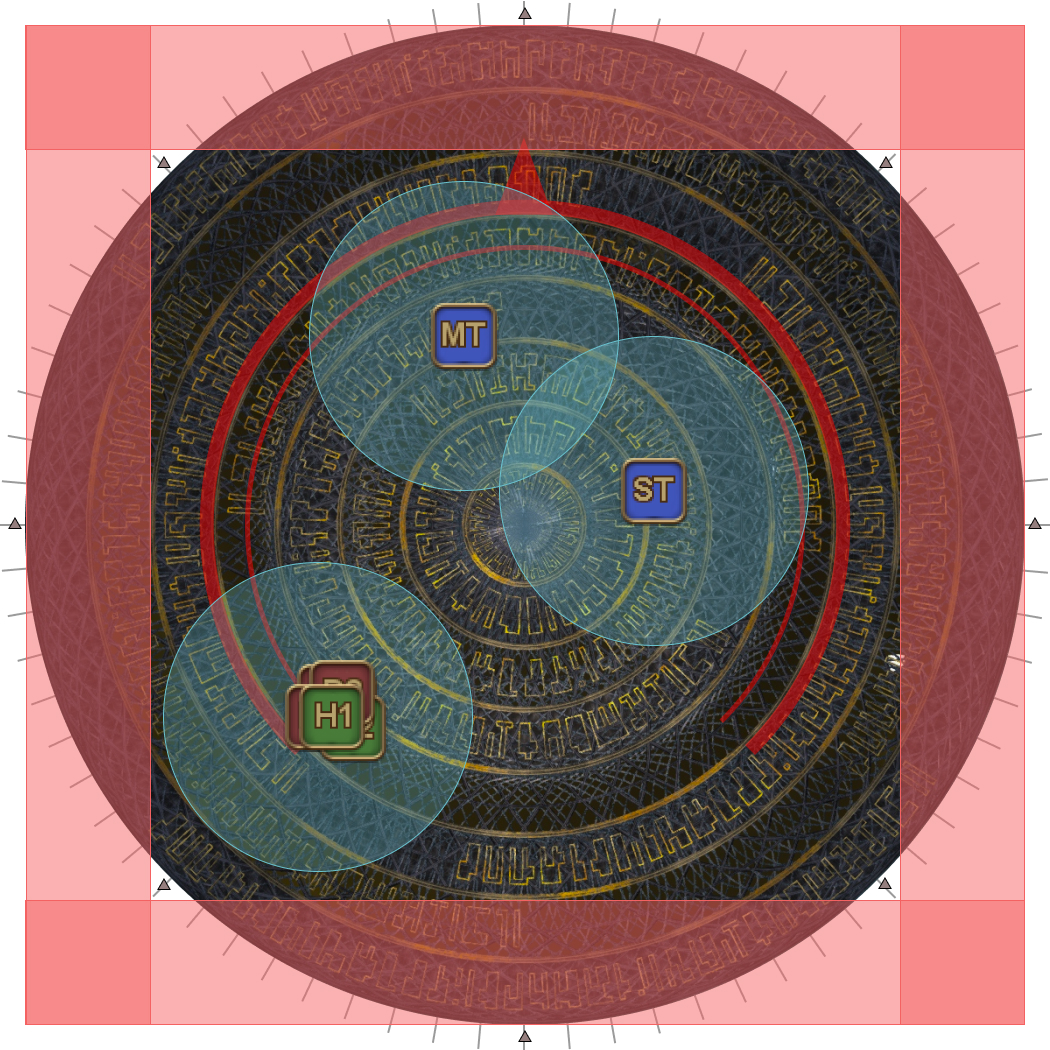 | 10. Cosmo Dive resolves. | 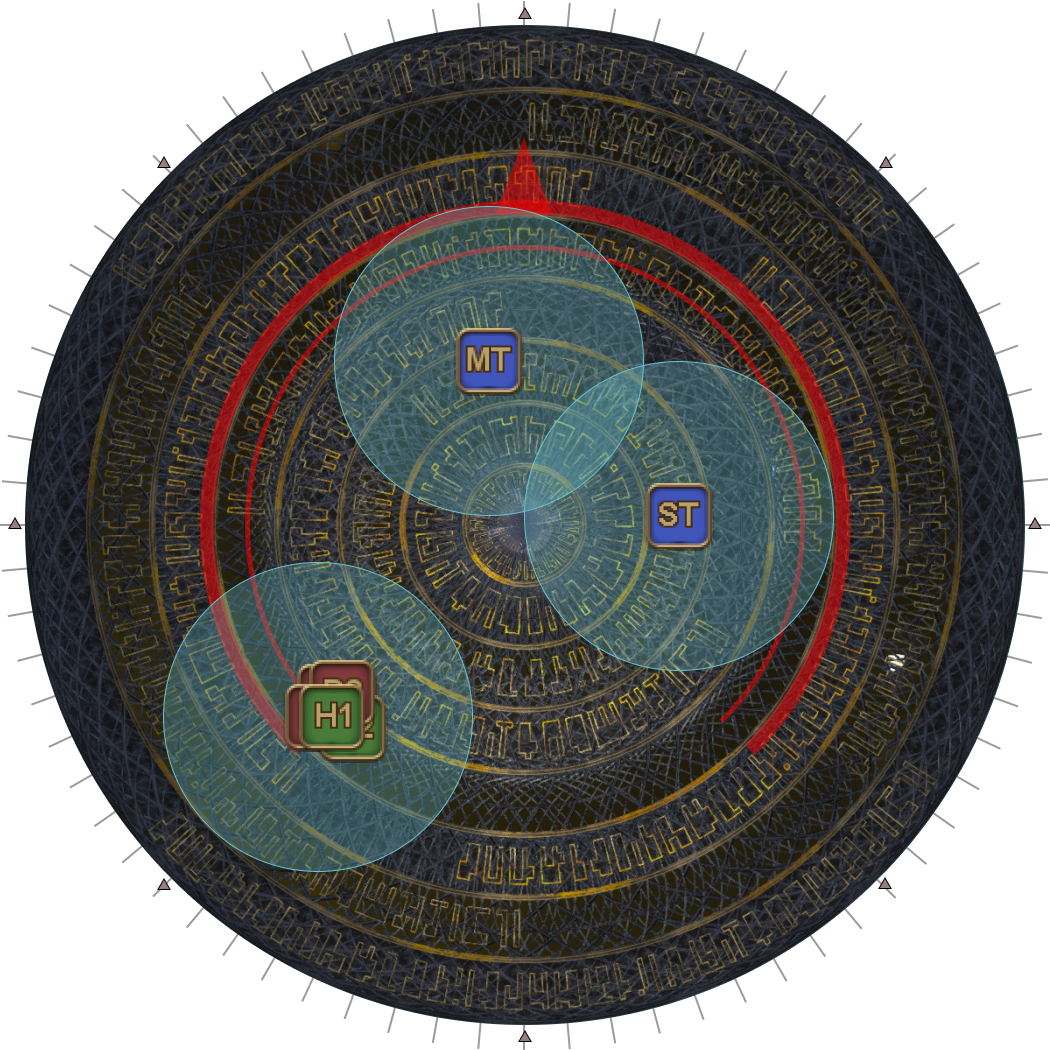 |
Unlimited Wave Cannon → Wave Cannon
Alpha Omega autoattacks twice before starting its second combination.
The next combination are two different Wave Cannons.
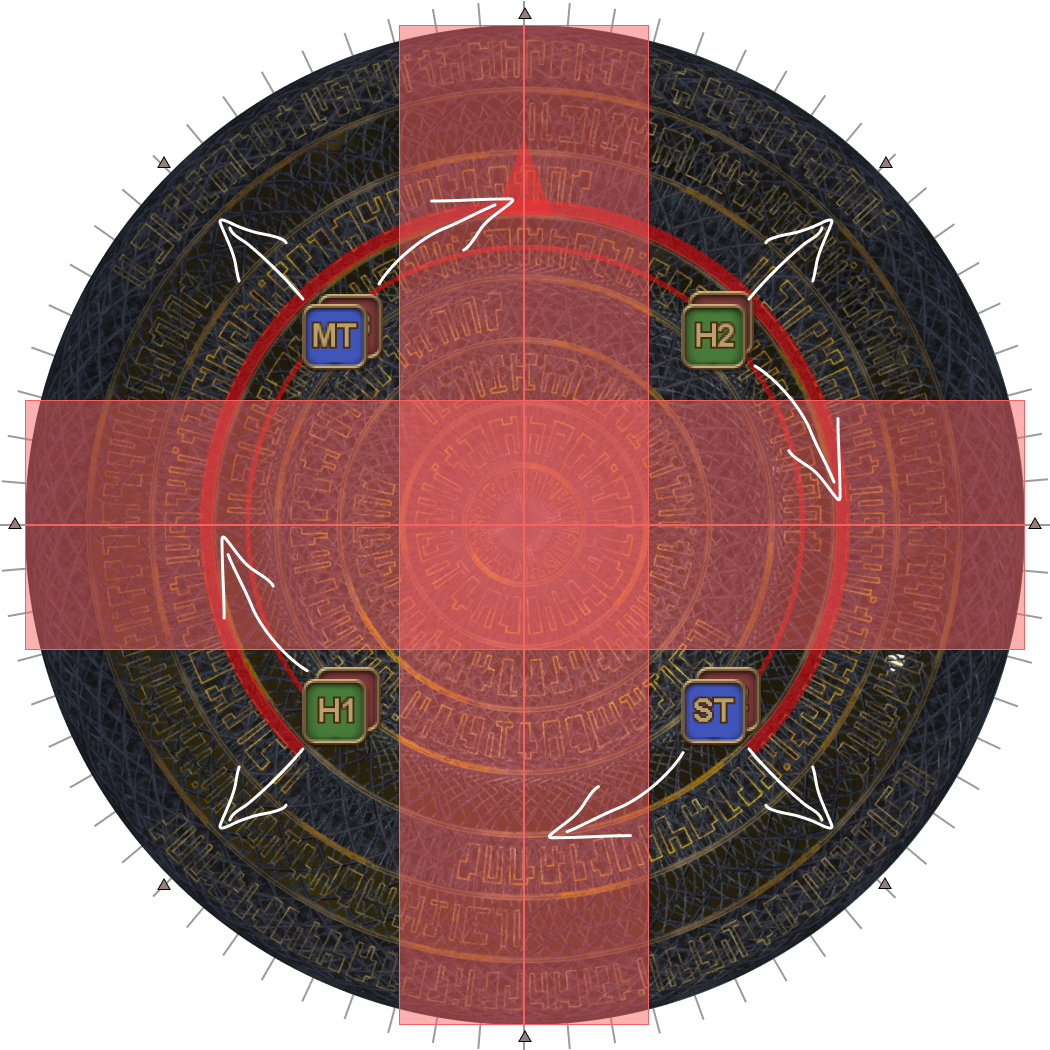
Unlimited Wave Cannon spawns four staggered “Exaflare” AoEs along an arc outside the arena in combination to six (large) baited AoEs under each player.
This is resolved by stacking together in the middle of the arena, and observing where the Exaflare arc begins. The party moves 1.5 waymarks (67 degrees) from the first Exaflare- this Exaflare would have passed the party by the time they reach its position, making movement simple.
Wave Cannon is the hard-hitting mechanic with this combination- the party needs to spread for two sets of four beams before stacking together to share one hard-hitting beam.
In particular, this final beam deals extra damage to the two front players, which should be the tanks.
| 1. Four consecutive Exaflare AoE telegraphs will appear on the outside of the arena. The first Exaflare telegraph will appear just before the castbar finishes. Stack in the middle to bait AoEs, before moving out, 1.5 markers before the first Exaflare telegraph. | 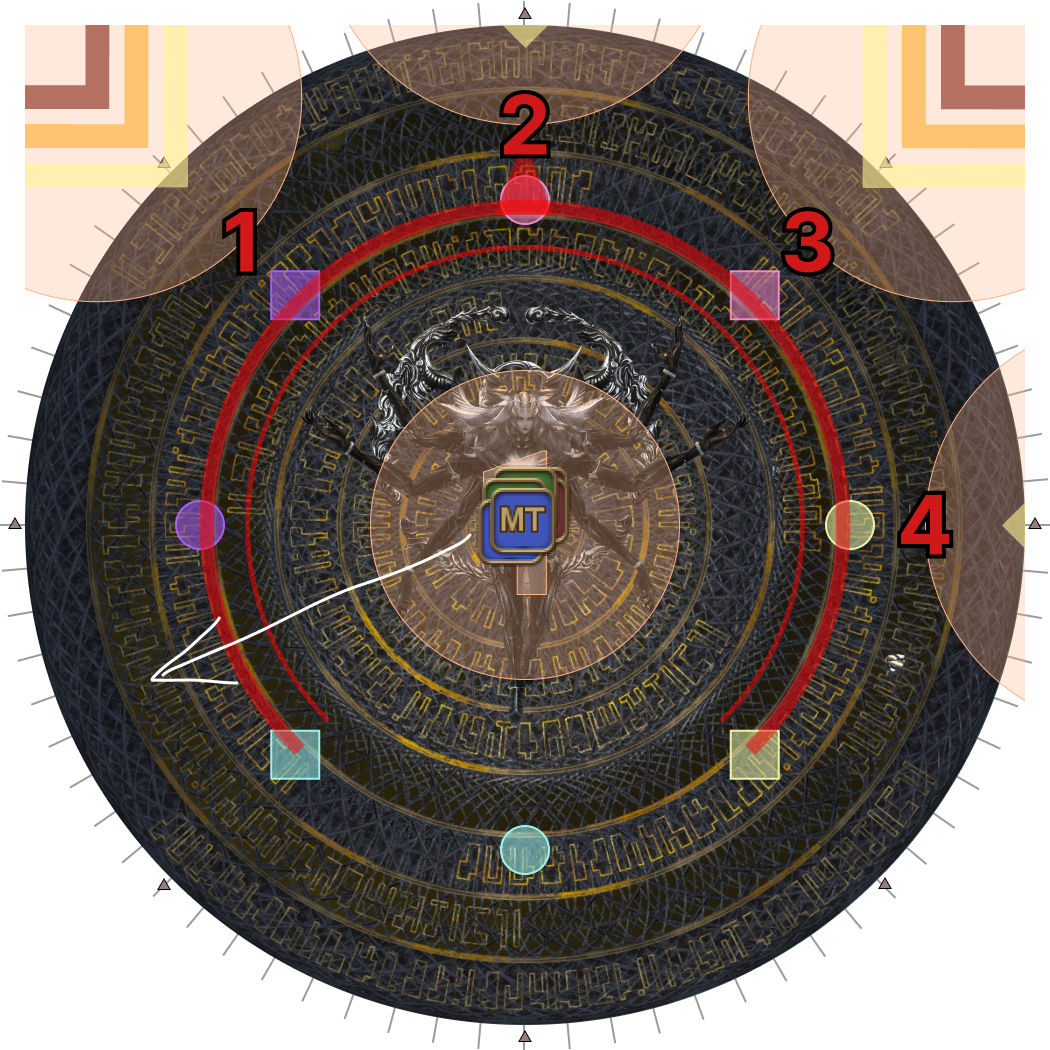 |
| 2. Stagger-step on your way out. By the time the third baited AoE appears, the first Exaflare would have passed and you should be just outside the boss's targeting circle. Turn and continue baiting AoEs in the same direction that the Exaflares spawned. | 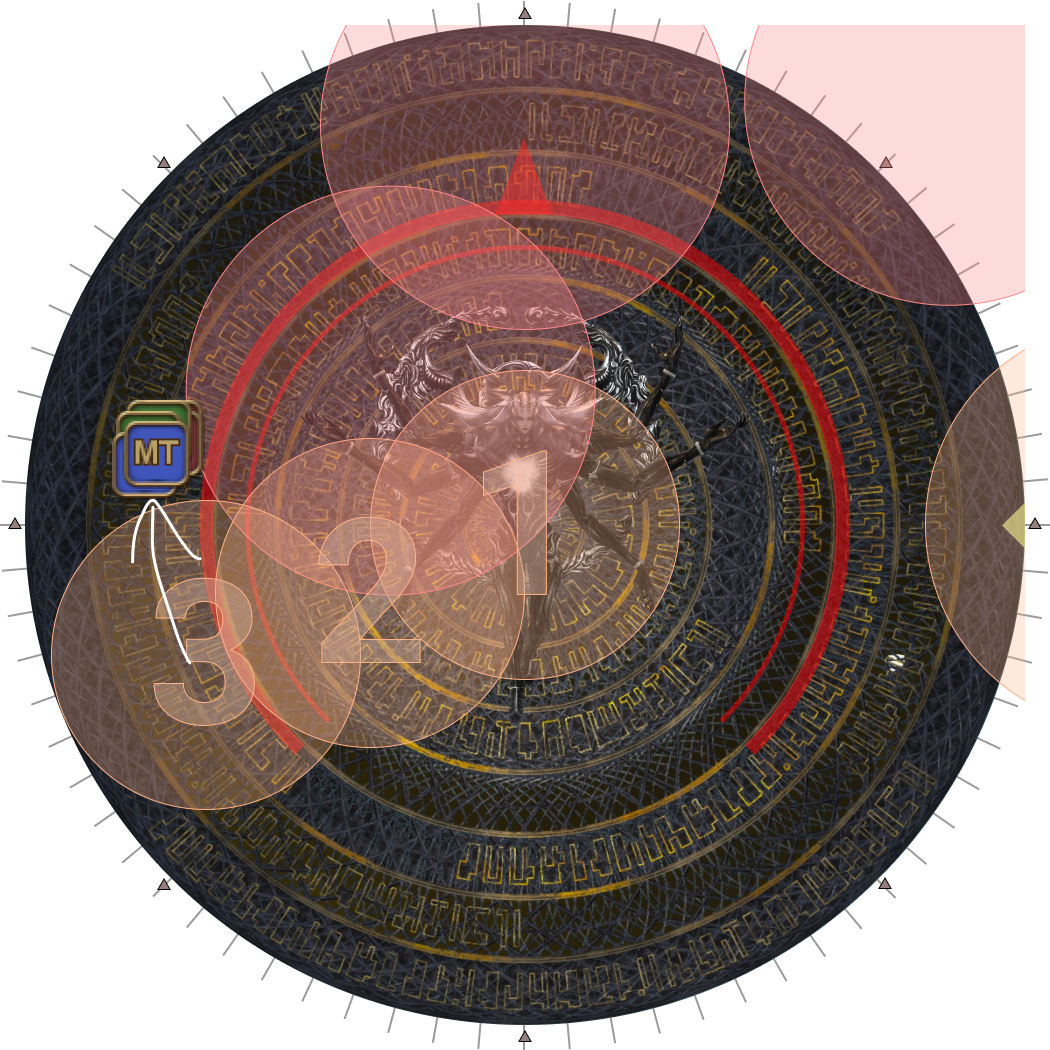 |
3. There will be six baited AoEs in total. | 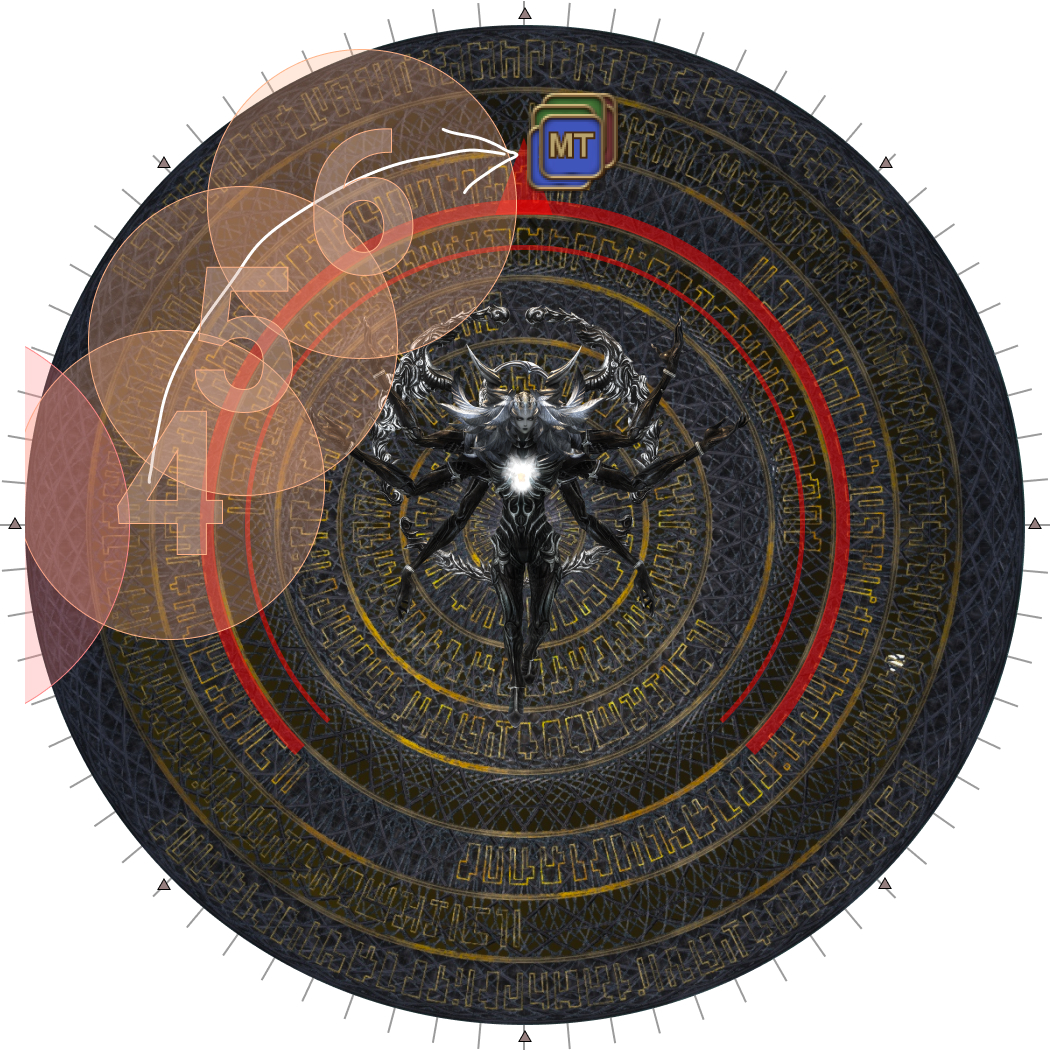 |
| 4. Spread out as Alpha Omega casts Wave Cannon, targeting four random players. | 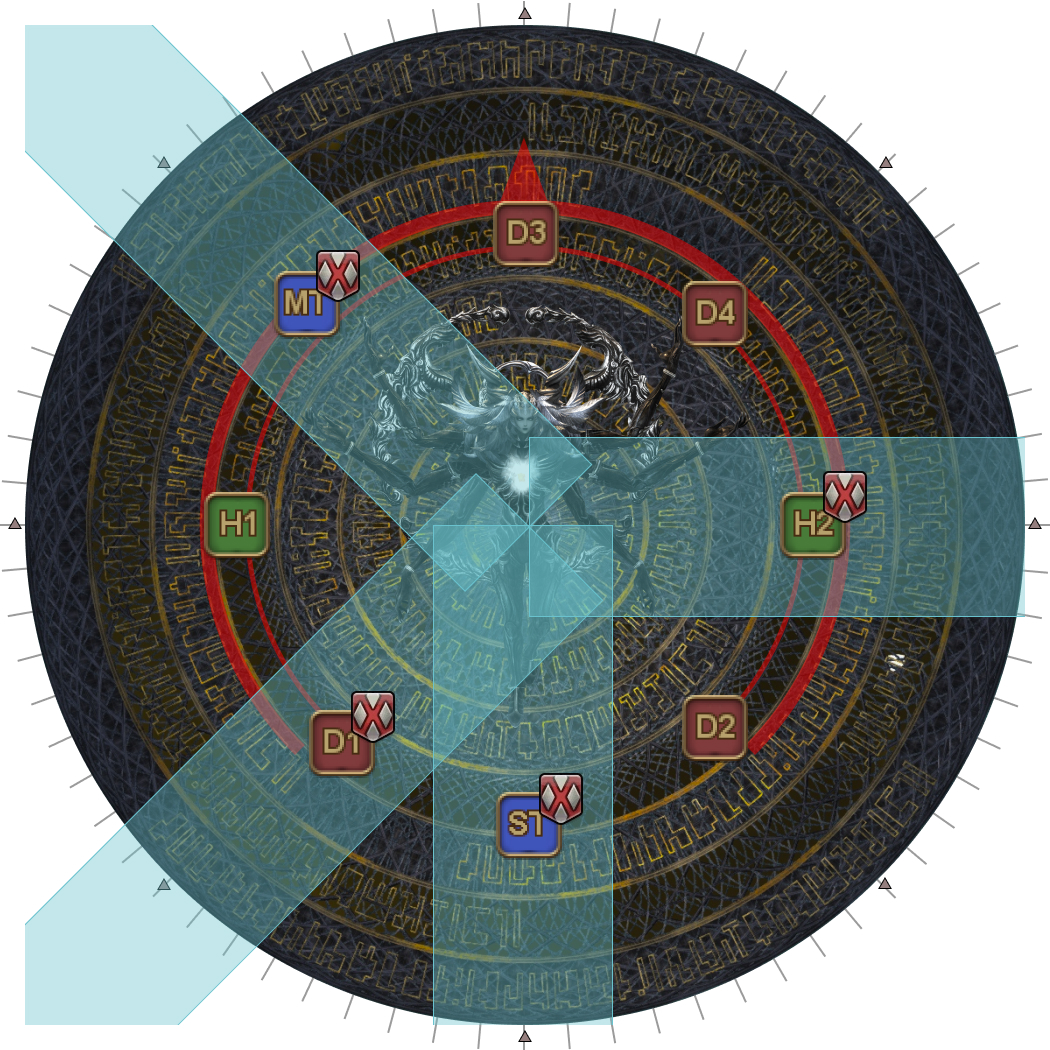 |
| 5. Alpha Omega's second set of waves hit the other four players. | 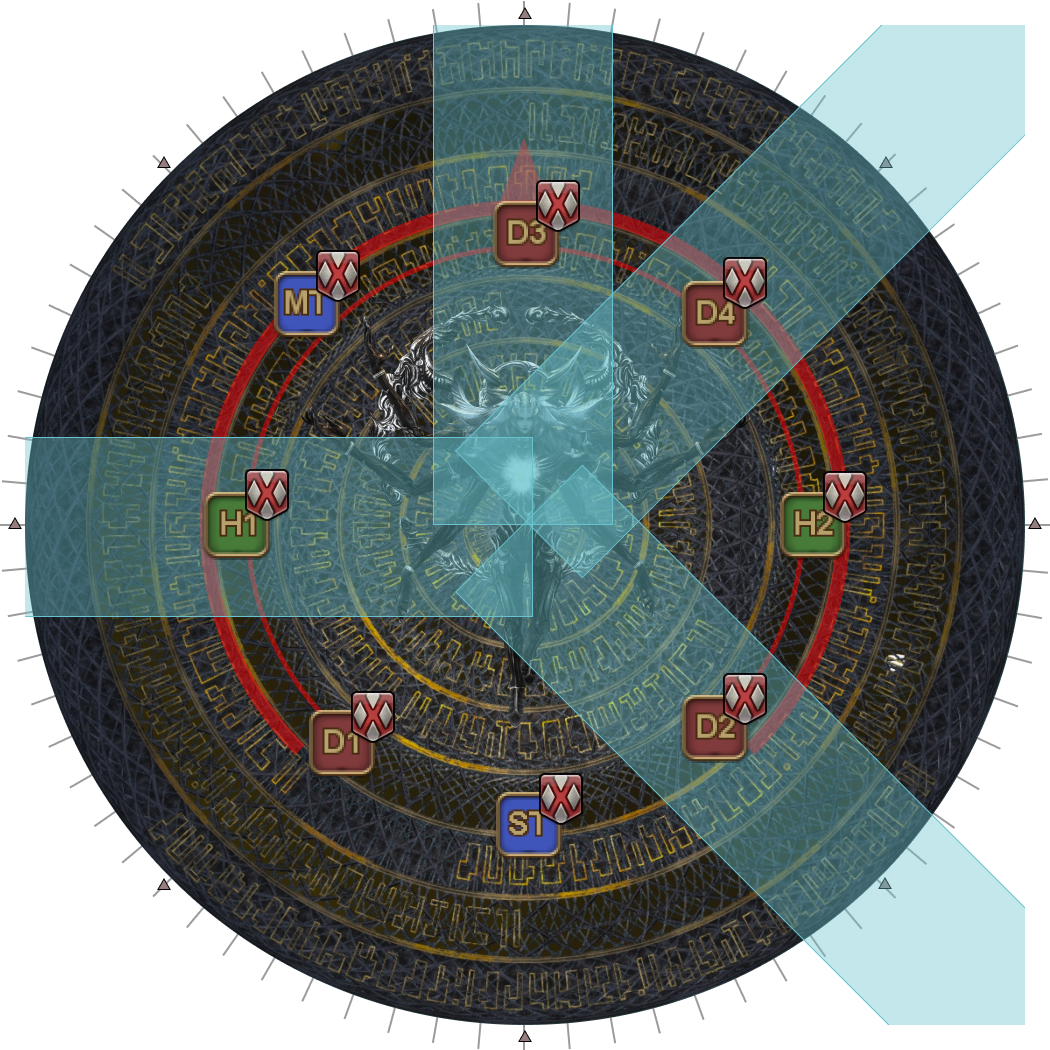 |
| 6. Stack together East, with both tanks in front to take the final shared beam. This is an extremely hard-hitting tankbuster.
|  |
Cosmo Arrow → Wave Cannon
Alpha Omega autoattacks twice before starting its third mechanic combination.
This Cosmo Arrow is independent to the first Cosmo Arrow at the start of the phase- it will not necessarily be the “opposite” to the first.
The catch this time is the Wave Cannon in the middle, as the party will now need to spread for the two sets of four beams while simultaneously dodging the Cosmo Arrow.
The final Wave Cannon stack resolves shortly after Cosmo Arrow finishes.
| Inside first | Outside first | ||
|---|---|---|---|
| 1. Inside telegraphs appear. | 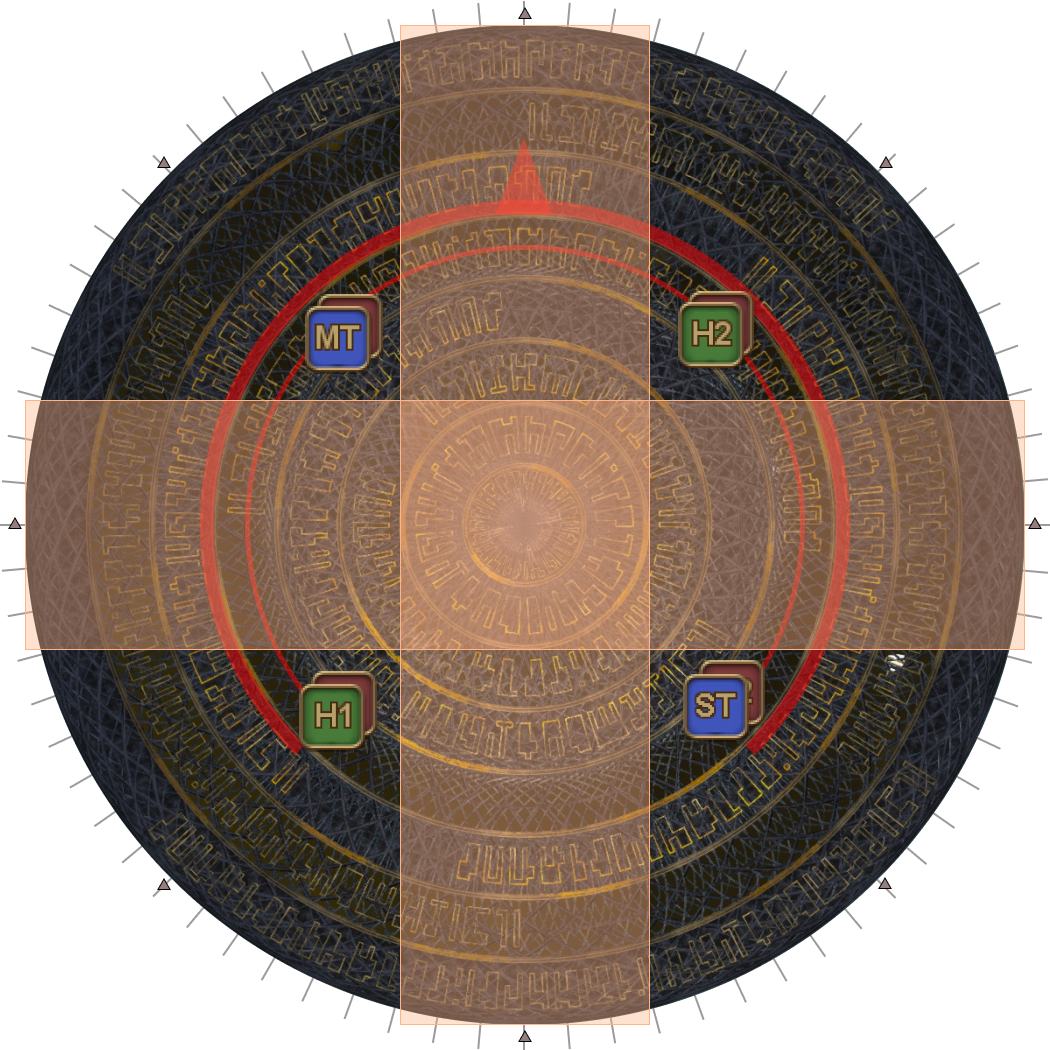 | 1. Outside telegraphs appear. | 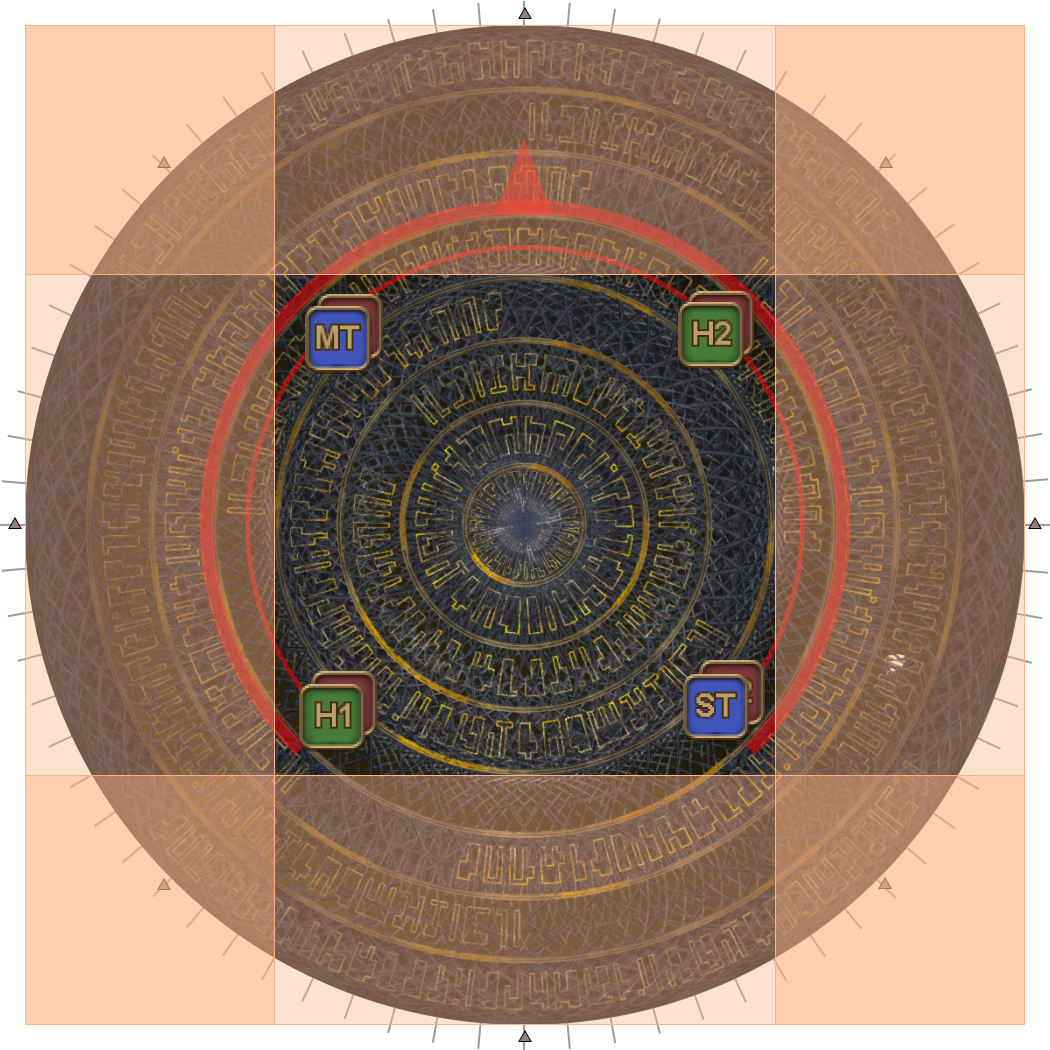 |
| 2. Outside telegraphs appear. | 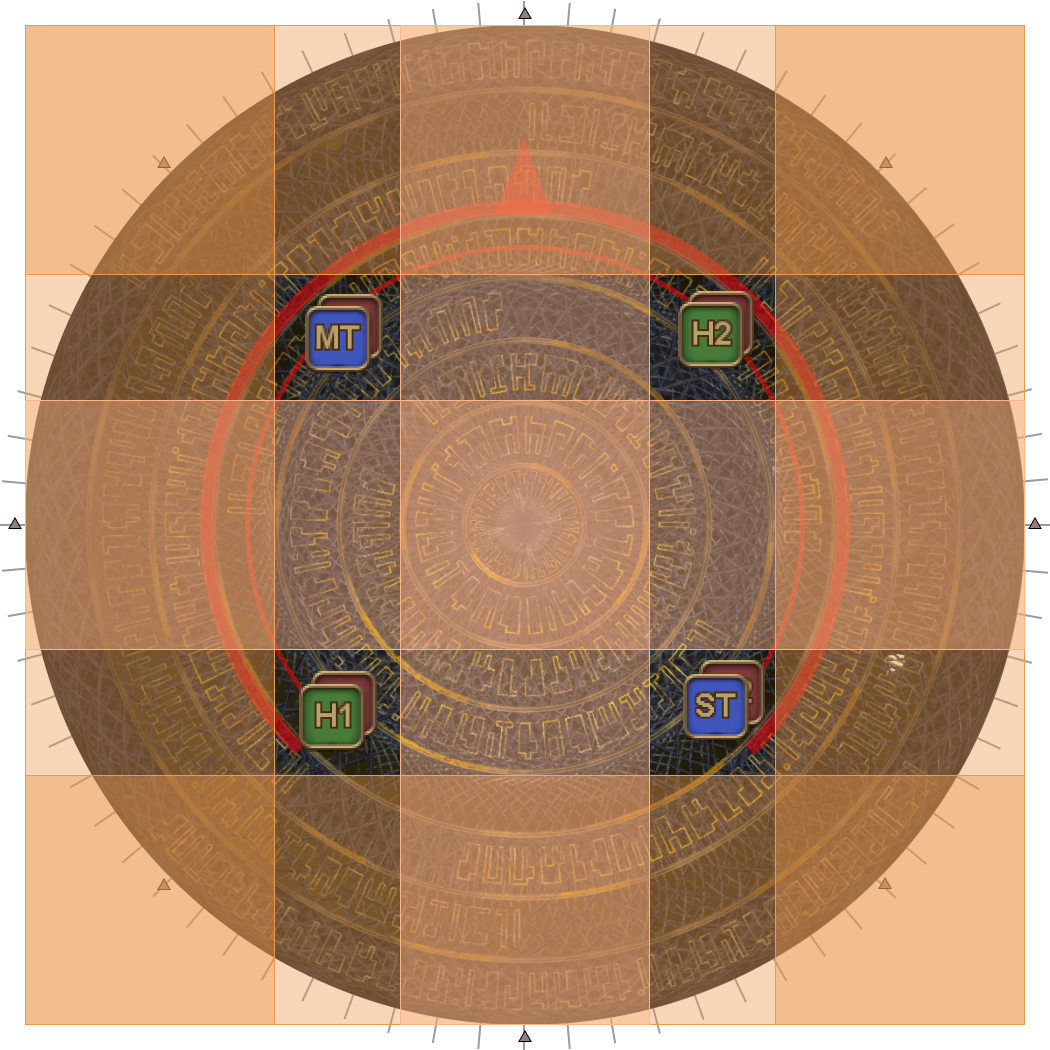 | 2. Inside telegraphs appear. | 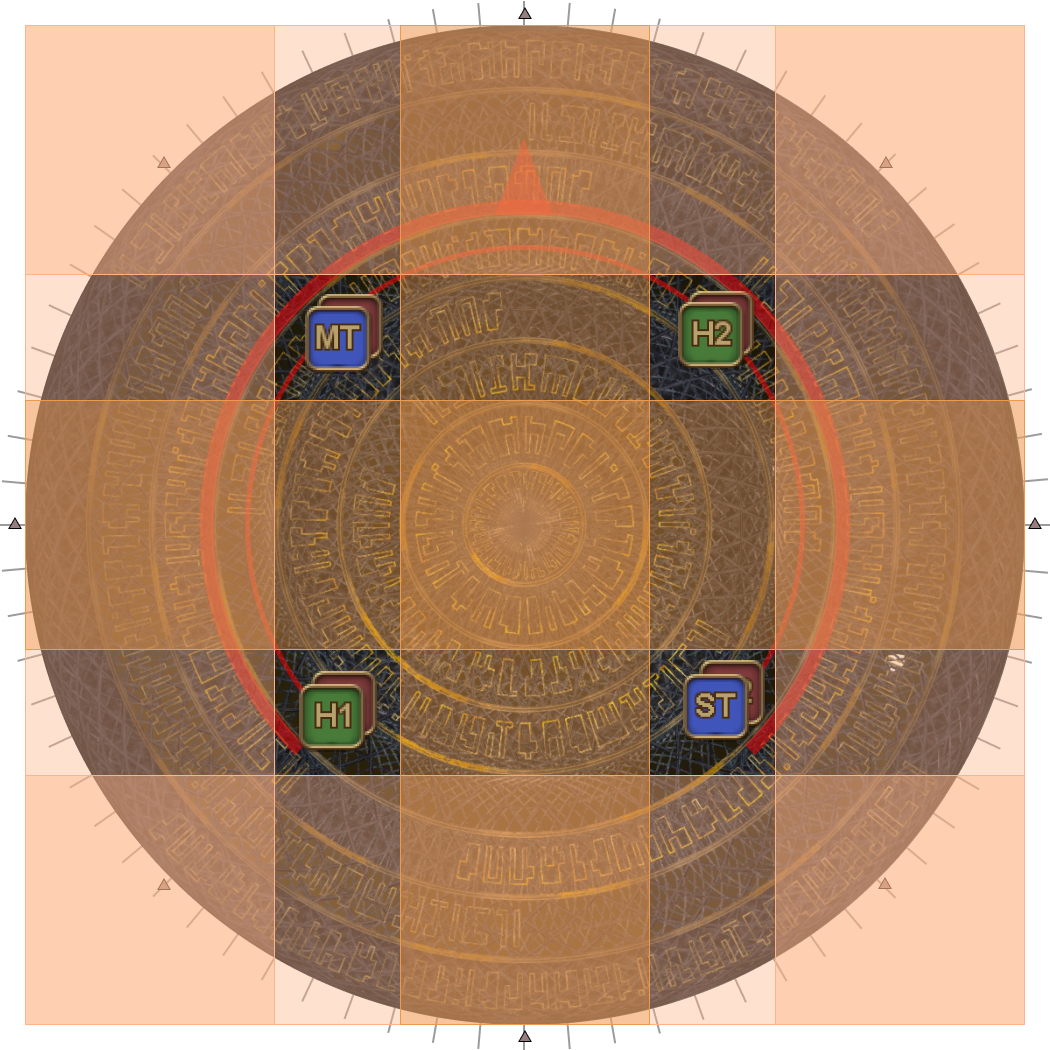 |
| 3. Inside AoEs resolve.
|  | 3. Outside AoEs resolve.
|  |
| 4. Dodge AoEs.
|  | 4. Dodge AoEs.
|  |
| 5. Dodge AoEs.
|  | 5. Dodge AoEs.
|  |
| 6. Dodge AoEs. Alpha Omega starts casting Wave Cannon.
|  | 6. Dodge AoEs. Alpha Omega starts casting Wave Cannon.
|  |
| 7. Dodge AoEs.
|  | 7. Dodge AoEs.
|  |
| 8. Dodge AoEs. First set of Wave Cannon beams resolve.
|  | 8. Dodge AoEs. First set of Wave Cannon beams resolve.
|  |
| 9. Dodge AoEs. Second set of Wave Cannon beams resolve.
|  | 9. Last AoEs. Second set of Wave Cannon beams resolve.
|  |
| 10. Last AoEs. Move to prepare for the Wave Cannon stack. | 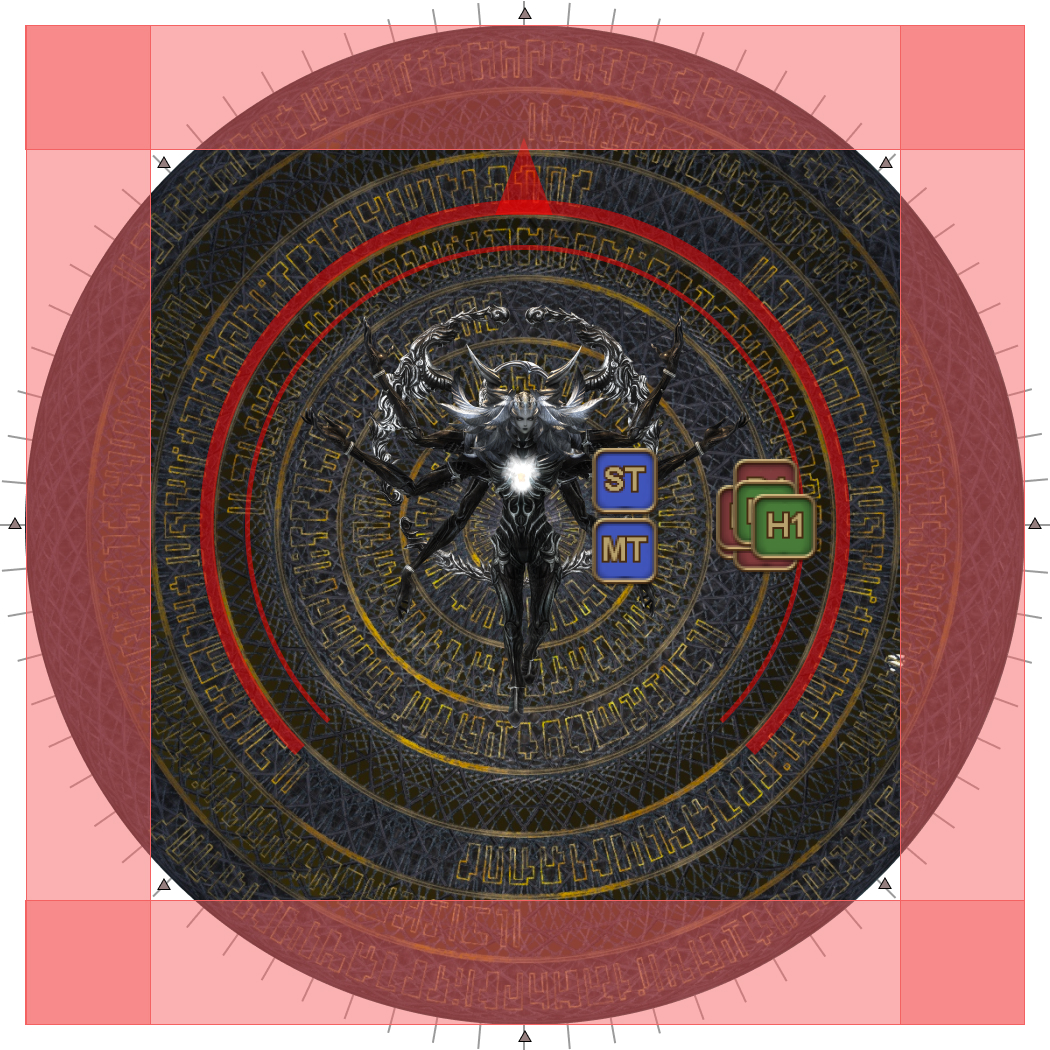 | 10. Move to prepare for the Wave Cannon stack. | 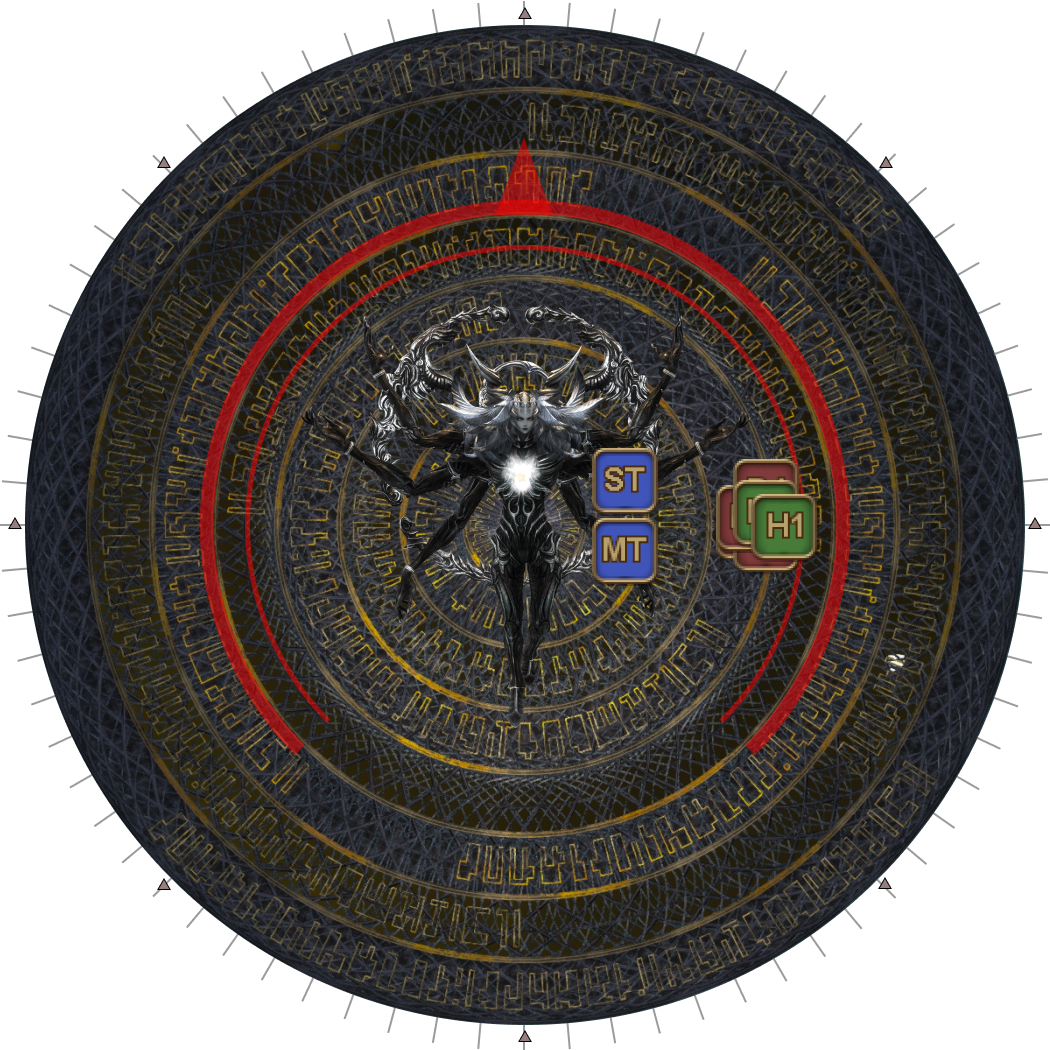 |
| 11. Stack together East (tanks in front) for Wave Cannon
|  | ||
Unlimited Wave Cannon → Cosmo Dive
Alpha Omega autoattacks twice before starting its fourth mechanic combination.
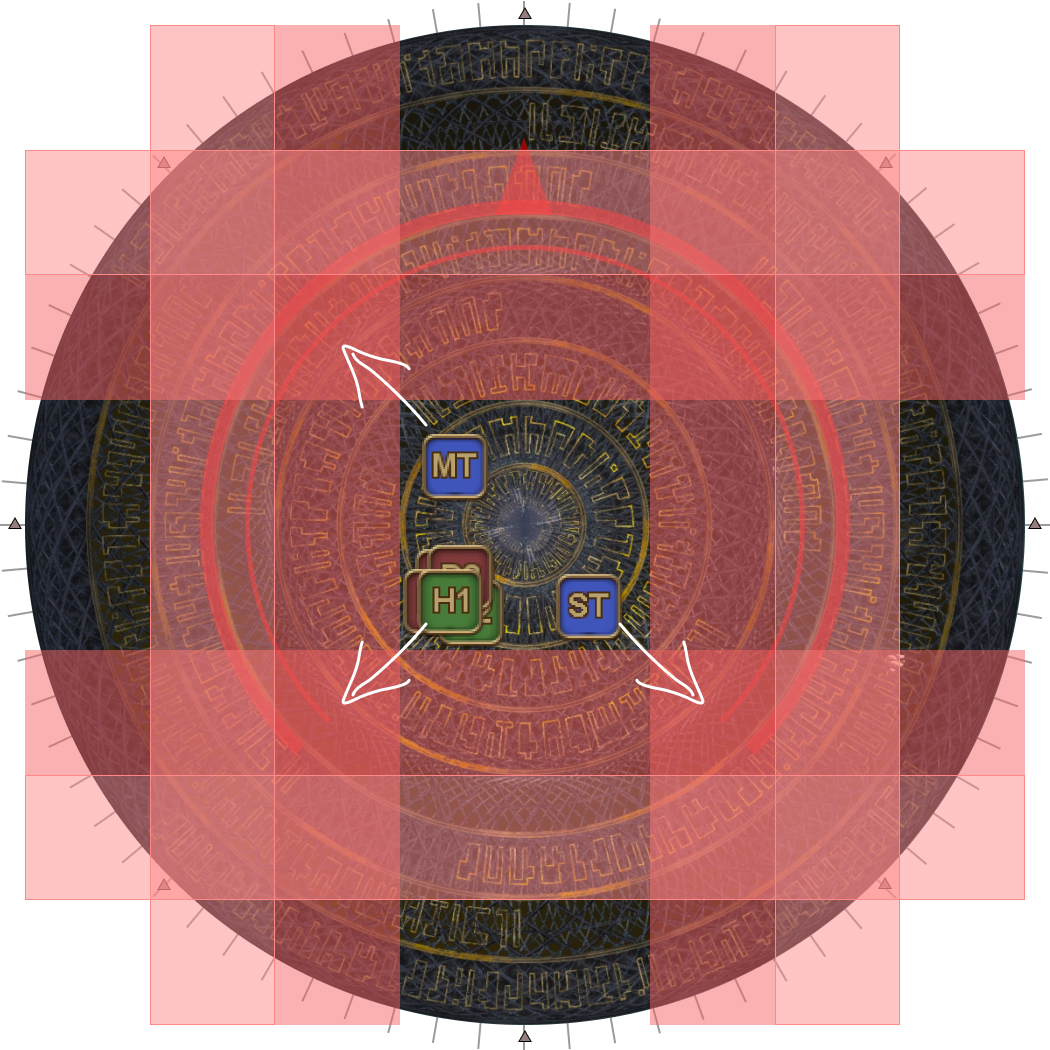
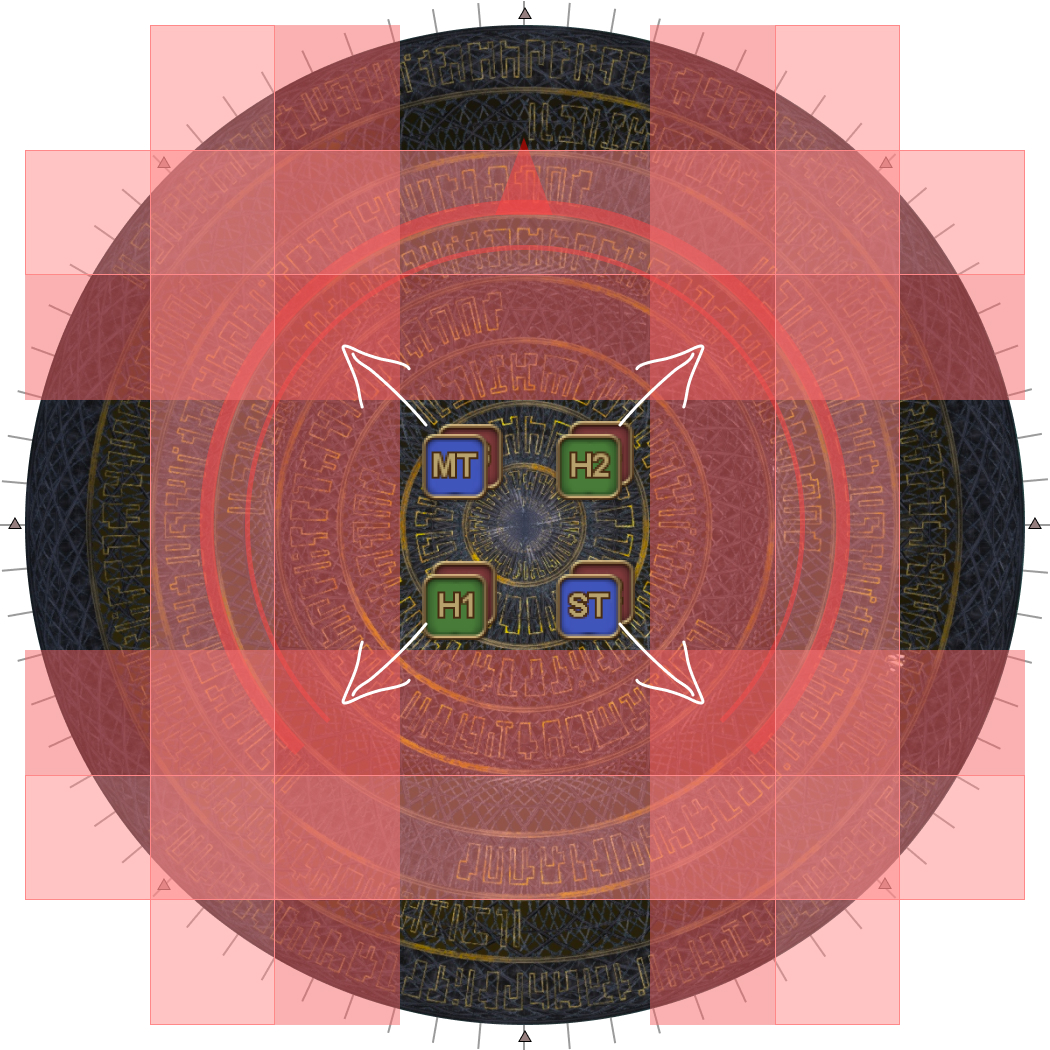
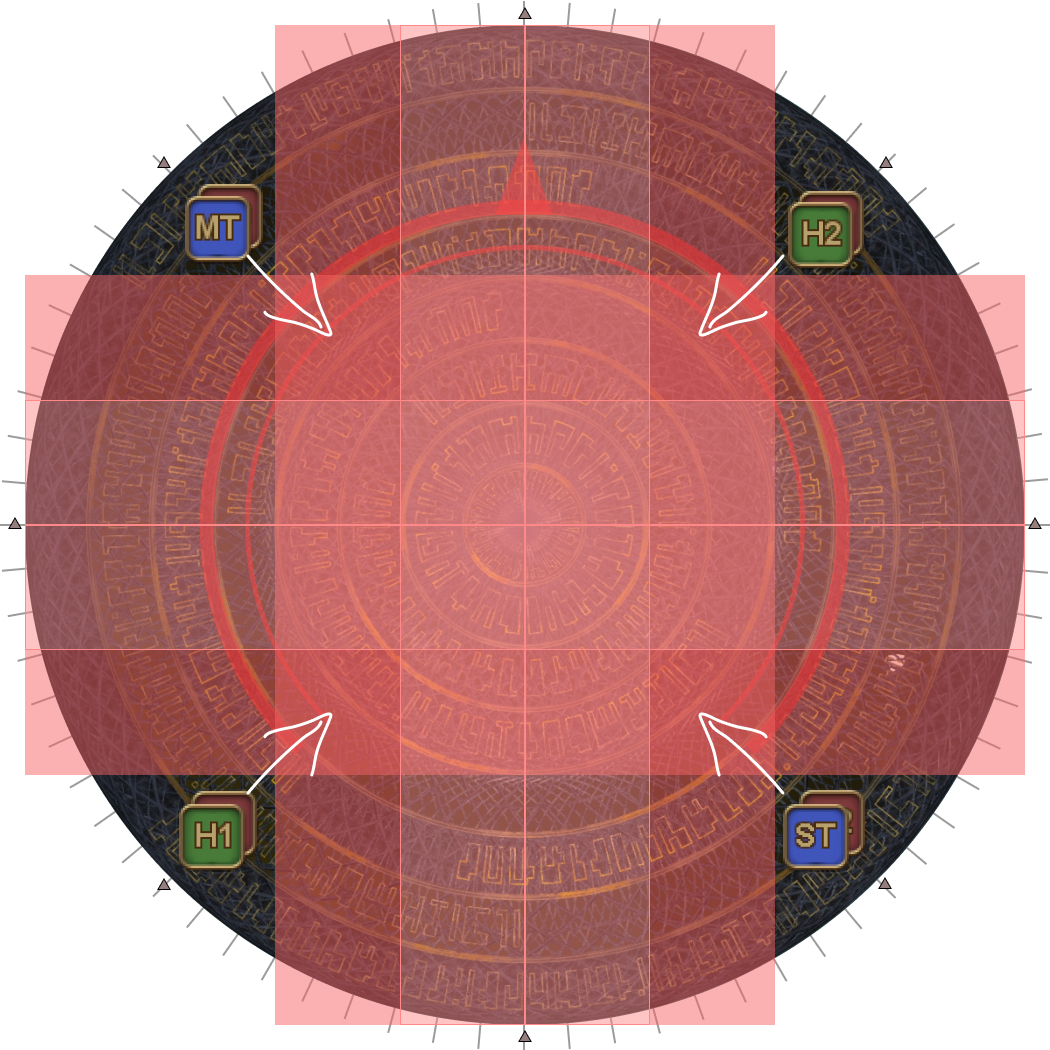
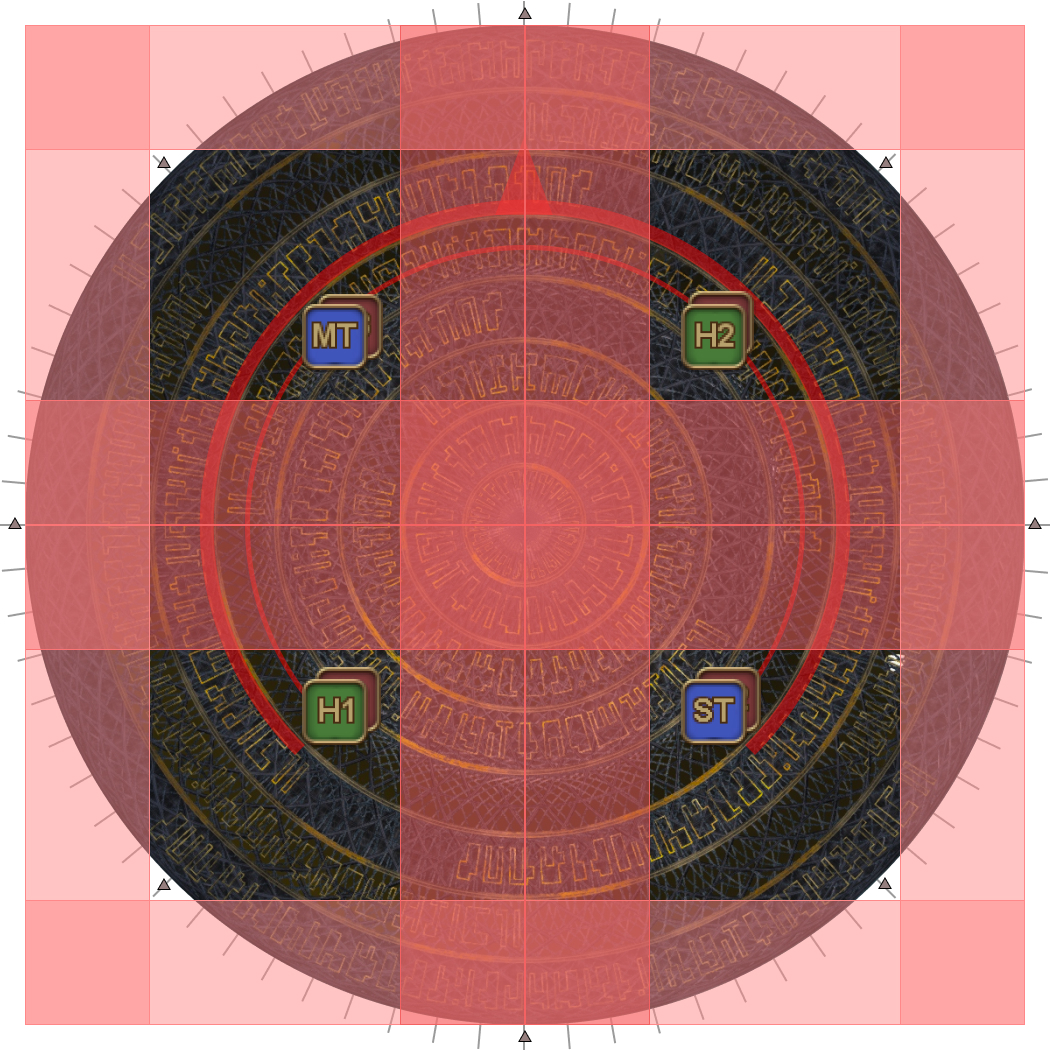
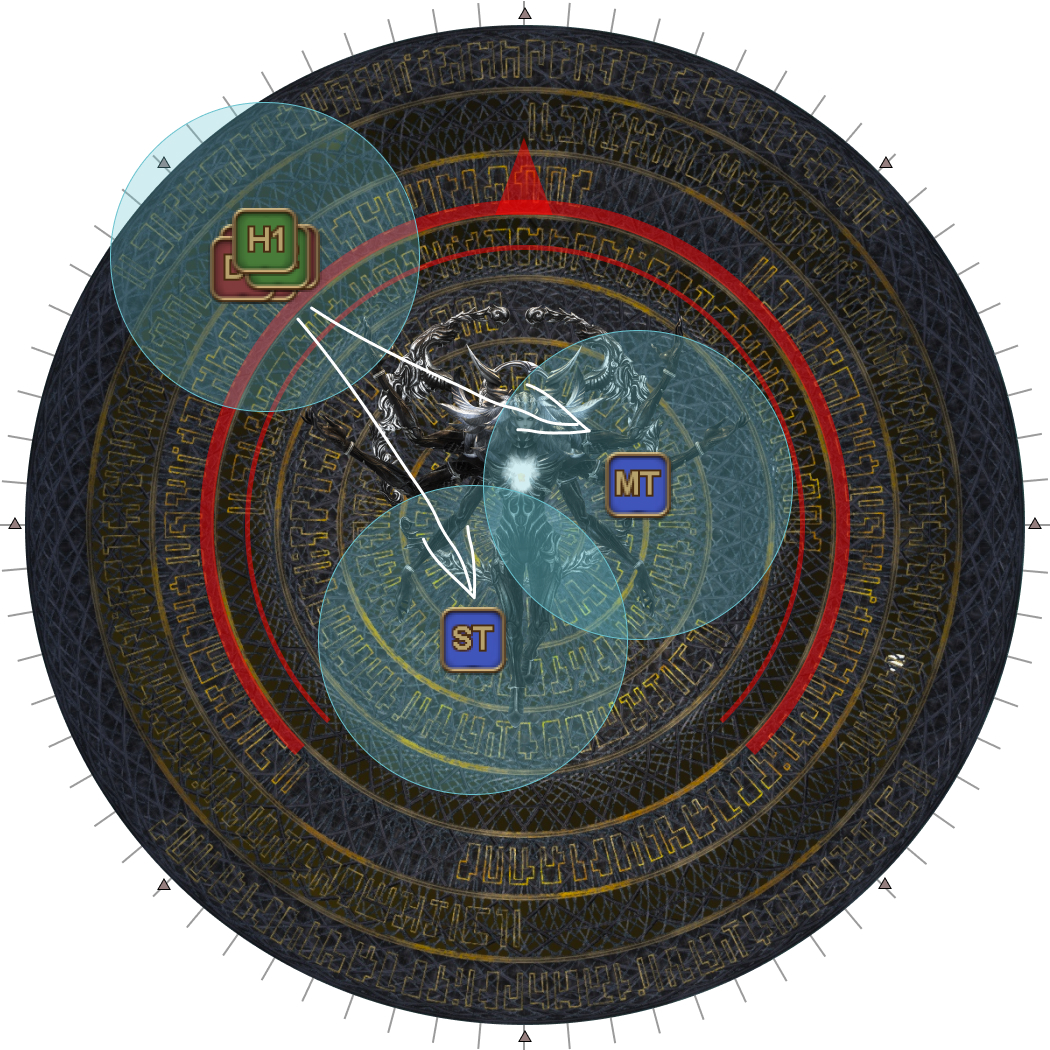
This is probably the simplest of all four combinations- dodge Unlimited Wave Cannon the same way as before, only this time, the party will stay where they are after dodging the sixth baited AoE to share the Cosmo Dive stack.
The tanks will move forward into the boss’s hitbox, with the MT going to the left, and the ST to the right.
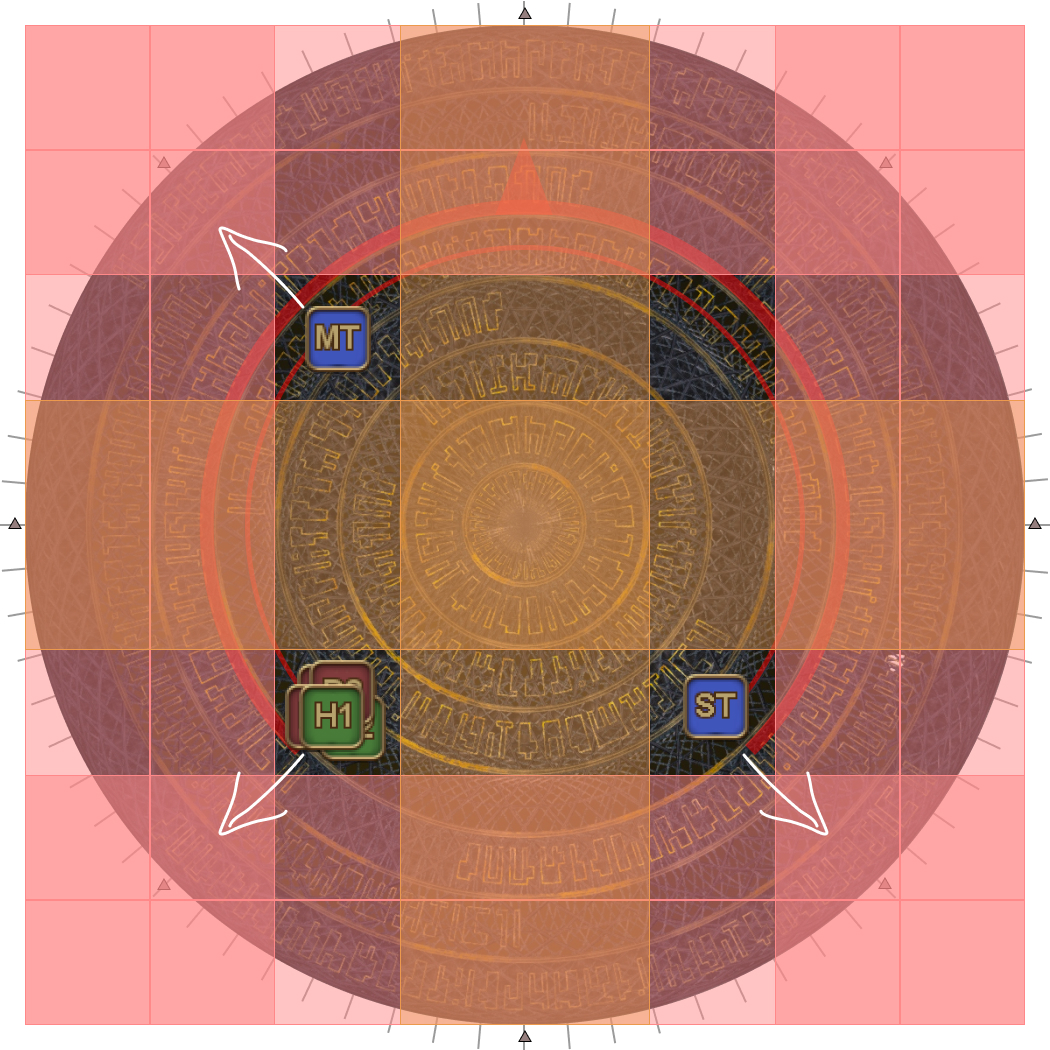
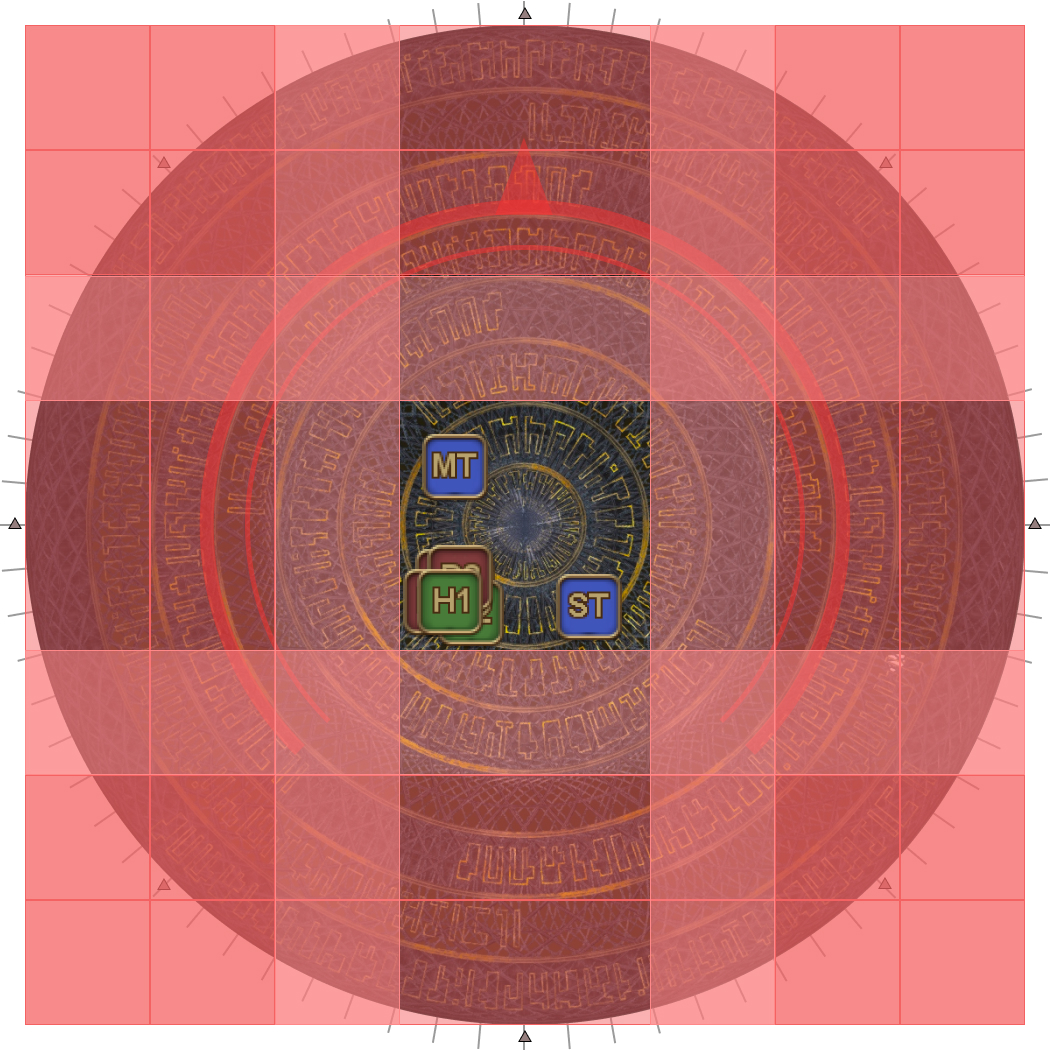
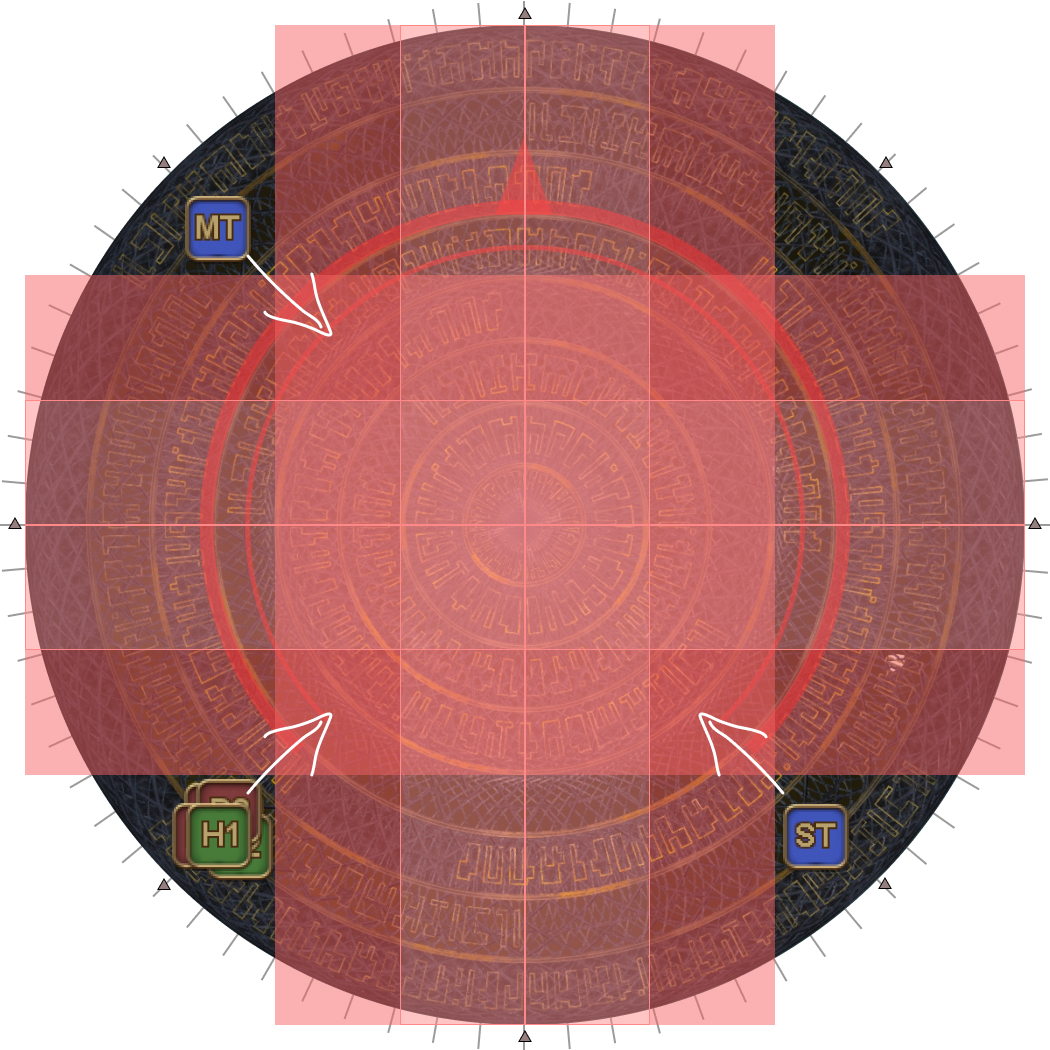
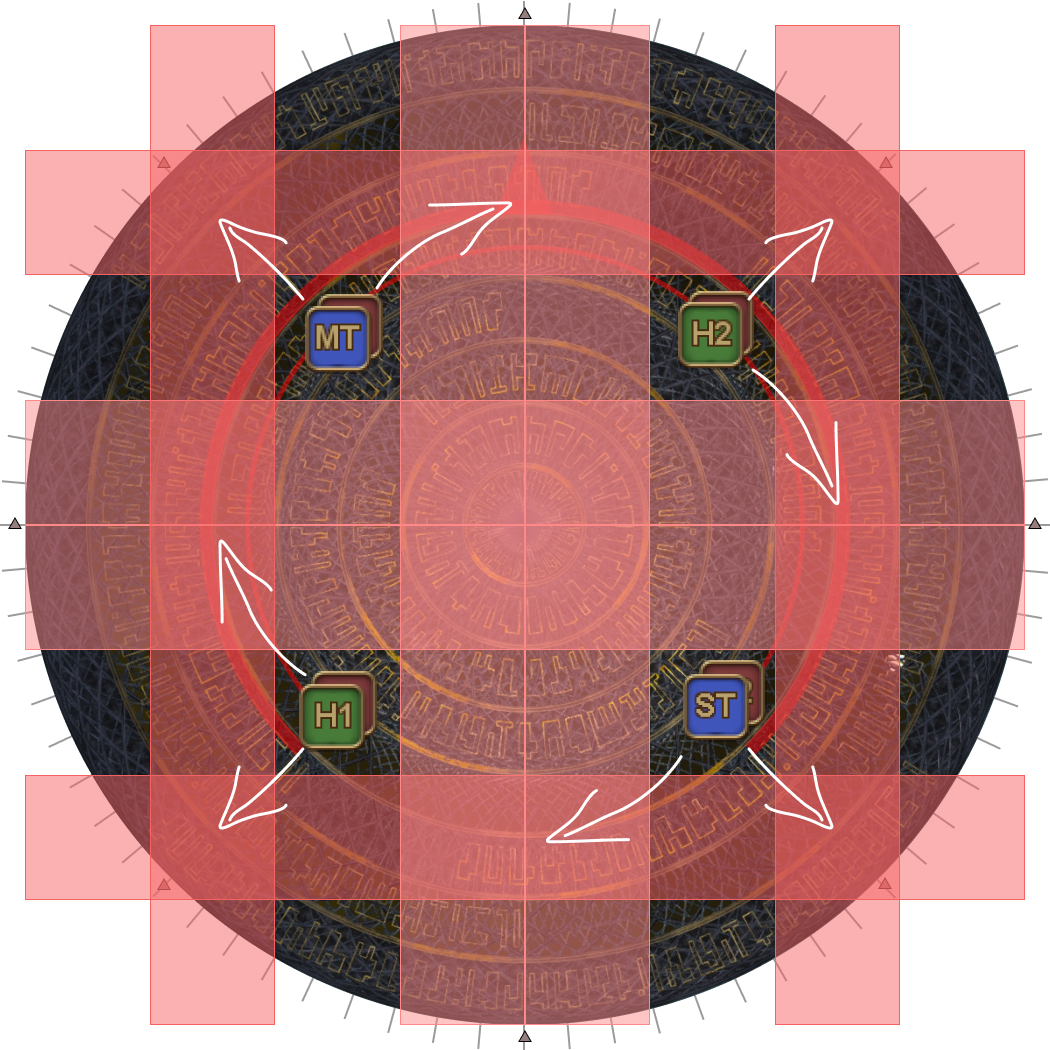
| 1. Just like before, four consecutive Exaflare AoE telegraphs will appear on the outside of the arena. The first Exaflare telegraph will appear just before the castbar finishes. Stack in the middle to bait AoEs, before moving out, 1.5 markers before the first Exaflare telegraph. | 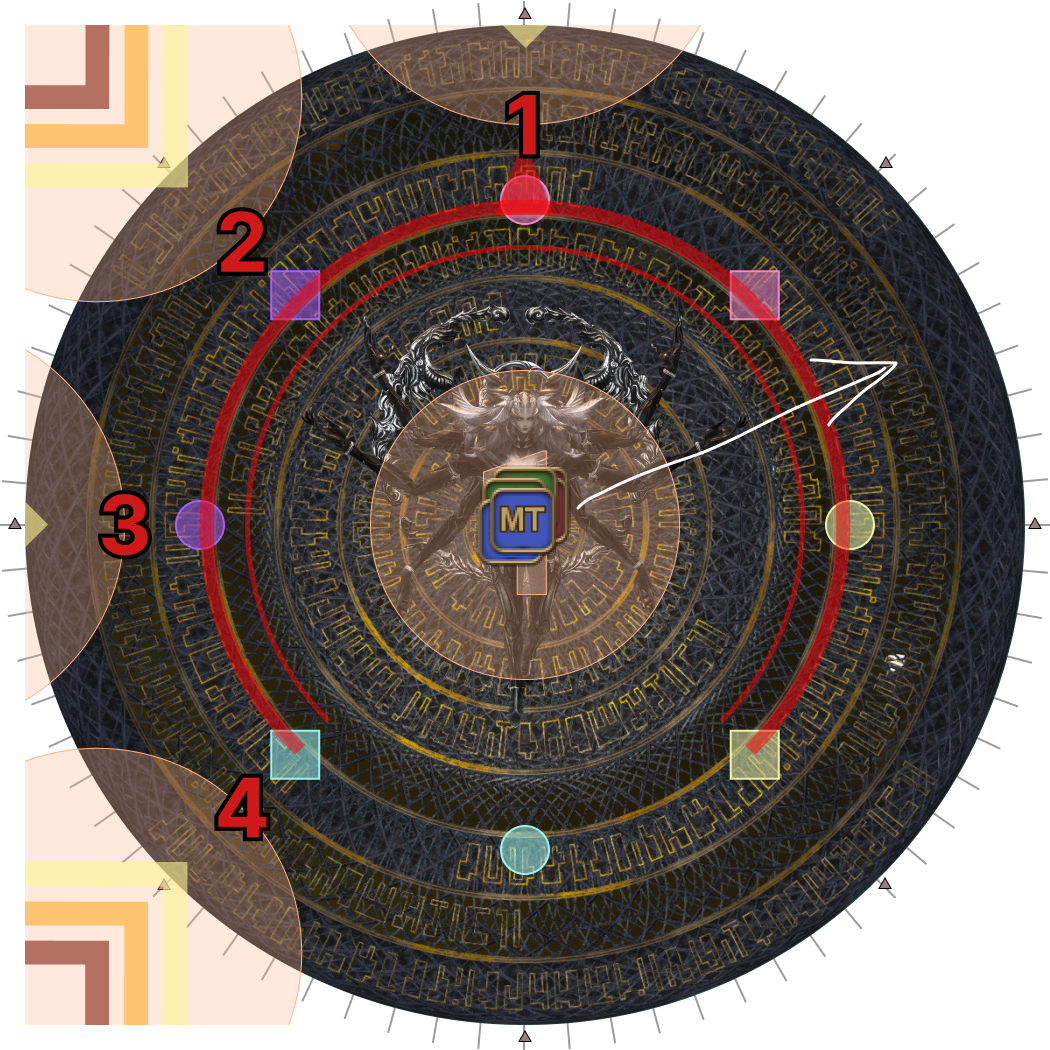 |
| 2. Stagger-step on your way out. By the time the third baited AoE appears, the first Exaflare would have passed and you should be just outside the boss's targeting circle. Turn and continue baiting AoEs in the same direction that the Exaflares spawned. | 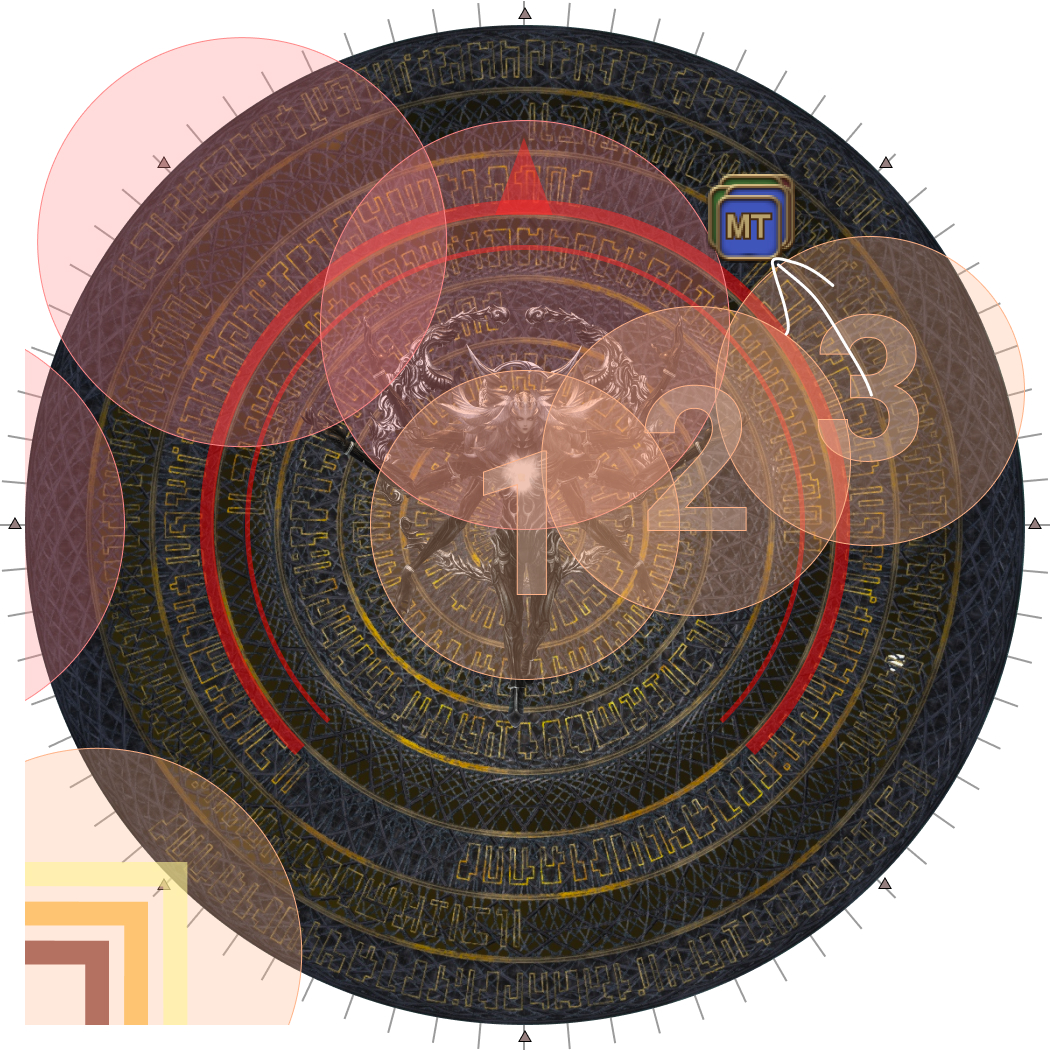 |
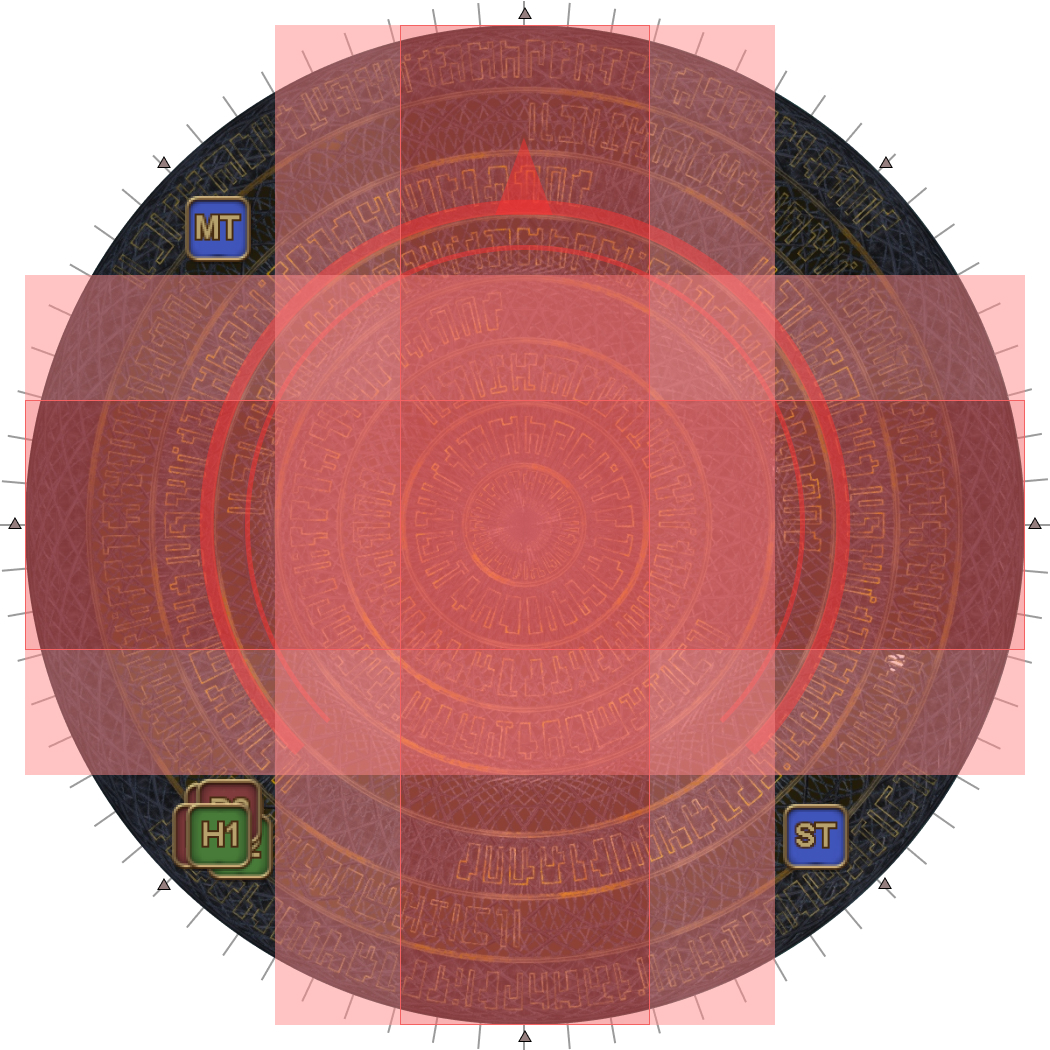
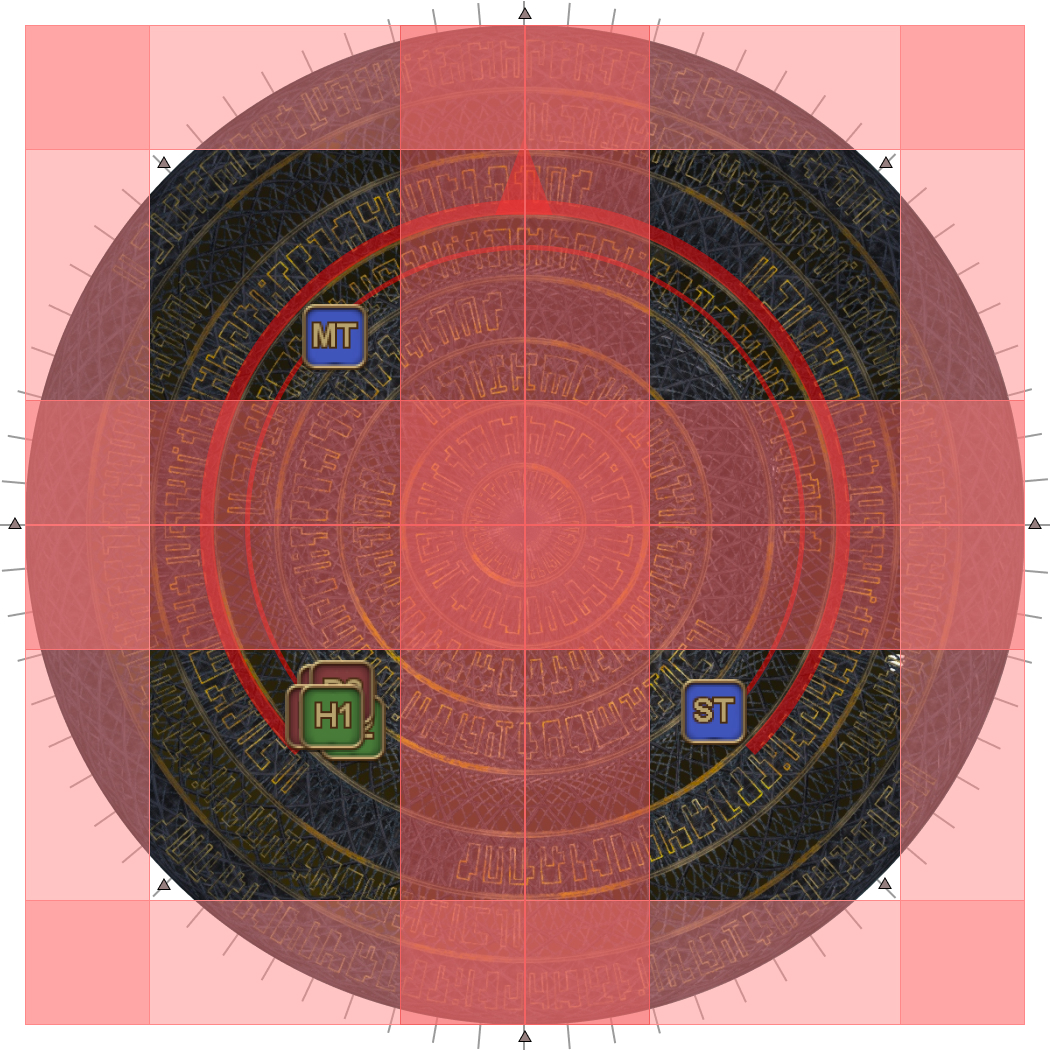
| 3. There will be six baited AoEs in total. |  |
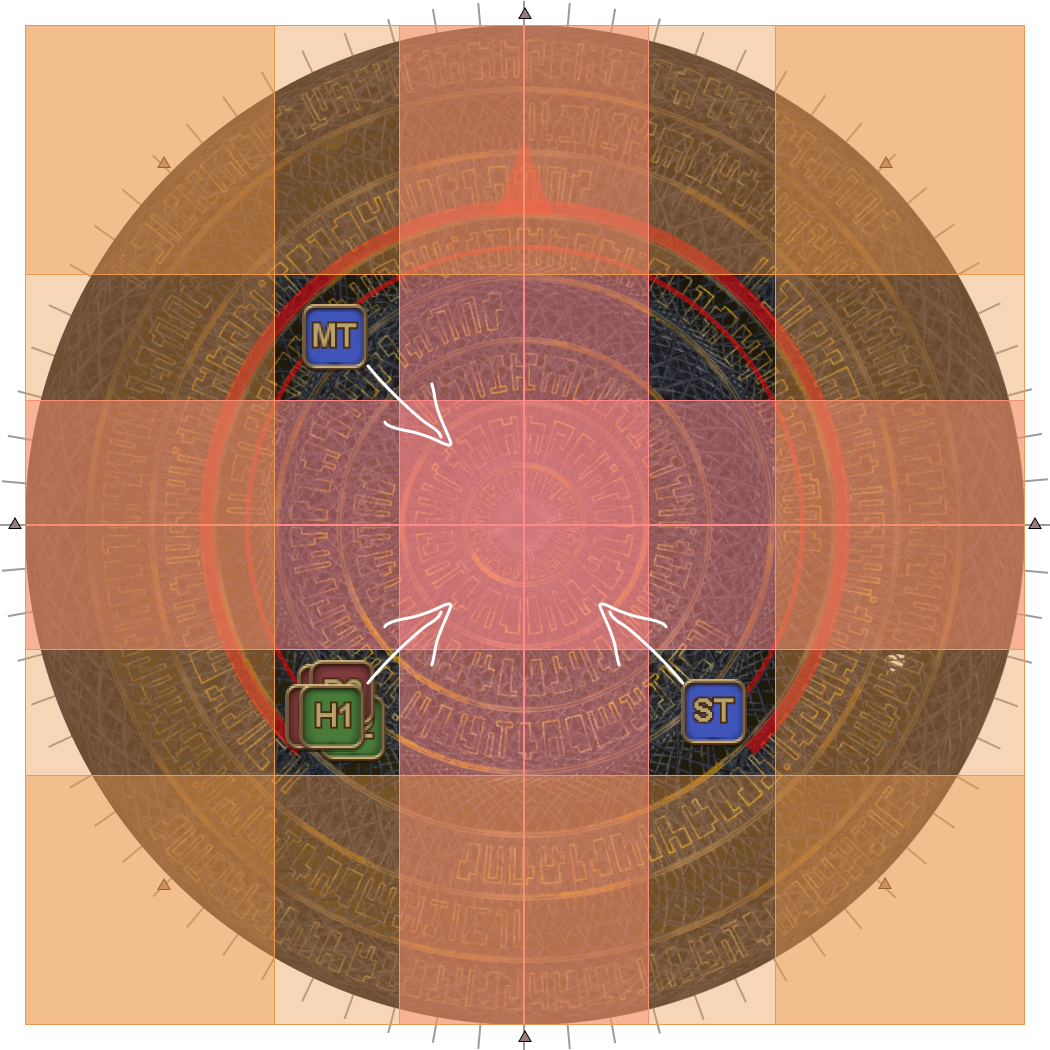
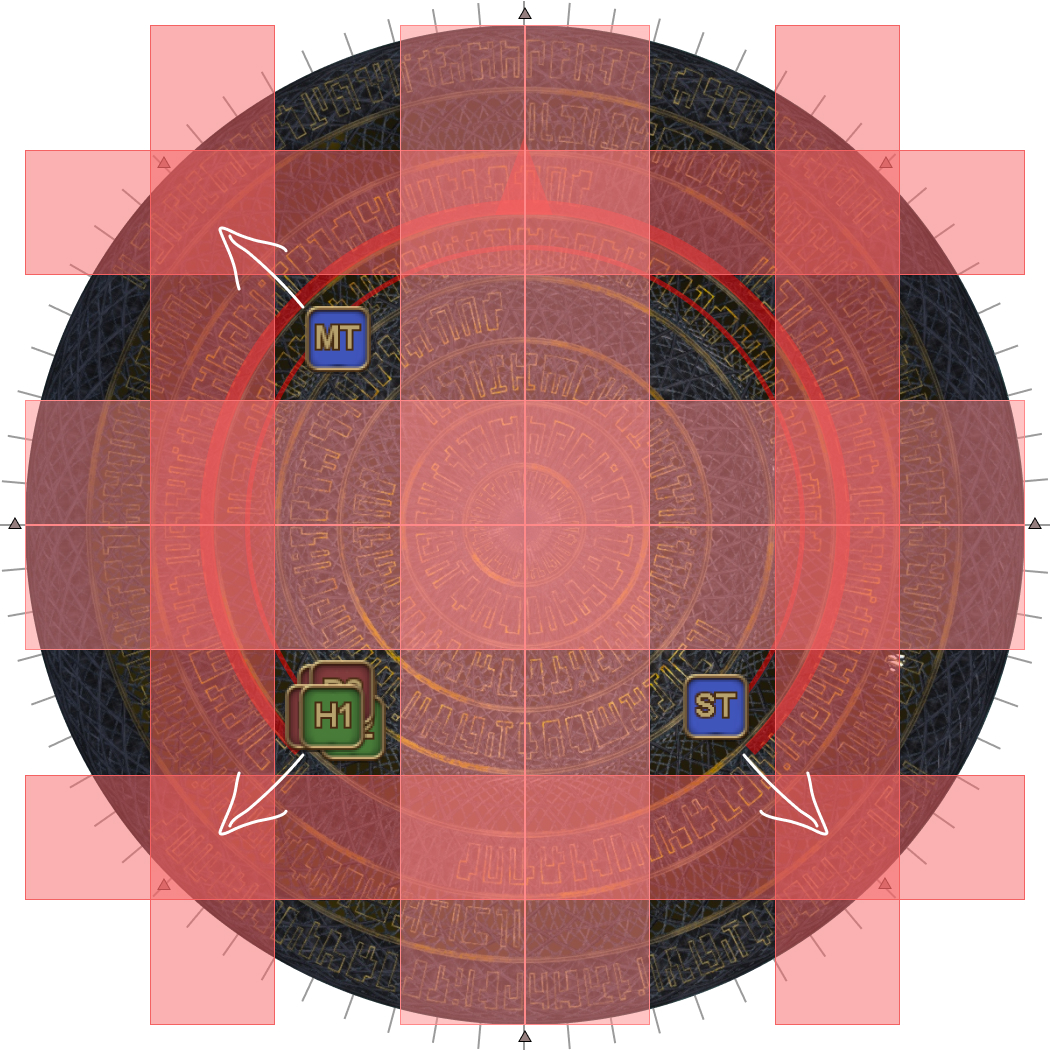
| 4. The party stays where they are outside the boss's targeting circle to share one of Cosmo Dive's AoEs, while the MT and ST move forward to take the other two.
|  |
At this point, the party should have rebuilt LB3 from the start of the phase.
This is where the two melee DPS will take turns LB3’ing the boss before the final major mechanic. The third melee LB3 doesn’t happen until the enrage cast.
As a general rule, the DPS LB order goes something like the following, although this should be confirmed between the two melee either at the start of the encounter, or during the cutscene before P6.
(Who does the final LB3 during the enrage cast will obviously be different if either melee is partnered with a DNC.)
| DRG | MNK | NIN | RPR | SAM | |
| DRG | X | MNK > DRG > DRG | NIN > DRG > NIN | RPR > DRG > DRG | SAM > DRG > DRG |
| MNK | MNK > DRG > DRG | X | MNK > NIN > NIN | MNK > RPR > MNK | SAM > MNK > MNK |
| NIN | NIN > DRG > NIN | MNK > NIN > NIN | X | NIN > RPR > NIN | NIN > SAM > SAM |
| RPR | RPR > DRG > DRG | MNK > RPR > MNK | NIN > RPR > NIN | X | SAM > RPR > SAM |
| SAM | SAM > DRG > DRG | SAM > MNK > MNK | NIN > SAM > SAM | SAM > RPR > SAM | X |
Cosmo Meteor
For this part, one healer will typically return to the middle to top up the party as there are a number of waves of damage going out. This is usually confirmed between the two healers either at the start of the encounter, or during the cutscene before P6, but generally follows the following order:
| Healer Mid priority | AST > SGE/SCH > WHM |
Alpha Omega will autoattack twice before turning to face North and cast Cosmo Meteor.
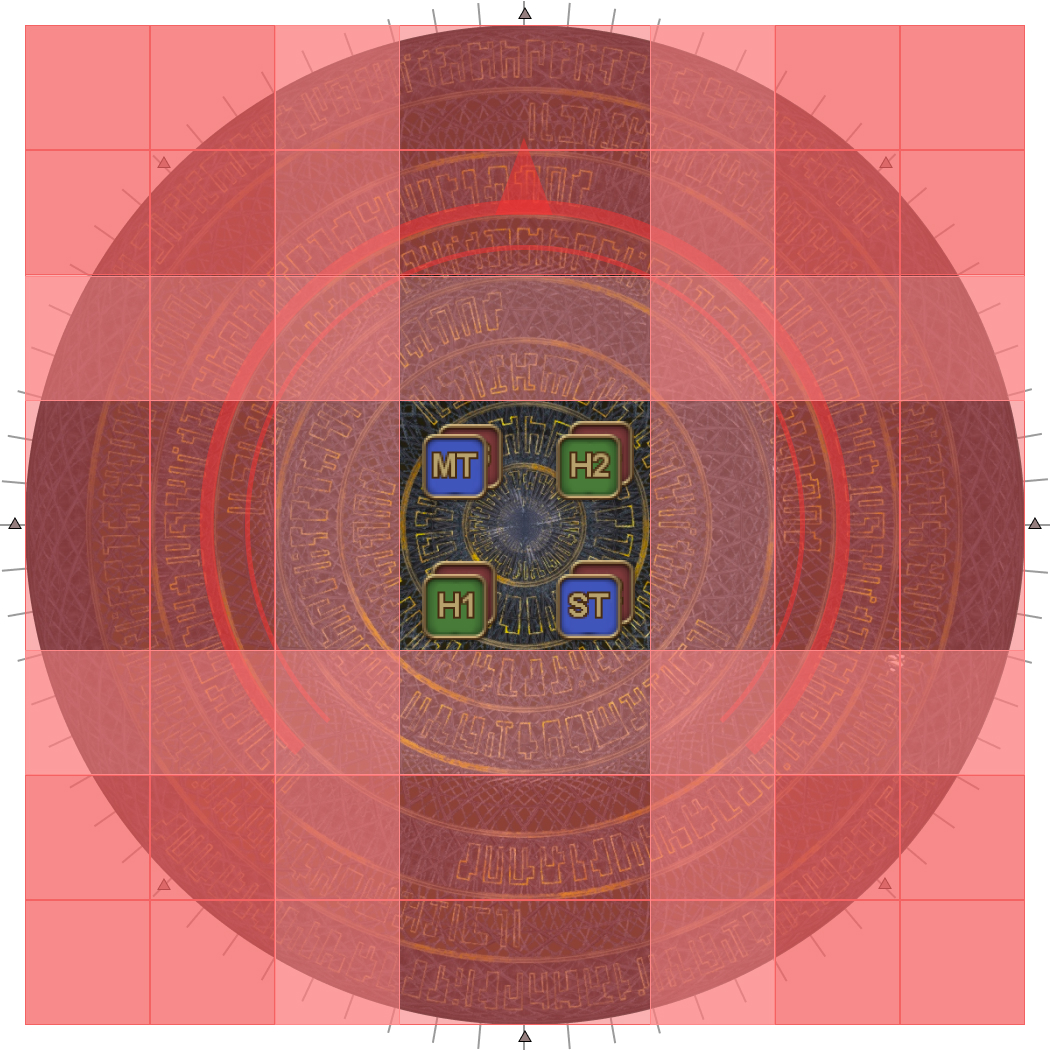
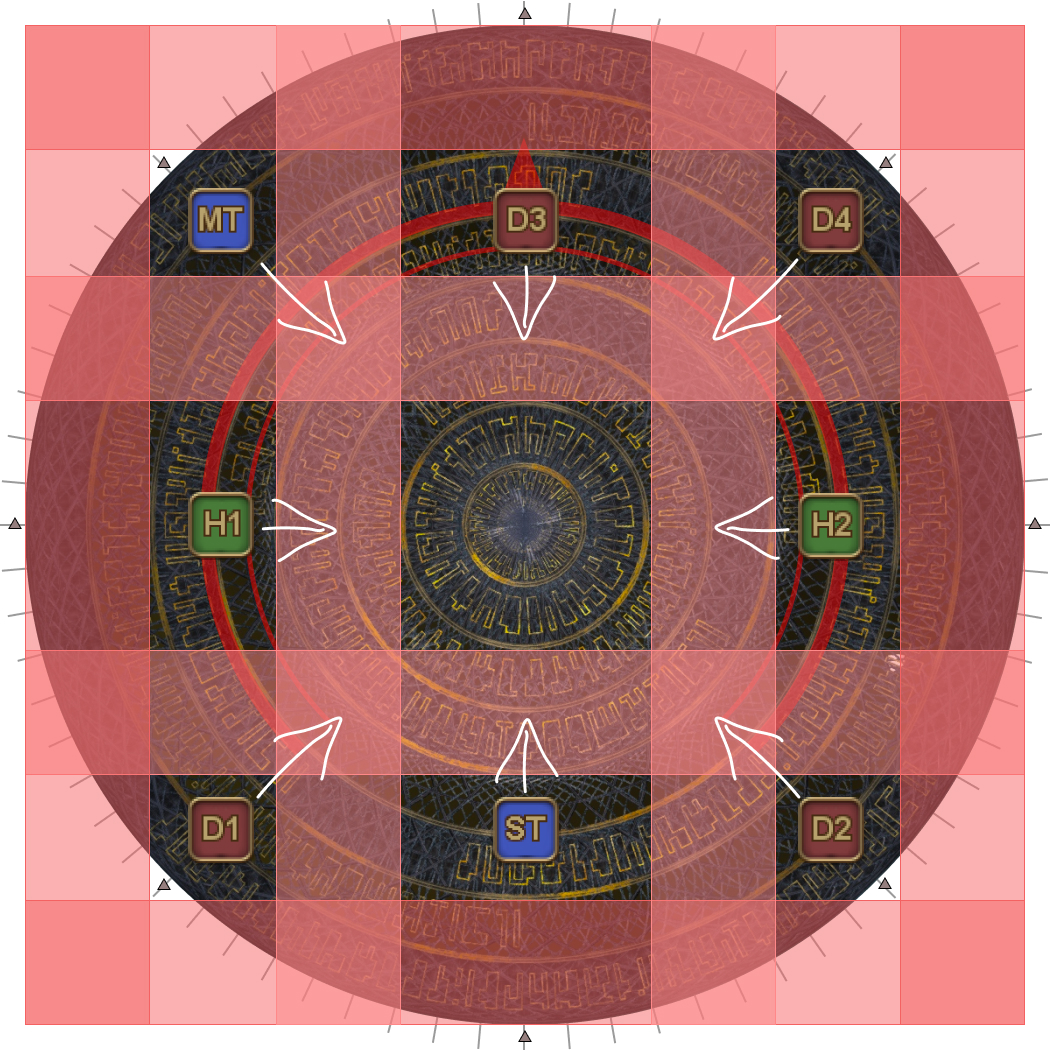
| 1. Stack in the center of the arena to bait AoEs. | 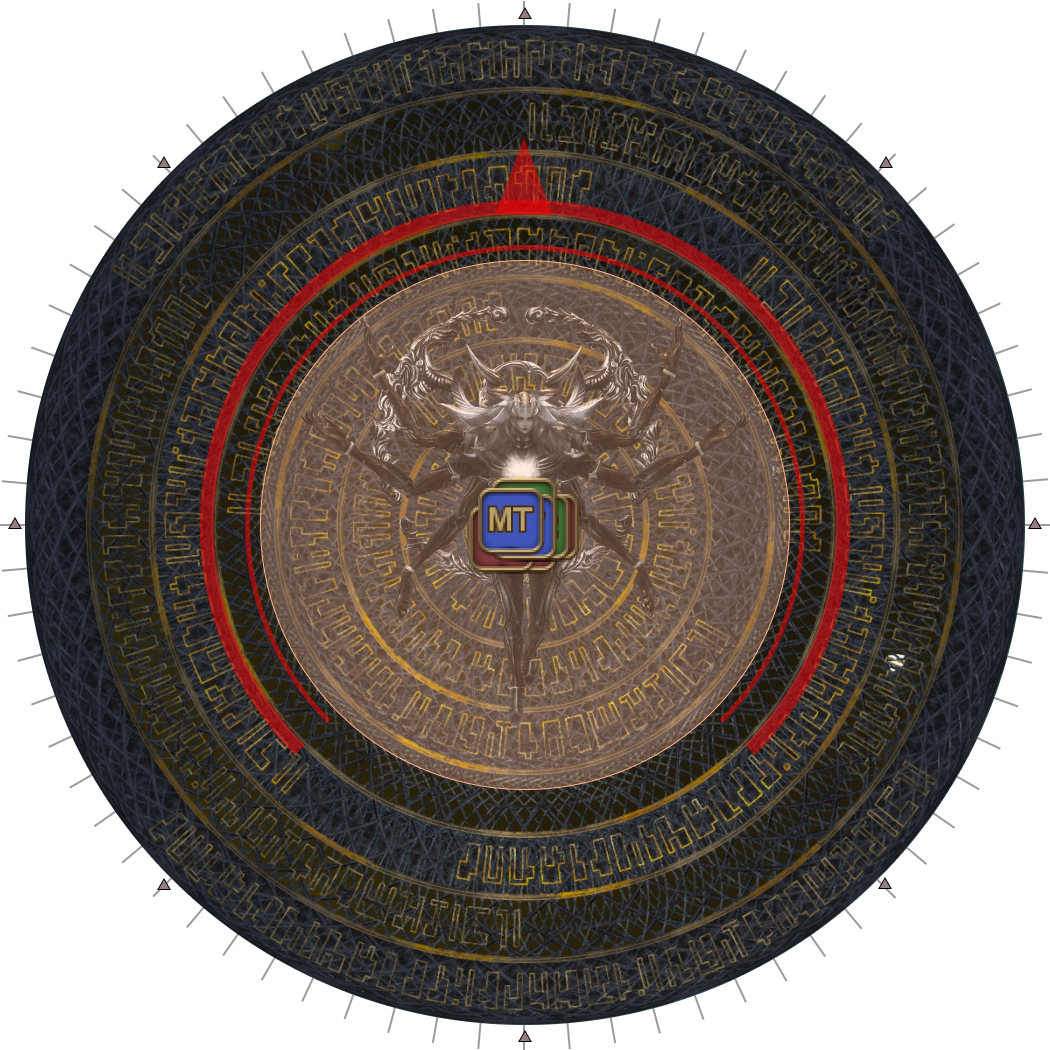 |
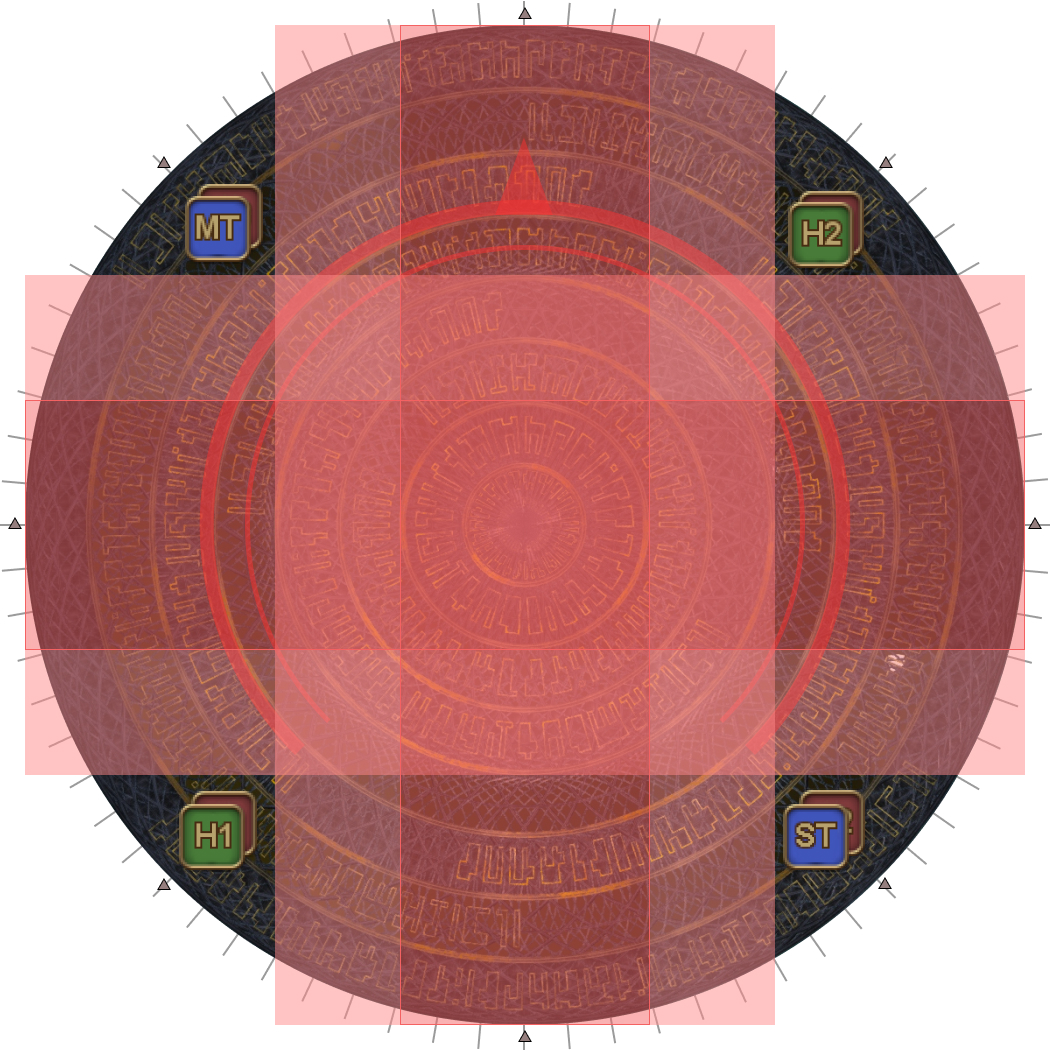
| 2. When the telegraphed AoE appears, spread out to your waymarked positions, and Caster LB3 targeting the center after dodging the telegraphed AoE. | 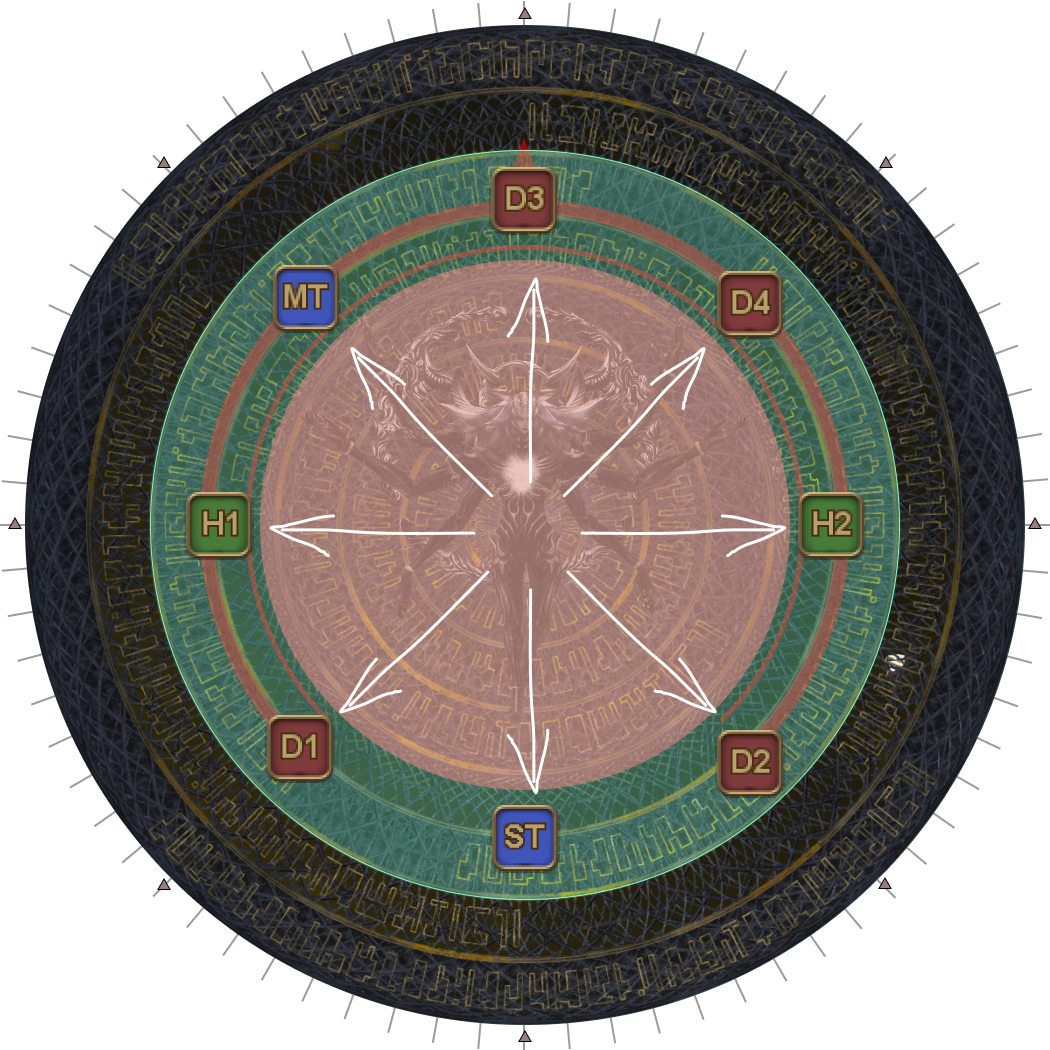 |
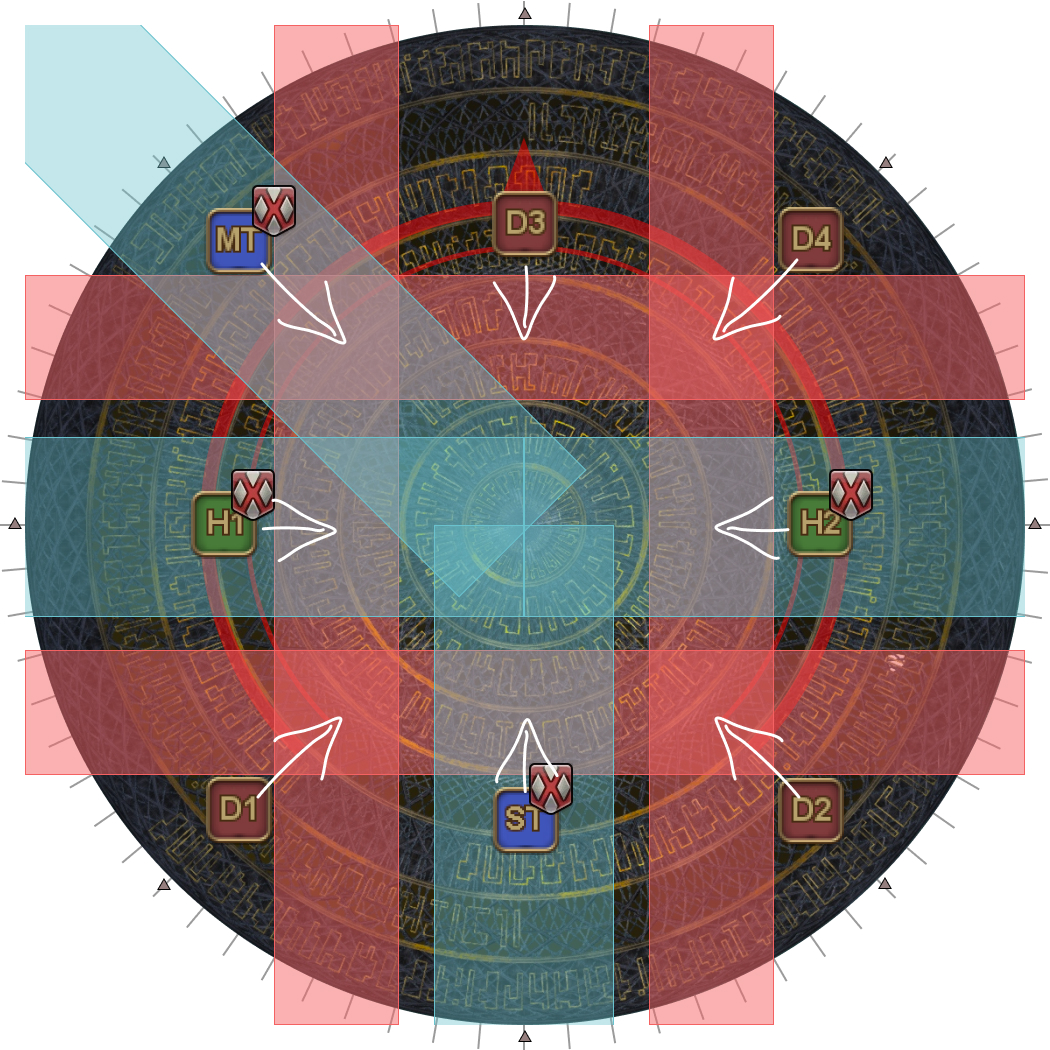
| 3. Two large Cosmo Meteors will spawn North and South, and five small Cosmo Comets will spawn around the edge of the boss's hitbox. The Caster LB3 will destroy all the Cosmo Comets, and damage the Meteors. Do not attack the Comets and Meteors during this period, focusing on Alpha Omega instead. Four random players get an untelegraphed AoE on them. After the AoE in the center resolves, one healer goes to the middle of the arena to top up the party for upcoming damage. | 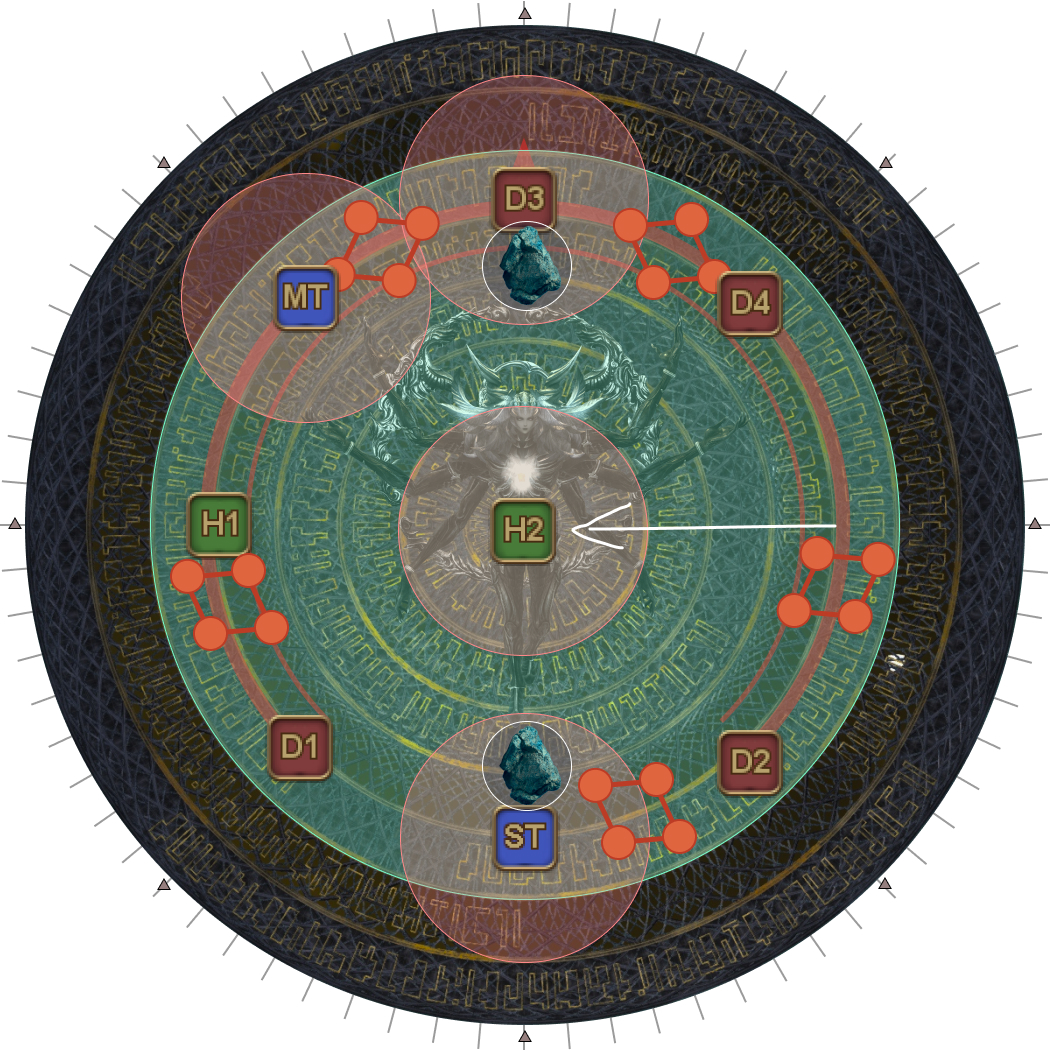 |
| 4. The four players that weren't hit by the untelegraphed AoEs now get hit. | 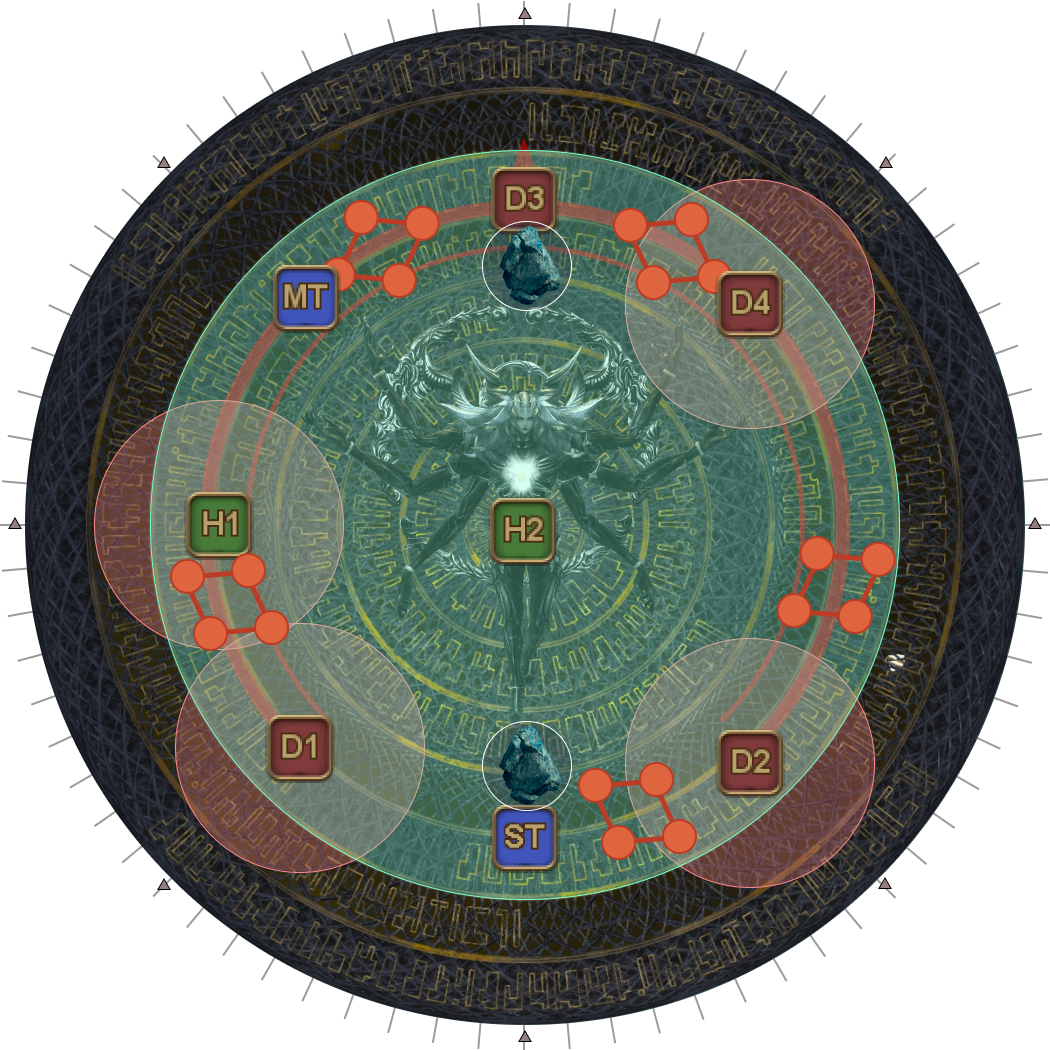 |
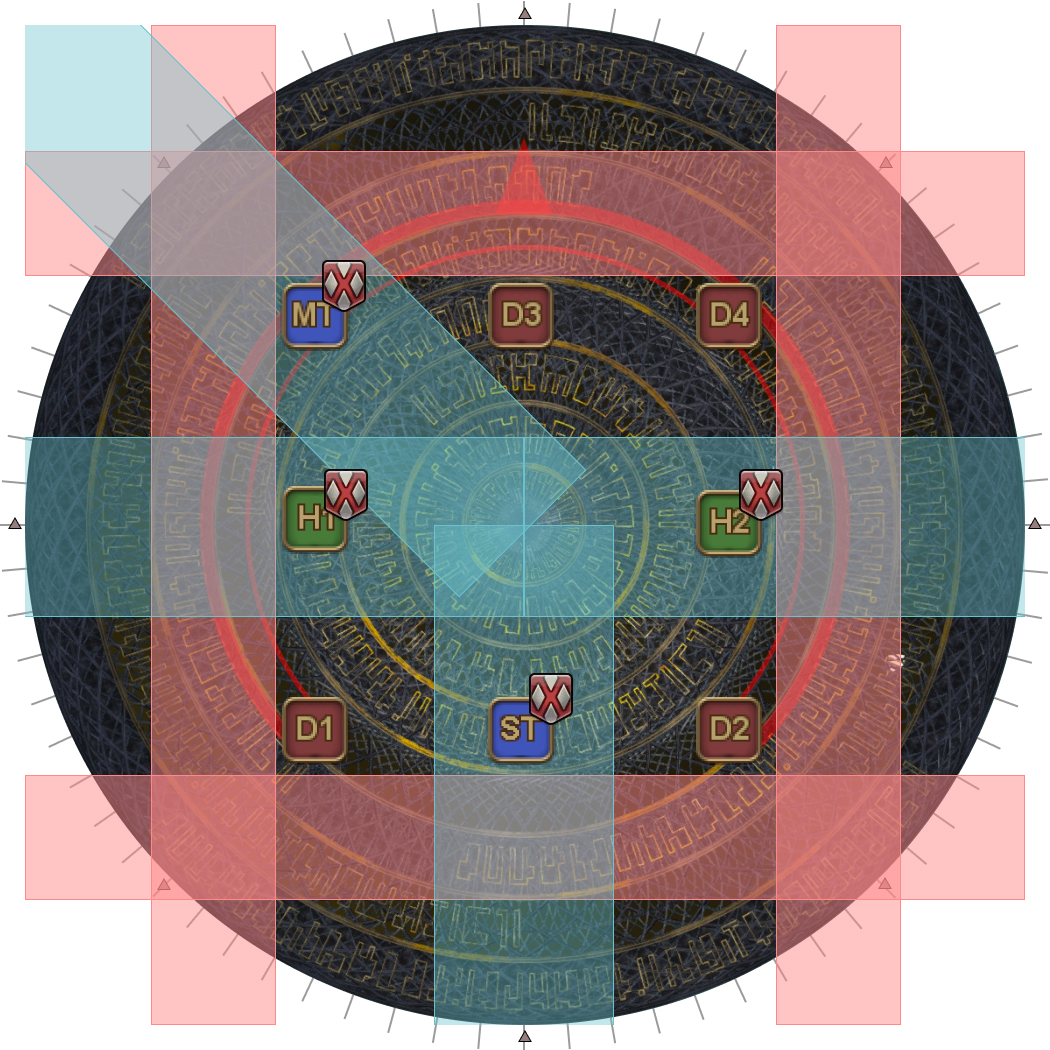
| 5. After the Caster LB3 resolves, the party will take a second set of Cosmo Meteor AoEs, targeting players four at a time. | 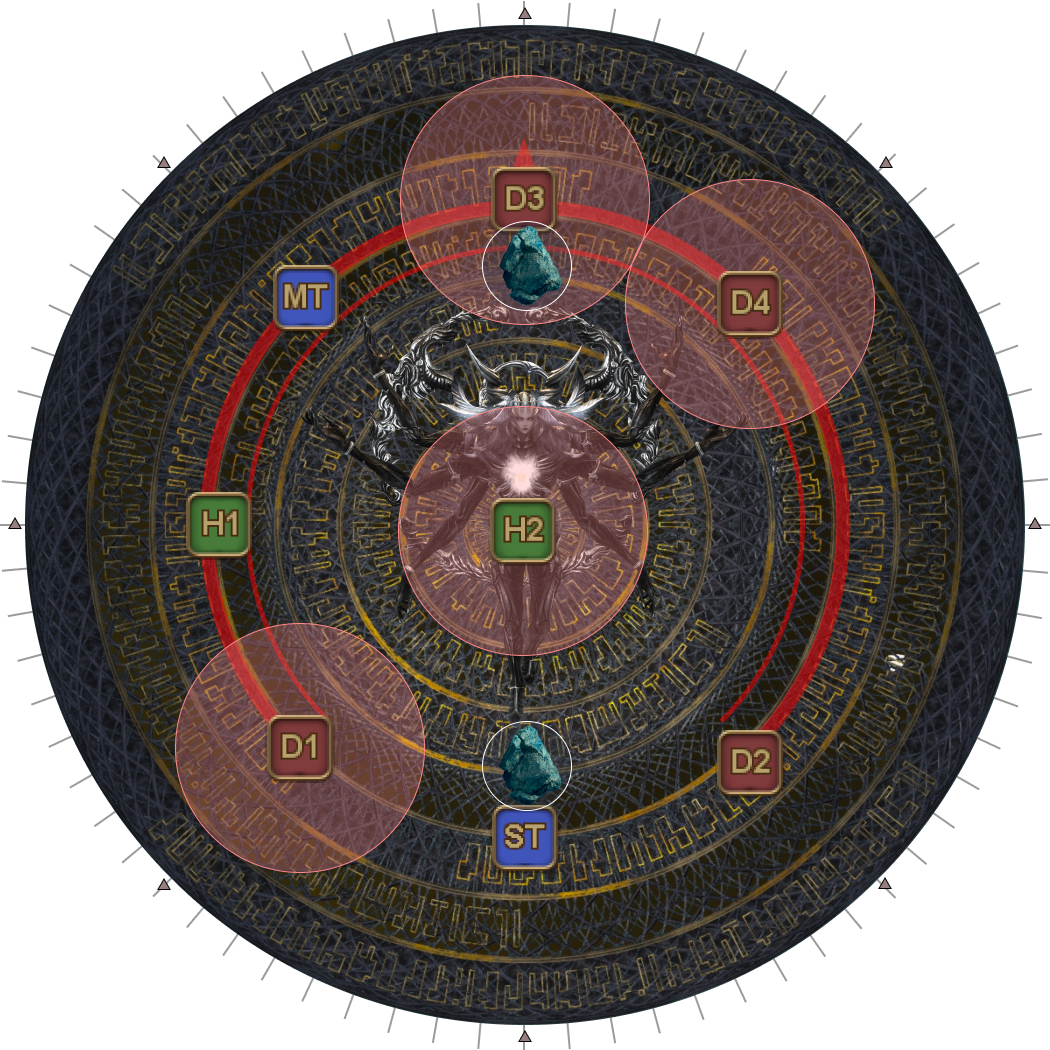 |
| 6. Like the previous set of Cosmo Meteor AoEs, the four players that weren't hit before now get hit. | 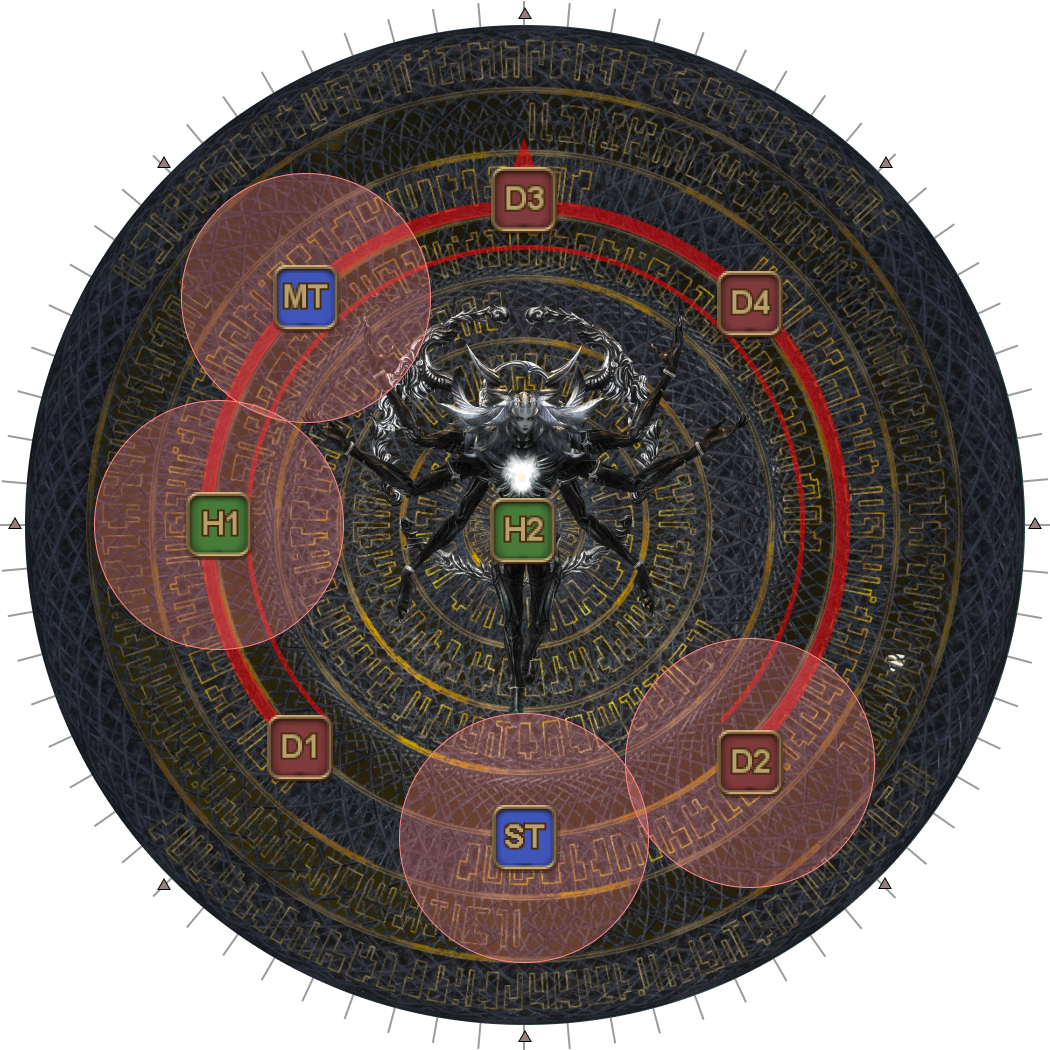 |
| 7. When the Limit Break bar replenishes, use a Ranged LB3 from North (or south) to finish off the two Cosmo Meteors. Around the same time, three Flare markers will appear on three random players. Because D3 is in the middle of their LB3, they will not be able to move, and the party will need to adjust around D3 depending on whether D3 has a Flare marker. | 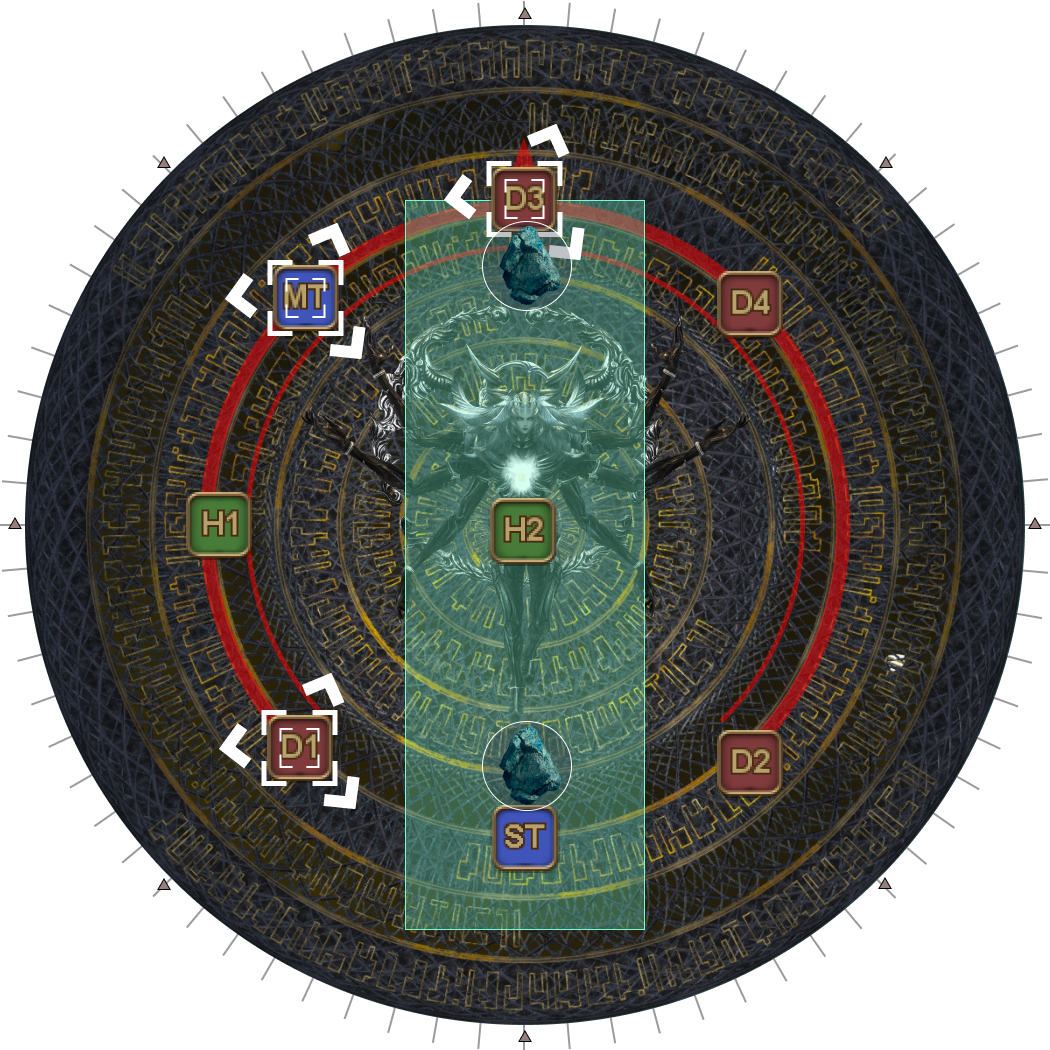 |
| 8. Have the three Flare markers move to cardinal locations. One of the remaining five players will be targeted for an untelegraphed shared damage AoE.
|   |
Magic Number
From here, Alpha Omega will cast Magic Number, which must be mitigated with a Tank LB3. Magic Number will also apply a debuff by the same name on all members of the party, which must be dispelled with a Healer LB3.
 | Affected by a factor that Omega previously considered meaningless. This effect can be dispelled via healer limit break.
|
Alpha Omega will do a second Magic Number (requiring another Tank into Healer LB3) before casting Run: ****mi* (which is a 30-second cast) as the hard enrage of the fight.
The tanks and healers will typically follow a “MT group” > “ST group” priority, although this is affected by whether a DRK is going to do the “suicide strat” (see the FAQ).
| Tanks | DRK > MT > ST |
| Healers | H1 > H2 |
Note that after the second healer LB3, the Limit Gauge will refill, giving one final melee LB3 during the enrage cast.
Buff windows
There are three buff windows in P6, and each player can use a potion once.
However, because players will be taking turns LB3’ing, some players will prefer not to use their potions at certain buff windows.
| 1. Opener | The tank that LB3s should not use potions here. If you did not use potions immediately at the end of Delta, they will not be available here. |
| 2. Immediately after Wave Cannon #2 | If 2-minute buffs are delayed here, the next 2-minute window will be cut short by the enrage. Healers and Casters should not use potions here because of upcoming movement. Melee DPS can use potions here, but be careful as both melees will need to LB3 after dodging Exaflares, and have them finish before Cosmo Meteor starts. |
| 3. Halfway into the enrage cast | The melee that will LB3 after the Healer LB3s should not use potions here. Potions should be used immediately after the second Healer LB3 (when Run: ****mi* starts) to get the full use before the enrage resolves. 2-minute buffs will come up halfway into the pot duration and may be clipped by the enrage depending on their duration, and how much they were delayed after Wave Cannon #2. |
Frequently Asked Questions
[Death Wall] Will the Death Wall kill you if you use an ability while still in it (similar to resurrection invulnerability)?
| No, it won't. The death wall activates after five seconds, and isn't based on player activity. |
[Cosmo Memory] Why is the tank LB3 priority WAR > PLD > DRK > GNB?
| Which tank should LB3 is determined by who loses the least from doing so. Because a WAR's and a DRK's burst is based on stacks with a very lenient timer (Inner Release and Delirium), it is very flexible. WAR and DRK get to use their 1m cooldowns on time with the rest of the party and still get the full benefit of their cooldowns, losing only a couple of filler GCDs. In contrast, PLD and GNB have their bursts on a timer (Fight or Flight and No Mercy), and their rotation revolves around getting as many attacks in that buff window as they can. As a result, a PLD or GNB either has to desynchronise with the party raid buffs, or give up GCDs in their own window, neither of which are attractive choices. |
[Wave Cannon] Does it matter which tank is in front?
| No, the player in front does not take extra damage compared to the second player. (Of course, if a PLD is using Passage of Arms, they should be in front.) |
[Wave Cannon] Why does the ST invuln first and not the MT?
| This is to accommodate for PLD + GNB tank compositions. If you happen to have a GNB (MT) + PLD (ST) for tanks, PLD must Hallowed Ground the first Solar Ray (before Delta) for them to get a Hallowed Ground use in P6. This then means the GNB would have to Superbolide the second Solar Ray (before Sigma), and if so, Superbolide won't be up in time for Wave Cannon #1. Note that this will break if you have a PLD MT and a GNB ST. |
[Wave Cannon] Why are the invulns fixed to the roles, and not the jobs? Aren't the invulns in P5 determined by the jobs?
| The invulns in P5 are fixed to the jobs because PLD must Hallowed Ground the first Solar Ray to even have a use in P6. However, the problem with fixing the invulns to jobs is when the standard MT/ST priority is not followed, for example, a PLD MT and WAR ST. In that scenario, if you fix the invulns to the jobs, but the mitigations to the roles, you open yourself to a wipe where the WAR has to Vengeance and Bloodwhetting, but also Shake It Off, which will dispel the WAR's buffs if used in the wrong order. You can get around this by then pinning the party mitigation to the jobs instead of the roles as well, but that becomes more trouble than it's worth. Given that it would be more common to have a WAR in the party (and thus a WAR ST) compared to specifically PLD MT + GNB ST, this is an acceptable tradeoff, with just a note to callout PLD MT + GNB ST as an exception. |
[Wave Cannon #2] I see some WAR MTs use Shake It Off to mitigate Wave Cannon #2's spread instead of the stack. Similarly, some SCHs use Expedient at Cosmo Dive #1 and Cosmo Meteor instead of mitigating Wave Cannon #2's stack. Is there a problem?
| Some WARs will Shake It Off immediately after Wave Cannon #1's stack, which lasts long enough to mitigate Wave Cannon #2's spread. This lets them get an additional use of Shake It Off at Cosmo Meteor's Flares. In a similar vein, some SCHs prefer to use Expedient like H1's 120s, mitigating Cosmo Dive #1 and Cosmo Meteor. Instead of Expedient, SCHs will use Fey Illumination to mitigate Wave Cannon #2's stack. Strictly speaking, there's nothing wrong with any of this provided the party survives Wave Cannon #2's stack. However, problems may arise when:
Unfortunately, WAR is very popular in TOP because of how Holmgang simplifies the Solar Ray tankbusters in P5, and SCH is very strong at mitigating P6, so this particular combination (and thus scenario) is not uncommon. This is the reason why a Feint has been added to Wave Cannon #2's mitigation as insurance against this happening. The SCH may also need to add Dissipation to the mix to ensure the party survives a high-roll. On the plus side, the WAR using Shake It Off at Cosmo Meteor's Flares mean that Feint will not be needed there. |
[Cosmo Meteor] Why is the healer priorty AST > SGE/SCH > WHM for who goes middle?
| At the end of the day, we want the party to be topped up between waves of Meteors, with shields. Note that H1 is also using their 120s mitigation there (Temperance/Neutral Sect). An AST with Neutral Sect not only has the strongest healing, but also the strongest shields. Putting the AST in the center assures all party members can get Macrocosmos, which is a great way to top up the party after Cosmo Meteor. Both SGE and SCH are largely interchangeable since they both can apply shields. That being said, SGE would have the better pure-healing ability because of Pneuma. WHM is last because they cannot apply shields. Furthermore, Temperance covers the entire arena, and WHM can place and trigger Liturgy of the Bell in the center to top up and mitigate damage for the party without needing to be in the center themselves. |
[Cosmo Meteor] What if the ST is a WAR or PLD? Wouldn't Shake It Off/Divine Veil only block one round of Meteors?
| Yes, it would, and Dark Missionary or Heart of Light would mitigate both Meteor waves. However, one problem with Cosmo Meteor is that it comes up a bit under 30 seconds after Cosmo Dive, so depending on when the H2 used Sacred Soil/Kerachole, the H2 30s mitigation may not be available to catch the first wave of four Meteor hits- this is where the ST 90s mitigations come in to make up for this first wave of Meteors while the H2 30s come back off cooldown, even if it's just a shield from Divine Veil or Shake It Off. |
[Magic Number] What is the DRK suicide strat?
| The DRK suicide strat involves the DRK cancelling the Tank LB3s at Magic Number. This results in the DRK dying, but quickly getting revived by the follow-up Healer LB3, with full MP, resulting in a slight DPS gain, assuming the DRK was able to empty out their MP bar before. The DRK can do this for both Magic Numbers (and generate enough Blood for Living Shadow in time for the last 2-minute window). Note that in order for this to work, the DRK must LB3 first, as dying will remove the Brilliant Dynamis buff that refills the LB gauge. You can use a macro to help instead of manually cancelling the Tank LB: /merror off /statusoff "Dark Force" /statusoff "Gunmetal Soul" /statusoff "Land Waker" /statusoff "Last Bastion" |
Troubleshooting
[Limit Break] We only have LB2 at the end of Cosmo Dive 2- what happened?
| Check how many debuffs (Addle, Dismantle, Feint, Reprisal) were applied to the boss while the party is spread out for the first part of Wave Cannon. There should not be any debuffs on the boss while the party is spread out, or just one debuff at most. The reason behind this is due to how LB is generated.- LB is generated whenever someone survives damage that is equal to or greater than their current HP due to mitigation or shields. However, there is some fine print- the order of operations are:
The problem is that if enough debuffs are on the boss at Step 1, the damage at Step 2 is no longer lethal, and thus, LB is not generated. In Wave Cannon's case, the base damage of the initial beams (83k-93k for melee, 77k-86k for casters) is lethal, but not by much compared to the party's max HP (77k for melee, 68k for casters), and is thus particularly susceptible to being overmitigated this way. A single Reprisal takes this down to 74.7k vs. 69.3k damage, which already borders on not being lethal. Adding a Dismantle on top of that lowers the damage down to 67.2k vs. 62.3k, well within a player's max HP. This is no longer lethal damage, and no LB is generated as a result. Take note:
|
[Unlimited Wave Cannon] I can't identify the starting point, and which direction to go!
| The first telegraph appears near the end of the cast, when the cast bar reaches the "nn" at the end of "Unlimited Wave Cannon". If you don't see a telegraph, rotate your camera until you see one, and pay attention to the empty spot adjacent. Then, one of two things may happen:
Alternatively, you can wait to after the boss's second auto-attack to briefly go out towards the edge of the arena to get better view of the whole arena before joining the party in the middle. |
[Wave Cannon 2] D1 is out of range and misses H2's mitigation, especially when Cosmo Arrow is the "out first" pattern!
| The H2 120s mitigations have a range of 30 yalms- if Cosmo Arrow is the "out-first" pattern, the other side of the arena (H1 and D1) will be out of range of H2's mitigations. However, since the boss's targeting circle is 24 yalms in diameter, if H2 uses their 120s mitigations when the party dodges in (putting everyone inside the targeting circle), H2's mitigations will catch everybody. This is also 14 seconds before the Wave Cannon stack resolves, so both H2 30s and H2 120s can be used here. | 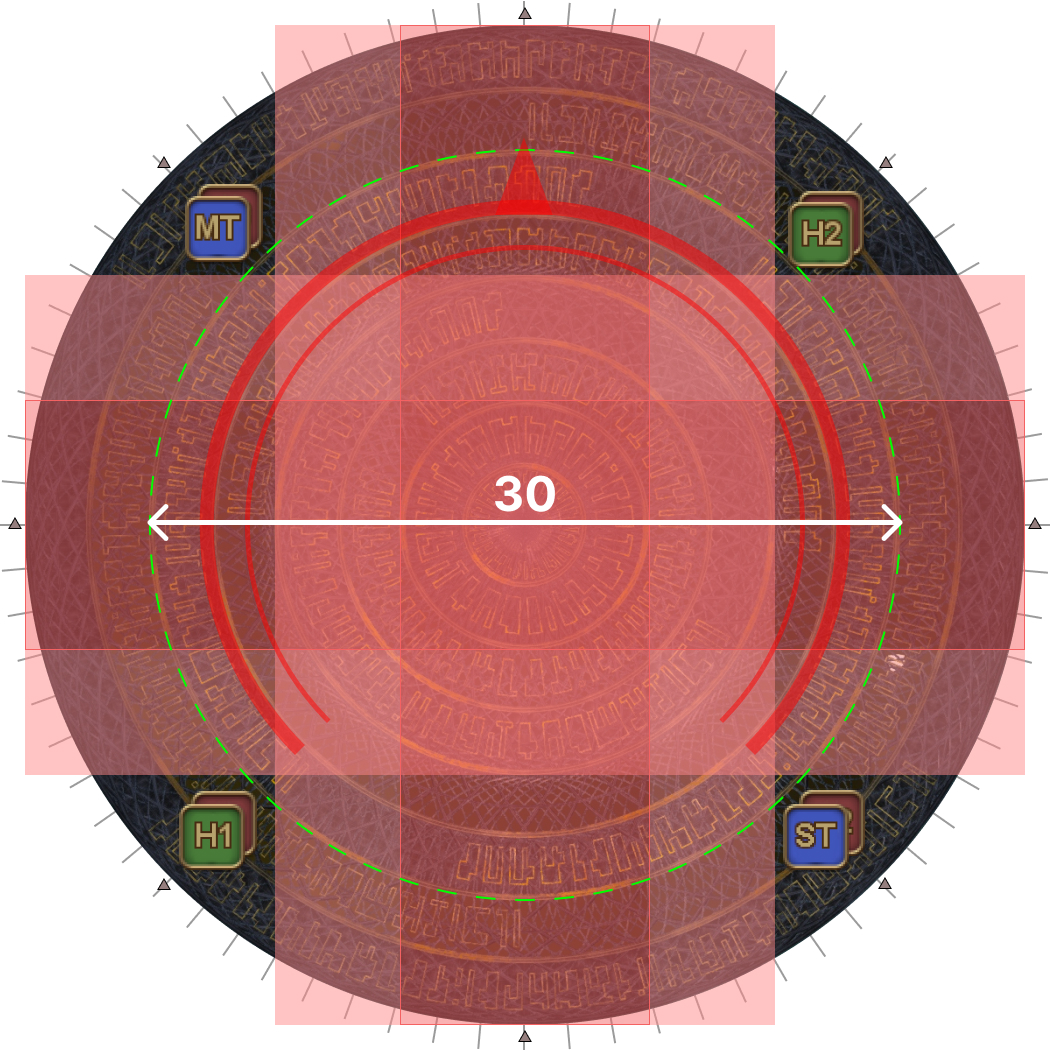 |