Dragonsong’s Reprise (Ultimate)
Elemental’s DSR PF strat can be broken down as follows:
- The Holy See: HMRT
- King Thordan: DRK-relative, role adjust
- Nidhogg: Easthogg
- Eyes: T/H red, DPS blue
- Alternate Timeline Thordan: 2-2 Dooms North, Anchored Dooms
- Double Dragons: △ WB1, DTTMR Mortal Vow, 5-1 WB2
- Dragonking Thordan: All 3-3-2
BiS Notes
- Dragonsong’s Reprise is the current Ultimate, and is not outgeared yet.
- BiS will be a mix of i600 gear, and i605 gear from Lapis Manalis.
Looking towards the future:
- Dragonsong’s Reprise will not be outgeared until i730 gear is available.
- Relic weapons (when they arrive) will have their substats capped at 269.
 (Full-size image: English, 日本語)
PoVs
Here are some clear PoVs that I’ve been collecting.
- MT PoV (WAR)
- ST PoV (PLD)
- H1 PoV (WHM)
- H2 PoV (SCH)
- D1 PoV (SAM)
- D2 PoV (NIN)
- D3 PoV (DNC)
- D4 PoV (BLM)
Things to note
- Using automarkers to mark Thunder players in Wroth of the Heavens, and especially Wroth Flames is considered the norm (use at your own risk).
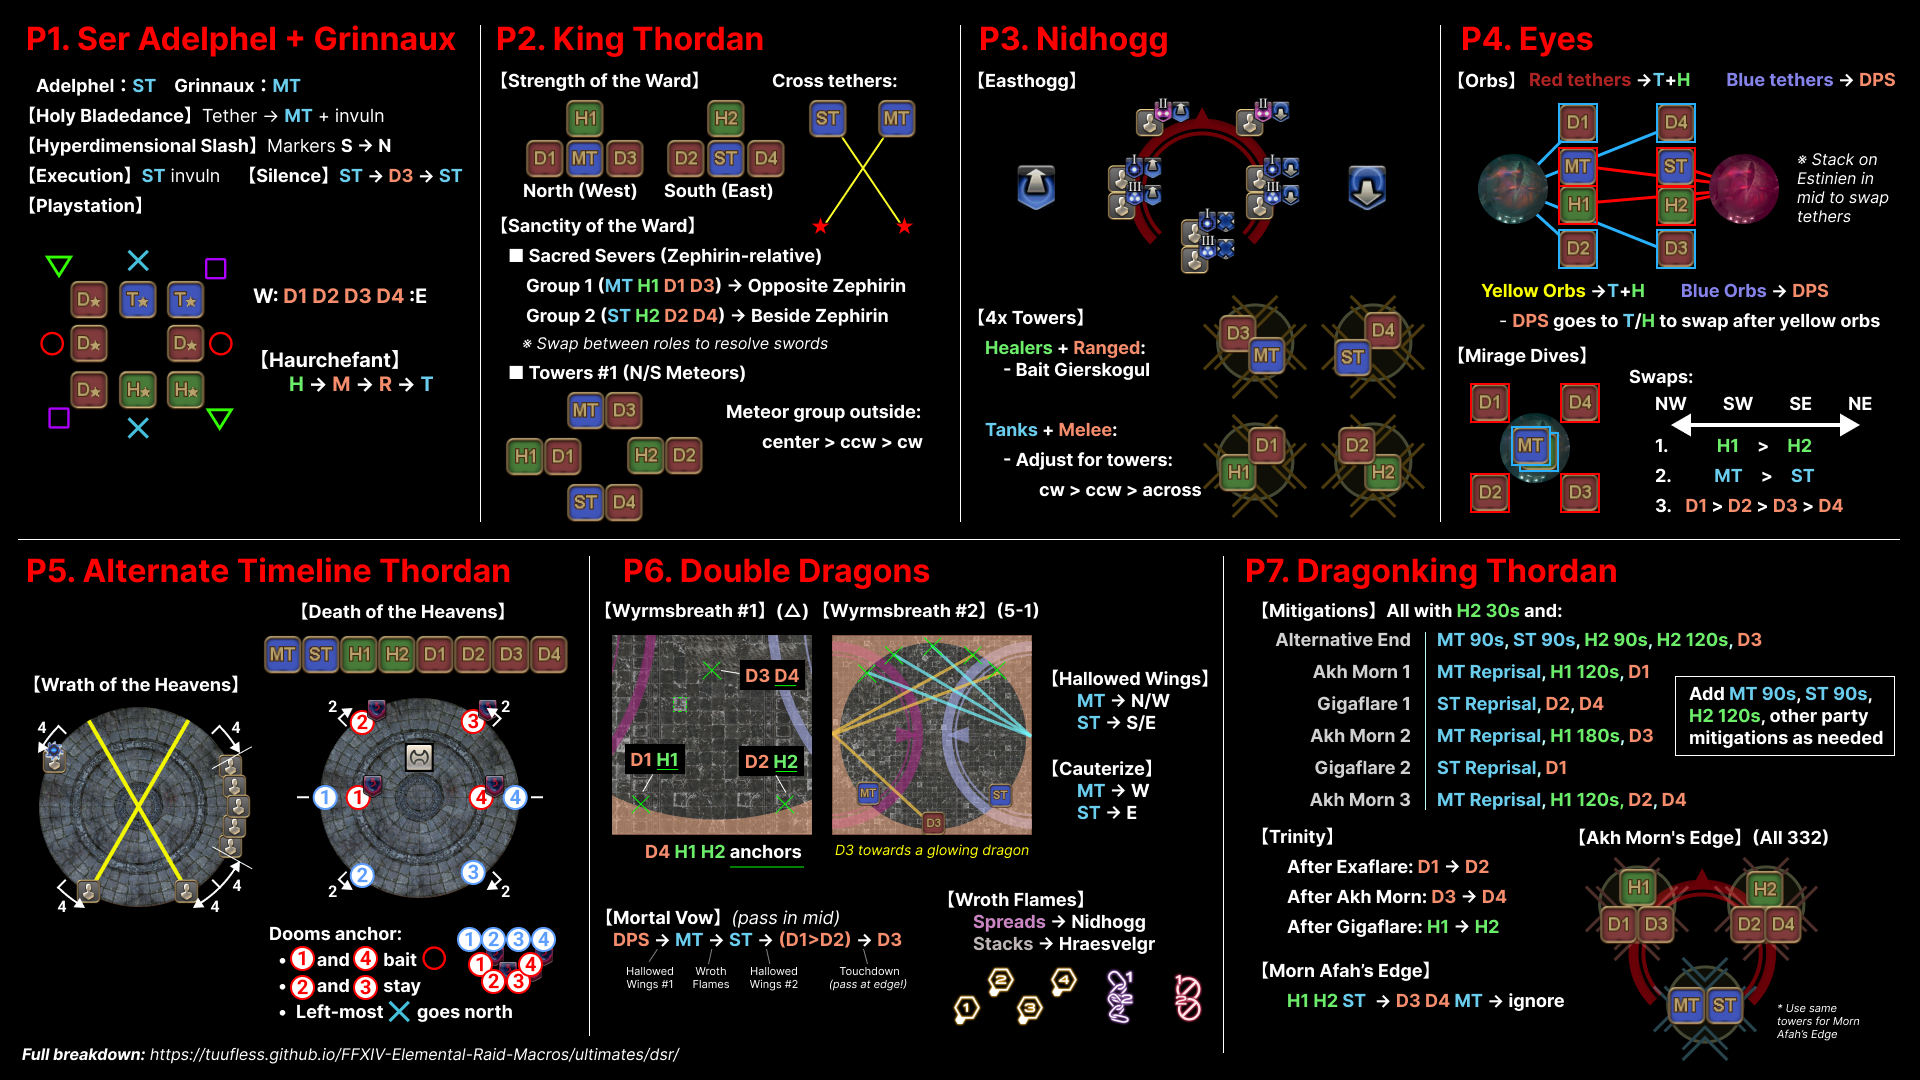
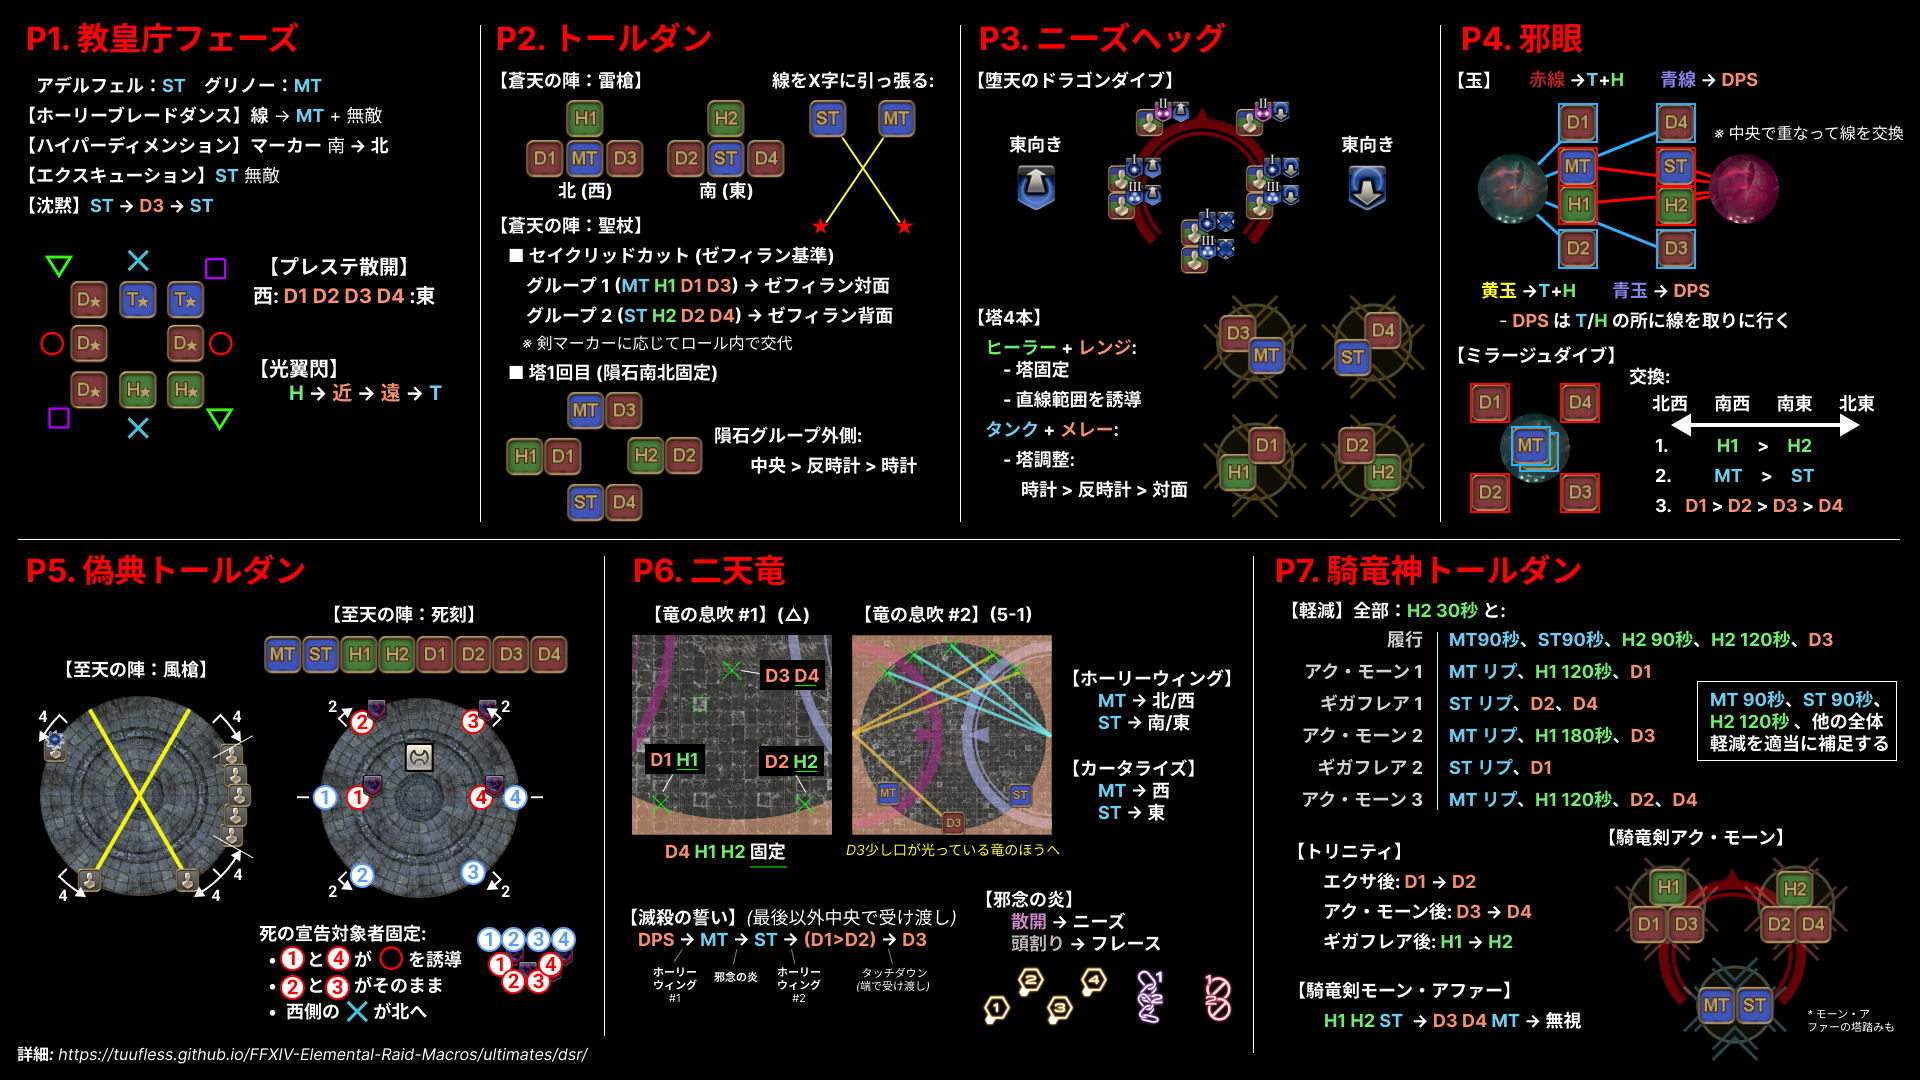
The Holy See
Dragonsong’s Reprise is the first Ultimate to showcase a “door” boss. As such, there are two sets of markers and macros to use for this fight.
English
 Adelphel:ST Grinnaux:MT
【Holy Bladedance】Tether → MT + invuln
【Hyperdimensional Slash】Markers S → N
【Execution】ST invulns
【Silence】ST → D3 → ST
【Playstation chains】
  D▽ T× T□
  D〇   D〇 west: D1>2>3>4: east
  D□ H× H▽
【Haurchefant】
   cleave cleave   ※ cleaves towards
  H/R AoE ★ T/M AoE   ring (True South)
        party
 H1+H2 → D1+D2 → D3+D4 → MT+ST
日本語
 アデルフェル:ST グリノー:MT
【ホーリーブレードダンス】線 → MT 無敵
【ハイパーディメンション】マーカー 南 → 北
【エクスキューション】ST 無敵
【沈黙】ST → D3 → ST
【プレステ散開】
  D▽ T× T□
  D〇   D〇 西: D1>2>3>4: 東
  D□ H× H▽
【光翼閃】
       扇範囲  扇範囲    ↑ 南
  遠隔デバフ捨て ★ 近接デバフ捨て
         他         ↓ 北
 H1+H2 → D1+D2 → D3+D4 → MT+ST
Markers
All markers are used to bait Hyperdimensional Slashes (black orbs).

XIVLauncher WaymarkPresetPlugin positions
{
  "Name":"DSR P1 - The Holy See",
  "MapID":788,
  "A":{"X":95.0,"Y":0.0,"Z":91.5,"ID":1,"Active":true},
  "B":{"X":108.5,"Y":0.0,"Z":95.0,"ID":2,"Active":true},
  "C":{"X":105.0,"Y":0.0,"Z":108.5,"ID":5,"Active":true},
  "D":{"X":91.5,"Y":0.0,"Z":105.0,"ID":6,"Active":true},
  "One":{"X":105.0,"Y":0.0,"Z":91.5,"ID":3,"Active":true},
  "Two":{"X":108.5,"Y":0.0,"Z":105.0,"ID":4,"Active":true},
  "Three":{"X":95.0,"Y":0.0,"Z":108.5,"ID":7,"Active":true},
  "Four":{"X":91.5,"Y":0.0,"Z":95.0,"ID":0,"Active":true}
}
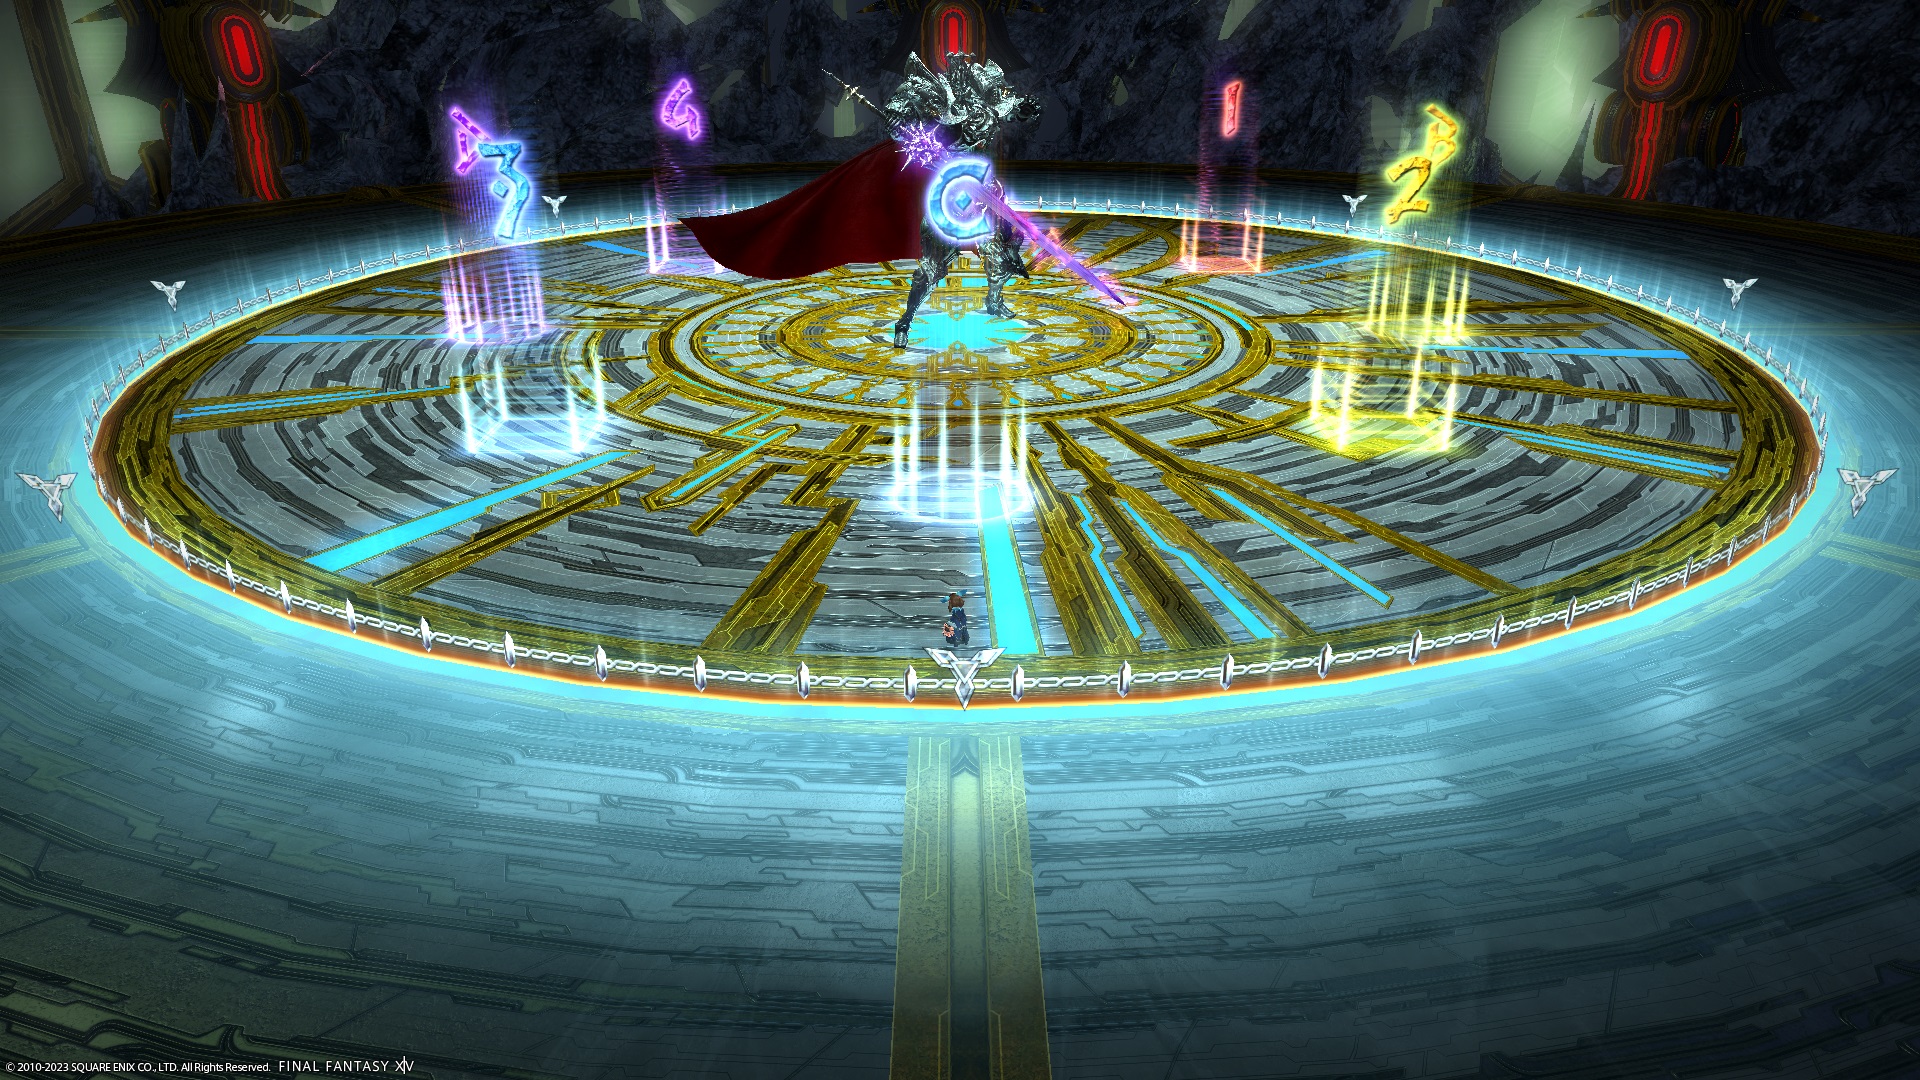
King Thordan
This is the macro for the bulk of the fight.
English
―《Thordan》――――――――――――――――――
【Strength of the Ward】
North (West) South (East)
H1 H2
D1 MT D3 D2 ST D4
■ Skyward Leaps + Towers
※ Use Thordan as north
Cross tethers:
MT:West tether → East of party
ST:East tether → West of party
【Sanctity of the Ward】
■ Sacred Severs (Zephirin-relative)
Group 1 (MTH1D1D3) → Opposite Zephirin
Group 2 (STH2D2D4) → Beside Zephirin
※ Swap between roles to resolve swords
■ Meteors
MT/D3 ※ Fix Meteors N/S
H1/D1 H2/D2 ※ Meteors run cw
ST/D4
※ Meteor group (T/H or DPS) outside
center > ccw > cw
※ Meteor grp → Final cardinal towers
※ Non-meteor grp → Clockwise from ice
―《Nidhogg》("Easthogg") ―――――――――――
【Dive from Grace】
②↑ ②↓
②③ ① ①③
①↑▲ ①↓ → ③↑▲ ③↓ → ②↑▲ ②↓
① ③ ①
※ Face east when placing towers
【4x Towers (H/R fixed)】
MT/D3 ST/D4 Tanks/Melee adjust:
● cw > ccw > across
H1/D1 H2/D2
※ H/R bait Geirskogul
■ Soul Tethers
MT → Nidhogg's tether (under boss)
ST → clone's tether
―《Eyes phase》――――――――――――――――
D1 D4 T/H → Red tethers
MT ST DPS → Blue tethers
H1 H2 ※ Stack on Estinien in mid
D2 D3 to swap tethers
【Yellow+Blue Orbs】
D1 D4 ※ DPS goes to T/H
MTH1 STH2 to swap tethers
D2 D3
【Mirage Dives】
■ Initial spread ■ Swaps (from true North)
D1 D4 1. ccw:H1>H2:cw
T+H 2. ccw:MT>ST:cw
D2 D3 3. ccw:D1>D2>D3>D4:cw
※ Around blue eye
―《Alternate Timeline Thordan》―――――――
【Wrath of the Heavens】
▼ ★ ▼
(blue) \ / ※ Use white dragon
\/ (party) as North
/ \
(tether) (tether)
【Death of the Heavens】(2-2 Dooms north)
■ Initial spread
※ Use Grinnaux as North
= Dooms
① ④ (dodge 2nd Impact)
① = Non-doom
② ③ (dodge 3rd Impact)
■ Playstation 2 (Anchored Dooms)
(▽/□) × (▽/□) ※ + bait circles
※ Doom players stay
× non-doomed adjust
■ Meteors:Caster LB2 (centered true N)
―《Double Dragons》 (△, DTTMR, 1-5) ―――――
MT → Nidhogg ST → Hraesvelgr
【Wyrmsbreath #1】
D3D4 ※ H1, H2, D4 stays
H1D1 H2D2 ※ D1, D2, D3 adjusts
【Akh Afah】North:MT, H1, D1, D3
South:ST, H2, D2, D4
【Hallowed Wings #1】MT → North ST → South
【Mortal Vow】(pass in mid except last)
DPS → MT → ST → (D1>D2) → D3
【Wroth Flames】Spread → Nidhogg
Stacks → Hraesvelgr
【Hallowed Wings #2】MT → West ST → East
【Wyrmsbreath #2】(5-1) D3 south
【Cauterize】(2x invuln) MT → West, ST → East
―《Dragonking Thordan》―――――――――――
【Mitigations】
All with H2 30s and:
Alt. End:MT 90s, ST 90s, H2 90, D3
AM1:MT Rep, H1 120s, D1
Giga1: ST Rep, D2, D4
AM2:MT Rep, H1 180s, D3
Giga2:ST Rep, D1
AM3:MT Rep, H1 120s, D2, D4
【Trinity】After Exaflare → D1, D2
After Akh Morn → D3, D4
After Gigaflare → H1, H2
【Akh Morn's Edge】(All 3-3-2)
H1D1D3 H2D2D4
MTST
日本語
―《トールダン》―――――――――――――――――
【蒼天の陣:雷槍】
北(西) 南(東)
H1 H2
D1 MT D3 D2 ST D4
■ スカイワードリープ ・ 塔
※ トールダンを北とする
線(交差):
MT:西の線 → パーティー東
ST:東の線 → パーティー西
【蒼天の陣:聖杖】
■ 剣マーカー(ゼフィラン基準)
グループ1(MTH1D1D3)→ ゼフィラン対面
グループ2(STH2D2D4)→ ゼフィラン背面
※ 剣マーカーに応じてロール内で交代
■ 隕石
MT/D3 ※ 隕石は南北固定
H1/D1 H2/D2 ※ 隕石は時計回り
ST/D4
※ 隕石グループ(T ・ H または DPS)は外側
中央 > 反時計 > 時計
※ 隕石グループ → 2回目の塔は東西南北
※ 非隕石グループ → 2回目の塔は時計回りにずれる
―《ニーズヘッグ》(基本東向き)――――――――――
【堕天のドラゴンダイブ】
②↑ ②↓
②③ ① ①③
①↑▲ ①↓ → ③↑▲ ③↓ → ②↑▲ ②↓
① ③ ①
※ 塔設置時は東を向く
【4塔(遠隔固定)】
MT/D3 ST/D4 近接 調整:
● 時計 > 反時計 > 対面
H1/D1 H2/D2
※ 遠隔はゲイルスコグルを誘導する
■ ソウルテザー
MT → 本体の線(ボス下)
ST → 分身の線
―《邪眼フェーズ》――――――――――――――――
D1 D4 T ・ H → 赤線
MT ST DPS → 青線
H1 H2 ※ 中央でエスティニアンに
D2 D3 重なって線を交換
【黄玉 ・ 青玉】
D1 D4 ※ DPS は T ・ H の所に
MTH1 STH2 線を取りに行く
D2 D3
【ミラージュダイブ】
■ 初期散開 ■ 交換(北(A基準)から)
D1 D4 1. 反時計:H1>H2:時計
T ・ H 2. 反時計:MT>ST:時計
D2 D3 3. 反時計:D1>D2>D3>D4:時計
※ 右眼(青)中心
―《偽典フェーズ》――――――――――――――――
【至天の陣:風槍】
▼ ★ ▼
(青玉)\ / ※ ヴェズルフェルニルを
\/ (他) 北とする
/ \
(線)(線)
【至天の陣:死刻】(2-2 死の宣告 北)
■ 初期散開
※ ゲリックを北とする
= 死の宣告
① ④ (2 回目のインパクトに入る)
① = その他
② ③ (3 回目のインパクトに入る)
■ プレステ(宣告固定)
(▽/□) × (▽/□) ※ と が〇を誘導
※ 死の宣告対象者固定
× その他調整
■ 隕石:キャス LB2(北(Aマーカー)側中心)
―《二天竜フェーズ》(三角、DTTTMR、北5・南1)――
MT → ニーズ ST → フレース
【竜の息吹 #1】
D3D4 ※ H1, H2, D4 固定
H1D1 H2D2 ※ D1, D2, D3 調整
【アク・アファー】北:MT, H1, D1, D3
南:ST, H2, D2, D4
【ホーリーウィング #1】MT → 北 ST → 南
【滅殺の誓い】(最後以外中央で受け渡し)
DPS → MT → ST → (D1>D2) → D3
【邪念の炎】復讐の炎 → ニーズ
道連れの炎 → フレース
【ホーリーウィング #2】MT → 西 ST → 東
【竜の息吹 #2】北5・南1 D3 南
【カータ】(タンク無敵)MT → 西、ST → 東
―《最終フェーズ(パールダン)》―――――――――
【軽減】
全部:H2 30秒と:
履行:MT 90秒、ST 90秒、H2 90秒、D3
アクモン1:MT リプ、H1 120秒、D1
ギガ1: MT 90秒、ST リプ、D2、D4
アクモン2:MT リプ、ST 90秒、H1 180秒、D3
ギガ2:ST リプ、D1
アクモン3:MT リプ、H1 120秒、D2、D4
【トリニティ(AA)】エクサ後 → D1、D2
アクモン後 → D3、D4
ギガフレア後 → H1、H2
【騎竜剣アク・モーン】(3・3・2)
H1D1D3 H2D2D4
MTST
Markers
PF uses the “inner” markers. All markers demarcate:
- The boundaries for the charges at the start of Strength of the Ward.
- The boundary for Nidhogg’s Drachenlance.
In addition, the intercardinal square markers indicate:
- Where to stand to bait the towers in Nidhogg.
- The boundary of Hot Tail in the Double Dragons phase.
XIVLauncher WaymarkPresetPlugin positions
{
  "Name":"Dragonsong's Reprise",
  "MapID":788,
  "A":{"X":100.0,"Y":0.0,"Z":87.0,"ID":0,"Active":true},
  "B":{"X":113.0,"Y":0.0,"Z":100.0,"ID":1,"Active":true},
  "C":{"X":100.0,"Y":0.0,"Z":113.0,"ID":2,"Active":true},
  "D":{"X":87.0,"Y":0.0,"Z":100.0,"ID":3,"Active":true},
  "One":{"X":109.192,"Y":0.0,"Z":90.807,"ID":4,"Active":true},
  "Two":{"X":109.192,"Y":0.0,"Z":109.192,"ID":5,"Active":true},
  "Three":{"X":90.807,"Y":0.0,"Z":109.192,"ID":6,"Active":true},
  "Four":{"X":90.807,"Y":0.0,"Z":90.807,"ID":7,"Active":true}
}
Frequently Asked Questions
[Damage Down] How strong is the damage down debuff in this fight?
The Damage Down debuff in this phase lowers a player's damage by 50%. |