Alexander Prime
After defeating Brute Justice and Cruise Chaser, the arena will change and Alexander Prime appears alongside Brute Justice and Cruise Chaser to begin the transition mechanic to this phase.
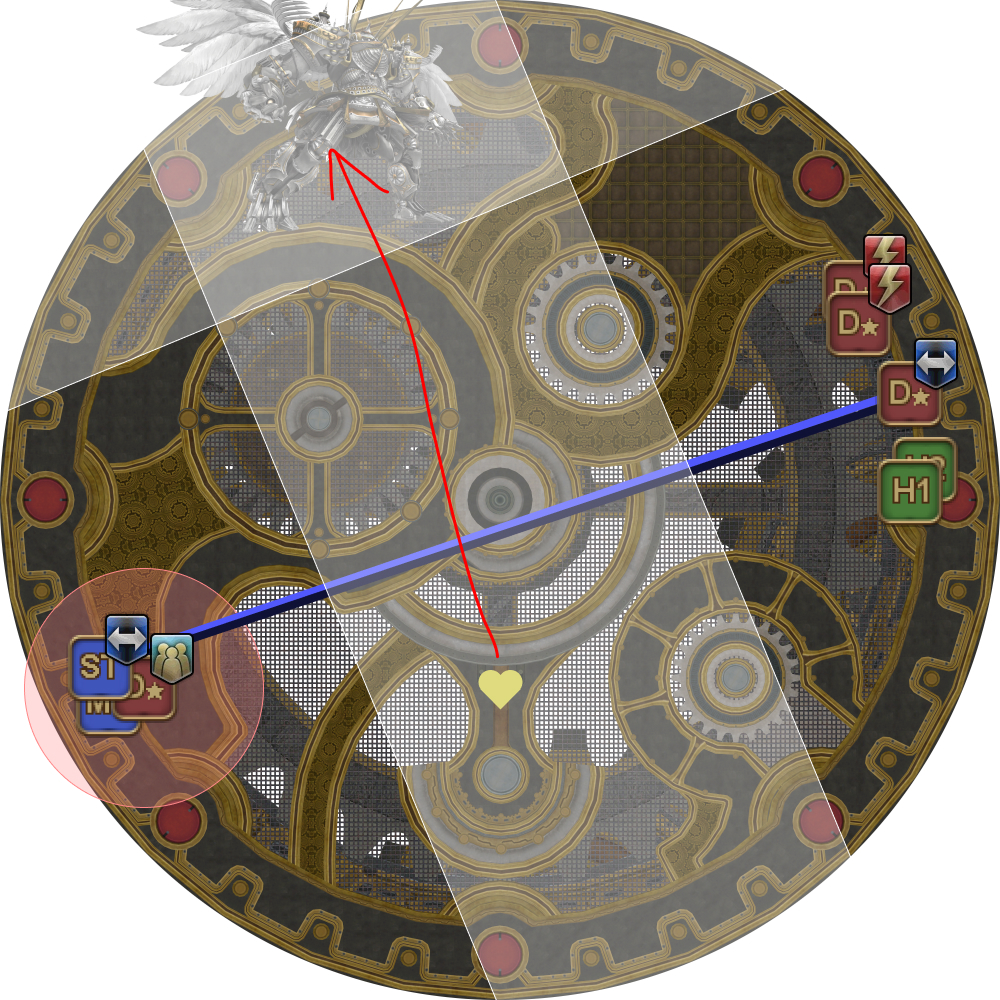
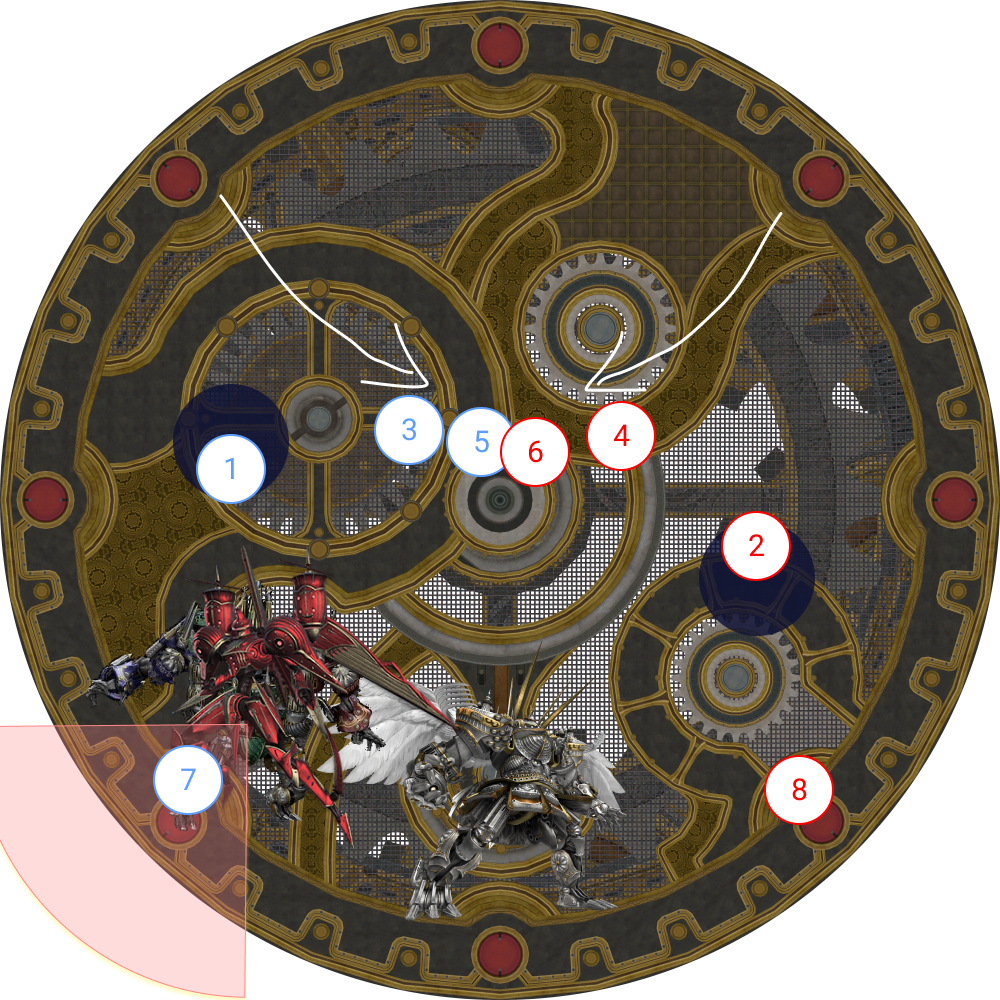
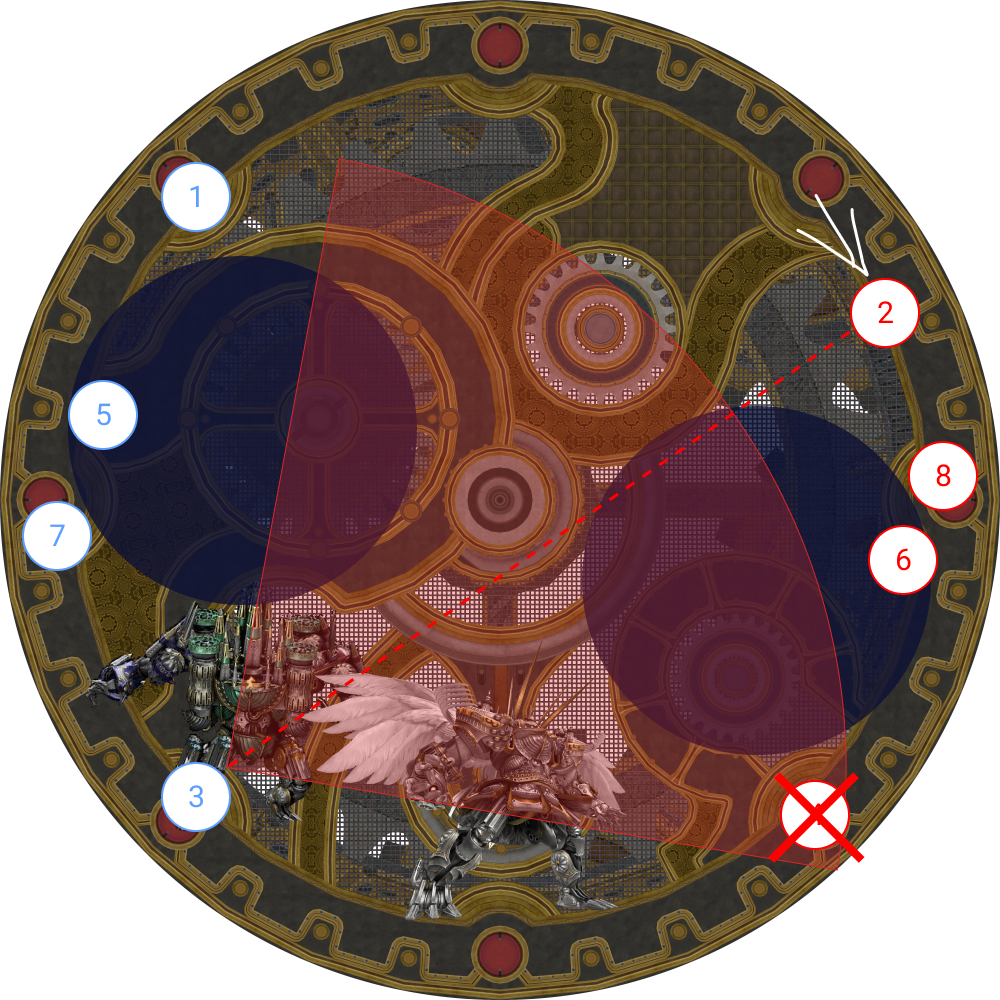
Temporal Stasis
| No debuff: Go to the east boss.
Red/Green tether: Go to the west boss about one marker apart.
Blue tether:
The blue-tether player on Cruise Chaser's side takes a few steps towards Cruise Chaser. Aggravated Assault: Far west/east on the same side as Brute Justice. | 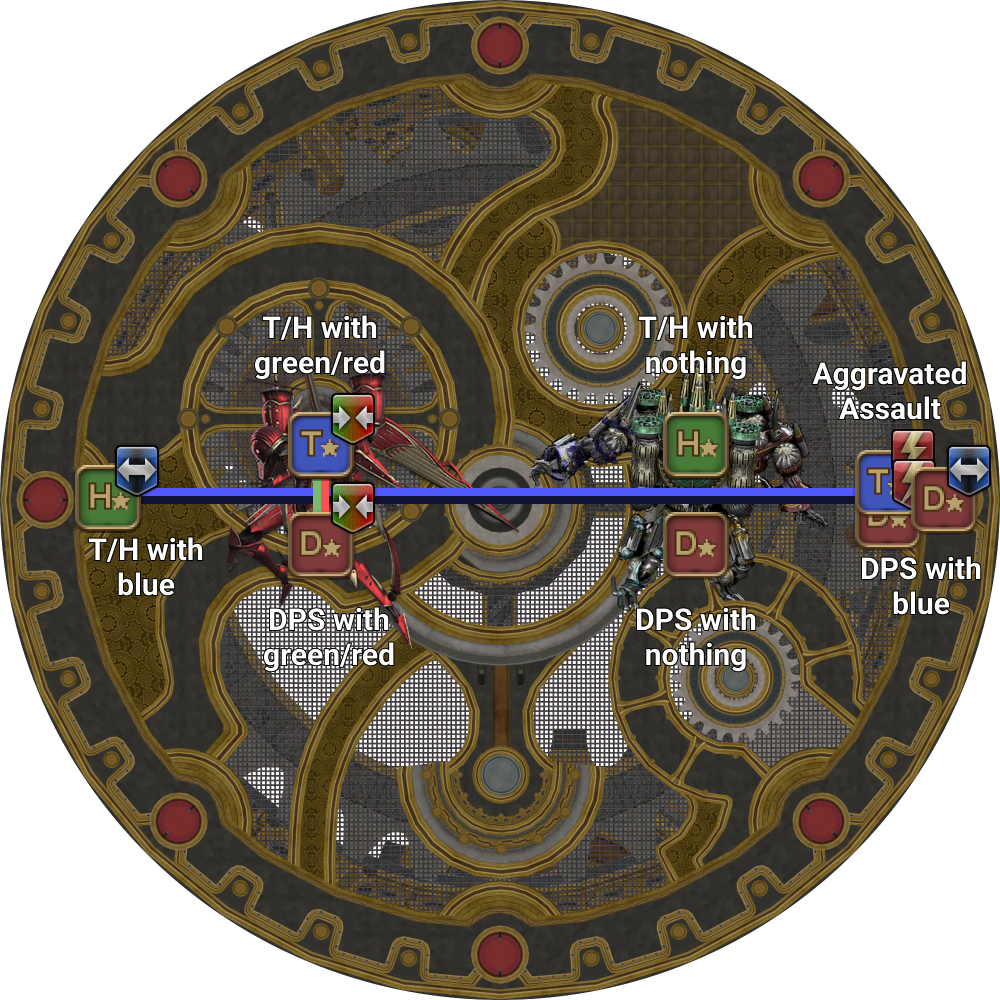 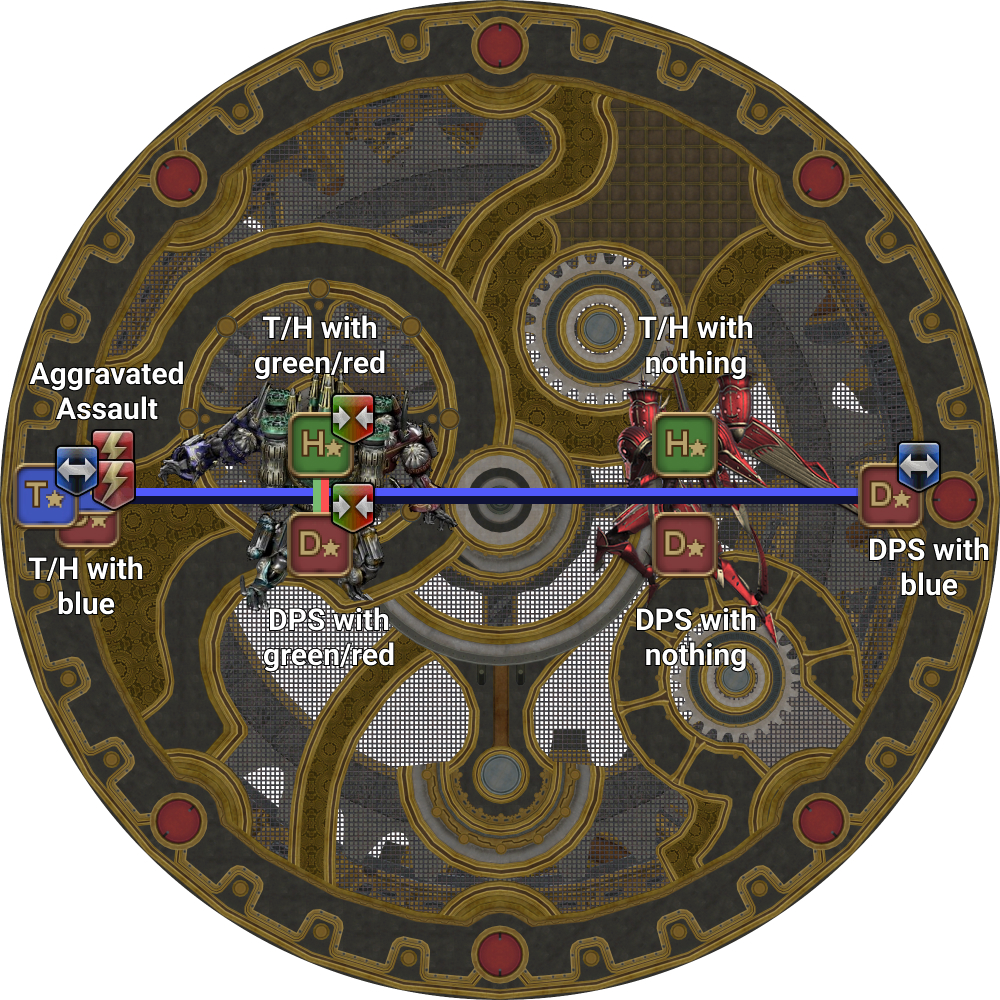 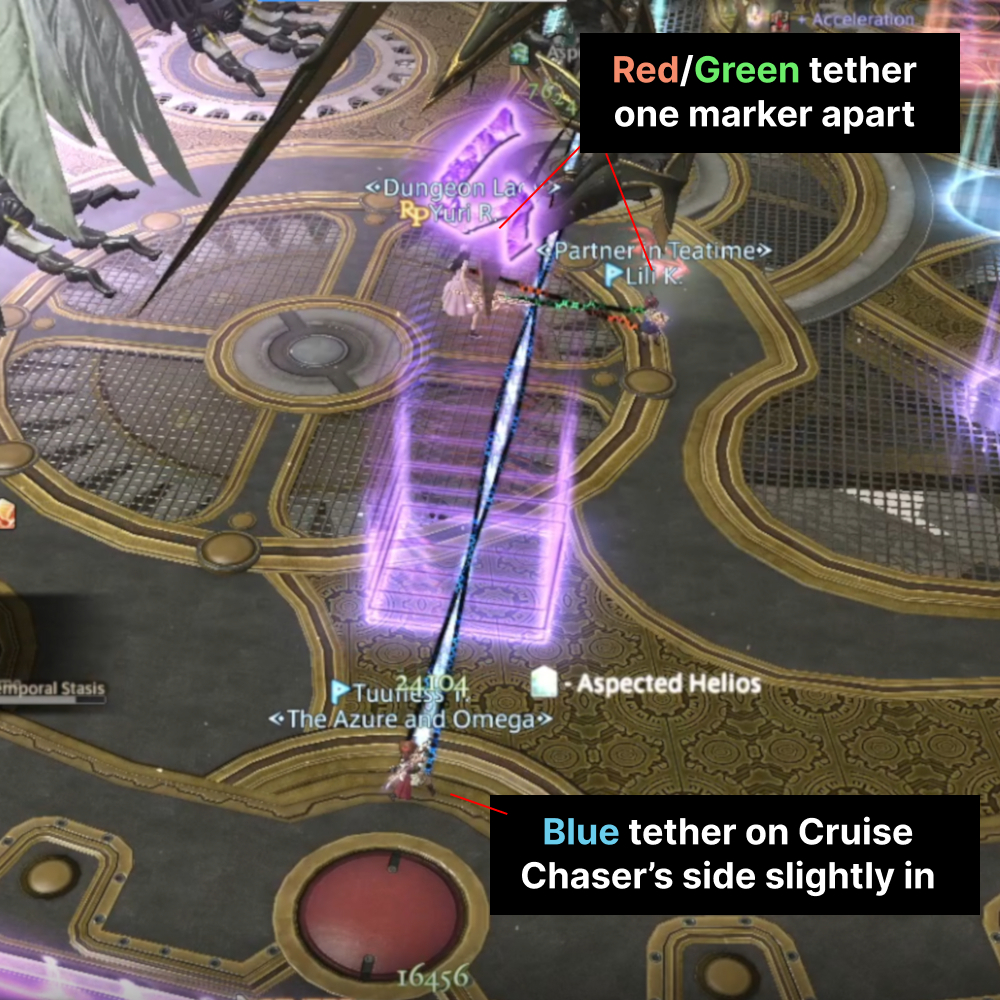 |
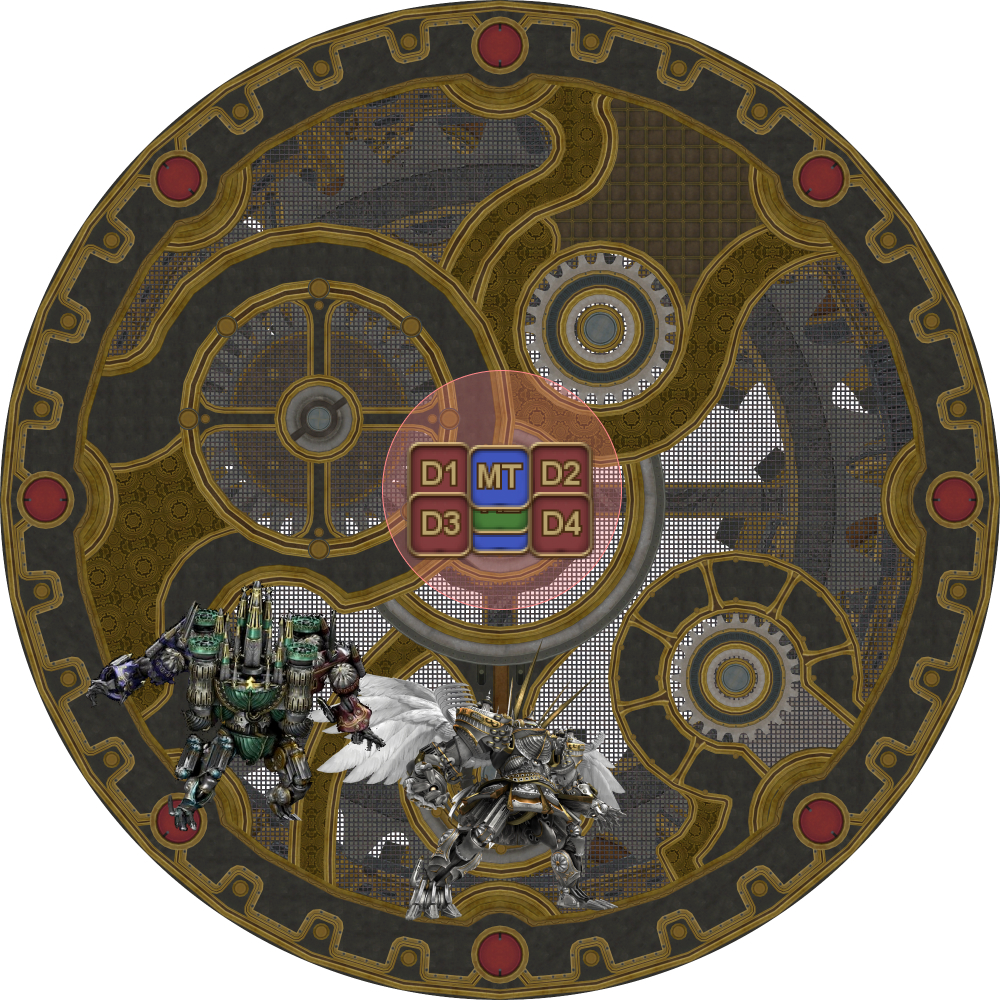
After Temporal Stasis, the ST will take aggro and invuln Alexander Prime’s Chastening Heat. This invuln should be timed to also absorb the three Divine Spear cleaves that follow.
Alternatively, you can mitigate the Chastening Heat, and invuln the Divine Spears (there will be one auto-attack in between).
| Chastening Heat + Divine Spears #1 | ST invuln. Tank swap from ST to MT after the Divine Spears. |
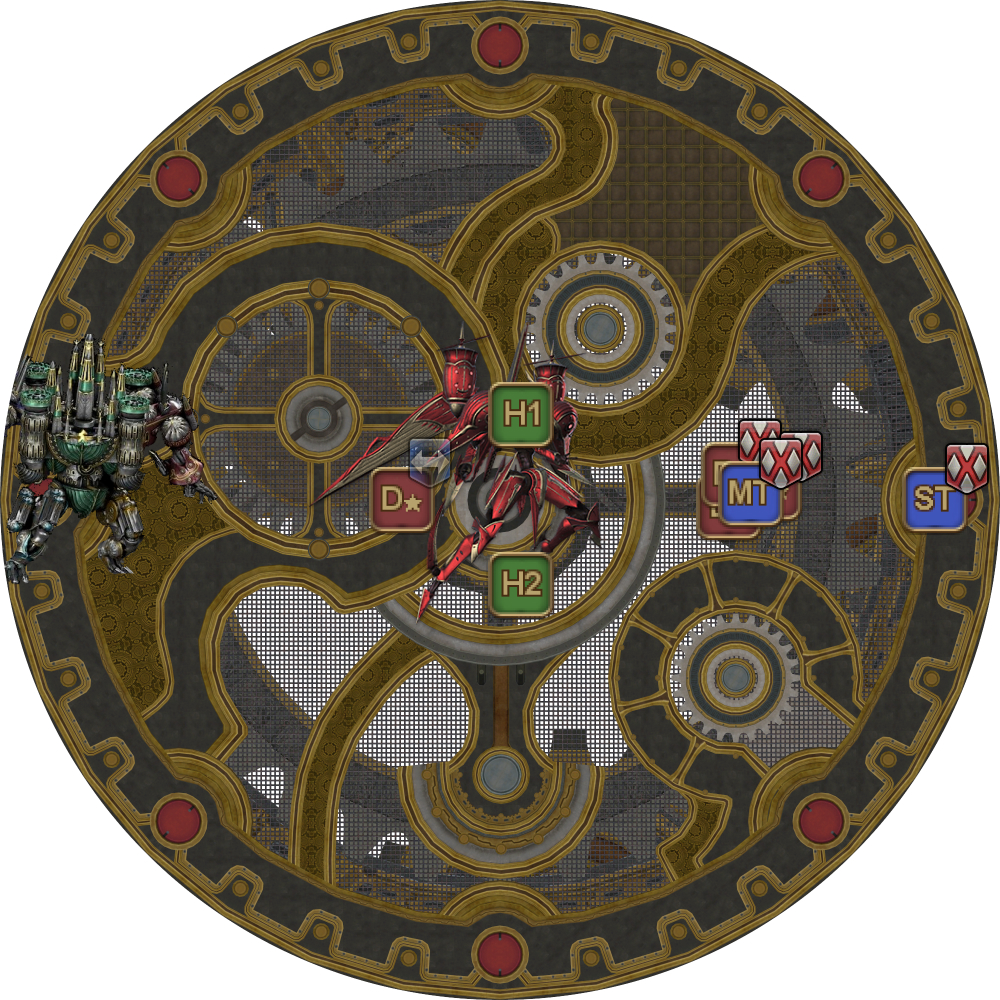
After the Divine Spears, have the MT Provoke and take aggro. Alexander Prime will autoattack twice before casting Inception Formation.
Inception Formation
| 1. Alexander spawns either True North or True South. Brute Justice and Cruise Chaser will spawn East and West in a random configuration.
The two Crystal players furthest from Alexander stands about 1.5 notches away from the red dot opposite Alexander. The other two Crystal players take reference from these players to make a square. Note: Be careful not to accidentally slant the square into a diamond! | 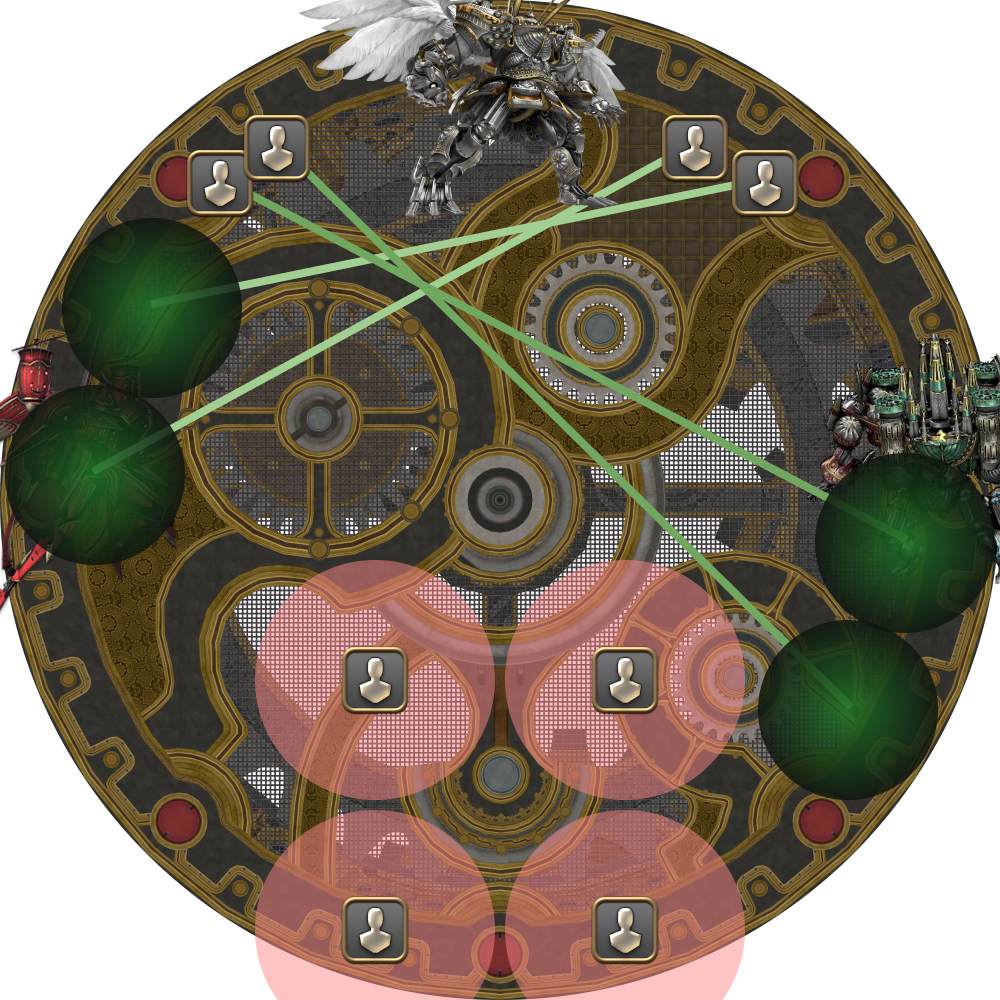 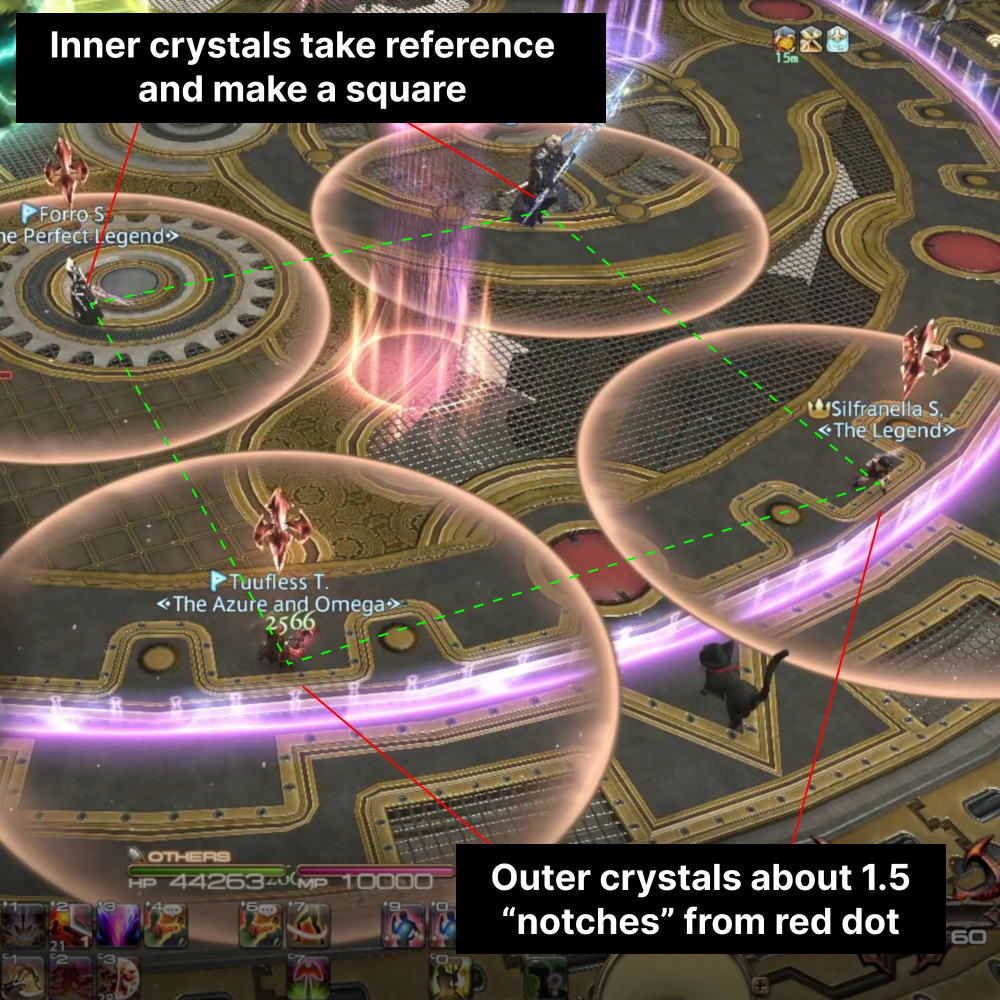 |
| 2. Resolve the Crystal AoEs and the green orbs.
The party wipes if any AoEs touch each other. Done correctly, the True Heart that spawns opposite Alexander Prime will hit all four crystals and turn gold, giving the party the Enigma Codex buff. (The Perfect Alexander phase will be impossible without the Enigma Codex.) | 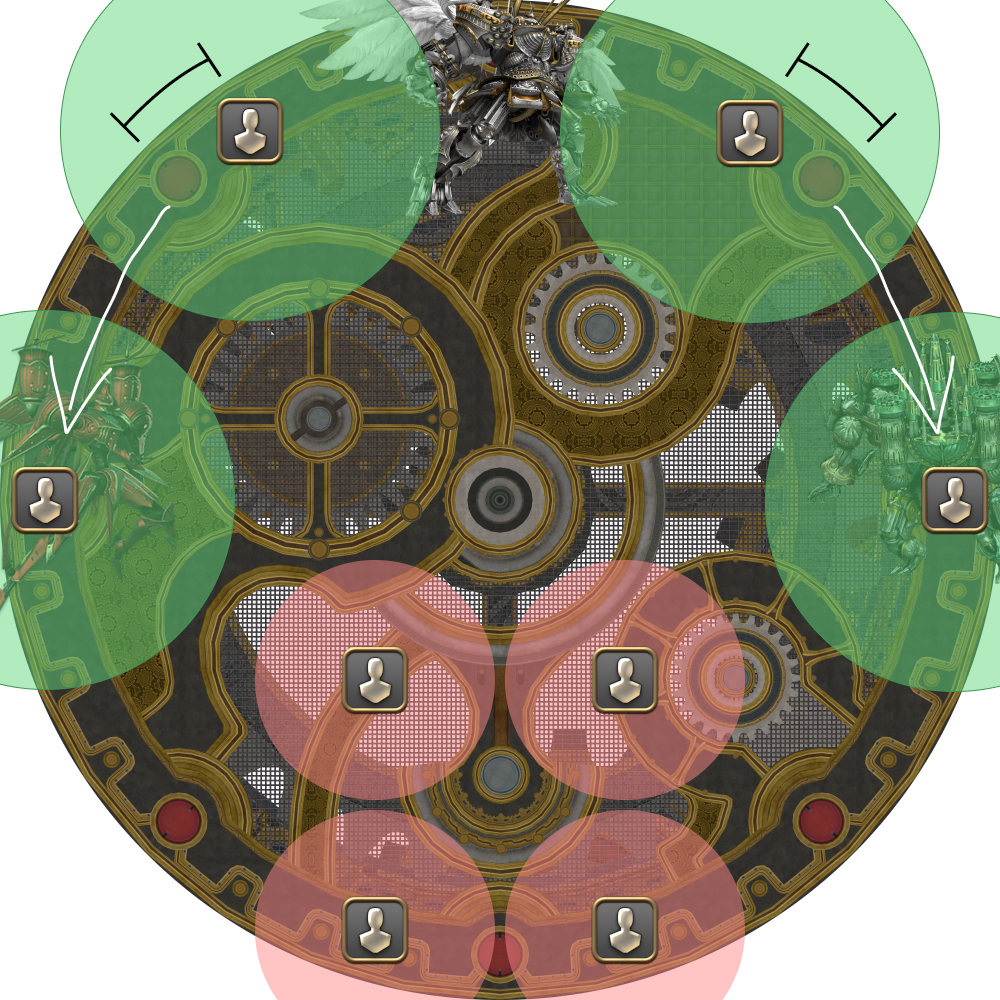 |
| 3. Move along the edge of the arena to gather along the north wall towards Brute Justice. This is done so players do not die to the crystal's proximity damage. When the crystals explode, the MT and ST take up their positions next to Brute Justice to prepare to bait two Flarethrowers. (Note that the green puddles left behind will slow down movement.) | 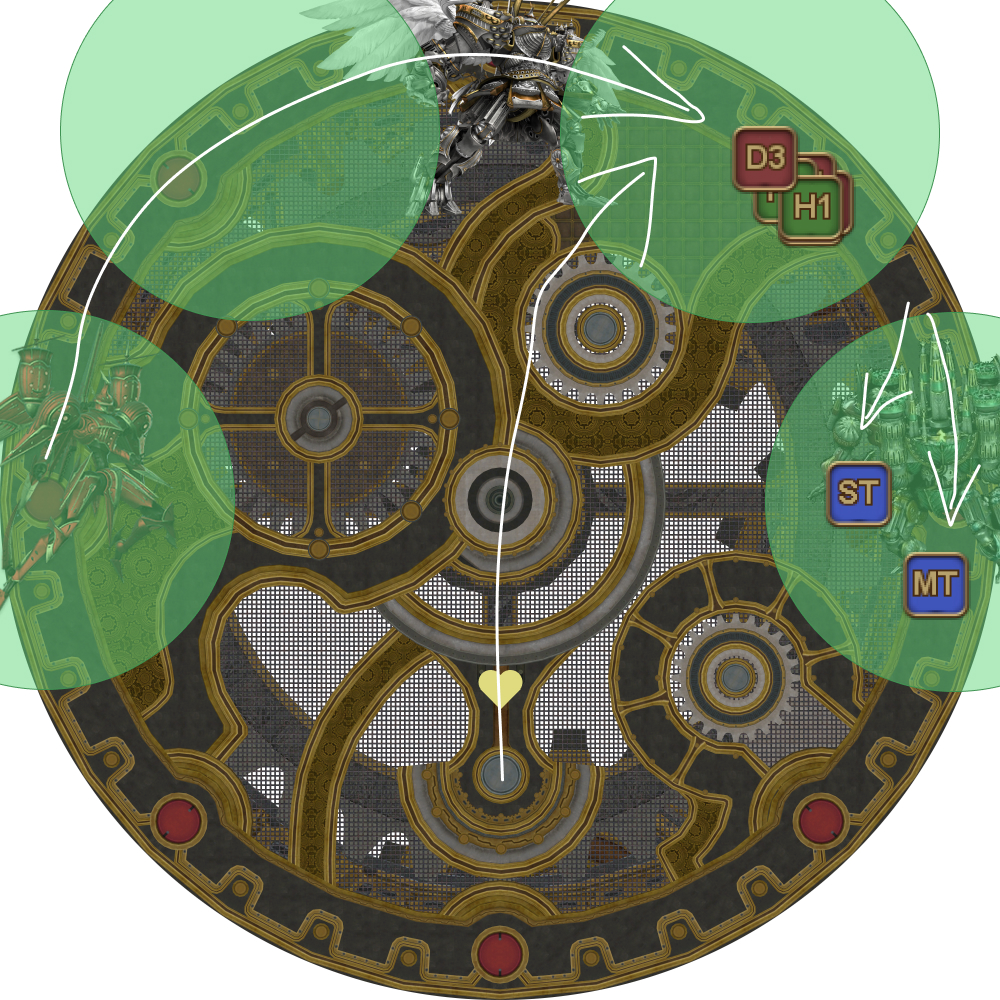 |
| 4. Brute Justice then Flarethrowers the three closest people starting from the nearest.
| 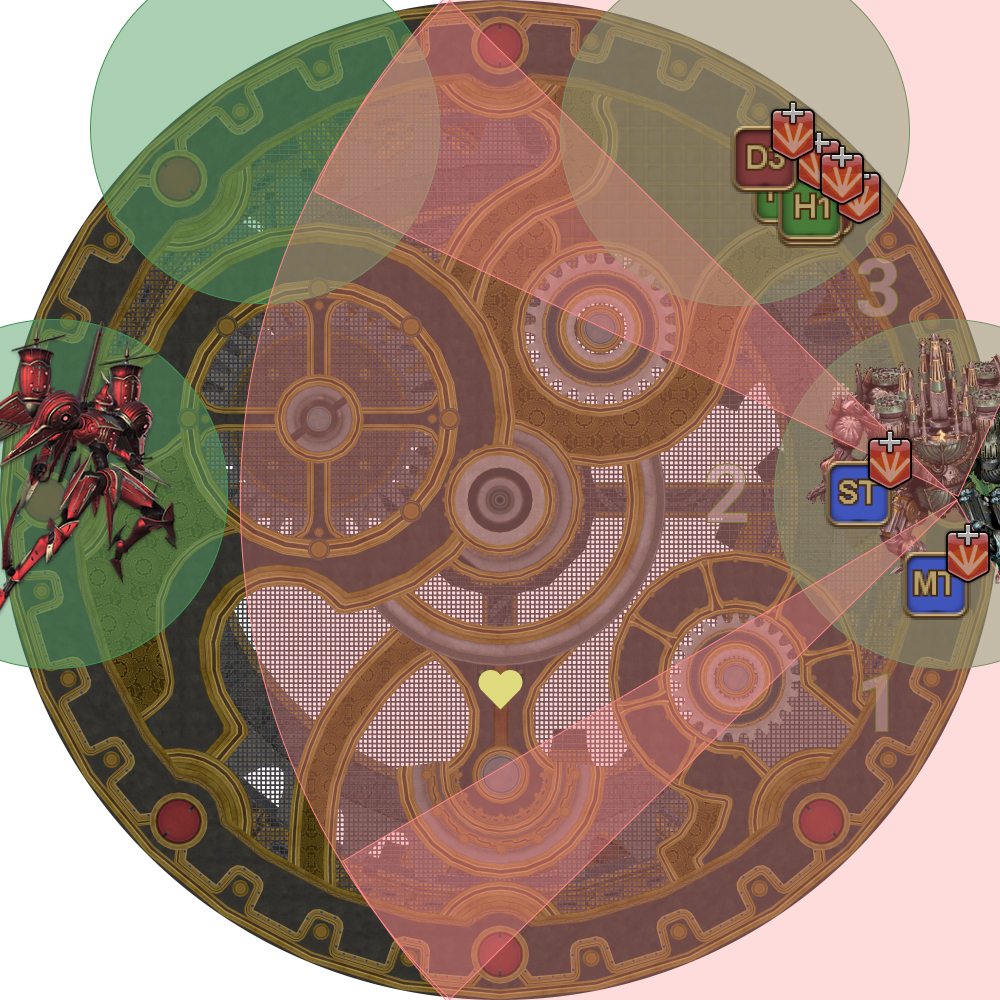 |
| 5. The True Heart will now move to a random spot at the edge of the Arena, where Alexander will spawn and cast Sacrament. Players will also get various debuffs to resolve.
|  |
| 6. Brute Justice will respawn West, and Cruise Chaser will respawn in the middle of the arena.
|  |
| 7. Cruise Chaser will then Alpha Sword the three closest players, which should be the two healers, and the DPS that had the blue tether. When Cruise Chaser cleaves either the north or south player, the rest of the party can run behind that player to avoid the incoming Super Jump. | 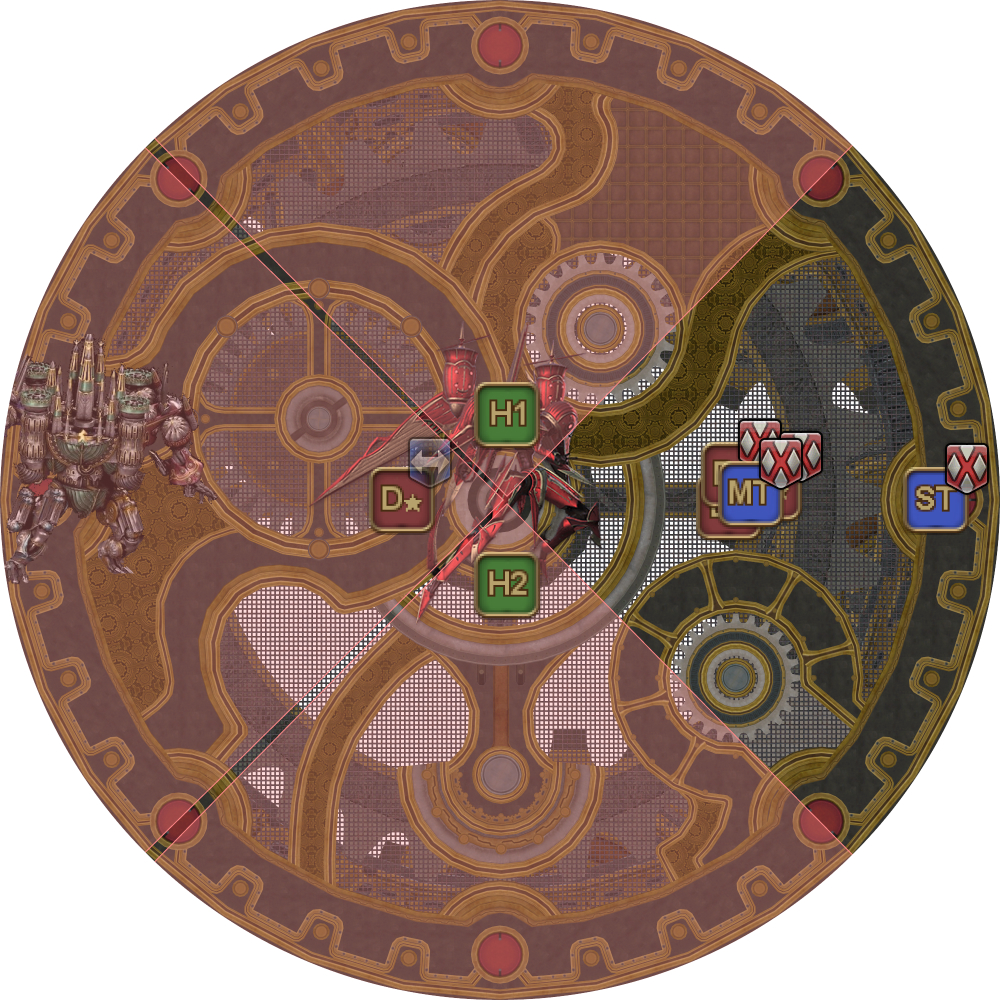 |
| 8. Brute Justice Super Jumps on the furthest player, which should be the ST. The impact AoE is quite large, so it's safe for all other players to run away from the ST by the third Alpha Sword. | 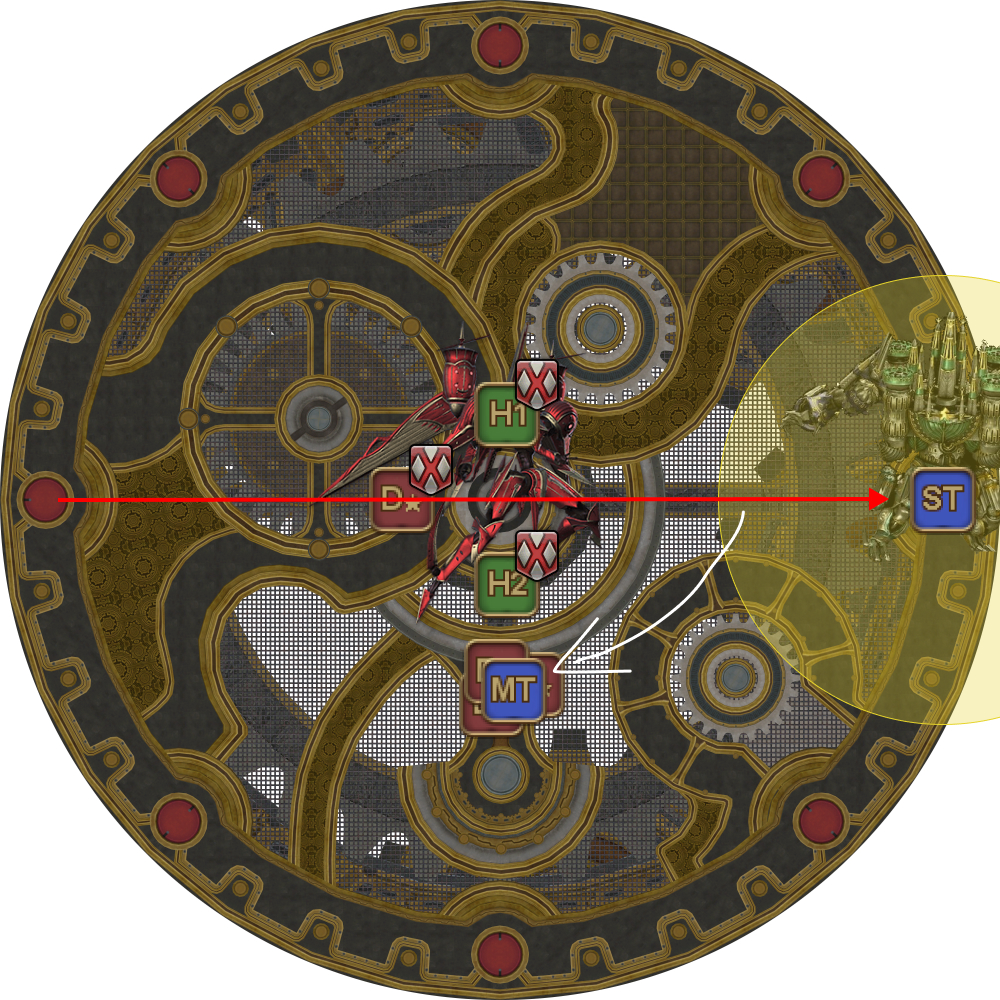 |
Alexander Prime will then reappear in the center and begin another Chastening Heat → 3x Divine Spear combo on the MT. Handle this like before- either invuln all these attacks, or mitigate Chastening Heat and invuln the Divine Spears.
| Chastening Heat + Divine Spears #2 | MT invuln. |
Note: If you have a PLD MT, depending on how fast you cleared the previous phases, Hallowed Ground may not be available here.
In that event, both tanks should mitigate and swap when Chastening Heat is being cast (have the ST point the Divine Spears east).
Alexander Prime then auto-attacks twice and casts Wormhole Formation.
Wormhole Formation
Wormhole Formation will use 09STOP’s method (highlighted by the Korean simulator).
Remember that all odd numbered players must face outside the arena and use Arm’s Length/Surecast when baiting Cruise Chaser to nullify the knockback from Alpha Sword.
| 1. Identify Limit Cut numbers, and stack in the middle of the arena to bait Chakrams. Identify where Brute Justice is, as this will determine who baits Super Jump and Apocalyptic Ray (and thus have stricter positioning requirements). | 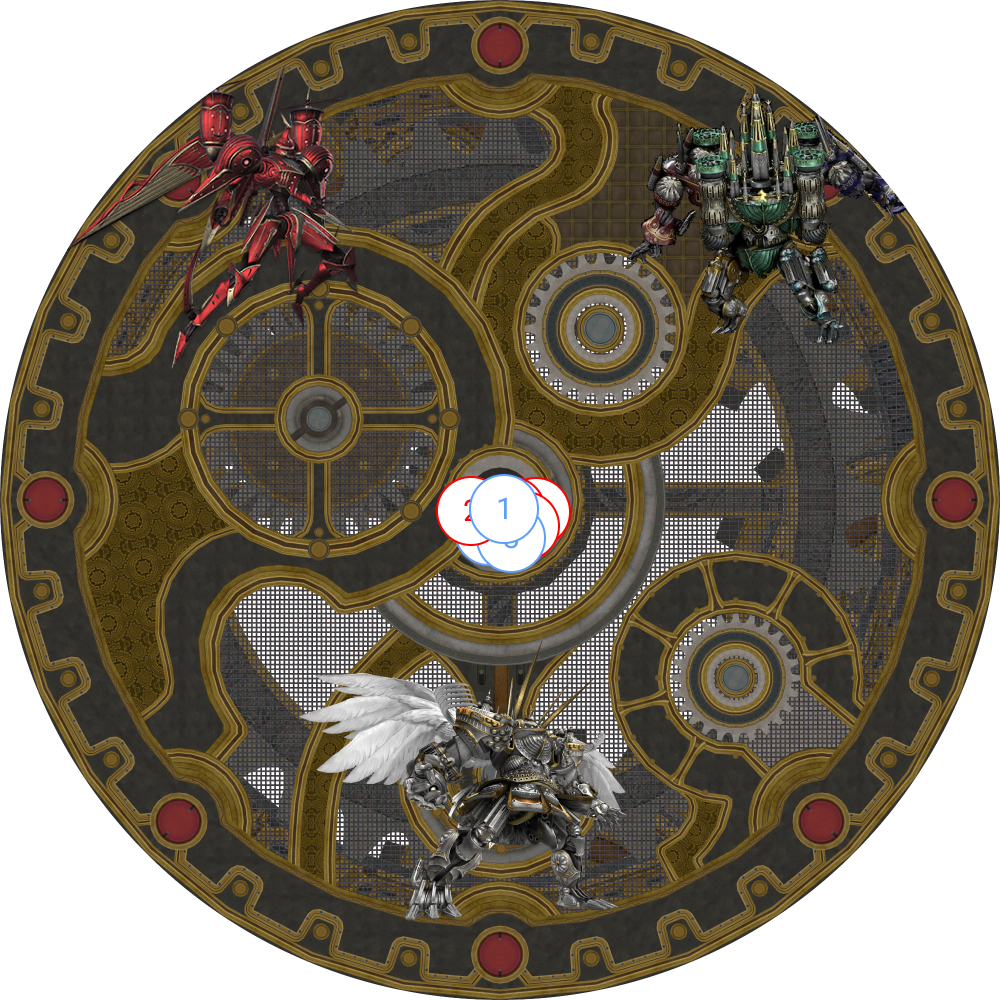 |
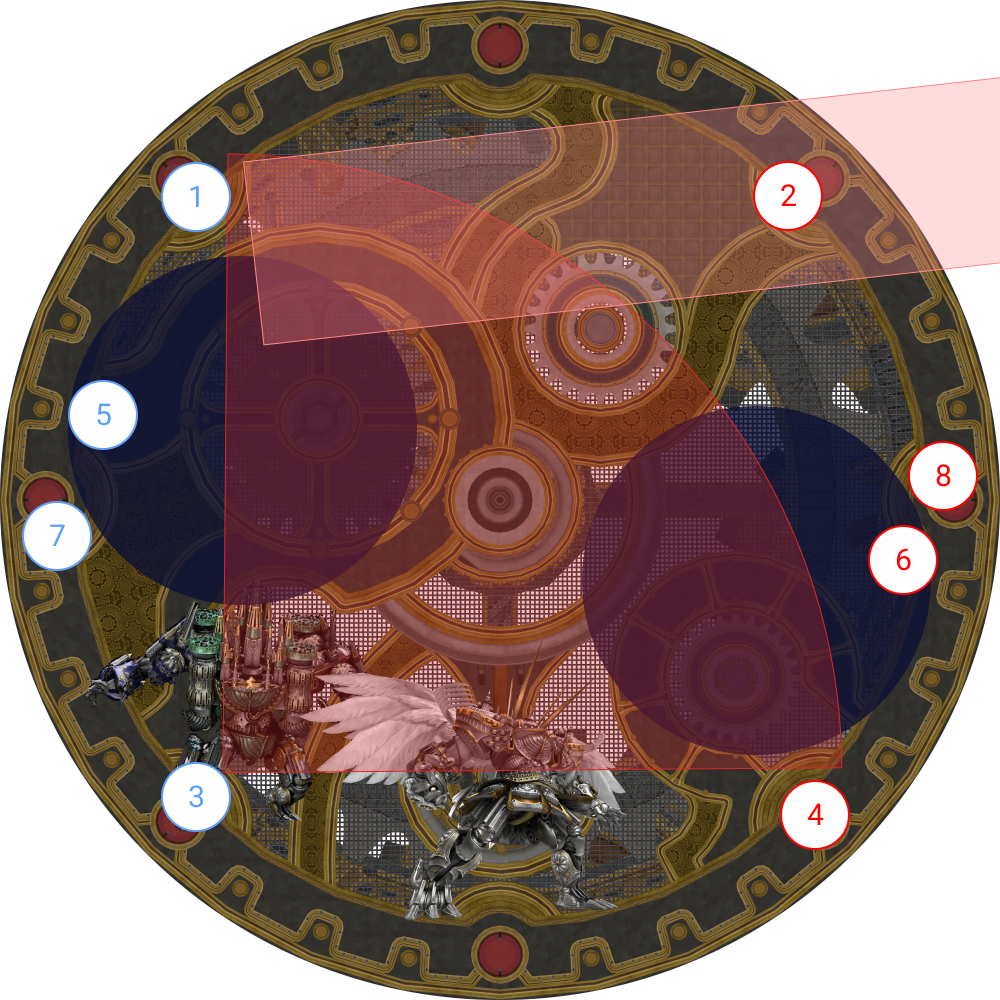
| 2. Move to positions.
(Notice 3 is slightly further in because they will be baiting Super Jump in this example. 4 is all the way at the edge.) Two Void puddles will also spawn slightly offset from the East and West. These need to be soaked three times, by specific players.
Each time a player takes the puddle, the puddle gets smaller. | 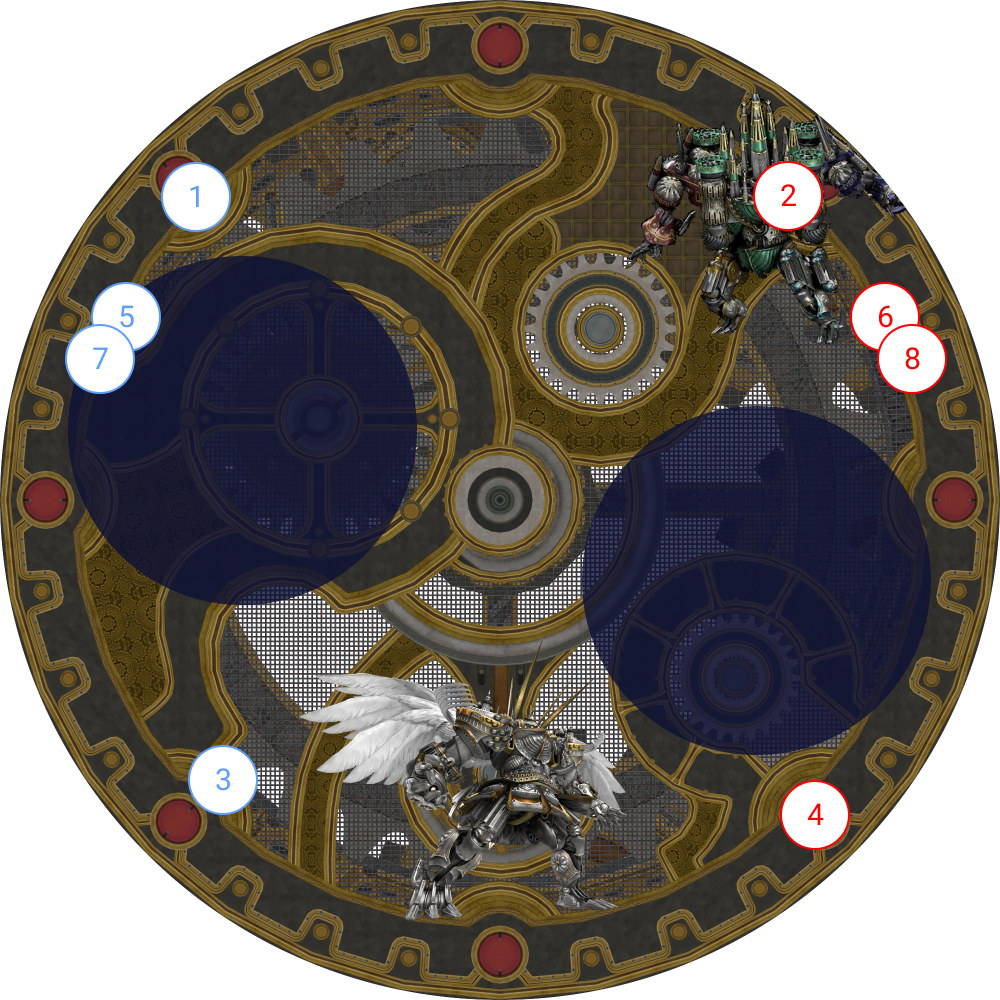 |
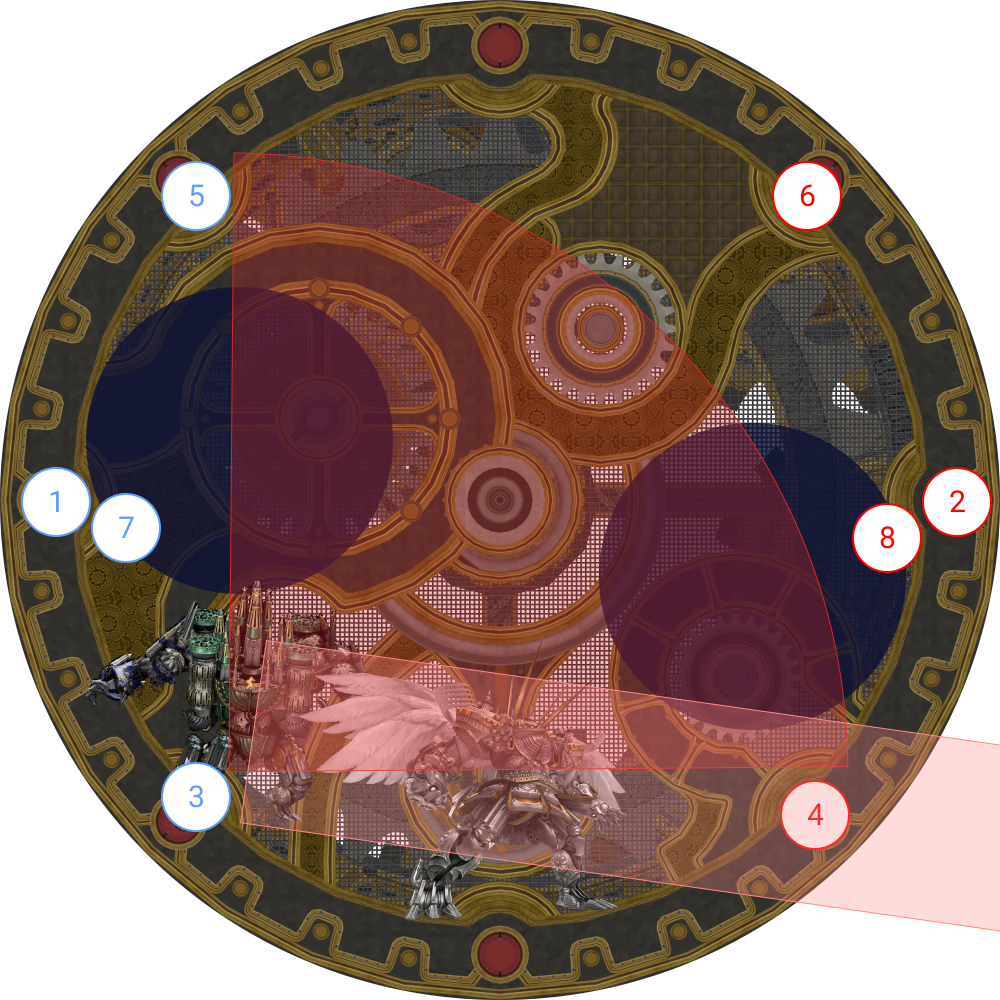
| 3. Chakrams fly. Brute Justice Super Jumps on the furthest player. Cruise Chaser cleaves 1. The player that originally started in front of Brute Justice (either 1 or 2) stays on the red dot until Apocalyptic Ray comes out. | 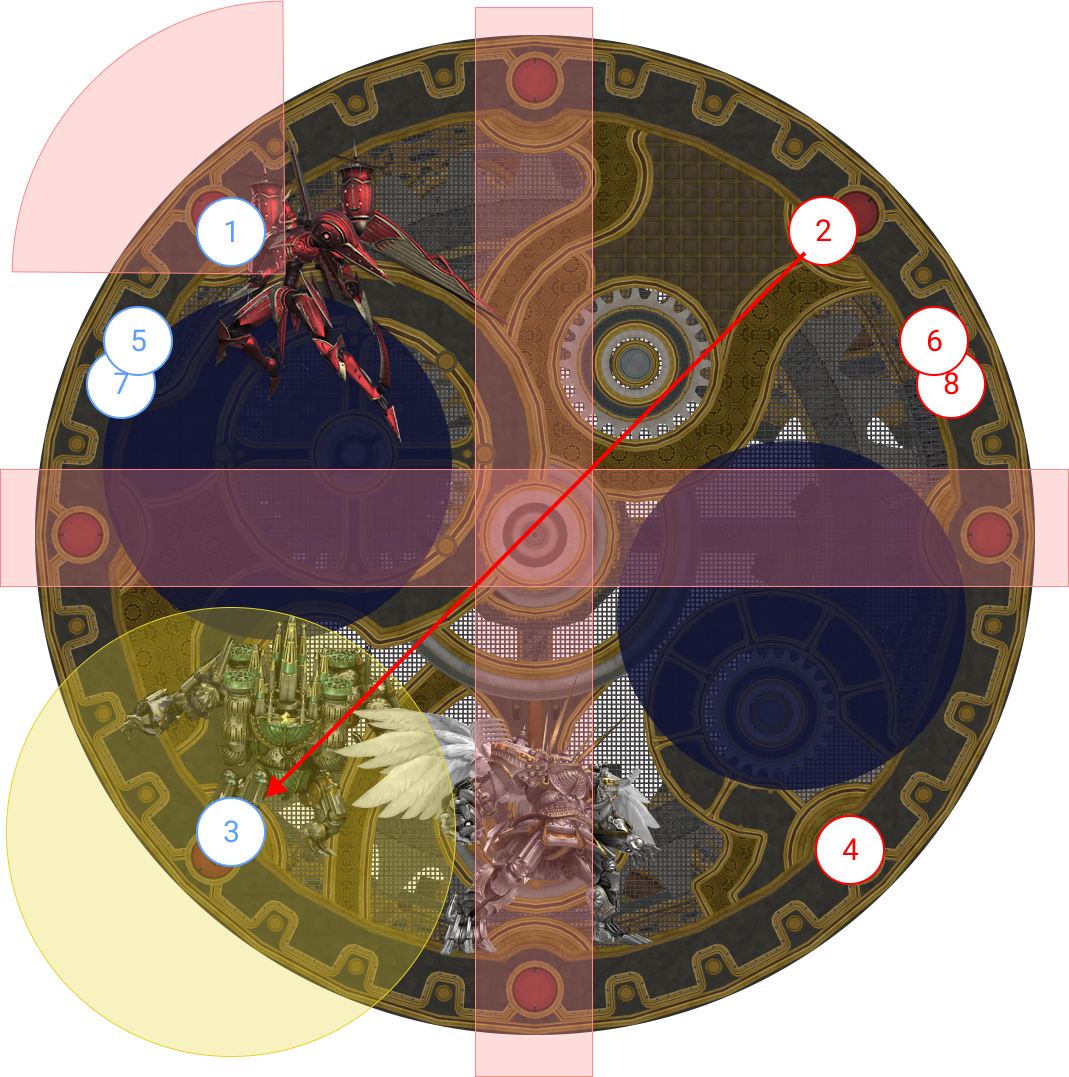 |
| 4. Brute Justice turns to face the furthest player (which should be 1 or 2) and casts Apocalyptic Ray. Cruise Chaser dashes 2.
|  |
| 5. Players 5 and 6 resolve their Void puddles, then take up positions north (where 1 and 2 were). Cruise Chaser cleaves 3. Alexander starts charging Sacrament. (do not panic!) | 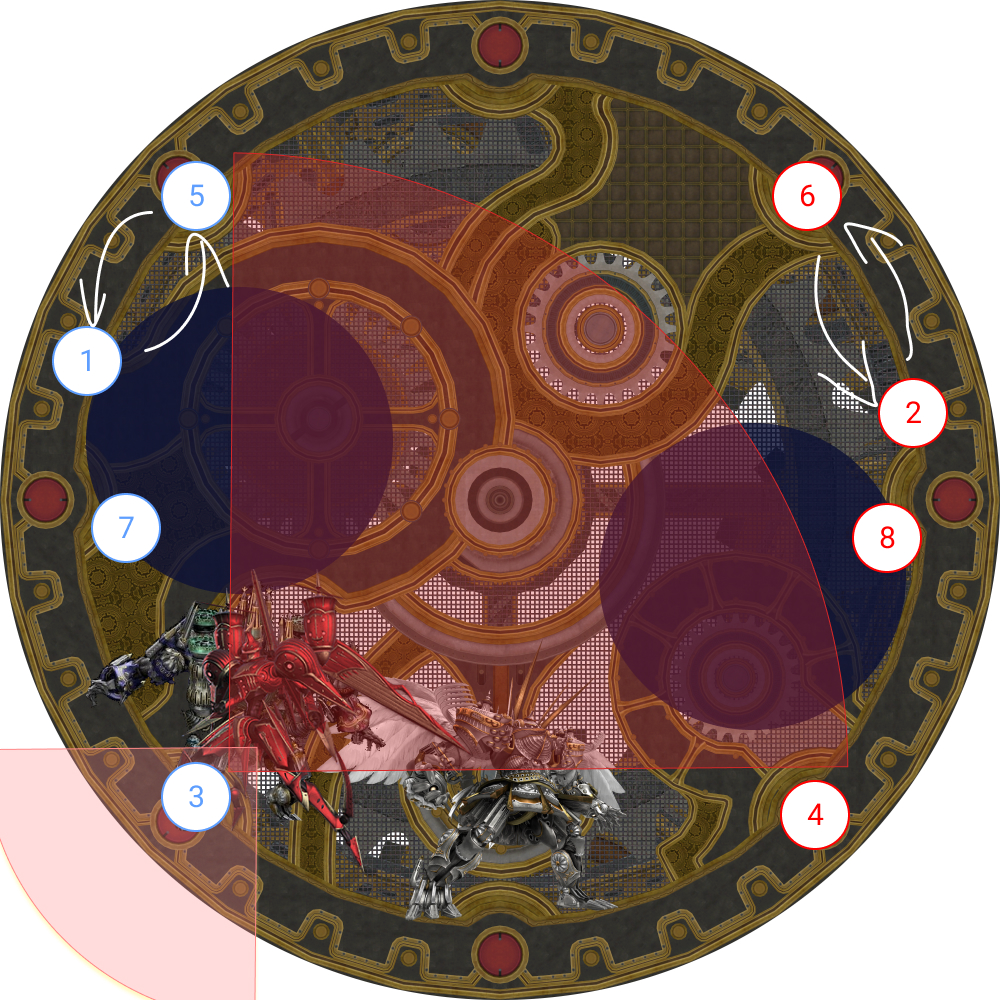 |
| 6. Cruise Chaser dashes 4.
|  |
| 7. Cruise Chaser cleaves 5. Sacrament resolves.
| 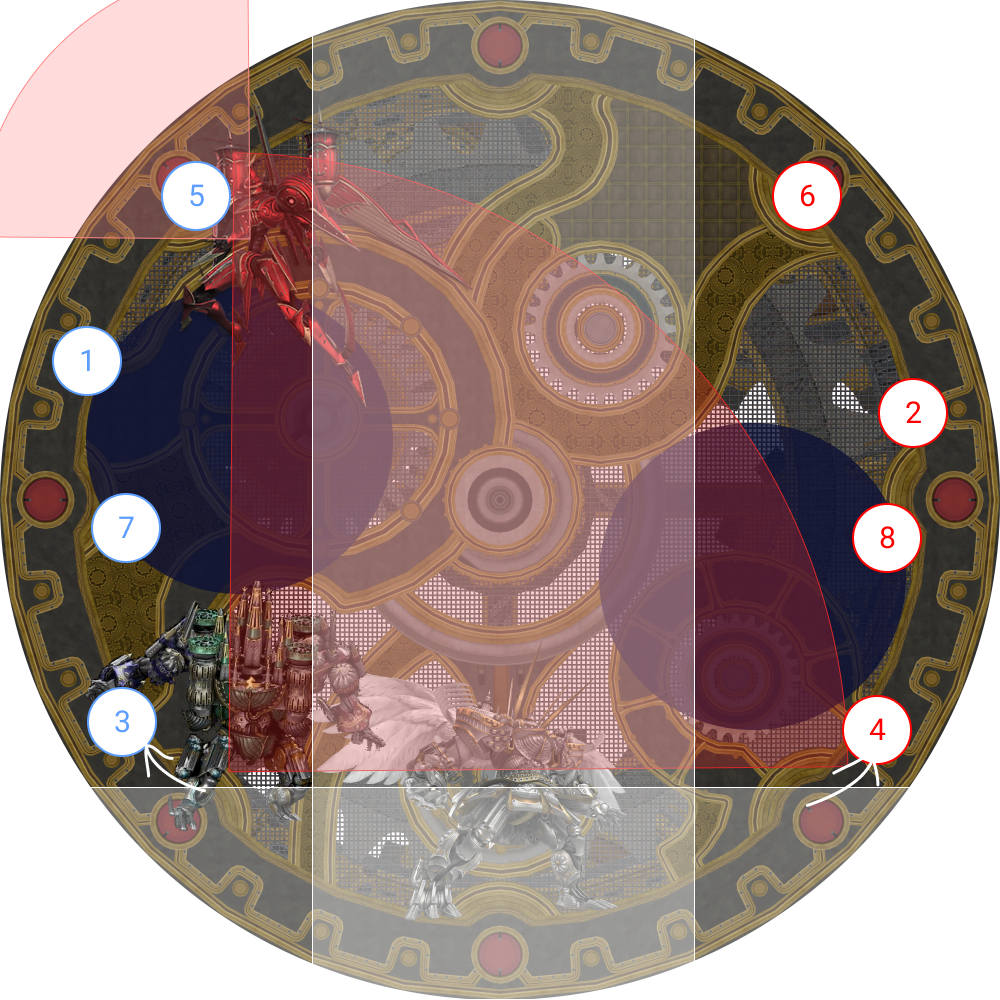 |
| 8. Cruise Chaser dashes 6.
|  |
9. Cruise Chaser cleaves 7.
|  |
| 10. Cruise Chaser dashes 8. Note: 7 must either wait for Cruise Chaser to dash before moving to the center, or run around Cruise Chaser instead. Tip: 8 doesn't have to resolve Super Blassty Charge south-east; they can resolve it south instead to be slightly closer to the Incinerating Heat stack. | 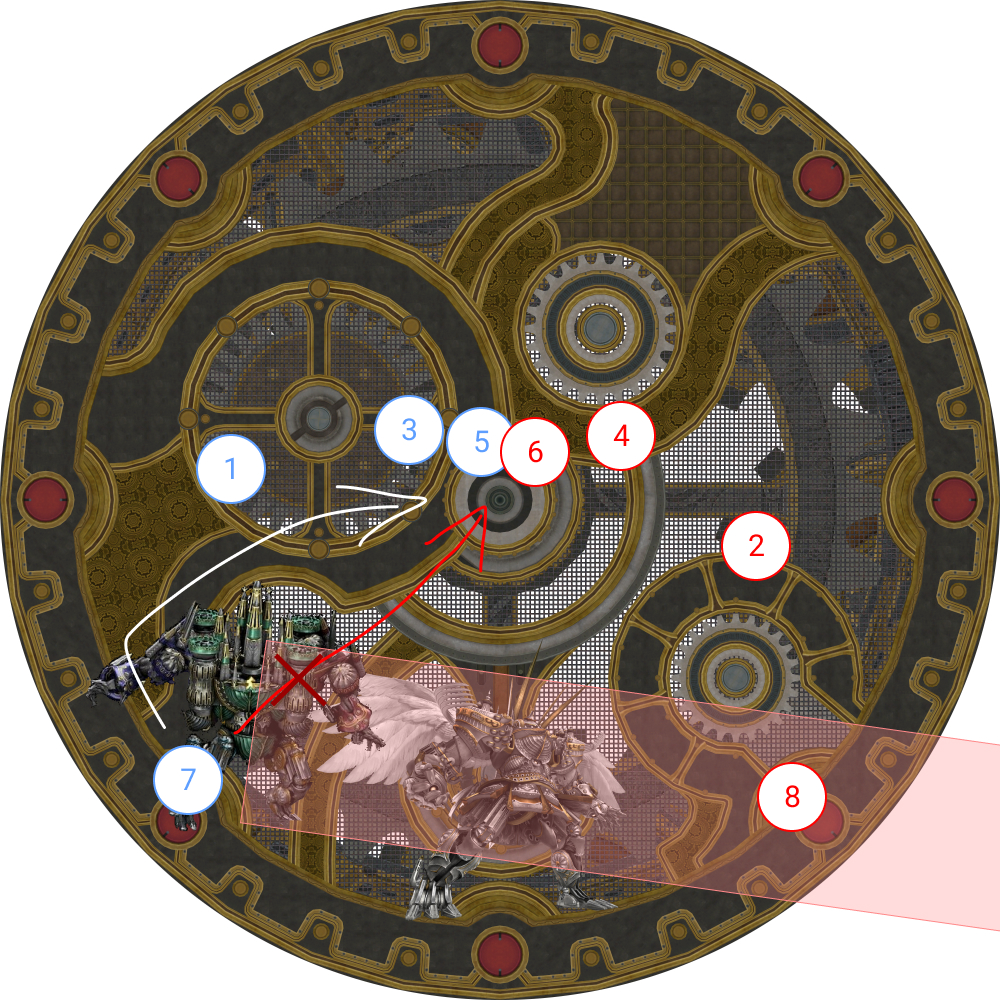 |
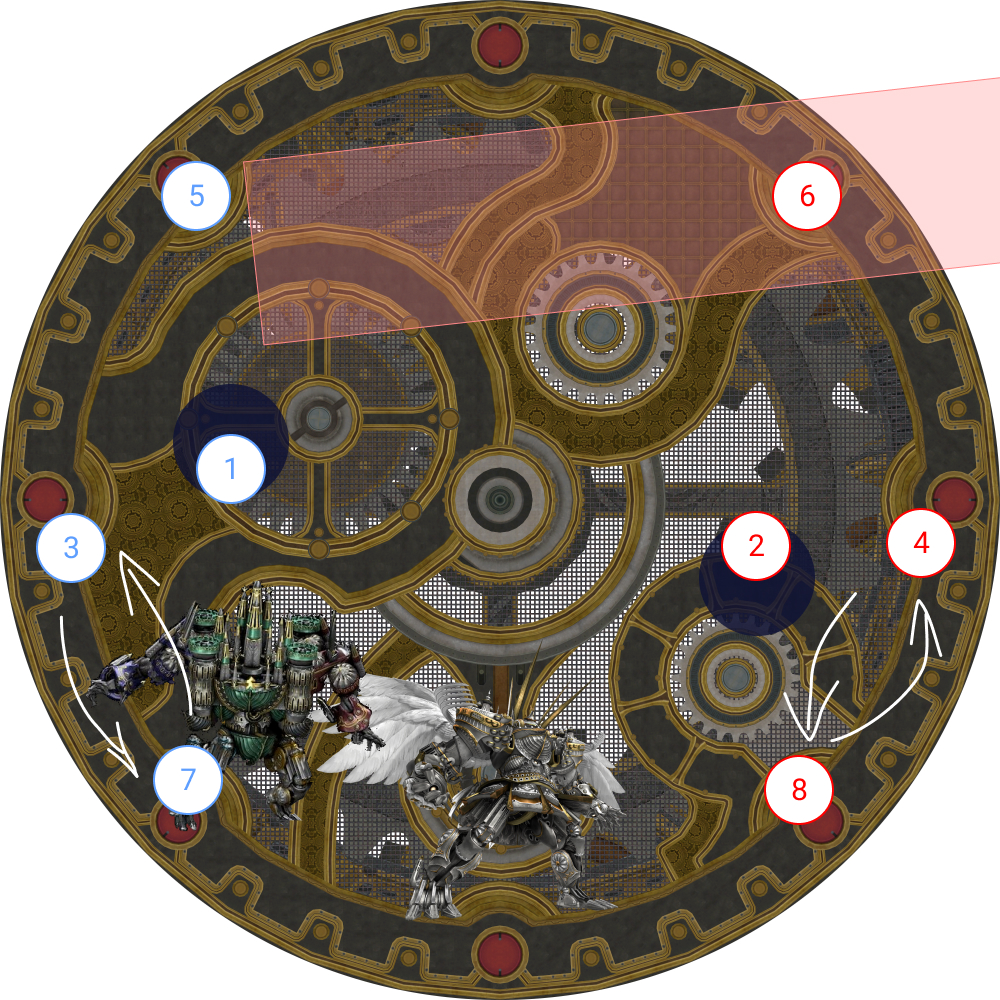
| 11. The party stacks in the middle for Incinerating Heat. Stack in three groups far enough that it is easy to identify whether a swap is needed for Enumeration, but close enough for all party members to split the Incinerating Heat damage.
|  |
| 12. Resolve Enumeration the same way as Brute Justice + Cruise Chaser.
If either side has both Enumerations (or equivalently, no Enumerations), D1 and D2 swap sides. | 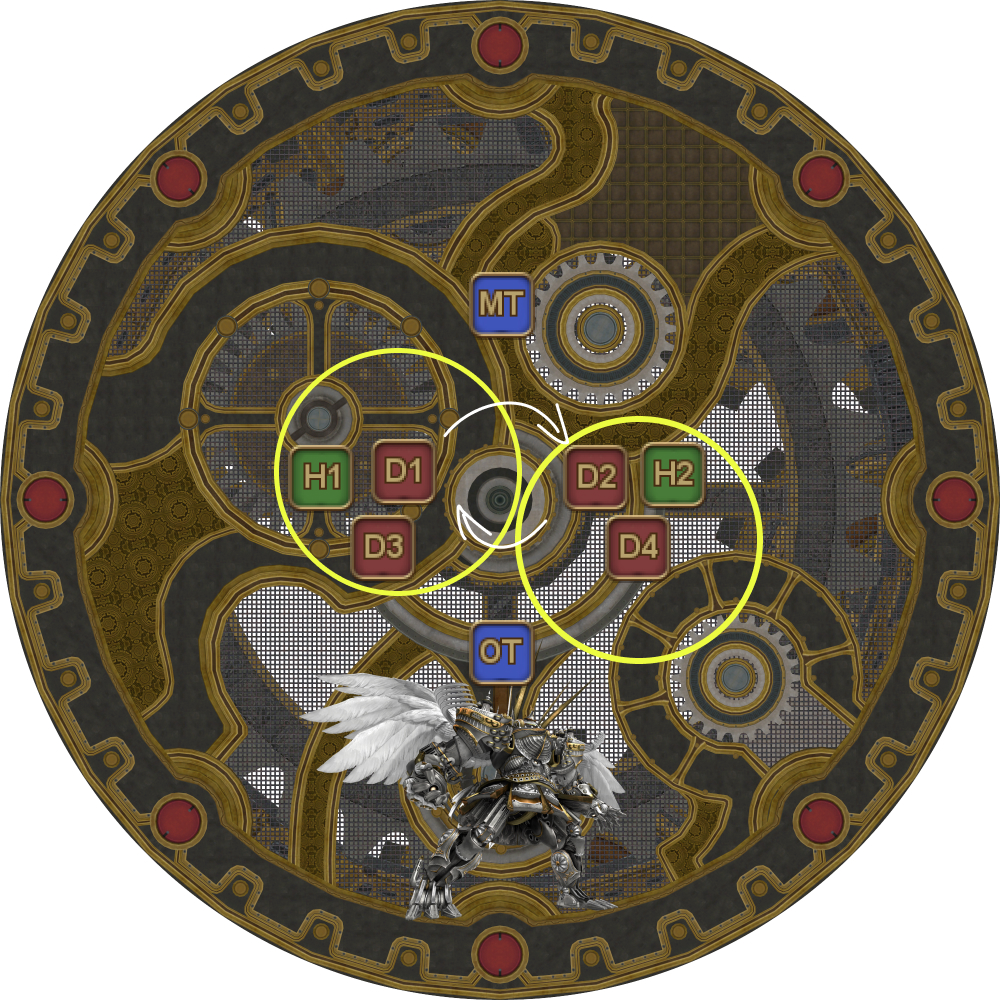 |
Pair-wise movement
Broken down into the major steps, here’s what each pair does. Note that what each pair does is independent from the rest of the party, so you can focus on executing your part.
All the action happens north and south. If it’s not your turn to do anything, or if you’re done, return to the East/West positions.
| 1 and 2 |
|
| 3 and 4 |
|
| 5 and 6 |
|
| 7 and 8 |
|
After the Enumeration at the end of Wormhole Formation, Alexander Prime will respawn back in the center of the arena and cast two Mega Holies back-to-back.
| Mega Holy x2 | MT Reprisal, D1, D4 (If timed correctly, Reprisal, Feint, and Addle will cover both Mega Holies). |
After the two Mega Holies, Alexander Prime will then cast Summon Alexander before disappearing.
J Waves
All three bosses will reappear, with Brute Justice landing with a J Storm.
- Cruise Chaser and Alexander Prime will immediately start casting their enrages.
- Brute Justice will hit the party with periodic J Wave raid damage roughly each GCD.
- Each J Wave also gives Brute Justice a damage-up stack (max 16).
The party will need to (in order):
- Defeat Cruise Chaser. (Cruise Chaser’s enrage finishes before Brute Justice’s 8th stack.)
- Defeat Brute Justice. (This will allow the party to damage Alexander Prime.)
- Defeat Alexander Prime. (Alexander Prime is invulnerable while BJCC are still around. If you have time, build gauge to prepare for the reopener at Perfect Alexander.)
As J Waves hit progressively harder, you will need to plan party mitigations accordingly:
| After 6 stacks: | MT 90s, ST 90s, H1 120s, H2 120s (This should be around the time Cruise Chaser dies.) |
| After 8 stacks: | ST Reprisal, H2 30s, D2, D3 |
| After 10 stacks: | Any remaining mitigations |
When Alexander Prime is defeated, a countdown to Divine Judgment will begin. If Alexander did not enrage, this will be survivable with a Tank LB3 and mitigations.
| Divine Judgment | Tank LB3, H2 shields, H2 30s (Tank LB3 when the countdown reaches ~4 seconds.). |
The party then proceeds onto Perfect Alexander.
Frequently Asked Questions
[Temporal Stasis] Why does the blue-tethered player on Cruise Chaser's side have to take a few steps towards Cruise Chaser?
| Cruise Chaser cleaves the three closest players to it. If the player with the blue tether on Cruise Chaser's side goes all the way to the arena's edge, the three closest players to Cruise Chaser now become:
This will kill everybody on that side of the arena. |
[Temporal Stasis] Why does the ST take aggro at the start of the fight instead of the MT?
| This lets the ST invuln the first Chastening Heat, which:
|
[Inception] Why do we criss-cross the green orb tethers?
| Criss-crossing the tethers prevents the green orbs (particularly the lower ones) from moving in the path of the players trying to place their crystals. |
[Inception] Why do we place the crystals in a square?
| The crystals need to be placed in a way such that the True Heart that spawns opposite Alexander hits all four crystals. Then will turn the True Heart gold and give the party the Enigma Codex buff. The Enigma Codex buff is necessary in order to clear Perfect Alexander. When the True Heart hits a crystal, it deals proximity damage to all players. As a result, we want to place them as far away from the party as we can. |
[Inception] Is Perfect Alexander really impossible without the Enigma Codex? Didn't a Chinese group clear without it?
| That group super-shielded Divine Judgment to the point where they didn't need to Tank LB3, which let them cheese Fate Calibration α with a Healer LB3 instead. More importantly, the group abused a timing issue with the forced march in Fate Calibration β, where if a player jumped and was mid-air when the mechanic starts, the forced movement time would continue to tick, but the player would not be able to move while they are mid-air and not be marched out of the arena as a result. Patch 6.1 fixed this by adding a delay from when players lose control of their character, to when the forced march starts. Now, if you try to jump, this delay will cause the forced march to begin only after your character lands, and you will march the full distance out of the arena. |
[Wormhole Formation] Can either 3 or 4 take the final Void puddle if 1 or 2 are dead?
| Cruise Chaser's Alpha Sword applies a Magic Vulnerability Up debuff that means that 3 and 4 cannot take the final Void puddle in the event 1 or 2 are dead. However, although the vulnerability increases damage taken by roughly 6-7 times, the puddle's damage is low enough that a tank can take the puddle with a Magic Vulnerability Up debuff without any mitigation (although something would obviously be nice to have). |
[Enumeration] Why don't we group both tanks with one Enumeration target, and both healers with the other Enumeration target?
| Let's call the earlier BJCC strat the "melee-swap" and the proposed alternative "TTD/HHD". With each strat, the party splits up as follows after Incinerating Heat:
The problem with Enumeration largely stems from two things:
Although the TTD/HHD strat looks simple, there are a few steps involved:
By keeping the same melee-swap Enumeration strat from BJCC, we:
To elaborate further, consider what happens when the party splits right after Incinerating Heat to resolve Enumeration. Assuming the DPS split up 2-2, there are two possible outcomes:
Without knowing what the Enumeration split will be ahead of time, only two players potentially have to adjust with the melee-swap strat 1/ 3 of the time, while at least two DPS are guaranteed to adjust (with all four DPS potentially having to adjust) with the TTD/HHD strat all the time, leading to more points of error. |
Troubleshooting
[Temporal Stasis, Inception] What is Plaint of Severity, Solidarity, and Surety?
| These are the names of the damage coming from Alexander's mechanics.
|
[Wormhole] How are players getting clipped by Apocalyptic Ray?
| This is quite common while learning the strat, and is the technical part of executing the strat. First off, check that the people that are taking the Void puddles aren't moving too close to the center of the arena, since that would obviously put them in the Apocalyptic Ray's AoE. More likely, either Player 3 or Player 4 (whoever wasn't baiting Super Jump) gets killed by an Apocalyptic Ray, in which case check the following:
|  |