Abyssos: The Seventh Circle (Savage)
PF uses Shinosho’s strat as a base, but uses Sleepo’s Inviolate Purgation strat and Inumaru’s War’s Harvest strat.
Nukemaru has made a guide aggregating all the strats together:
Things to check on Party Finder
- Japanese parties prefer to:
- Inviolate Bonds: Have the first stack in the center of the arena, but do the second stack where the island meets the bridge.
- Forbidden Fruit #5: Take the bird tethers clockwise.
- English parties prefer to:
- Inviolate Bonds: Resolve both stacks in the middle of the islands.
- Forbidden Fruit #5: Stretch the tethers across the arena.
Japanese
The following is Game8’s macro:
MT組:MTH1D1D3 ST組:STH2D2D4
 【基本散開】     【ノックバック+鳥】
MT/D1 ST/D2     D1       D2
     ★      D3  MT   ST  D4
H1/D3 H2/D4    通路       通路
           H1       H2
【生命の果実:頭割り】 │【魔印創成:散開】
北側:MT組 南側:ST組 │基本散開※頭割りと被ったら通路
【エクサ+頭割り】      │【鳥誘導+塔】
西:MT組 東:ST組   │基本散開準拠でズレたら時計回り
【魔印創成:獄】
  ▼西島▼          ▼東島▼
頭割り MT/D1       MT/D1 頭割り
ST/D2 H2/D4 通路 H2/D4 ST/D2
    H1/D3     H1/D3
English
G1:MTH1D1D3 G2:STH2D2D4
 【Basic spread】 【Knockback + birds】
 MT/D1 ST/D2    D1       D2
      ★     D3  MT   ST  D4
 H1/D3 H2/D4  (bridge) (bridge)
            H1     H2
【Forbidden Fruit 1】  │【Inviolate Bonds】
 North:G1 South:G2│Basic spread
【Exaflares + stack】    │【Birds + towers】
 West:G1 East:G2  │Basic spread, bait CW
【Inviolate Purgation (Sleepo)】
   ▼West▼          ▼East▼
 (stack) MT/D1         MT/D1 (stack)
 ST/D2 H2/D4 (bridge) H2/D4 ST/D2
     H1/D3       H1/D3
Markers (Game8)
These are the markers as promoted on Game8’s website.
All markers are used for Sleepo’s Purgation. Of note, the spread position for the outer-left positions (B and 2) are directly west/east of the markers.
XIVLauncher WaymarkPresetPlugin positions
{
  "Name":"P7S (Game8)",
  "MapID":877,
  "A":{"X":114.29,"Y":0.0,"Z":86.151,"ID":0,"Active":true},
  "B":{"X":119.543,"Y":0.0,"Z":96.25,"ID":1,"Active":true},
  "C":{"X":114.29,"Y":0.0,"Z":100.75,"ID":2,"Active":true},
  "D":{"X":114.29,"Y":0.0,"Z":91.75,"ID":3,"Active":true},
  "One":{"X":85.71,"Y":0.0,"Z":86.151,"ID":4,"Active":true},
  "Two":{"X":80.457,"Y":0.0,"Z":96.25,"ID":5,"Active":true},
  "Three":{"X":85.71,"Y":0.0,"Z":100.75,"ID":6,"Active":true},
  "Four":{"X":85.71,"Y":0.0,"Z":91.75,"ID":7,"Active":true}
}
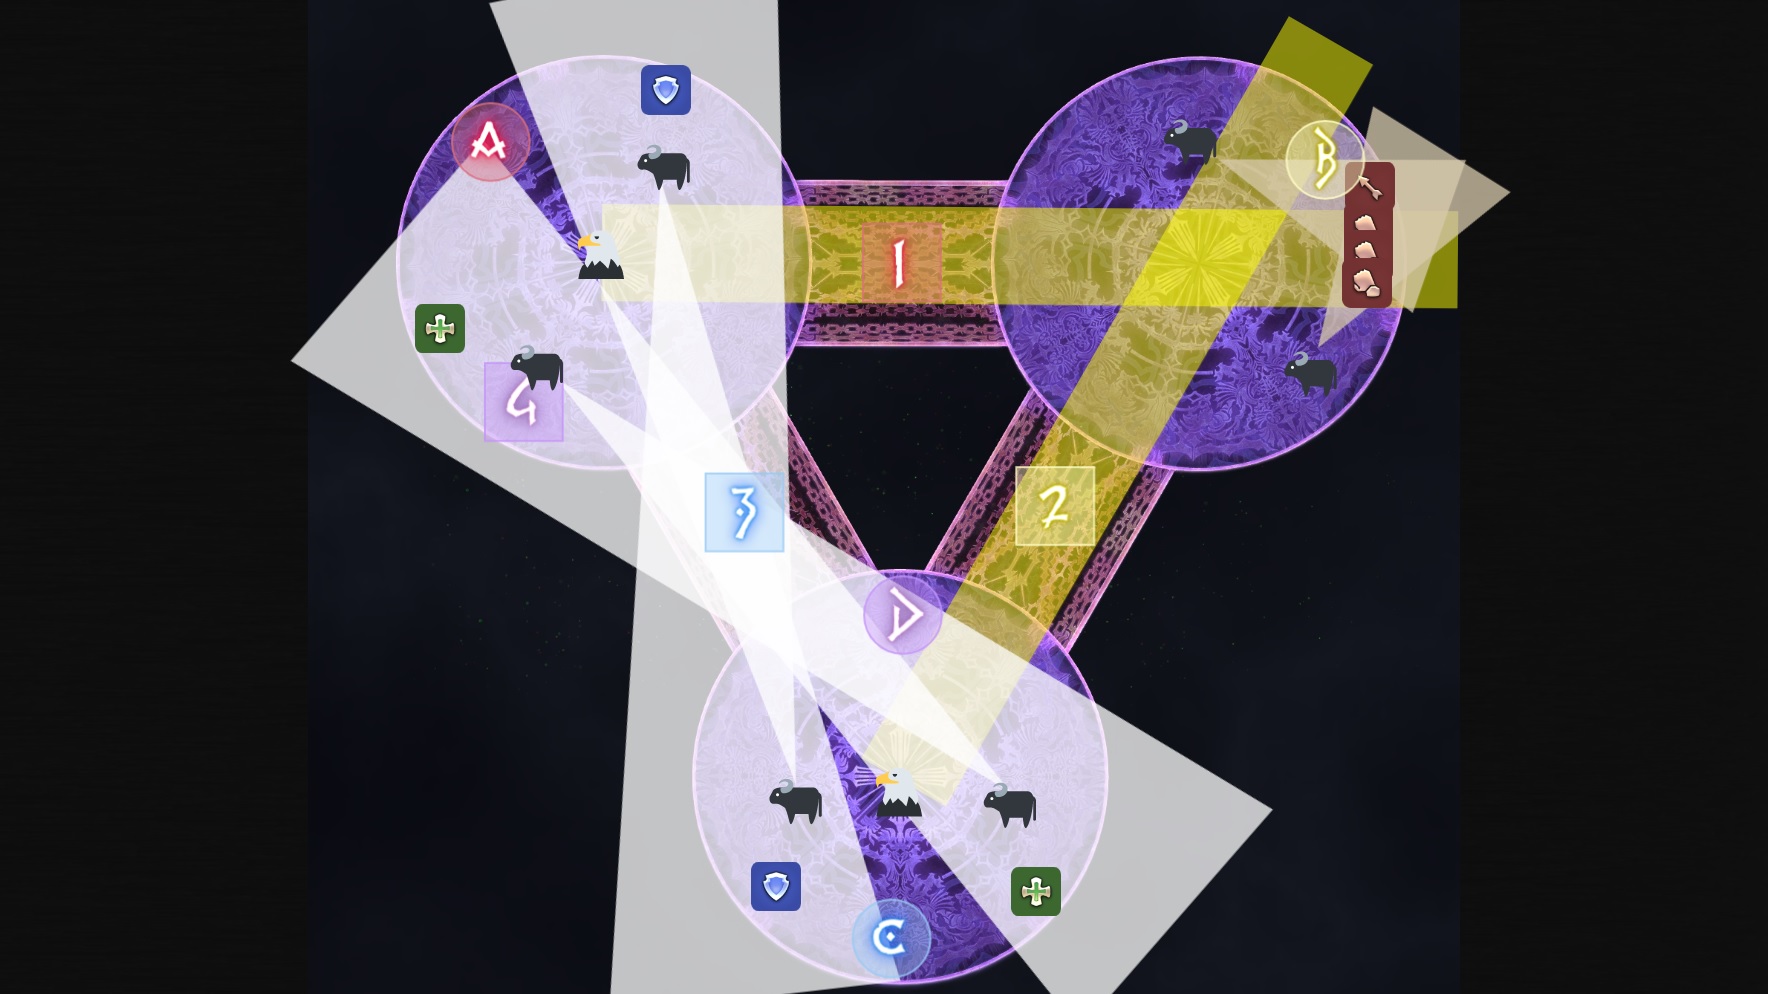
Markers (Sleepo)
These set of markers can only be placed in-game after you have cleared the fight (the arena with expand after clearing, where you can then place the markers).
If you haven’t cleared the fight, you will need to copy the markers from someone who does.
All markers are used for Sleepo’s Purgation.
2andB: Stack positions.- All other markers are the spread positions.
XIVLauncher WaymarkPresetPlugin positions
{
  "Name":"P7S (Sleepo)",
  "MapID":877,
  "A":{"X":114.29,"Y":0.0,"Z":82.75,"ID":0,"Active":true},
  "B":{"X":122.084,"Y":0.0,"Z":87.25,"ID":1,"Active":true},
  "C":{"X":122.0842,"Y":0.0,"Z":96.25,"ID":2,"Active":true},
  "D":{"X":114.29,"Y":0.0,"Z":100.75,"ID":3,"Active":true},
  "One":{"X":85.71,"Y":0.0,"Z":82.75,"ID":4,"Active":true},
  "Two":{"X":77.915,"Y":0.0,"Z":87.25,"ID":5,"Active":true},
  "Three":{"X":77.915,"Y":0.0,"Z":96.25,"ID":6,"Active":true},
  "Four":{"X":85.71,"Y":0.0,"Z":100.75,"ID":7,"Active":true}
}
Timeline
 (Credit: u/ExiaKuromonji)
Inviolate Purgation (Sleepo)
This is a strat to resolve Inviolate Purgation that involves alternating all eight players between the two front islands.
Famine’s Harvest
The group tethered to minotaurs need to cross tethers to avoid hitting one another.
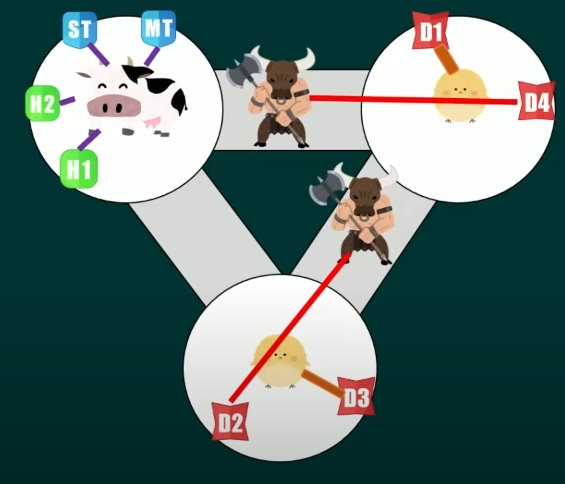
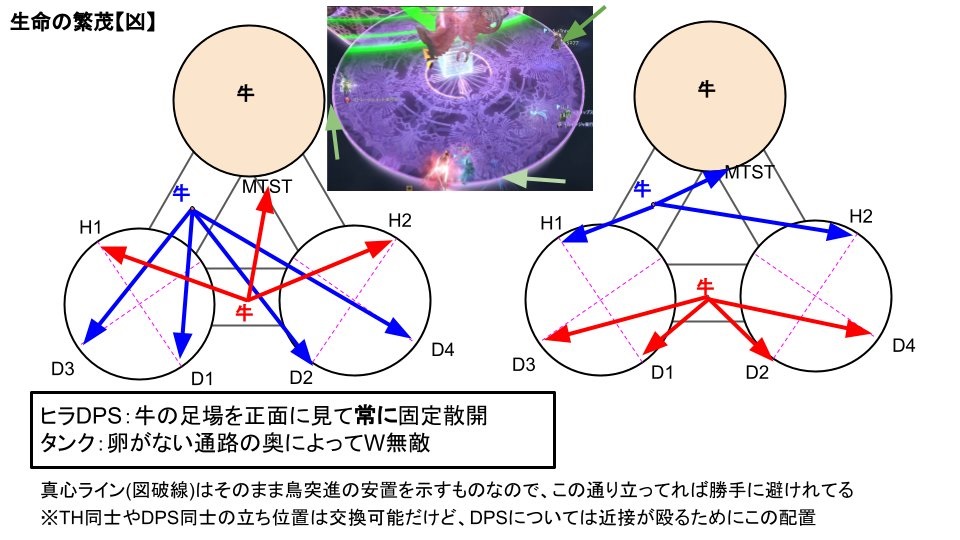
Death’s Harvest (fixed positions, tank invuln)
One of the three platforms has an add; use this platform as North, and then all (non-tank) players have fixed assigned positions as shown below, regardless of which Behemoth they’re tethered to.
Tanks stack on the empty bridge and invuln.
War’s Harvest (Inumaru)
Note that the minotaur tethers will not be stretched out enough to turn purple. As a result, shields and mitigations are required for the two minotaur players to survive.