Asphodelos: The Third Circle (Savage)
PF uses Inumaru’s strat as a base, but puts Darkened Fires (闇の炎) on intercardinal positions (Shinosho), and replaces Fountain of Fire (霊泉) with Mr. Happy’s strat (see below).
English parties replace Firestorms of Asphodelos (FoA) with “my” strat (see below).
Things to check on Party Finder
- Check the positions for the transition (older macros may have different positioning)
English
This is the macro often used in English parties. In particular, Firestorms of Asphodelos is, er, “my” strat.
【Darkened Fire】 【Transition】
D3/MT [1] D4/ST MT▼D3
[4] ▲ [2] H1 D1
D1/H1 [3] D2/H2 H2 D2
※Destroy clockwise ST D4
【Adds】MTH1D1D3 N→W STH2D2D4 S→E
Left (cw)→2 tethers Right (ccw)→1 tether
【Experimental Gloryplume - Spread】
MT ST ※ Melee (N/W), Ranged (S/E)
D1 ▲ D2 ※ Explosions-Relative:
D3 D4 1st→D1D4 2nd→MTH2
H1 H2 3rd→STH1 4th→D2D3
【Fountain of Fire】(Mr. Happy)
Start N or W:H1 MT→D1→D3
Start S or E:H2 ST→D2→D4
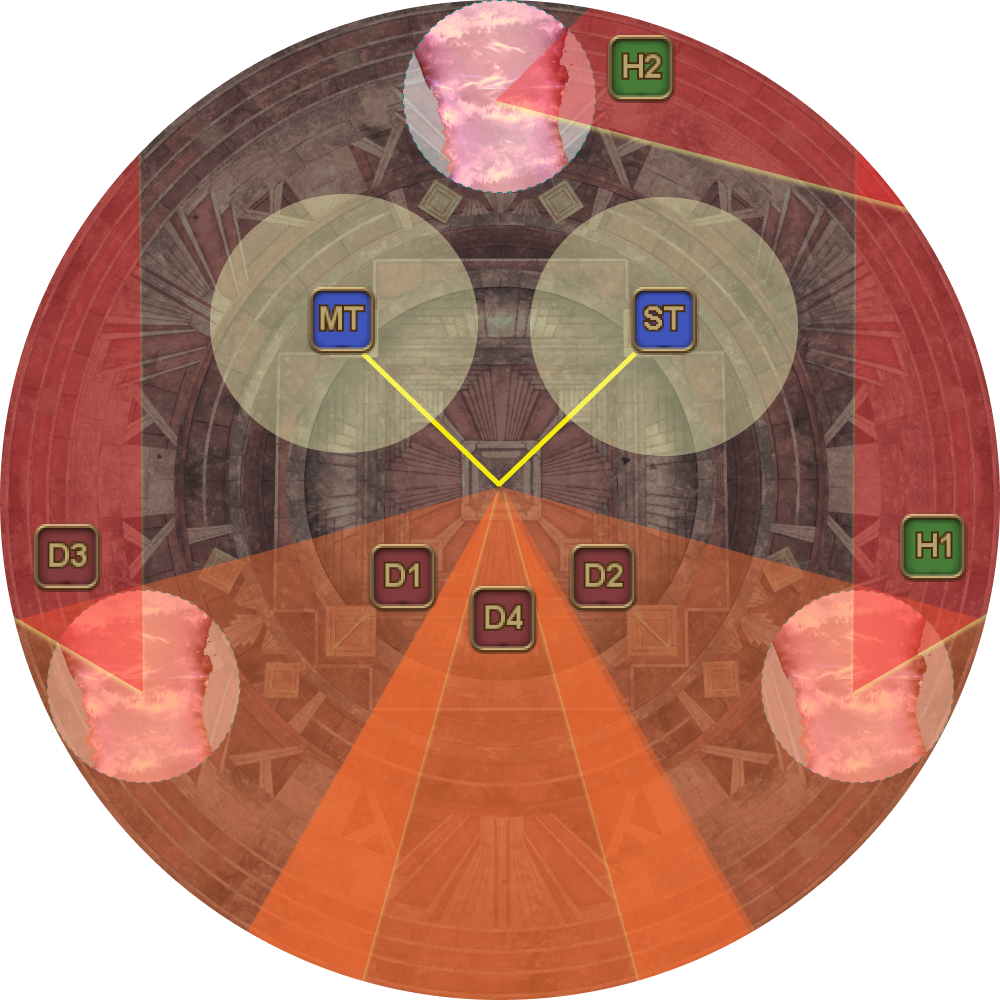
【Firestorms of Asphodelos】 (Tuufless)
■ All Spreads: 《H+M (N)》 《T+R (S)》
(Boss) D1 D2 MT ST
(Edge) H1 H2 D3 D4
■ 1. Fan AoE→Stack/Spread
Resolve at 1st slice on assigned N/S side
■ 2. Tethers + Tornadoes
H2● ※Tanks stack inside
D1D2H1 boss circle + invuln
▼ ※D1D2H1 bait one fan
● MT+ST ● AoE outside circle
D3 D4 ※H1>D2 sub if needed
■ 3. Knockback
Black tornado
Healers+Melee Tanks+Ranged
Japanese translation
  【闇の炎散開】   【突進時散開】
 D3/MT  [1]  D4/ST   MT▼D3
  [4] ▲ [2]     H1 D1
 D1/H1  [3]  D2/H2   H2 D2
 ※時計回りに破壊     ST  D4
【雑魚】MTH1D1D3北→西 STH2D2D4南→東
  外周に立ち中央を向く:左→線2本 右→線1本
【魔力錬成:小黒玉散開】
   MT ST   ※ 近接:北(西)  遠隔:南(東)
  D1 ▲ D2 ※ 爆発基準:
  D3   D4  1回目→D1D4 2回目→MTH2
   H1 H2   3回目→STH1 4回目→D2D3
【霊泉の炎・陽炎の翼】(ハピおじ式)
  北か西から:H1  MT→D1→D3
  南か東から:H2  ST→D2→D4
【辺獄の炎嵐】(Tuufless式)
 ■ 散開位置 ヒーラー・メレー(北) タンク・レンジ(南)
  (ボス側)  D1 D2      MT ST
   (端側) H1   H2    D3   D4
 ■ 1. ピザカット→黒玉
    1回目のピザ基準で処理する
 ■ 2. 線+扇範囲誘導
     H2●      ※タンク2人はボスサークル
       D1D2H1  内で重なって無敵
     ▼      ※ D1D2H1はボスサークル
  ● MT+ST ●    外3人で扇1枚受け
  D3     D4  ※竜巻の代理H1→D2の順
 ■ 3. ノックバック→黒玉
             黒竜巻
    ヒーラー・メレー組   タンク・レンジ組
Japanese
This is the game8 macro often used by Japanese parties.
【4:4分け(雑魚/霊泉)】
MT組:MTH1D1D3 ST組:STH2D2D4
【闇の炎設置ペア:X字】
 D3/MT ① D4/ST
    ④ □ ②
 D1/H1 ③ D2/H2
※サイコロ数字マーカー、時計回りに炎を倒す
【十字走火】大玉/小玉:基本北西 ※北東方面に出た場合北東
【突進:中央散開】ボスからMT/D3→H1/D1→H2/D2→ST/D4
【突進:左右散開】←TH DPS→ ※縦の並びは中央散開
【雑魚誘導】MT組:北→西  ST組:東→南
【雑魚突進】
線2本:繋がってる鳥の対角の時計回り
線1本:繋がってるペアの対角
【魔力錬成:闇(辺獄の炎嵐以外)】
近接組(MTSTD1D2):北安置 遠隔組(H1H2D3D4):南安置
【霊泉フェーズ:ハピおじ】
塔踏みAOEスタート場所:MT組→北/西 ST組→南/東
※時計回り塔踏みとAOEを設置
AoEペア:MT/ST → D1/D2 → D3/D4
【辺獄散開】
     〇H2
    MT   ST
D3    ボス    H1
〇  D1 D4 D2 〇
【黒竜巻ノックバック】
    黒竜巻
←近接     遠隔→
【赤小玉→黒小玉】 【赤大玉→黒小玉】
  MT ST    D1 MT D2 ST
     ★          ★
  D1  D2
   中央
  H1 H2    D3 H1 H2 D4
 D3    D4
↑辺獄1回目ピザ後も【赤小玉→黒小玉】の並びで散開
【辺獄中ピザカット避け】
ピザ3番目待機→1番目に退避→その場で頭割りor散開
【辺獄中のノックバック後散開】
     〇
ST D2  ★  H2 D4
 〇  D1  H1 〇
  MT    D3
English translation
【4:4 splits (adds/FoF)】
 MT group:MTH1D1D3 ST group:STH2D2D4
【Darkened Fires:Intercardinals】
 D3/MT ① D4/ST
    ④ ▲ ②
 D1/H1 ③ D2/H2
※Numbers on markers, destroy clockwise Fire
【Devouring Brand】Fireplume:NW
      ※ NE if explosions appear there
【Transition】
 Mid:(Boss) MT/D3→H1/D1→H2/D2→ST/D4
 Sides:(Line up as above) ←TH DPS→
【Adds phase】MT:N→W  ST:E→S
 2 tethers:CW from opposite bird
 1 tether:Opposite corner from partner
【Experimental Gloryplumes】
 Melee (MTSTD1D2):N safe-spot
 Ranged (H1H2D3D4):S safe-spot
【Fountain of Fire:MrHappy】
 MT group→N/W ST group→S/E
 AoE pairs:MT/ST → D1/D2 → D3/D4
 ※ Resolve towers and AoEs moving clockwise
【Storms of Asphodelos】
      〇H2
     MT   ST
 D3    ▼    H1
 〇  D1 D4 D2 〇
【Black tornado knockback】
     Black tornado
 ←Melee     Ranged→
【1st Gloryplume】 【2nd Gloryplume】
   MT ST    D1 MT D2 ST
     ★          ★
   D1  D2
   (mid)
   H1 H2    D3 H1 H2 D4
  D3    D4
↑(FoA) Spread formation after 1st pizza AoE
【(FoA) Dodging pizza AoEs】
Wait at 3rd→Dodge to 1st→Spread/stack at 1st
【(FoA) Knockback Spread positions】
     〇
ST D2  ★  H2 D4
 〇  D1  H1 〇
  MT    D3
Markers
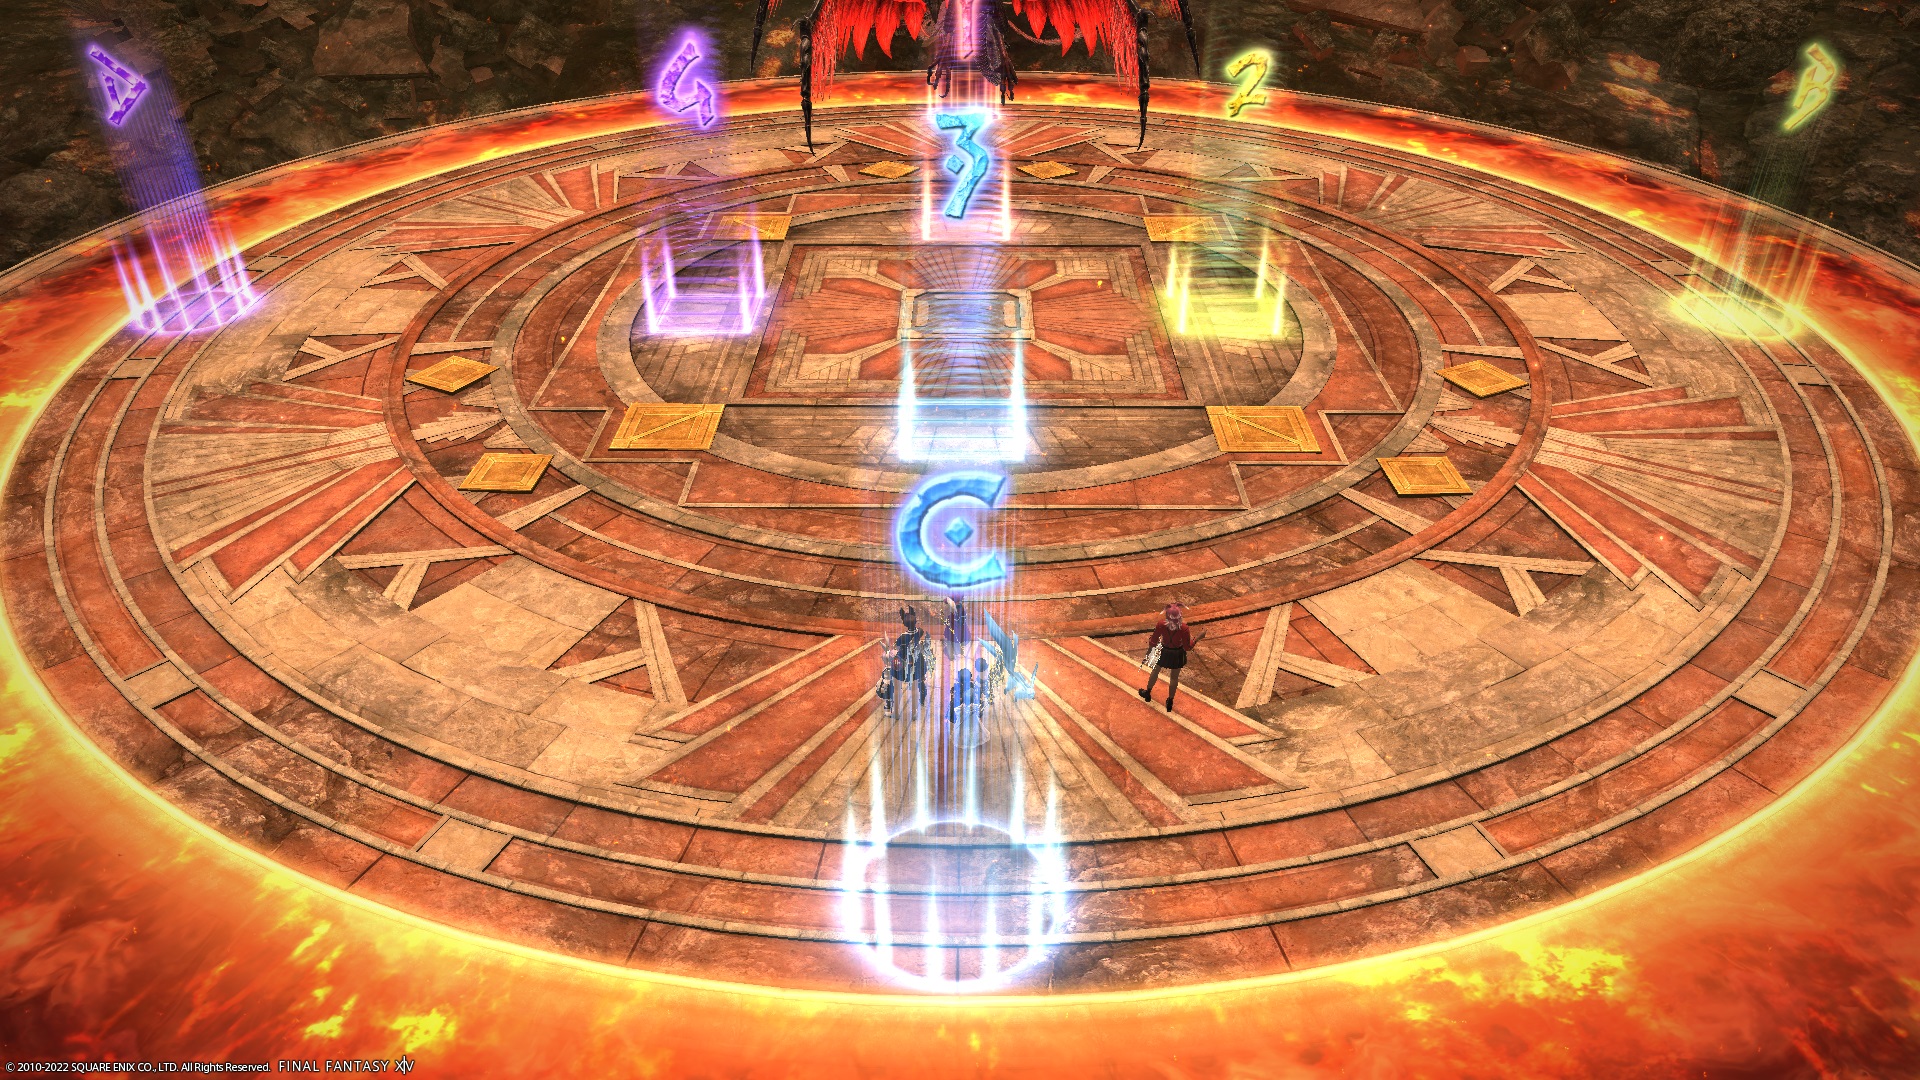
ABCDare for orientation, and for the transition stacks (if applicable).1234are for:- Resolving the “Limit Cut” dice during Darkened Fires
- Placing the eye thingies during Fledgling Flight.
XIVLauncher WaymarkPresetPlugin positions
{
  "Name":"P3S",
  "MapID":807,
  "A":{"X":100.0,"Y":0.0,"Z":81.5,"ID":0,"Active":true},
  "B":{"X":118.5,"Y":0.0,"Z":100.0,"ID":1,"Active":true},
  "C":{"X":100.0,"Y":0.0,"Z":118.5,"ID":2,"Active":true},
  "D":{"X":81.5,"Y":0.0,"Z":100.0,"ID":3,"Active":true},
  "One":{"X":100.0,"Y":0.0,"Z":94.0,"ID":4,"Active":true},
  "Two":{"X":106.0,"Y":0.0,"Z":100.0,"ID":5,"Active":true},
  "Three":{"X":100.0,"Y":0.0,"Z":106.0,"ID":6,"Active":true},
  "Four":{"X":94.0,"Y":0.0,"Z":100.0,"ID":7,"Active":true}
}
Experimental Gloryplume
【Experimental Gloryplume - Spread】
   MT ST  ※ Melee (N/W), Ranged (S/E)
  D1 ▲ D2 ※ Explosions-Relative:
  D3   D4  1st→D1D4  2nd→MTH2
   H1 H2   3rd→STH1  4th→D2D3
The first Experimental Gloryplume always starts with the four explosions around the outside of the arena. We use these four explosions to determine where everyone is spreading.
For example, if the first two explosions were the ones below (east and west), then the final spread positions for the black orbs spread would look like:
    3             ST
 2     4       MT    D2
1       1  →  D1      D4
 4     2       D3    H2
    3             H1
Firestorms of Asphodelos
There are two main ways of doing Firestorms of Asphodelos (FoA) in PF.
Firestorms of Asphodelos (Inumaru)
Japanese parties will follow Inumaru’s strat. Inumaru’s strat maintains the pairs from the earlier Experimental Gloryplume:
- Tanks + Melee north
- Healers + Ranged south
Experimental Ashplume (Spread) Dodge the "pizza" AoEs, followed by stacking or spreading as required. If the party needs to spread, follow this formation. | 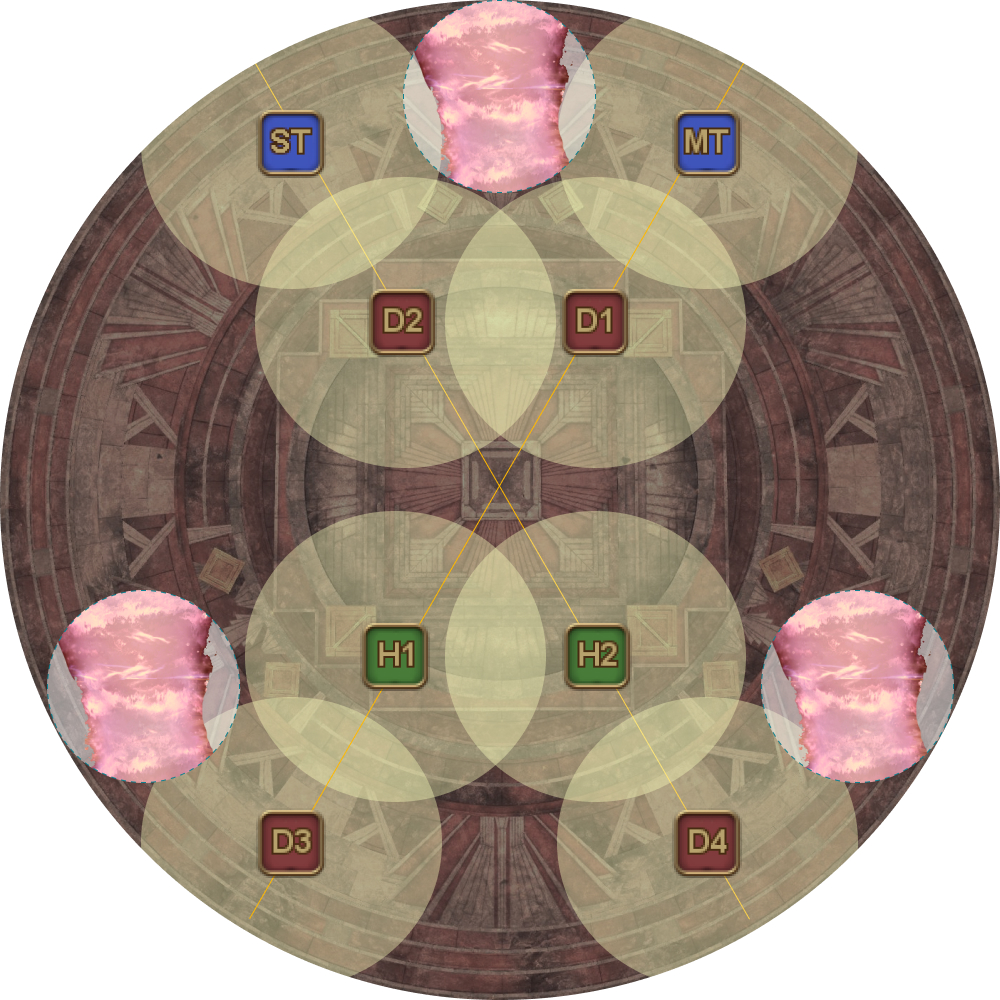 |
Storms of Asphodelos Dodge the "pizza" AoEs, and move into position:
|  |
Darkblaze Twister (Spread) Start from the black tornado, move clockwise around the boss to bait five sets of AoEs before getting knocked back. Stay close to the other tornados to dodge the donut AoEs before stacking or spreading as needed. Using the black tornado as north:
If the party needs to spread, take up this formation. | 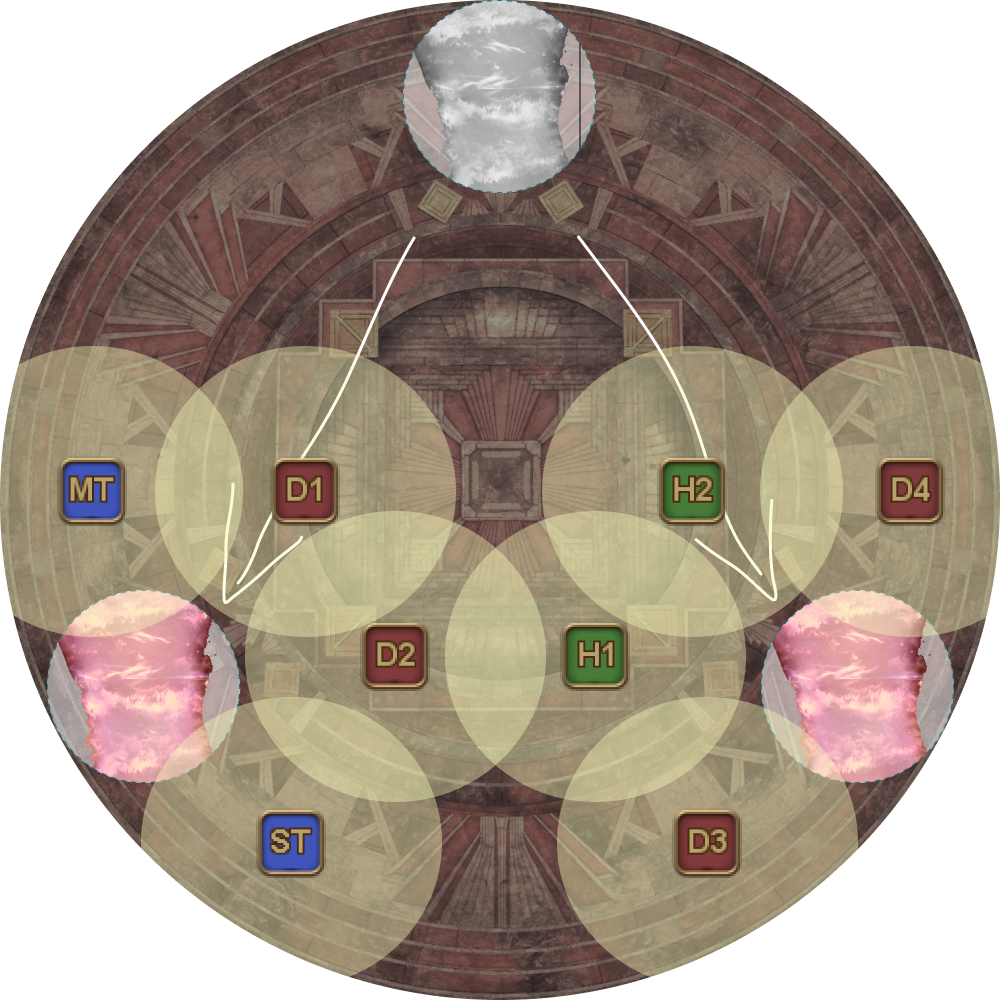 |
Firestorms of Asphodelos (Tuufless)
English parties will do “my” strat instead. The pairings for Firestorms of Asphodelos are different:
- Healers + Melee north
- Tanks + Ranged south.
Experimental Ashplume (Spread) Dodge the "pizza" AoEs, followed by stacking or spreading as required. If the party needs to spread, follow this formation. | 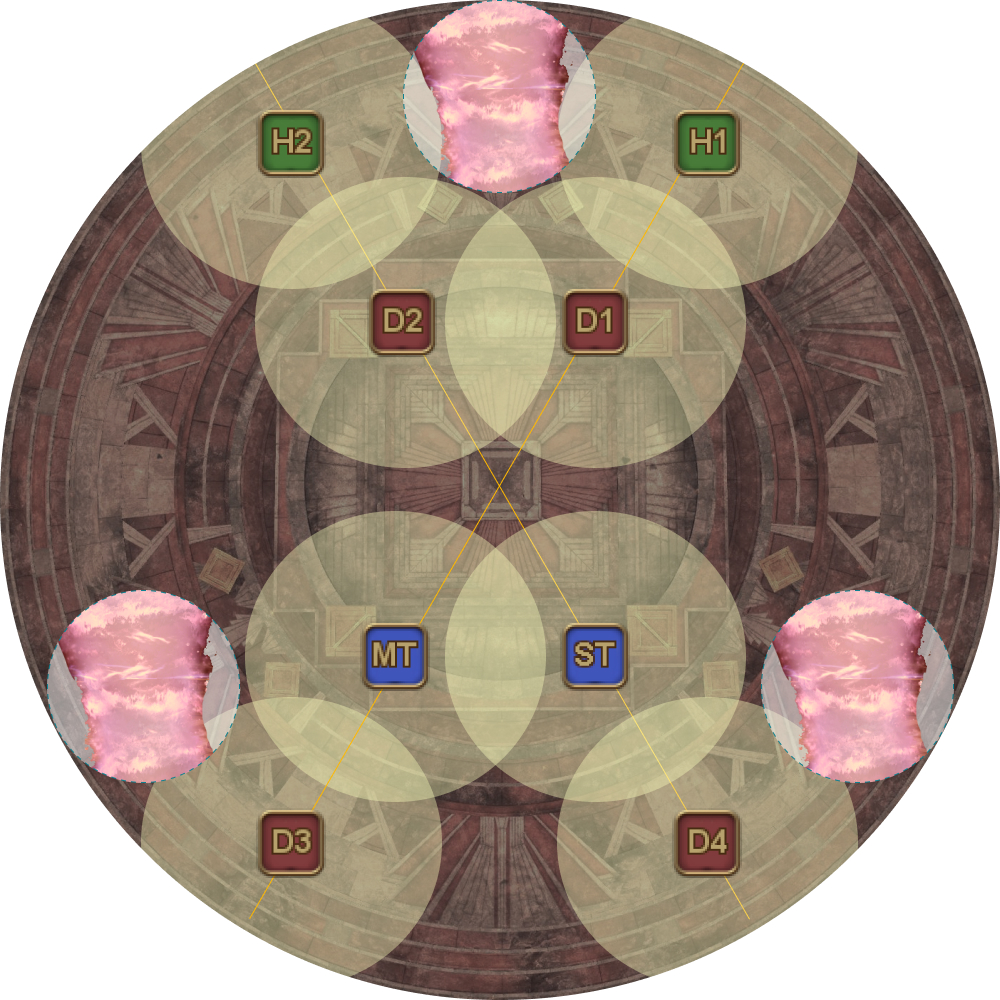 |
Storms of Asphodelos Dodge the "pizza" AoEs, and move into position:
In the event any of the ranged players are dead, H1 (followed by D2) goes and takes their position instead. | 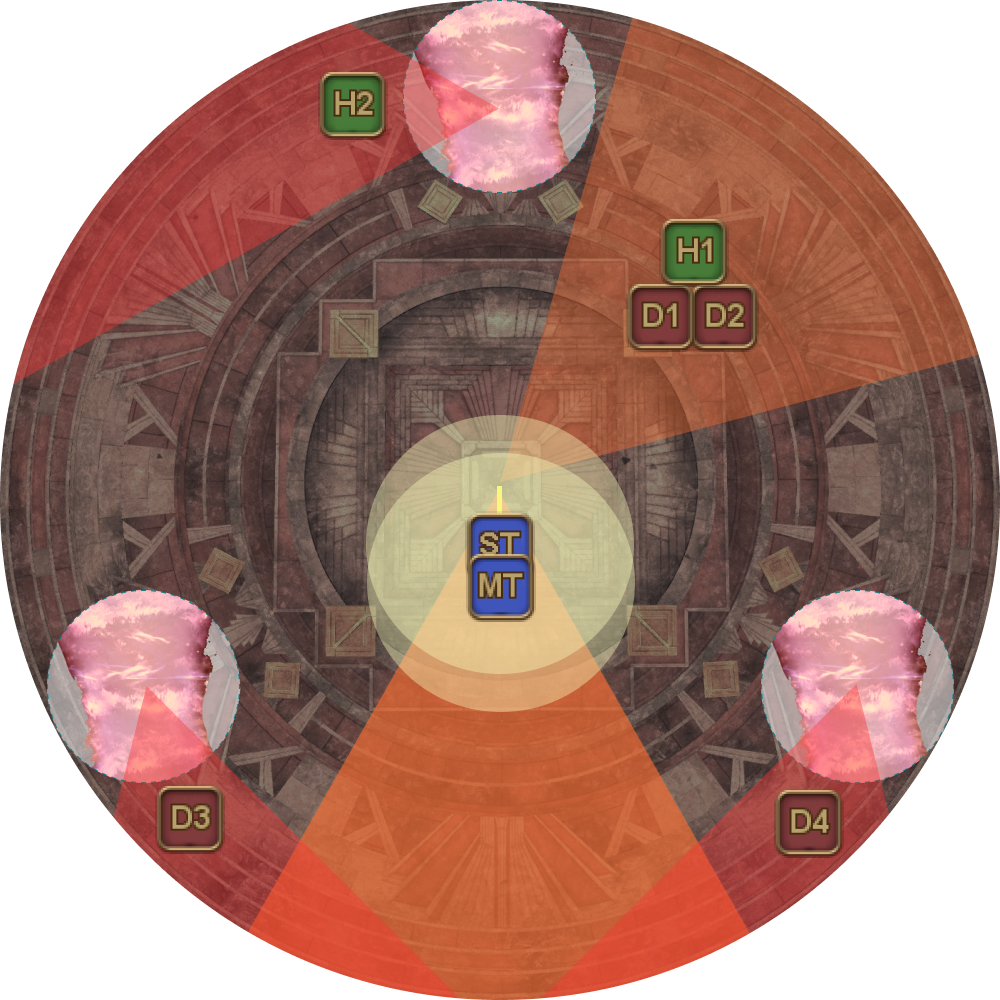 |
Darkblaze Twister (Spread) Start from the black tornado, move clockwise around the boss to bait five sets of AoEs before getting knocked back. Stay close to the other tornados to dodge the donut AoEs before stacking or spreading as needed. Using the black tornado as north:
If the party needs to spread, take up this formation. |  |
Timeline
 (Credit: u/Syldris)